
For a while now, I’ve been trying to come up with a way of showing you how I have my sewing space set up as well as how I move in and around it when I’m sewing. I’d considered doing a video about it on my YouTube channel but realised quickly that the software I use to edit my videos wasn’t quite good enough to get the vision I had in my head onto the screen!
So we’re going old-school and doing a blog post about it instead!
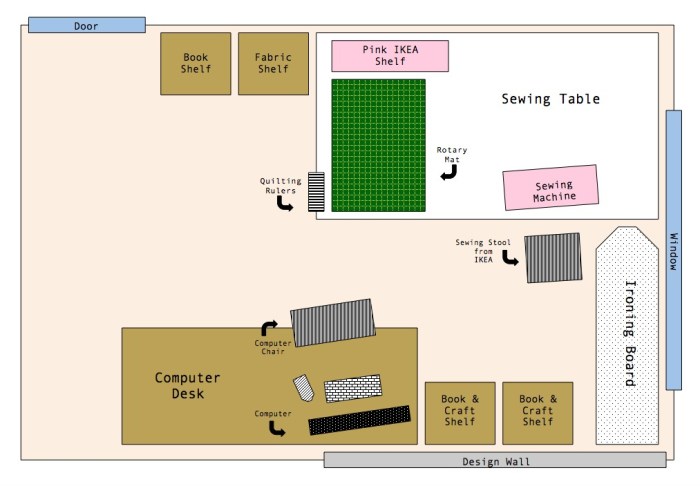
So this is a birds-eye view of my sewing room.
I set it out in a way where I would be able to work as efficiently and hassle free as possible.
When I’m cutting my fabrics I stand along the left side of the sewing table in front of where my quilting rulers hang from a hook. Close at hand on and around that pink IKEA shelf I have my rotary blades, pencils, thread snips and pins ready to go as I cut and piece blocks together.
Then I have my sewing machine set up as close to the window as possible so that I’m working in natural light. (FUN FACT: I do a lot of my sewing standing up! I find I work so much more efficiently and quicker when I do. I’m able to do this as the table is quite tall and is at the perfect height for me to easily sew while standing. The only time I sit and sew is when I’m quilting and sewing on the binding!) The ironing board permanently stands in the corner and in front of the window ready to press units and blocks as soon as they come out of the machine.
Along the back of the room, I have my design wall. It’s nothing fancy. Just odd pieces of white cotton batting simply pinned onto the wall using thumb tacks! It spans about 60″x65″ (1.5mx1.6m) along the wall and can easily accommodate most of the quilt top designs I make. I find having a design wall such a help! Sometimes you can get so engrossed in what you’re doing close up that you forget to step back and see what the bigger picture looks like. With a design wall, I can place all of my blocks up, step back and see what (if anything) needs to changed, swapped or binned!
Another big area in my room that I had to plan cleverly was the placement of my computer and desk. I wanted it to be in a position where it would be central to me when I’m sewing so that I can listen and change music, read and follow a tutorial or pattern, find inspiration easily as well as to document my sewing adventures and knowledge on my blog and on my YouTube channel.
In terms of storage, I have a few book shelves here and there where I lazily (yet strategically) stack my fabrics, craft accessories and books. I also have a few huge plastic containers of fabric meterage under my sewing table as well as tubs full of scraps, strips, leftover batting and lots of WIPs!
So that’s the basic layout of my room and I how I find it best to work within it. When I am working on a project, like anything, it does take me a while to get into a rhythm or flow with how I move about and get things done efficiently and safely! I usually do all of my cutting first (whether that be for just one block or a for good chunk of quilt I’ve got going on), then lay out all of the cut pieces in the order I need to sew them, I pin, piece and press and then pop it up onto my design wall. Then repeat until I flop! 😀
+++
Look out for tomorrow’s post where I’ll be delving deeper into a few ideas and ways you can organise your fabrics, notions and general everyday-ness in your own sewing room or space! Hopefully a few things might inspire you (and myself to be honest) to get your sewing space in tip-top organisational heaven!
Happy Sewing, Friends!
xx
