Analysing a Floral Stitchery

About a week ago I finished stitching a lovely floral embroidery that I had sitting on my desk waiting to be started for about six months or so. It was one of those designs that as soon as I saw it, I just had to make it!

Quite often I find myself go in and out of favourite styles or types of ways to be creative; whether it be simple patchwork piecing, quilting, crafting or a bit of delicate embroidery. So at a time where I was struggling to find the time and energy to do anything creative because of my work schedule and other life-y responsibilities, my itchy fingers and restless mind were in desperate need to do something fun, colourful, beautiful and creative! (Also the fact that I was in the mood for snuggling up on the lounge with a favourite quilt and re-watching one of my favourite movie franchises: The Lord of the Rings – Extended Editions played a huge role in getting this embroidery started!)

So this is where the nerdy part starts; A basic analysation of an embroidery…

When figuring out what colours to use for this design, I put my Florist hat on and thought sensibly about what kind of flowers where in it and what types of colours they would be in real life. I knew instantly that I wanted to use a variegated purple thread for the fluffy hydrangeas on the left hand side and at the back of the arrangement. Hydrangeas come in so many beautiful colours and shades and I wanted to really show the lighter and darker changes that the little flowers making up a hydrangea head have.

That big rose right of centre had to be red! It needed to be centre stage; fluffy, full and magnificent! Again, I used a variegated thread for this to add interest and to give a little bit more depth to the overall design. Its lovely little friend behind it is a couple of shades lighter, a little bit more fuller and finished again with a variegated thread full of luscious shades of oranges, pinks and reds.

The other elements of the arrangement (know as ‘filler’ flowers in the world of floristry) I also wanted to be true-ish to life and not take away initial interest of the main flowers. The deep greens and flowing golds compliment the overall colour scheme and design, while the heavy navy vase cements the design adding shape, roundness and a finality to the arrangement. In early plans I was actually going to embroider the vase a metallic gold but as the embroidery got along, I thought if I did that there would be too much gold/yellow tones in the design. By using a near opposite colour from the colour wheel, the navy vase compliments everything perfectly!

So there you have it. I little peak into how my brain worked out how to apply colour to this darling embroidery. Whether you found this post dead boring or super helpful, I hoped you enjoyed watching this embroidery come to life. And if you saw it all unfold on Instagram, thank you for enjoying the endless ‘spam’ of my work-in-progress!

Now I’m on the hunt for the perfect frame so that I can hang this beauty on a wall in my sewing room and swoon over it every time I notice it! I love finding old frames at charity shops so I think that’s what I’ll do when I next get the chance!

Also, if you would love to make this embroidery too, I found the pattern on one of my favourite websites that have a great range of embroidery designs, Urban Threads.

+++

And now I’m onto the ‘what’s next?’ phase.

Although I have a tonne of other projects to finish (*cough* Star Sampler Quilt Along! *cough*), I’m always on the hunt and yearning to start something new! Here though, is a quick list of immediate projects I’ve got going and/or want to start very soon!

  • Star Sampler Quilt Along to finish (the quilt-top construction tutorial will hopefully be ready this coming week!)
  • Pixelated Rose Quilt  to continue piecing (see my Instagram for more updates!)
  • New crafty YouTube Tutorials to plan and film (includes a lunch tote bag, flower crown and floral wreath and of course more block tutorials!)
  • A winter coat to lay out, cut and sew together (yep, the inner dressmaker in me is dying to break out!!)
  • Swoon. I have yet another Swoon block waiting patiently for me to piece together (this one involves a beautiful colour palette of purple Tula Pink fabrics!)

There’s just so much I want and need to do! It can be awfully overwhelming at times… But little-by-little I’ll get there and do it all to the best of my ability!

I hope you’re all enjoying a splendid period of creativeness and are enjoying whatever it is that you’re currently making!

Happy Sewing, Friends!

xx

‘Tis The Season // 2016

Words truly fail me when I think of just how fast this year has gone…

I can very clearly, to the day, remember exactly what I was doing this time last year in the lead up to Christmas, almost as if it was yesterday! Yet so many things – moments, milestones and memories – have past in between and it’s hard to believe that we’re only days away before starting a new year all over again!

ChristmasDecos7

To me, December always feels like if you blink you miss it, you know? This December has been no different. With a time demanding retail job, everyday life responsibilities, sickness, YouTube content to shoot, edit and upload along with the ever-looming Christmas Day deadline to buy presents, bake, cook, clean and sing at Carol nights, I’m surprised I’m still able to get up early in the morning and get the day started!

+++

To start this post off, I would first like to issue an apology. Everyone reading this who is following along with my latest Quilt-Along I’m so sorry for taking aaaaaages to get Block Eight up. My excuse is muddled up somewhere in the last paragraph! 😓

But in all seriousness, I honestly haven’t had the time to film the bulk of the tutorial because of my work schedule and a few other life-y type things. This week, leading up to Christmas has just been the busiest. I’ve practically been living at work due to extending trading times and such while attending Christmas lunches and parties. So in between that, Carol services, gift buying and sleeping, all of my video and tutorial making have been temporarily placed to one side ready to be picked up again early in the New Year.

 Another thing I was hoping to get done and show you was a Christmas themed Stop-Motion Embroidery video. (A bit like this…) The pattern was chosen, the beautiful white linen fabric and gorgeous coloured threads to match were bought and the pattern was meticulously transferred onto the fabric. And that’s how far I’ve gotten. Boo!

christmasembroidery
PATTERN SOURCE: Urban Threads

I was so excited to get stitching and enjoying watching the pattern come to life through my numerous photos. But again, that tricky life element called ‘time’ has killed my dreams to their core and made the project flop graciously on its head. Anyway… I’ll keep it in mind to do for next Christmas!

 Let’s move on from my hum-drum excuses and complaining onto some more exciting news! In the next week or so, the 2nd of January to be exact, I’m going on holiday! I’m going on a week-long cruise with my parents down to Melbourne and around Tasmania on the Emerald Princess! Words aren’t enough to describe just how excited I am – I’m so desperate for a holiday! We booked this cruise all the way back in 2014 sometime, so it’s been a long time coming! I hope to be able to take lots of photos and even film a little bit for you to make into a Holiday Vlog just like I did for our Fiji cruise in 2014. I even bought a fancy new camera for the occasion so there are no excuses to capture something to show you!

 And speaking of something to show you… I recently filmed something fun for my channel that I haven’t done in quite a while. It’s a ‘What’s In My Bag?’ video! I’m not sure if you’re at all interested in what I keep in there, but for those of you are a little bit nosey like me, I think you’ll like it! It’s just something a bit fun and lighthearted for this time of the year and gives an opportunity for you to get to know me more! If you wanna have a glimpse at the things I carry around with me all of the time you can see it right here!

+++

 So now that another year is over, it’s time to start planning for the next!

I will be continuing with my Quilt Along series in January – we’ll get all 12 blocks finished and then piece, baste, quilt, bind and label the quilt and admire it and cherish it forever! There are lots more tutorials and other content I want to make next year too – hopefully with a mix of sewing, crafting, floristry and lots more lifestyle and vlogging elements!

While still working at Spotlight, I’m planning on enrolling and studying the next certificate level up in Floristry where I’ll learn more complex designs and arrangements as well as explore the ins-and-outs of business management! Ooo!

Along with that, I have two very good friends who are getting married next year, another wedding where I’ll be doing the flowers AND I’ll be also turning the big THREE-OH in September! Crazy!!

 It’s gonna be a great year! I can feel it already!!

Happy Festive Sewing, Friends!

xx

PS. Oh! I almost forgot! I have actually managed to finish one Christmas project that I started a few weeks ago! You may remember this darling appliqued snowflake design I shared on my Instagram all ready to be stitched into place on the machine…

img_0017

I have since backed it with a matching chevron print fabric, stuffed it with a ginormous cushion insert and placed it on the lounge to be snuggled against, leaned on and comfortably squished by all ranges of backsides! I’m so happy with how it turned out!

christmassnowflakepillow2016

Happy Days!!

x

A Crazy Craving for Applique!

Ever since mid-semester break begun early last week, a strange and very exciting urge (or craving) came over me to get my hands moving and get stuck into some hand-sewn applique!

It’s literally been an age since I last did any hand applique. I’ve done little bits here and there when sewing on quilt labels and such, but nothing really intense where the project is solely based on or designed around this technique.

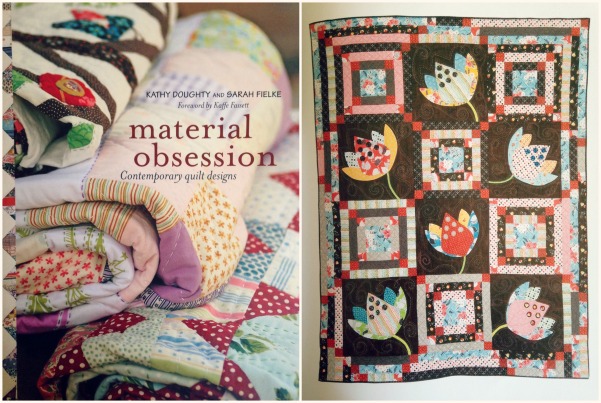
So over the weekend, the hunt began to find the perfect pattern to stitch! My first port-of-call (as always) was my book shelf: always full of fab ideas and glorious inspiration! It never lets me down! And I somehow knew instinctively that I would find what I was looking for in this book – Material Obsession by Kathy Doughty and Sarah Fielke.

MaterialObsessionBook

From what I could remember, a lot the designs featured in this book involved applique pieces, perfect hand-quilting textures and brilliantly clashing fabrics to boot! So to my delight and happiness, after flicking through it once, my eye stopped on this cheery tulip pattern that perfectly summed up the exact thing I was looking to stitch up! (I was also hoping to find a pattern that was a flower or was centred around flowers as they seem to be very much my life right now!)

FancifulFlowersPage

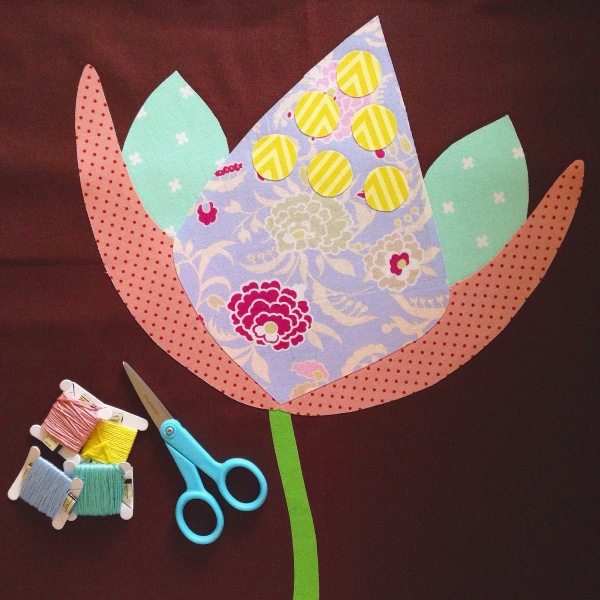
After a quick scan through the details for the applique block and what techniques needed to be used (this pattern can be created using either the hand-turned applique method or the raw edge method. I chose to do the later! Ooo, I always love a good button-hole/blanket stitch!!), I hurriedly picked out a few fabrics that I thought would go well, searched for some template plastic to trace the template pieces on to (a few pattern pieces needed to be reversed) and I rolled out my vliesofix (or heat-n-bond paper) and got stuck in!

TulipBlockOne

Happily, it only took me one afternoon to get the first block completely finished! I had a whole weeks worth of The Tonight Show Starring Jimmy Fallon to watch, so I got comfy with a cup of tea and immersed myself into a world of sewing that I’ve missed so much over the past couple of months! (PS. These blocks are big ol’ boys – they measure about 18.5″ squared!)

I’m now currently onto the second block, exploring a different colour way and choosing another dominate floral fabric for the centre piece.

IMG_5880

This one features one of my all-time favourite fabrics by Amy Butler – Gypsy Caravan in the print called Gypsy Mum! I think the colours are just so divine and I love the pop of those eggplant colour details throughout it!

GypsyCaravan

At the moment, I’m not sure whether I’ll follow the pattern in the book or just make up each block as I go as a side project to all of my other side projects and then piece them into a quilt… Right now, I’m just looking at it as an adventure that will keep my hands busy while on break from my floristry course and that will continue to soothe my craving for some down-right good-ol’ sewing! (Plus, it’s just really nice to have a new project displayed up on design wall in my sewing room! For a while there it was looking quite bleak and unloved… But these gorgeous tulips are pepping it up nicely and giving the room a warm and welcoming glow again, making me one happy quilter!)

As always, I’ll keep you updated with the progress of this (yet another) quilt-in-progress on my social media pages (ie. Instagram). TBH, I’m really enjoying this one – it makes a great change from piecing a block together on the sewing machine to having to hand trace, cut, press and then hand-sew each piece down. It’s a process that I’ll always love doing!

Happy Sewing, Friends!!

xx

An Update from my Sewing Room… #6

Hello Friends!!

It’s always so lovely to find the time to sit and write and share and catchup with you!

I must admit, my blog has very sadly been neglected over the past few months… Life has seem to find the accelerator pedal and made the past few weeks just fly by! (I mean, can you believe it’s the middle of February already!! Geez!)

So as always, there are lots and lots of new exciting things to catchup you up on – so let’s dive in!

first update – floristry!

I’m a student once more and no ordinary student at that! I’m learning how to become a Florist!

IMG_5493

I’ve always wanted to study floristry ever since I was in my last year at high school. (I’ve also always been into gardening and growing my own plants, veggies, herbs and fruits. A trait inherited from my dad and paternal grandfather.) But things and experiences prevented me from pursuing it until late last year when I was very randomly reminded of my early interest in wanting to do it. So I did some research and found out that one of the local TAFE colleges in my area offered the very course I was interested in! Yay! So I applied and begun the course on the 1st February!

FlowerDuo

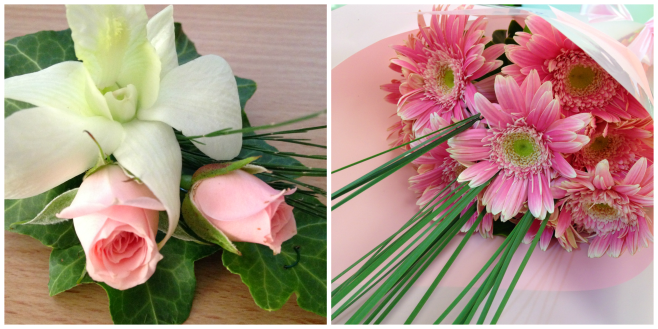
If you follow me on Instagram, you may have seen some new photos of flowers and arrangements and be thinking, ‘why?’…. And now you know! Of course I’ll keep posting pictures of my sewing adventures and life adventures and other sorts of things, but now pretty florals and bouquets will be added to the mix as well!

+++

second update – youtube

Now, you may be thinking if I’m studying floristry does that mean no more tutorials, videos, blogging, sewing, crafting…??!!

No. I will never stop sewing! Patchwork and quilting is my life! I’ve found that if I’m ever having a personal crisis or have had a bad day or am feeling blue or even 100% happy, I know that I can always rely on sewing to cheer me up, to put me back in the right mind set and to remind me that life is good. 🙂

And I love sharing that with you! I love teaching and helping you out. I love inspiring you and watching you grow in your skills and confidence. I have so many great things planned to share with you on my YouTube channel and blog this year and I’m so excited to get stuck into them!

However, now that my time is being shared with my studies there will be times when videos may be late or go up on the wrong date or not go up at all from week-to-week. (I may even change my upload day soon – I’ll let you know when and if I do!) It really will depend on how busy the week gets with study, family life, prior commitments etc. But just know I will always do my best to get something up and out to you each week!

And just as a sneak-peek to those of you who read my blog, here are a few of the tutorials/videos coming up on my channel over the next month or so… (in no particular order, btw!)

TutorialSneakPeek

– My Mini Quilt Collection

– Ocean Waves Block Tutorial

– Boxy Zipper Pouch Tutorial

– February Favourites

– Behind the Scenes: The Tutorial Edition*

(*This will be a video showing you how I film, edit and produce my block tutorials. It’ll be the behind the scenes of the Ocean Waves block!)

– And there’s the potential of a mini Spotlight Fabric Haul if you would like to see it… Let me know if you do!

+++

third update – sugar block club

This year I decided to jump on the band wagon and join in on one of Amy’s from Stitchery Dickory Dock Sugar Block Clubs. (Click here if you want to learn more about it!)

These are the two blocks I’ve made so far for January and February – Churn Dash and Log Cabin variations!

SugarBlockClubDuo

I’ve decided to use solids for each of my blocks as I absolutely love using them at the moment! (Plus, I have lots of solid fabric to get through!) I’m sticking with a neutral creamy colour for the background which will help each of the colours I choose to sing and show off the designs in each block. I’m so excited to see where this quilt will end up!

+++

fourth update – happy mail!

Although I’ve already thanked her, I just want to acknowledge and share this lovely gift that a wonderful friend, reader and viewer sent me last week!

CarissasThankyou

Carissa made me this super cute little ‘thank you’ wall hanging/mini in the design of an envelope, featuring hand embroidered details, beautiful little sample fabrics from her HST Sampler Quilt along with a gorgeous little frenchie bulldog fussy cut for the fabric postage stamp!! Ahh, soooo cute!!

Along with this, she so generously sent lots of fun things like Pop Tarts and a selection of American candies, binding clips, a Buzz Lightyear Mug (!!) and so many other awesome little things!

And so again Carissa, thank you so much for sending me such a lovely, generous and thoughtful package! You’re truly the best! (Can you tell I’m still on a bit of a high from all of it?! Te-he!)

+++

And that’s the update done! (There’ll be a fifth update but I’m going to make that into a separate post – it’ll be all about my Four-Patch Love Heart Block tutorial!)

 I’m so looking forward to completing my floristry course and perhaps sharing some flower care and construction tips with you some time!

And, I’m quite eager to get those tutorials underway and share them with you asap!

Wishing you all a wonderful week ahead,

Happy Sewing, Friends!

xx

Celebrating 4 years of 3and3quarters!

Last week, on the 4th November, my darling little blog celebrated it’s 4th anniversary!

You know, there really are times when I can’t believe it’s been four years since I begun writing and sharing all of my quilty adventures! So much has happened between then and now (naturally) and in no way did I think that my blog would ever be as rewarding as is it today!

So as I’ve done previously in my past yearly anniversary posts, we’re gonna take a look and recap all of the highlights from the past year – starting with the birth of my niece last year…

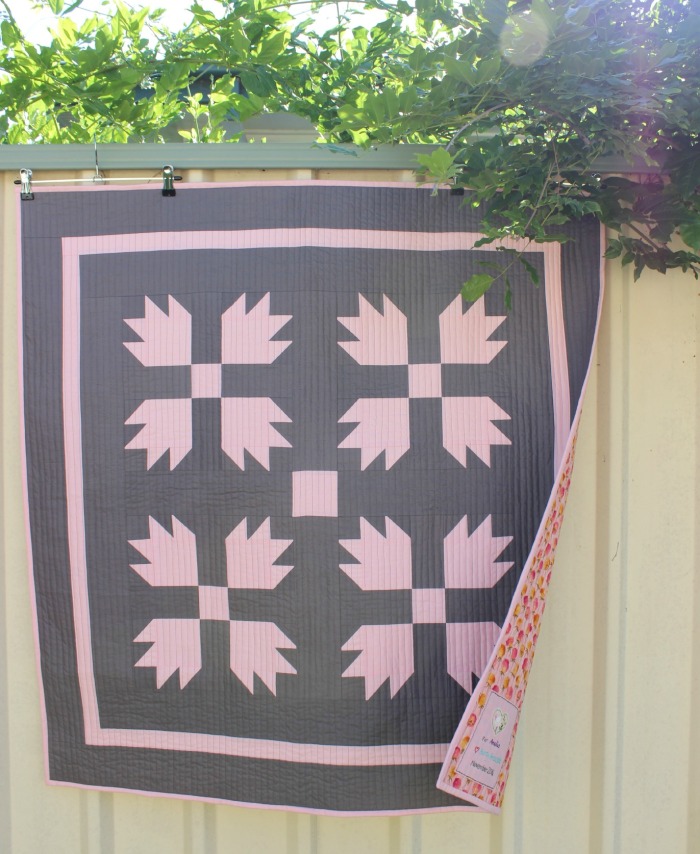
With the news of my first niece due to be born in early December, I got cracking immediately onto making a quilt to give to her and the family at her Baby Shower. I opted for a block that I had previously made very early on in my patchwork-y venture, the Bear Paw block (one of the first blocks I ever made HSTs for!). The vision I had for this quilt was traditional-meets-modern (which is pretty much my approach for all of the quilts I make) and wanted to have the quilt top be a concentrate of richly deep solid fabric colours; grey and pink.

Amelia's Baby Quilt (2014)
Amelia’s Baby Quilt (2014)
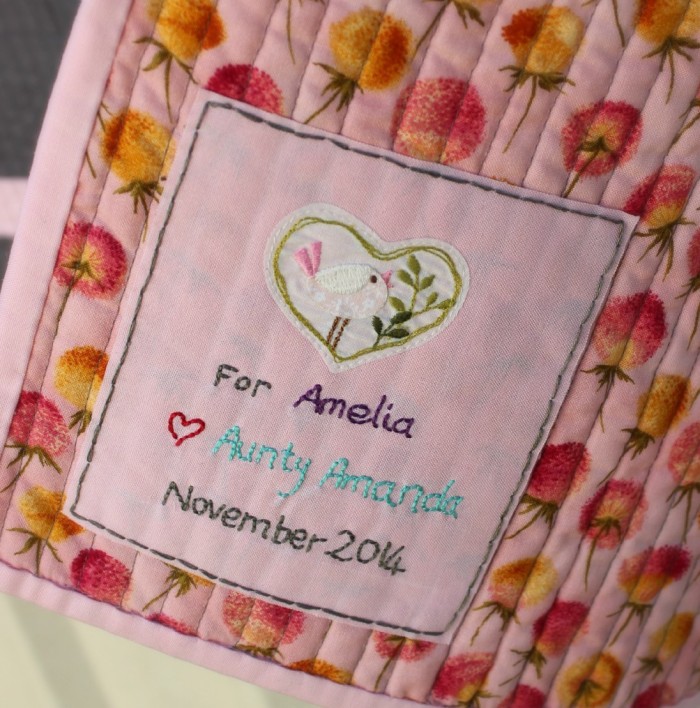
Amelia's Baby Quilt Label
Amelia’s Baby Quilt Label

I added a beautifully matching modern floral print as the backing and made a one-of-a-kind embroidered label with her name and best wishes from her Auntie. And now with her 1st birthday rapidly approaching, this little gorgeous little girl is one of the most sweetest and cheekiest little things who loves blowing raspberries and is ready to get exploring on all fours! Such a darling!

+++

In February, I had a lovely break away from reality and went on a cruise holiday to Fiji and New Caledonia, sailing on Princess Cruises. It was a holiday I was very much in need for and I enjoyed every minute of it! If you like to re-experience the places we visited, you can read the post I wrote or watch the vlog I made!

Dravuni Island, Fiji

And while sailing around the big blue Pacific Ocean, I also had the chance to chill out and stitch up this fun tree embroidery pattern that I had purchased from Urban Threads.

Delicate Tree (2015)

Admittedly, I haven’t done as many embroidery projects as I would’ve liked to this year, but this one turned out so lovely that I’m quite content with it being the only one I’ve made so far!

+++

Okay, so let’s get into some of the quilts I’ve made over this past year! Happily, I’ve made more quilts this year than I did last year which really is wonderful! I had made a secret new year resolution to myself to make more quilts this year and the amount that I’ve made has made me quite happy!

The first two that shine like little gems in my mind are the commissioned baby quilts I made for a friend back in July. The brief was that both mums-to-be didn’t know the genders of their babies so each quilt needed to be gender-neutral and super cute!

TwoLittleBabyQuilts
Granny Squares Baby Quilt & Pinwheel Baby Quilt (2015)

And these are what I ended up with! Words really can’t describe how lovely they equally turned out. Everything about each one I was so happy about: the quilting, the fabrics, the binding, the neutral-pastel tones, the sizes and their sheer cuteness! From what I’ve been told, both mummies loved their little quilts and each bundle-of-joy arrived safely and happily!

The next quilt that I’m equally thrilled about making was Donna’s 50th Birthday Quilt using the Diamond Square block! Although gifted a few weeks after the big day, she thankfully loved it!

Donna's 50th Quilt (2015)
Donna’s 50th Birthday Quilt (2015)

Knowing that her favourite colour was blue, I raided my sash and pulled out a number of contrasting blue prints that I knew would look really effective against each other. After cutting and piecing over 120 HSTs into this all-over quilt top design, I chose to quilt it with a design I’d been seeing everywhere on Pinterest but had never actually tried. It’s where you quilt a line on either side of the seams, creating this super effective spaced-out grid type pattern. I absolutely love it! It was so quick to do and really suited the over-all feel of the quilt.

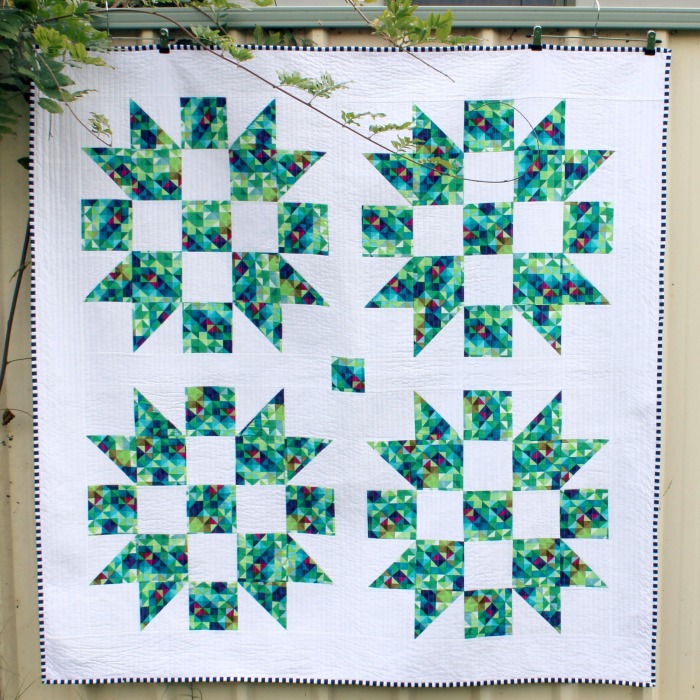
The next quilt is Geo Dreams. This one holds a lot of sentimental feelings and emotions as it was the first quilt made in my first ever Quilt-Along series on my YouTube channel.

Geo Dreams Quilt (2015)
Geo Dreams Quilt & Label (2015)

The amount of support and love I received from all you in regards to the series and the finished quilt is something that I will cherish for a very long time to come! And because of that wonderful participation and encouragement, you gave me the guts to start another Quilt-Along! Although we’re only half-way through, the HST Sampler Quilt Along is going great-guns and I couldn’t be more happier with the amount of people who are giving it a go and who are learning and growing in their patchwork skills!

+++

Two very exciting opportunities that happened over the past year was the chance to join in on two very special Blog Hops! Both opportunities were so much fun to be involved in and I’m so grateful to have been invited and put my two-cents into the ring!

The first one I was invited to join was the RJR Supreme Cotton Fabrics Blog Hop! For this one I made my darling Crown of Thorns Mini Quilt using some of their deliciously bright and rich solid fabrics.

Crown of Thorns Mini Quilt (2015)

What I loved about this one was the beautiful harmony between traditional and modern. The Crown of Thorns block is very traditional in nature and is known by many other names. With this mini quilt, I simply turned the block onto a point, added some richly modern colours to the mix and voila, a thoroughly modern little mini!

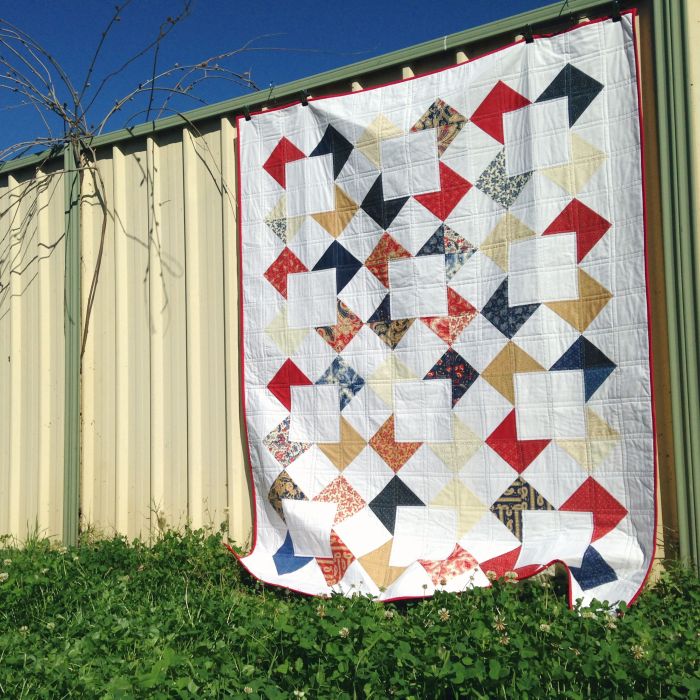
The second Blog Hop that I was invited to join in on was one hosted by the Fat Quarter Shop celebrating the versatility of their Jolly Bars pre-cuts! The range I was given to play with was the Polka Dots & Paisleys by Minick & Simpson for Moda Fabrics.

OpenWindowQuilt1

Paired with a white solid fabric and matching red binding, I cut and pieced each Jolly Bar into 12 Open Window blocks resulting in this warming quilt! (And this quilt has a very happy ending: It now lives in America with a family who will cherish and love it for years to come!)

+++

Ooo, we gotta touch on some of the darling little mini quilts I’ve made this year! I have a huge love, appreciation and possible obsession when it come to mini quilts! What can I say, they’re just so darn fun and quick to make!

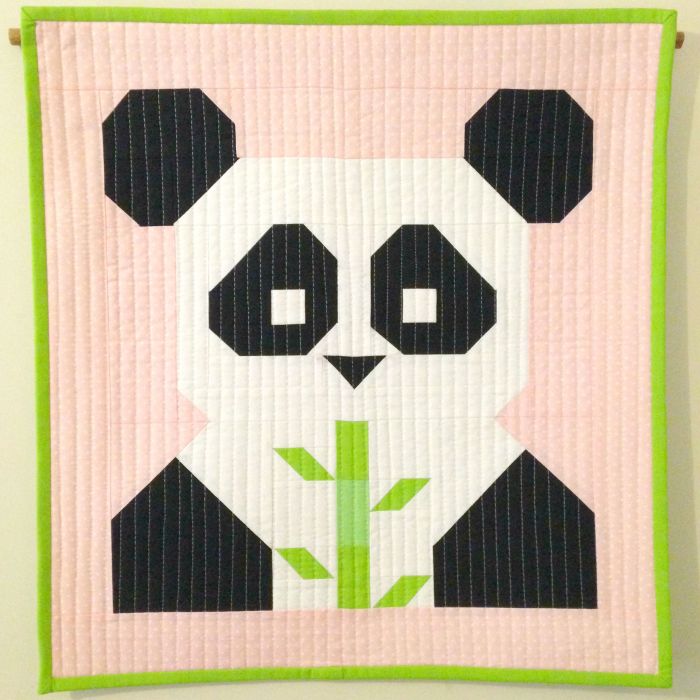
The highlights from the year have to be these three little darlings!

FQS Pandamonium Mini Quilt (2015)
Notting Hill House Mini Quilt (2015)
Pineapple Mini Quilt (2015)

So now, because of my mini quilt obsession, the walls in our house are overloaded with precious pictorial mini quilts greeting people as they walk through the house. There’s nothing wrong with that, right?

+++

And lastly, the one other thing I want to reflect on and share with you is the wonderful support and growth of my YouTube channel. It’s crazy to think that there are so many people out there who share the exact love and passion that I have for patchwork and quilting! (For a while there I thought I was the only one!) It’s been so lovely to be able to reach out and chat to other like-minded people whom I can share my exciting successes with and swoon together over delightful fabrics and fun new patterns!

The reason why I chose to start a YouTube channel was to simply have another avenue to create content for my blog. I was ready to venture out and challenge my creativity with a new medium to share and teach my love and skills in patchwork, quilting, crafting and baking. It was also an opportunity I took to strengthen my self-confidence in speaking out-loud and to grow and challenge my teaching skills. And I can happily say today that in each of these things I have grown tremendously and have gained a few thousand new friends along way!

So a big THANK YOU to each and everyone of you who watches, comments, likes and supports everything that I do both on here on my blog and my channel (and Instagram!). You’re all such wonderful people and I’m so glad to call you all my friends! Yay! 😀

+++

If you would like to take a squizz at the past three yearly recaps I’ve written, here are the links for you to follow:

Year One: One Year Down…

Year Two: Two Years Later…

Year Three: Three Years Down!

So here’s to another successful and fun year of making quilts, making mistakes, saying Yes! to every opportunity that comes my way, making new friends and strengthening the bond with old ones!

Happy Sewing, Friends!

xx

+++

2015 Blogging is dedicated to my darling Lucy. A beautiful soul that I miss dearly everyday.

Lucy

Rescued: 4th July 2004/Passed: 14th April 2015

xx

An Update from my Sewing Room…

Today, I thought I’d take some time out and write up a bit of an ‘old school’ type post.. One where I share with you all of the going-ons that have been happening in and around my sewing room! Just like the good ol’ days!!

First up, I’ve been spending my down time making this quilt for a friend of mine who recently celebrated a very special birthday! (I’m saying no more on the subject, just incase they read this blog!) Typically, I missed the deadline of their actual birthday to have this quilt finished and gifted to them, but you know, better late than never!

IMG_4195I found the inspiration for this one on Pinterest (where else!). The picture hit me straight in the face and I knew instantly it was perfect for this occasion! The recipient of this quilt loves the colour blue, so I riffled through my stash and found a mish-mash assortment of beautiful blues and mints with a mixture of prints, directions and values that would help add interest and movement to the quilt. I then paired these with a crisp white-on-white print fabric that make all of the blues pop and sing! All up I think I made about 120 5″ HSTs… I do love making HSTs but sometimes the monotony of trimming can be draining and painful! But after numerous cutting, piecing and trimming sessions, the time came to place the squares into place onto my design wall. I did this with no particular plan. I simply just placed them up ensuring similar prints and colours weren’t placed too close to one another. This did take a lot of back-and-forthing to ensure everything was working harmoniously!

TrioBlueHST

The way I chose to piece the quilt top was an odd and very laborious one. I literally pieced the quilt top together one square at time… What I did was divide the quilt into quarters, pieced each one together and then brought them all together to complete the quilt top! It may not seem that tiring, but by doing it this way, I was forced to press every single seam on the back flat open! It wasn’t fun and it slightly took away the fun and excitement of making this quilt. But hey-ho, I pushed through it and got it completed about two weeks past its due date! Oh dear!

However I must say, by doing it that way, I had so much more control on getting the points of the triangles sitting perfectly together! I don’t think I’ve ever been able to get such perfect point matches and seam nests/joins in any other quilt I’ve pieced! Some of these beautiful joins just simply take my breath away!! PerfectPointsSo now I have the quilt top hanging to the right of me whilst I find the perfect backing for it and muster the enthusiasm to baste it! I’ll keep you updated once I’ve basted it and starting the quilting!

+++

Next, I finally managed to finished my Tree embroidery that I took away with me while on holiday in Fiji! I’m not really sure why it took me so long to finish as I only had a few little areas to fill in to say that it was completed! I did share the finished result on my Instagram, but here it is again if you missed it, plus another showing the details…

IMG_4095

IMG_4102

I purchased this embroidery pattern from Urban Threads – a great online source of modern and quirky embroidery patterns and ideas!

+++

Another thing that’s been revolving and considered in my sewing room is the decision to open my own Esty store! I’ve sold things I’ve made online before – for quite a few years actually – but wanted to find and use a new platform that would be and is more accessible to international shoppers. From what I’ve heard, Etsy has a pretty good reputation and is trustworthy and well known worldwide, so I thought I’d give it a go and see what happens!

At the moment, I haven’t anything for sale yet as I’m still at the planning stage of figuring out shipping rates, packaging and what it is I actually want to sell in my shop. I have a few quilts that I’ve made (or are half made atm!) that I would like to sell as well as some embroideries (possibly framed; still figuring that out!) and a few other things that I’ve made in the past that have sold well.

So stay tuned, things will be up and running fairly soon! (Hopefully!)

+++

Ooo!! Exciting times are ahead here in Sydney! The craft and quilting communities are getting ready for the Craft & Quilt Show to open next week!! Wheee!! This is like our version of QuiltCon or Quilter’s Market, where you get to explore, buy and be inspired by what’s new in the crafting and quilting worlds!

Craft-Quilt_FB-button_403px-by-403px_come-see-us2

Also at the show they have the Sydney Quilt Show on where they display all of the quilts to be judged for Best in Show and other awards for 2015. I’ve entered in quilts over the past two years, but decided not to enter this year for a few different reasons. But I’m excited to see what the quality is like this year. The quilts last year were the best I’ve seen yet!

+++

And speaking of quilts and fabric and all good things, I recently went on a bit of a splurge on one of my favourite online fabric stores, Kelani Fabric Obsession! Every time I click onto that website, there’s always something new and beautiful to tempt me to buy and I sit there trying to justify why I need it in my life!

IMG_4170

This time around, I did have a few good reasons why I needed to purchase some new fabrics… The first is a commission to make two gender-neutral baby quilts for a friend who has two girlfriends expecting! I love, love, love making baby quilts, so I said yes and immediately began planning what I would make! So half of the fabric I bought are to use in those two little quilts, while the rest of the order is to be used to make some special projects for my Esty shop! I’m so excited to get into them and get making some beautiful things for you all!

Oh, and I almost forgot! I uploaded a ‘Haul’ video on my YouTube channel over the weekend showing you everything I got!! If you would like to watch that, click right here!

+++

And finally the last thing I wanted to share with you is something I saw on Instagram this morning. It was a pledge created by Amy Gibson from the blog, Stitchery Dickory Dock. Called the ‘The For Keeps Pledge’, she encourages us quilters to pledge to keep the art of quilt making joyful, soulful, non-boastful and enjoyable! To see the pledge in full, click here to go to the blog post she wrote about it! I think it’s such a great concept for all quilters to focus on and work by, especially for me as I share so much of what I do online and with others.

+++

So that’s the end of the update! There is still so much to share with you but all in good time… 😉

Happy Sewing, Friends!

xx

How to make a Quilty Cross Pincushion!

Hello!

Well, it’s been a bit of a while since I last published post! Gosh! But I think I have a pretty rock-solid excuse for why… I’ve just returned home from a two week cruise to Fiji!!

Dravuni Island, Fiji

I had the best time and will be sharing more of my adventures and love for cruising with you in the next few days!

Now, a few weeks ago, before I went on holiday, I made a video tutorial showing how to make a Quilty Cross Pincushion and I’ve only just realised that I haven’t yet shared that with you here, on my blog!

After casually browsing on Pinterest looking for some inspiring ideas, I came across some sweet little pincushions that I thought would make a great little project to film and share.

So using my favourite Quilty-Cross method by Auntie Cookie, I paired white cotton linen with a few of my ultimate favourite DS Quilts fabrics and proceeded to make this tutorial…

Since uploading this video, I’ve had a wonderful amount of positive feedback from my lovely viewers saying they’ve been inspired to make one for themselves! Such words of encouragement are always wonderful to read!

Will you be making one too?

Happy Sewing Friends!

xx
Stop-Motion Embroidery #3

Every few minutes or so I would ‘down tools’ and take a photo of how far I had progressed in completing this little embroidery.

This was the result…

In all honesty, I have no idea how long this actually took me, as it was one of those projects that I kept coming back to over a period of three months.

But know this… While I was making this embroidery I watched all four season of Downton Abbey (love that show!!) as well as childhood movies like Hook! (one of my favourite Robin Williams movies) and Peter Pan (oh, to never grow up!).

Create Embroidery 2

Here’s a bit more info about this embroidery…

– Music: ‘Mermaids’ by Jinja Safari
– Pattern: Urban Threads http://goo.gl/WB4XfF
– Embroidered onto 100% Cotton Linen
– Backed with light-weight fusible interfacing
– Traced using a HB lead pencil
– Hoop: Semco, size 260mm (10″)
– I use DMC threads/floss with a no. 7 sized embroidery needle
– Captured using a Canon Power Shot SX280 HS camera
– Embroidered using back-stitch

I’ve also made two other Stop-Motion Embroidery videos. Here are the links if you wish to see them as well!

Stop-Motion Embroidery #1 – Flowers

Stop-Motion Embroidery #2 – Heart

Happy Stitching Friends!!

xx

I made a Quilt!!

As is expected at this time of the year, the last few weeks have been filled with festive get-togethers, exciting gift making and an endless array of baking, giving me very little time to tend to my lovely little blog.

But in the last few days before Christmas, I’ve hoarded away a little bit of time to spend writing to you! And boy, is there a lot to write!

So with Tony Bennett’s Christmas album crooning in the background, let’s get down to business!

First, allow me to introduce to you my beautiful niece Amelia who was born on the 5th December.

Amelia!

She came into the world in a very hurried fashioned that earned her and her parents a National News worthy story! Let’s just say, they didn’t quite make it to the hospital in time! Here’s the story if you want to know more!

Next, let’s address the title of this post…

Yes indeed, I did make a quilt. And I did it in quite a sneaky type way too (you may have seen a few glimpses on Instagram!). Usually at Christmas, my close group of friends and I do a Kriss Kringle type of gift giving. So to sooth my need to make a quilt as a gift this Christmas season, I chose to make one for one of my closest girlfriends who I’ve known since high school.

Sam's Tribute Quilt

Thankfully she loved it! And even luckier, the colours went perfectly with a lot of the décor she has in her new inner-city apartment! Whoo!

The pattern I used is called the Tribute Star Quilt that I found (as a FREE download!!) on the Denyse Schmidt website! It’s quite an easy pattern to follow, choc-full of HSTs and simple squares that would look great using any print or solid fabrics.

Sometime in the New Year, I’m planning on giving the Tribute Star block another go using a few different type prints (maybe) and turning the block onto it’s point and adding corner triangles to the edges. From what I can see in my mind’s eye, I think it’ll be a little good ‘un!

What’s also kept me busy over the past few weeks are the Christmas tutorials I’ve been filming, editing and publishing onto YouTube!

Videos I’ve made include:

Paper-Pieced Christmas Trees

Handmade Christmas Felt Ornaments

Handmade Christmas Paper Crafts

Reindeer Cupcakes

The BEST Gingerbread Men in the World

Rocky-Road Christmas Tree

I’ve been putting so much time and effort into these little videos to the point where I’m quite ready to take a much-needed break once Christmas and Boxing Day arrive!

However, once Christmas is over, I’ll be getting straight back into it!

Before the month’s out, I’ll be publishing another Stop-Motion Embroidery video featuring this beautiful design from Urban Threads.

Create Embroidery

And then in the New Year, I have a ton of new quilt block tutorials planned as well as some other fun crafty ideas for you to be inspired by!

If you want to be in the loop of what, where and when I upload these video tutorials, check out my YouTube channel and subscribe to be the first notified! I would love to have you join me!

So my friends, I wish you all a very happy festive season, celebrating and making beautiful memories with your nearest and dearest!

xx

Handmade Christmas Felt Ornaments!

Get the Pattern: Handmade Christmas Felt Ornamants Template

***

Although it’s currently summer here in Australia, today has greeted us with a cold and drizzly rainy day that I really don’t mind too much at all! (See ya later humidity!)

So, with only 13 more sleeps until Christmas (What!? Surely, that can’t be right?!), here’s a little video I made showing you how to make some very inspiring and very festive felt ornaments!

Now these little beauties are entirely handmade, so of course they will look a little rough and imperfect, but I think that adds to their charm!

If you’re keen to make this craft this season, feel free to be as creative as you like, go crazy and mix up the colour combinations or stay traditional in your designs like I have. The choice is completely yours!

XmasOrnaments

For more information about these handmade goodies, check out the description box that’s accompanied with this video on YouTube.

Have fun making!!

Happy Sewing Friends!

xx

XmasOrnamentsAlternate
Alternate Video Thumbnail