After a few weeks between drinks, so to speak, we’re back to it and ready to plunge into Block 6 of our Mini Block QAL!
This time around, we’re making the Single Irish Chain.
FUN FACT! I’ve never made this block before until now. I’ve seen bigger versions of it here and there on many social media places and a quilt made entirely out of this block is just simply gorgeous! I’ve definitely added it to my ‘Quilts-To-Make-One-Day-When-I’ve-Got-Nothing-Else-To-Do’ list! 😂
This block, like most in this series, is super simple to construct and gives you a really great opportunity to practice and perfect your skill in nesting seams. (You should all be pros at it by now!! 😜) It’s a block that’s not too fiddly or stressful to piece and should take no time to finish!
I can’t wait to see all of the beautiful versions of this block that you’ll make! Enjoy!
+++
I’ll do my very best to try and not have such a gap of time between this block tutorial and the next! Block 7 just has to be my absolute favourite in this series and I can’t wait to get making it! It’s just the cutest!
Until then, don’t forget to share all of your blocks with me on the Instagrams using the hashtag: #AmandasMiniQAL and tagging me: @3and3quarters!
It’s been a bit of a while between posts, huh? This is the part where I typically write up my excuses… Busy life. No time. Unbelievably tired. So on and so on.
Well, although I haven’t been sharing very much both here and on my YouTube channel, I’ve been busily planning, designing and organising behind the scenes! Yeah!
One major thing that’s in the works is my next Quilt-Along series! I know, I know, I’ve been teasing what’s in store for the past few months but I do promise it’ll be starting very soon!
Planning time, using ‘Printshop’ by Cotton+Steel!
All of the blocks have been designed and are ready to go and the over-all layout of the quilt is locked in! Now I’m just waiting on the arrival of my fabrics (I’m using ‘Printshop’ by Cotton+Steel) and I’ll get straight into filming! I’ll also then be able to release an official start date as well as a full run-down of all of the info you’ll need to sew along with me (in blog post and video form)! TBH, I did want to have it started by now but a few unforeseeable things came up that prevented the series getting started. But no worries, it will be getting underway very soon and I’m so excited to get into it! I miss making tutorials for you!
Moving onto making content for my YouTube channel, I wanted to share an idea I’ve recently been seriously thinking about. I’ve mentioned this before, but one of my favourite types of content to watch on YouTube are Vlogs. This is where people film their everyday daily life and either upload it everyday or patch the week together into a weekly video. I did begin doing something like this on my channel a few years ago but it fell by the way-side as I felt I wasn’t quite ready to make that kind of content yet. But is this something you’d be interested in watching if I did this on my channel? Do you wanna see what happens in my everyday life? Obviously it’s a big thing to take on. I’m naturally very quite and shy and keep a lot to myself, so this would be a huge adjustment and fun challenge for me to take on. But it’s something I’ve been mulling over in my mind this past month or so and would really love to take it up and try it out. I’ve even begun researching what camera and equipment I could use to make the vlogs the best that they can be! Anyway, I would love to know what you think! Any feedback is good feedback in my opinion! 🙂
+++
In other news, just like my blog and channel, my poor sewing machine has been sadly neglected over the past few weeks. 😦 Call it being busy. Call it lack of inspiration. Call it a creative-brain-block. Whatever it is, I just haven’t felt the old spark or natural urge to do any ‘personal’ sewing. It’s actually really bumming me out. (It’s also another reason why I haven’t been blogging recently. There hasn’t been anything new to share with you! Or any photos to upload into this blog post!) Although I’m really excited to get started on my Quilt-Along, I don’t have any exciting sewing to get into while waiting for it to begin. Everyday I scroll through my Instagram feed and see all of you making such beautiful blocks, quilts and projects while I’m sitting here feeling guilty about not getting on with anything or whipping up something special to share with you… Ho-hum, hopefully I’ll break through my creative doldrum soon and find that good ol’ inspirational spark again! Fingers crossed!
So hopefully it won’t be too long between this post and my next! I’ll try not to let a month(!) fly past without touching base with you!
I hope you’re all having a wonderful week!
Happy Sewing, Friends!
xx
PS. By the way, have you seen my latest block tutorial? I made a FPP Arrow Block!
Today I woke up and was inspired to make a block tutorial for my YouTube channel!
Whether it was actual inspiration or a form of ‘YouTuber Guilt’ as I haven’t uploaded in awhile, I don’t know! But I put my head down and bum up and got into creating! And I’m so happy I did! There’s nothing like a good sewing session to soothe away the stresses of life!
So because time is quite limited for me at the moment, I stuck to a relatively quick and simple block to both cut and piece together. So when in need of a block like this, I always turn to my fab 130 Mini Quilt Blocks book by Susan Briscoe! There I found the inspiration to make a Mini Thread Spool block.
I’ve had an idea for a possible quilt design centring around the Spool block. The one I have in mind isn’t quite as small as this one and is slightly different in design. But I wanted to give this one a go just to see where I could take the design in my head and how to make it into a reality! (Stayed tuned for that one!)
But how adorable is this mini block though!? I’m so delighted at the size of it – it’s super cute!! I’m so keen to make more and then piece them together into a really sweet mini quilt to hang in my sewing room (that’s if I can find anymore room on the walls!!). 😀
Here’s how to make one yourself…
MEASUREMENT & CUTTING INFO:
Cut –
x1: 3.5″ square from a stripe fabric
x2: 5.5″x1.5″ rectangles from a dark or contrasting fabric (spool ends)
x2: 3.5″x1.5″ rectangles from a background fabric
x4: 1.5″ squares from a background fabric
Follow the steps in the tutorial to learn how to piece this adorable block together!
FINISHED BLOCK SIZE: 5.5″x5.5″ squared
+++
As always, don’t forget to share with me your finished blocks! Instagram, Facebook and/or Twitter are the best ways to do this!
As the weekend greets us on this fine Friday afternoon, I thought I’d share with you a lovely and simply modern block that you can easily whip up in under half an hour as you unwind from the working week!
I’m calling it the Simple Cross block. It’s basically just a modified version of the X Plus Block but without the ‘X’ bits in each corner. They’ve been replaced with four 4.5″ squares.
So here’s a guide on how to make to it!
+++
First, using two contrasting or matching fabrics, cut the following measurements from each one.
*Grey = background / Blue = main print
Next, pair up the two 2.5″ blue squares with two of the 2.5″ grey squares. (Image 1)
Flip and pin each pair together and then sew a 1/4″ seam down the side that’s pinned. (Image 2)
Then press the seam on each duo towards the darker side of fabric with a medium steamy iron. (Image 3)
Next, take the rectangle piece and the two left over 2.5″ grey squares and sew each one to either end. Press the seams outwards towards the darker side of fabric. (Images 4/5/6)
After that, take two of the 4.5″ grey squares and place one of the blue/grey duo rectangles in between them. (Image 7)
Flip and pin the duo to one of the sides of either square and then sew a 1/4″ seam along it. Press the seam outwards towards the 4.5″ corner square. (Images 8/9)
Then, sew the other 4.5″ grey square to the other side of the blue/grey duo. Make another row with the left over pieces, resulting in two identical rows. (Image 10)
Next, sandwich the row with the blue rectangle in between the top and bottom and rows. (Image 11)
Pin the centre row evenly to the top edge of the bottom one and then sew them together using a 1/4″ seam. Neatly press the seam inwards towards the centre row. (Images 12/13)
Lastly, pin the top row to the top edge of the centre row and sew them together. (Image 14)
Press the seam inwards again to finish the block.
The finished size of the block is: 10.5″x10.5″ (26.5cmx26.5cm).
Yes, I’m still alive! Still sewing. Still quilting. Still dreaming!
The past two weeks have been quite crazily busy for me, hence the sad neglect towards my blog. But all is back on track again and it’s time to give you an update on some of the things I’ve been doing/making/planning etc.
For ages I’ve been so intimated to make this block because of the quarter-square-triangles or ‘hourglass’ units along the sides. But once I did some research into the technique and found out just how easy and simple they were to construct, I’ve been churning them out like there’s no tomorrow! I’m now happy to say that the Ohio Star block has become one of my all-time favourites to make! Yep!
Another video recently uploaded was my Q&A video.
After asking for questions from you on Instagram and on my channel, I sat down and answered as many of them as I possibly could! Questions included: where I get my inspiration from, what are my favourite fabric ranges, when did I start sewing as well as what my favourite Disney movie is and what Adventure Time character do I relate to most! It was a fun little video to make and I hope I’ve answered some of the questions about me you’ve always wondered!
+++
One huge project that had been taking shape in my sewing room over the past week was one a little different to what I’m used to!
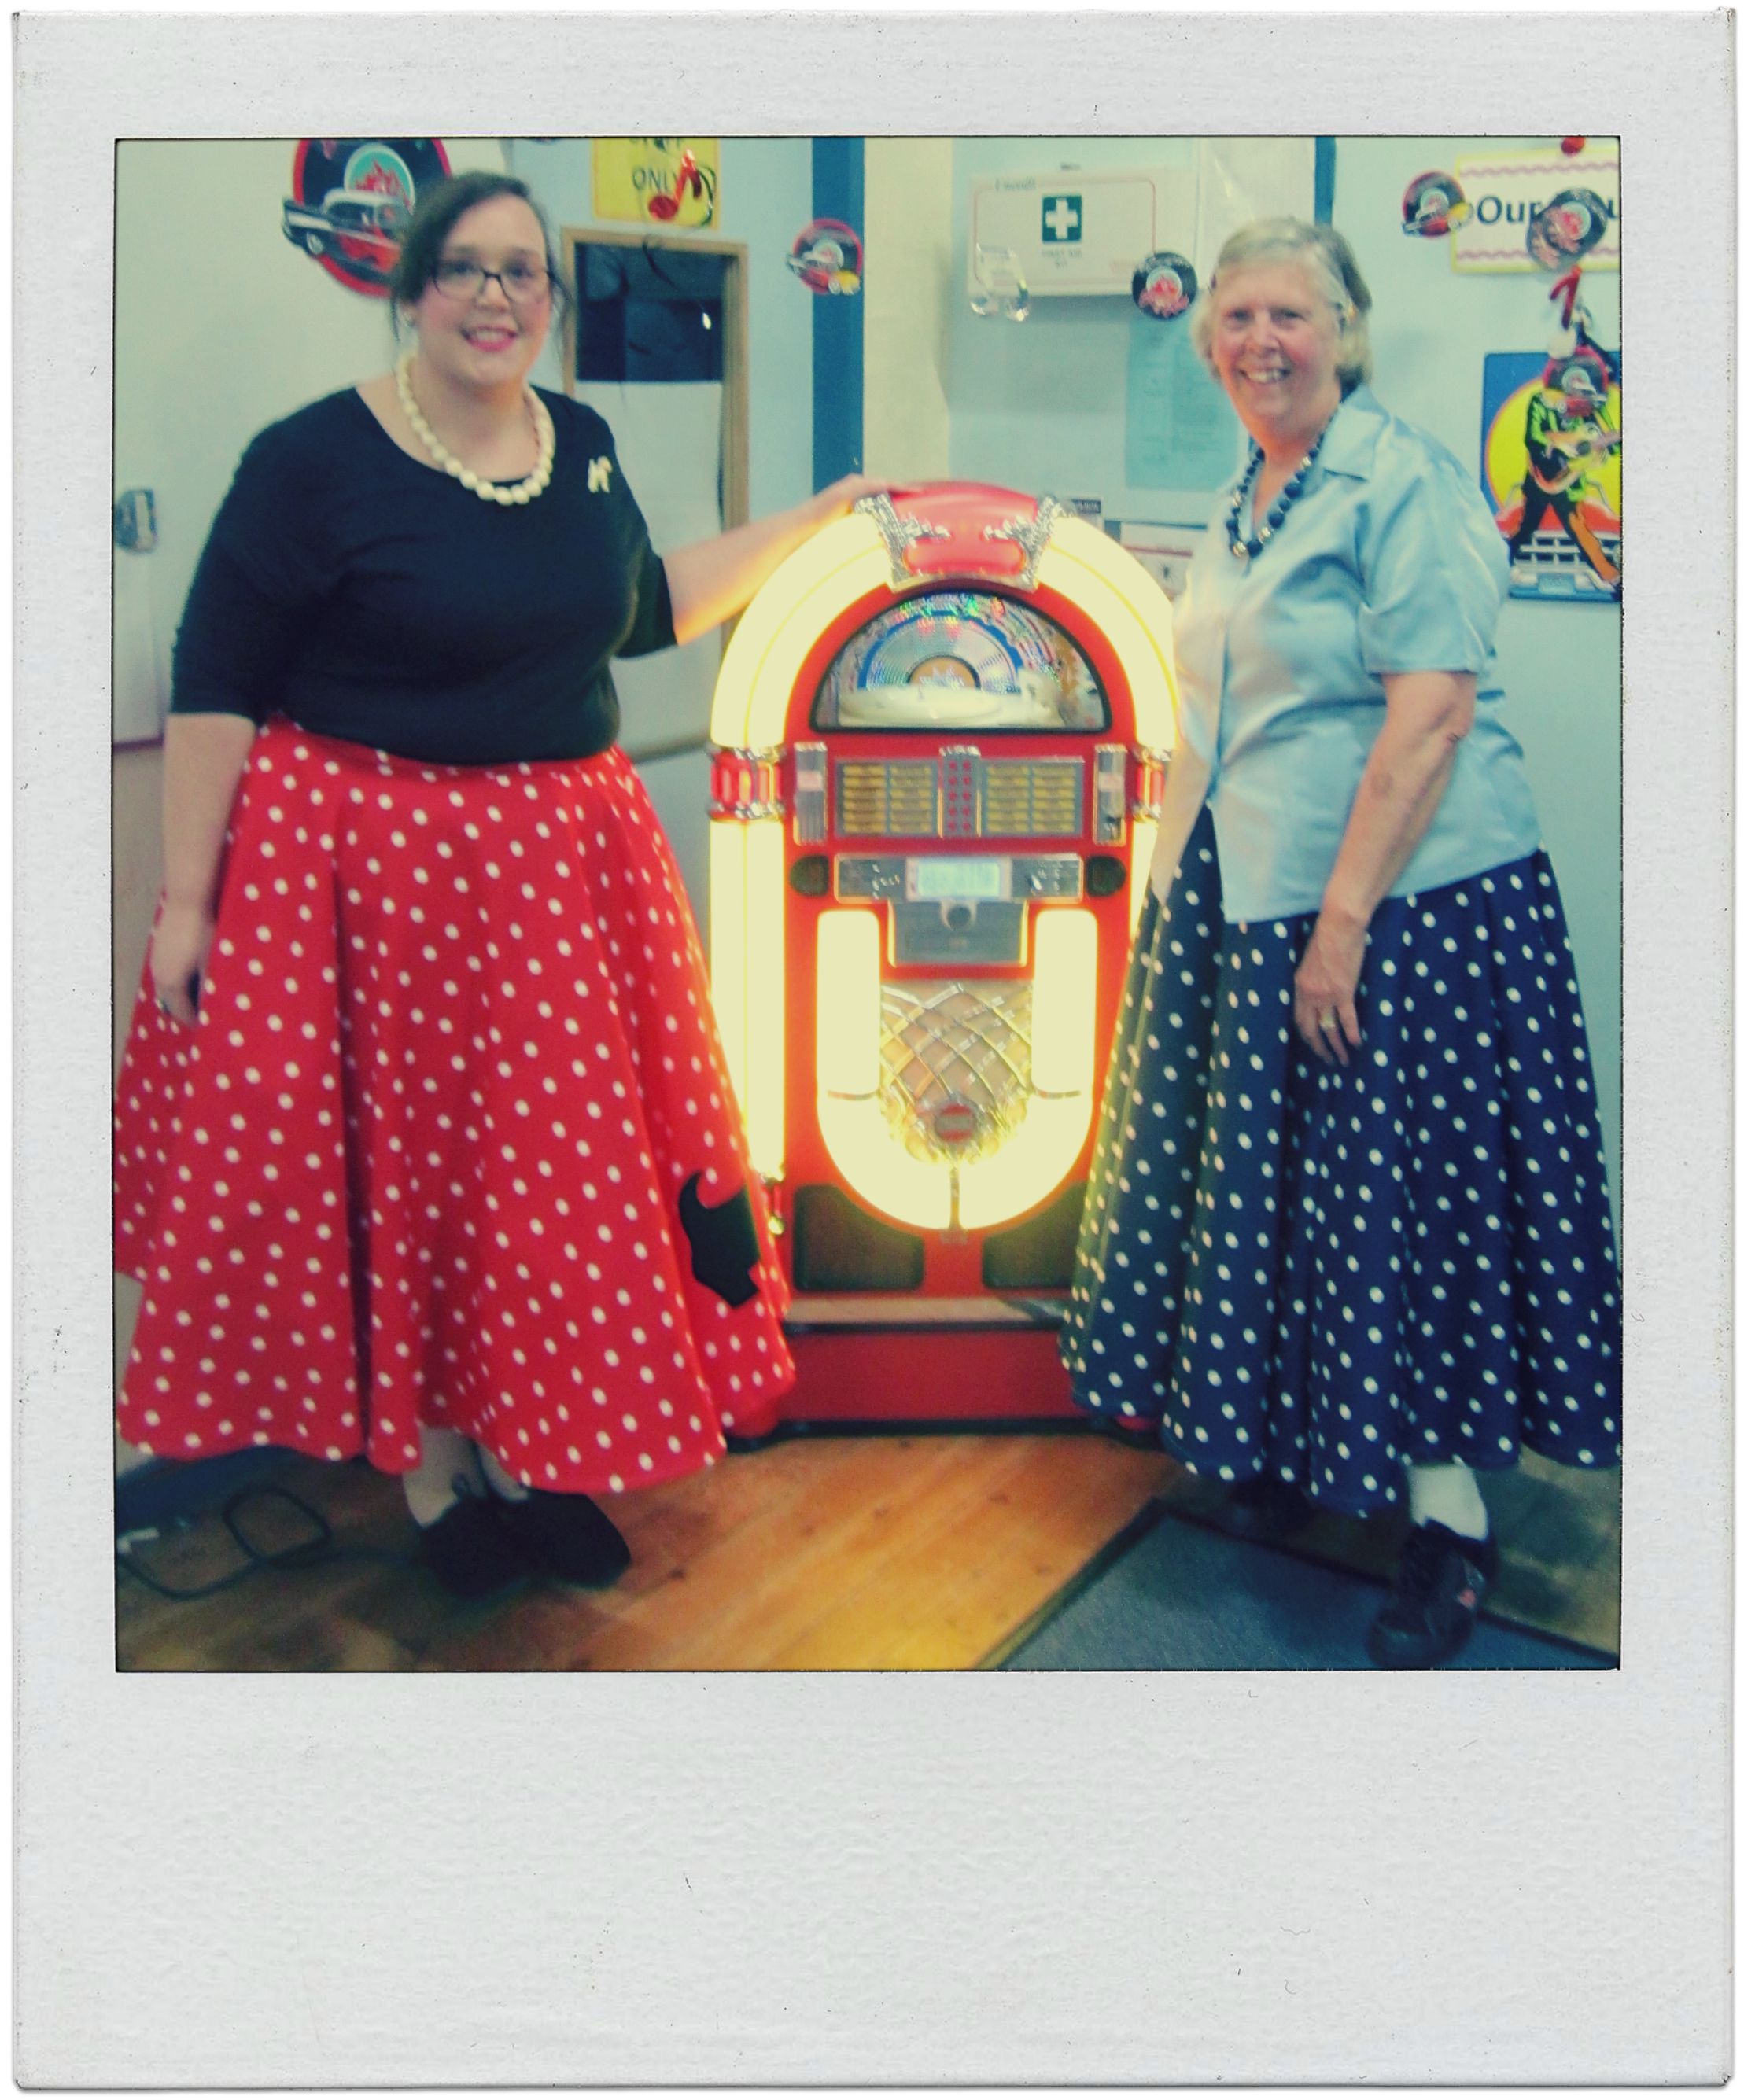
Making two 1950’s poodle skirts with double tulle petticoats!
At my church, the PWA (Presbyterian Woman’s Association) held a 50’s night to raise money for one of the ladies in our congregation who is a Missionary in Niger, South Africa. It was a fun night with lots of dancing, hot dog eating, trivia questions, lots of laughs and endless skirt twirling!
I made a blue skirt for mum (her favourite colour!) featuring white spots and no specific applique design. Mine, I made a little shorter, in the same fabric as mum’s but in red. I also added a gorgeous felt Scottie Dog applique near the hem on the left-hand side. My 5 year old nephew gave him the name of Buzz.
Both were full-circular skirts that took up about 4.5m of fabric to make! The tulle skirts were about the same, made up of a layer of soft bridal tulle and stiff nylon netting that helped to puff the skirts out. They were a bit of a handful to cut out, but quite easy to construct. All of the hassle was worth it though as the skirt was so much fun to wear and swish in! I can’t count the amount of times mum and I twirled around on the dance floor while listening to some awesome 50’s tunes!
+++
So what’s in the planning, I may hear you ask…?
Well, due to the guilt I feel inside for neglecting my darling blog over the past few weeks, I’ve set myself the challenge to write and publish a blog post every single day during the month of September! Boom!
September is a pretty busy month for me so there won’t be anything short-on to write about! The month is full of birthdays, special weekend celebrations, shows in the city, the start of a new Quilt-Along series, the start of a new job (more to come on that very soon!) and so much more! I’m super-excited to share all of that with you and to also rise up to the challenge and chat with you everyday during the month! Whoo! Roll on September!
+++
Lastly, be on the look out for a very special and insanely exciting post on my blog tomorrow!
The past few weeks have also seen me do a lot of secret sewing that I’ve hinted a few times on Instagram… Remember these pics…
Well, that’s all the hinting you’re gettin’ until tomorrow!
A very good afternoon to you friends! I hope you’re doing well! Me? Well I’m rugged up in a scarf and woollen jacket, with a lovely cup of tea beside me while I write this post to help keep my fingers warm! Ahh, winter… It’s nice to think about when it’s hot out but when it really comes along, you hate it with every inch of your numb digits and extremities!
Anyway, today we’re delving again into the fun things happening in and around my sewing room! Lots of things have been happening and I’m so excited to share them with you!
Right! Let’s get started!
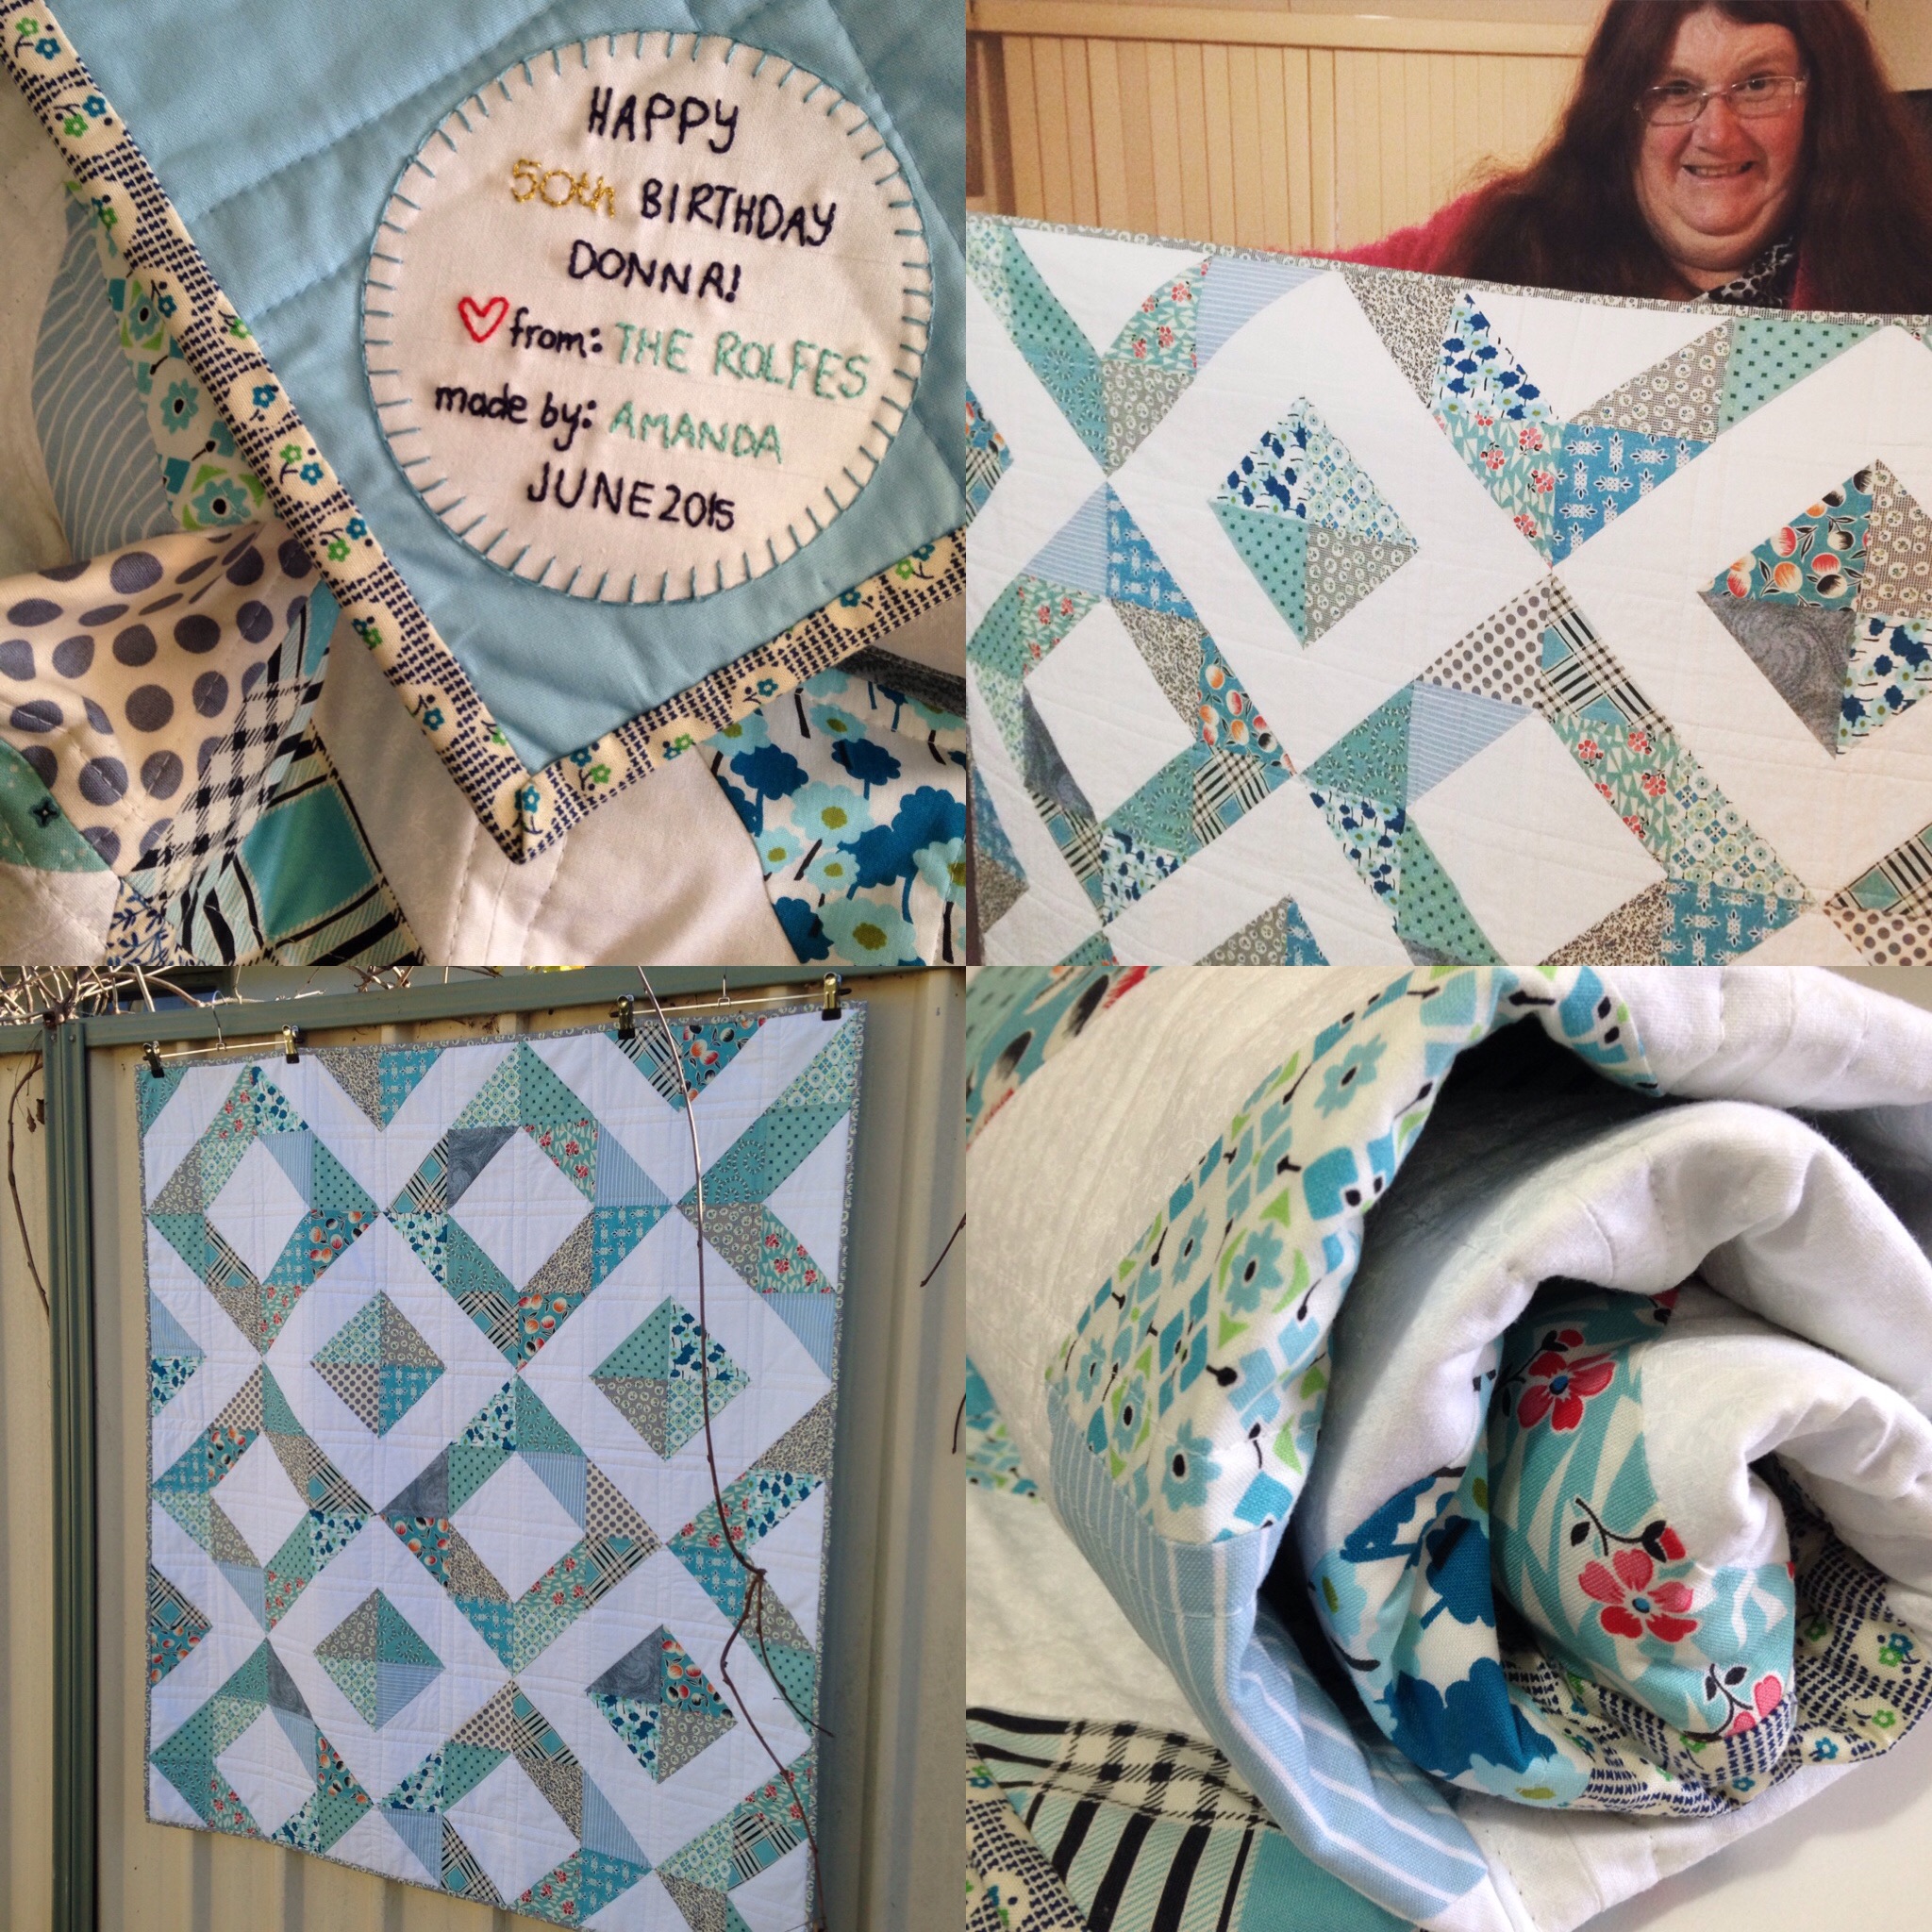
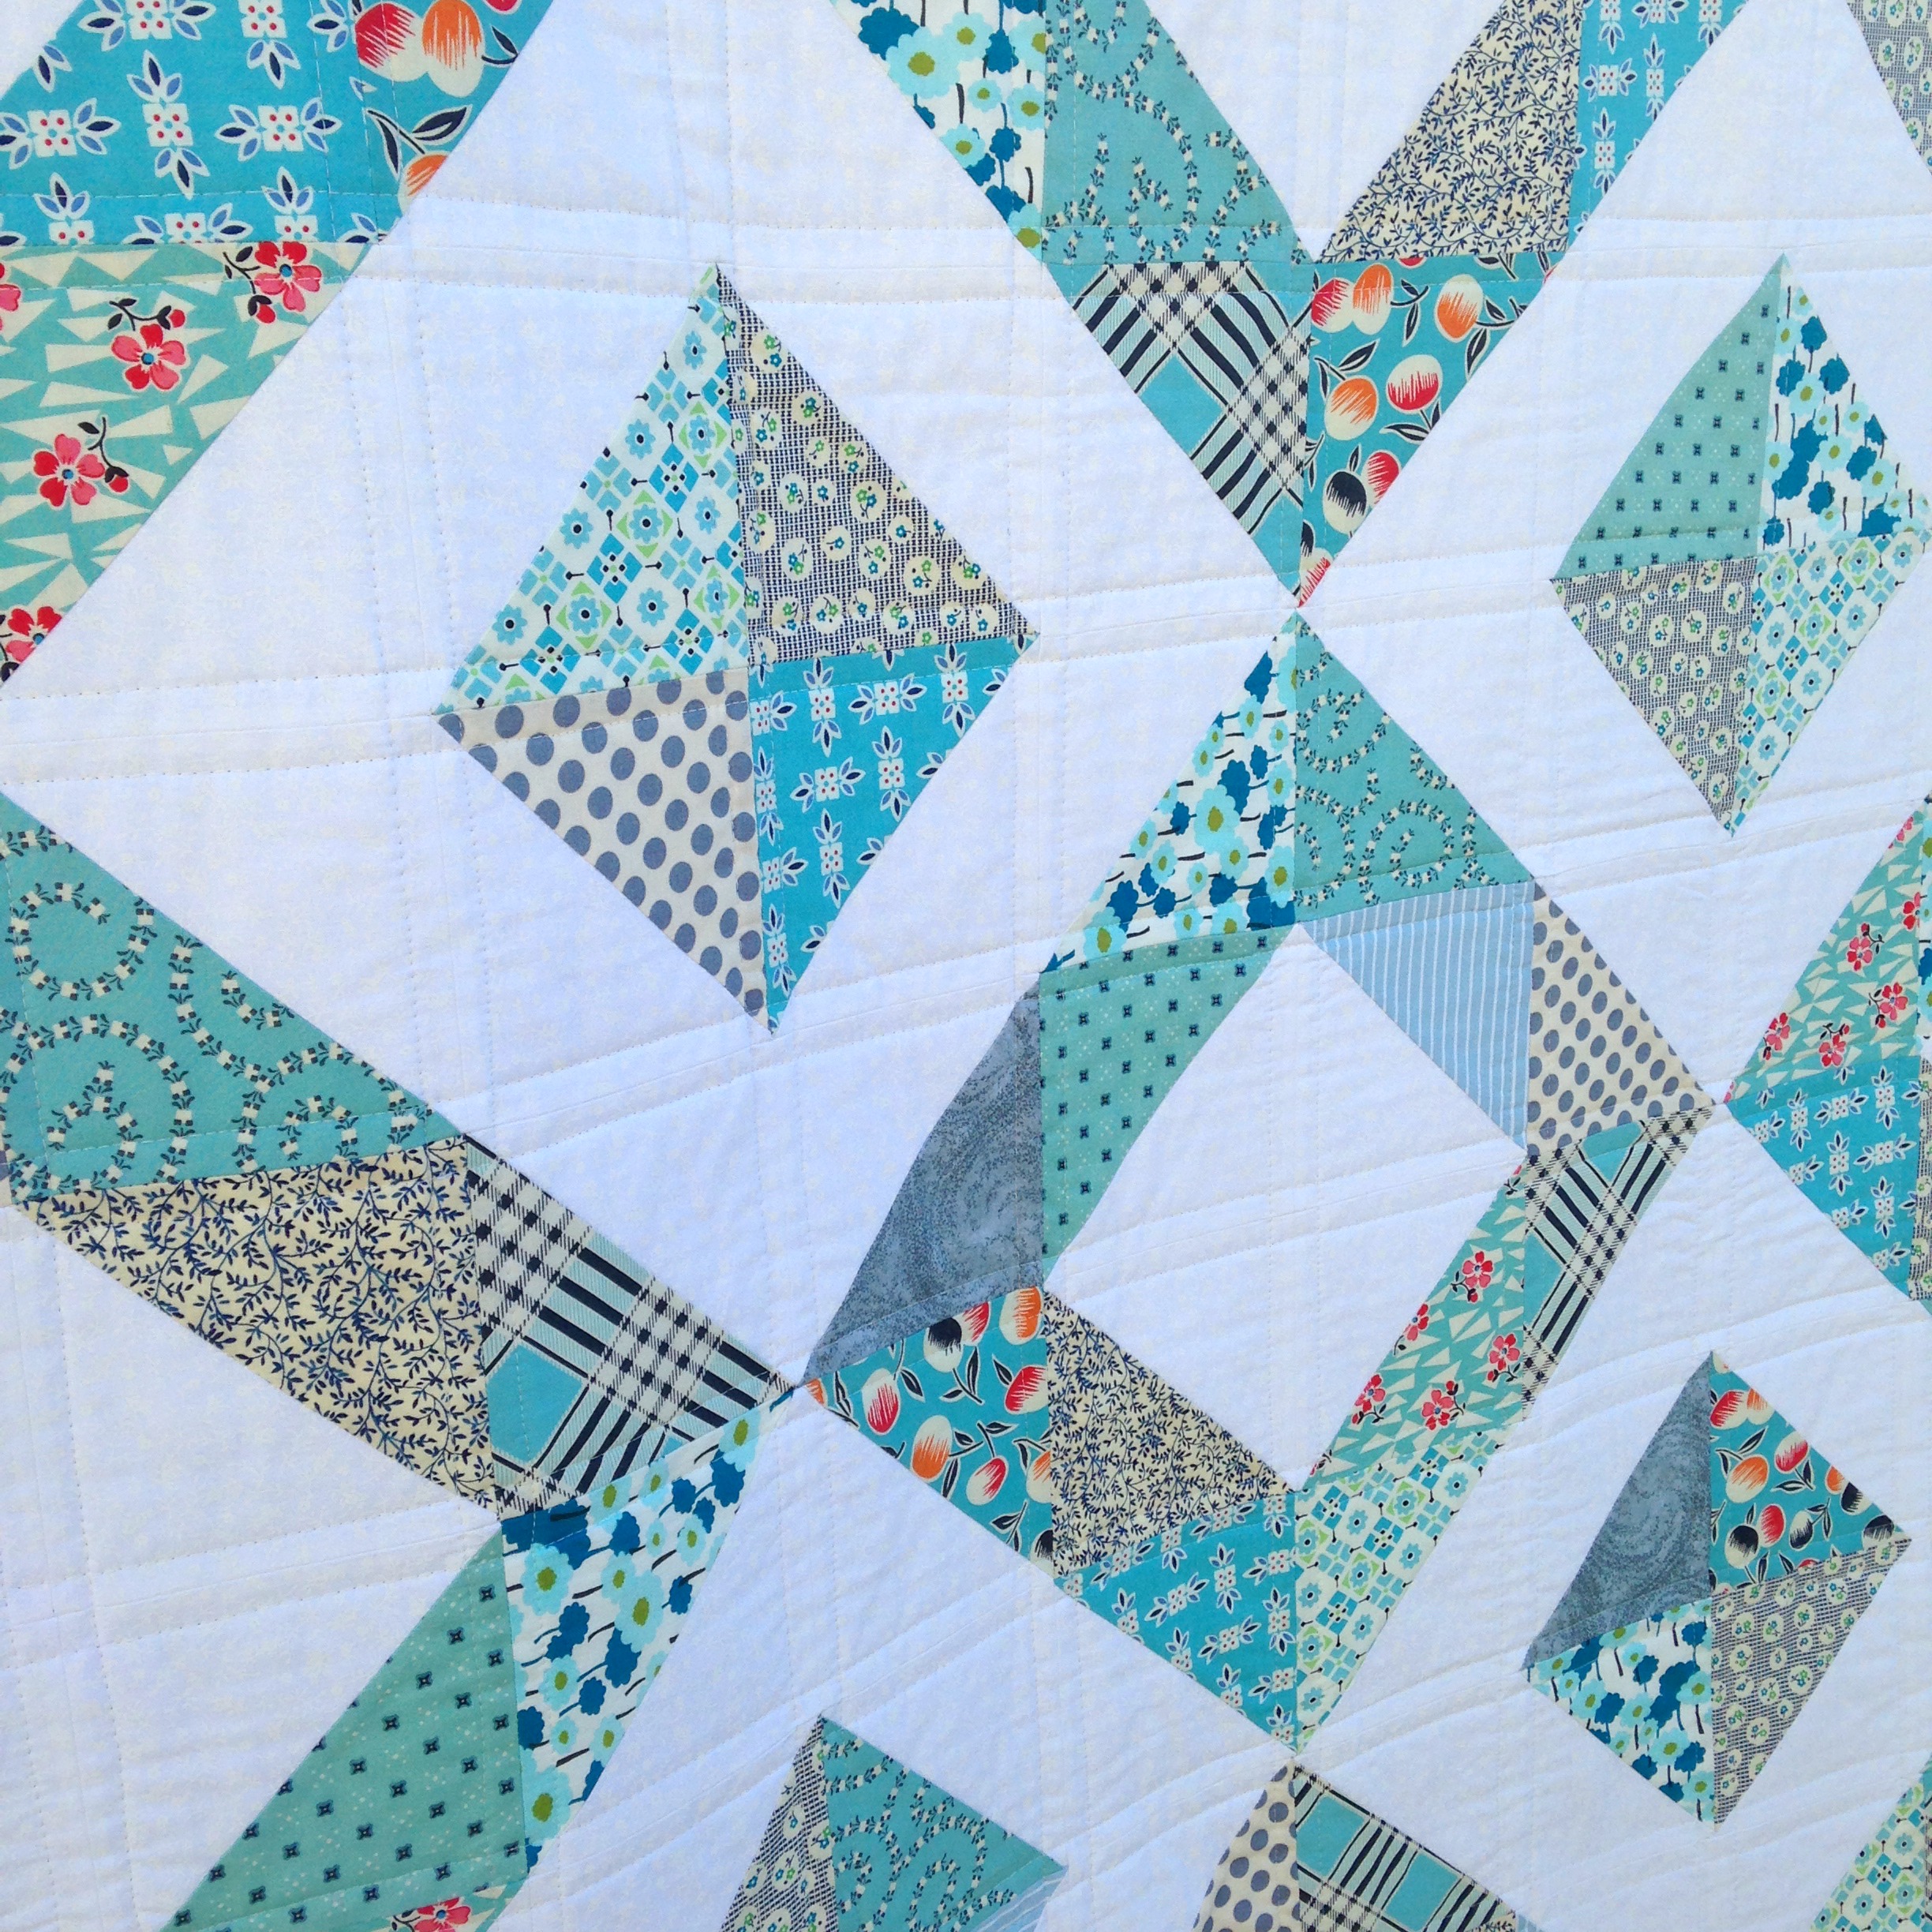
Last week, I bunkered down and got my Diamond Square Block Quilt finished to finally gift to one of my good friends for her 50th birthday! Although Donna’s actual birthday was at the end of May, she received her quilt over a month late with exclaims of excitement and thankfulness!
It was quite funny to watch her reaction: as she was talking, she kept folding and unfolding the quilt to look at it and inspect it! I’ve seen many reactions to people receiving quilts but this one, well, it was super lovely to watch!
I’ve also just realised I haven’t shared with you the final finish of the quilt! The quilting design I chose was one I’ve been wanting to try for a while now and have been waiting for the right quilt-top to come along for me to try it on. It’s the technique where you sew two parallel lines next to the seam joins of each block/unit to create a grid-like surface pattern. (Ooo, did I explain that well enough?)
I’ve seen this type of quilting on so many quilts when on Pinterest and I just fell in love with how simple but effective it seemed to be. I love how it adds a subtle outline to the blocks as well as adding that secondary grid-type pattern to the quilt-top. I definitely think I’ll try out this method again, especially when I’ve made a quilt that has quite a distinctive design/pattern to it!
+++
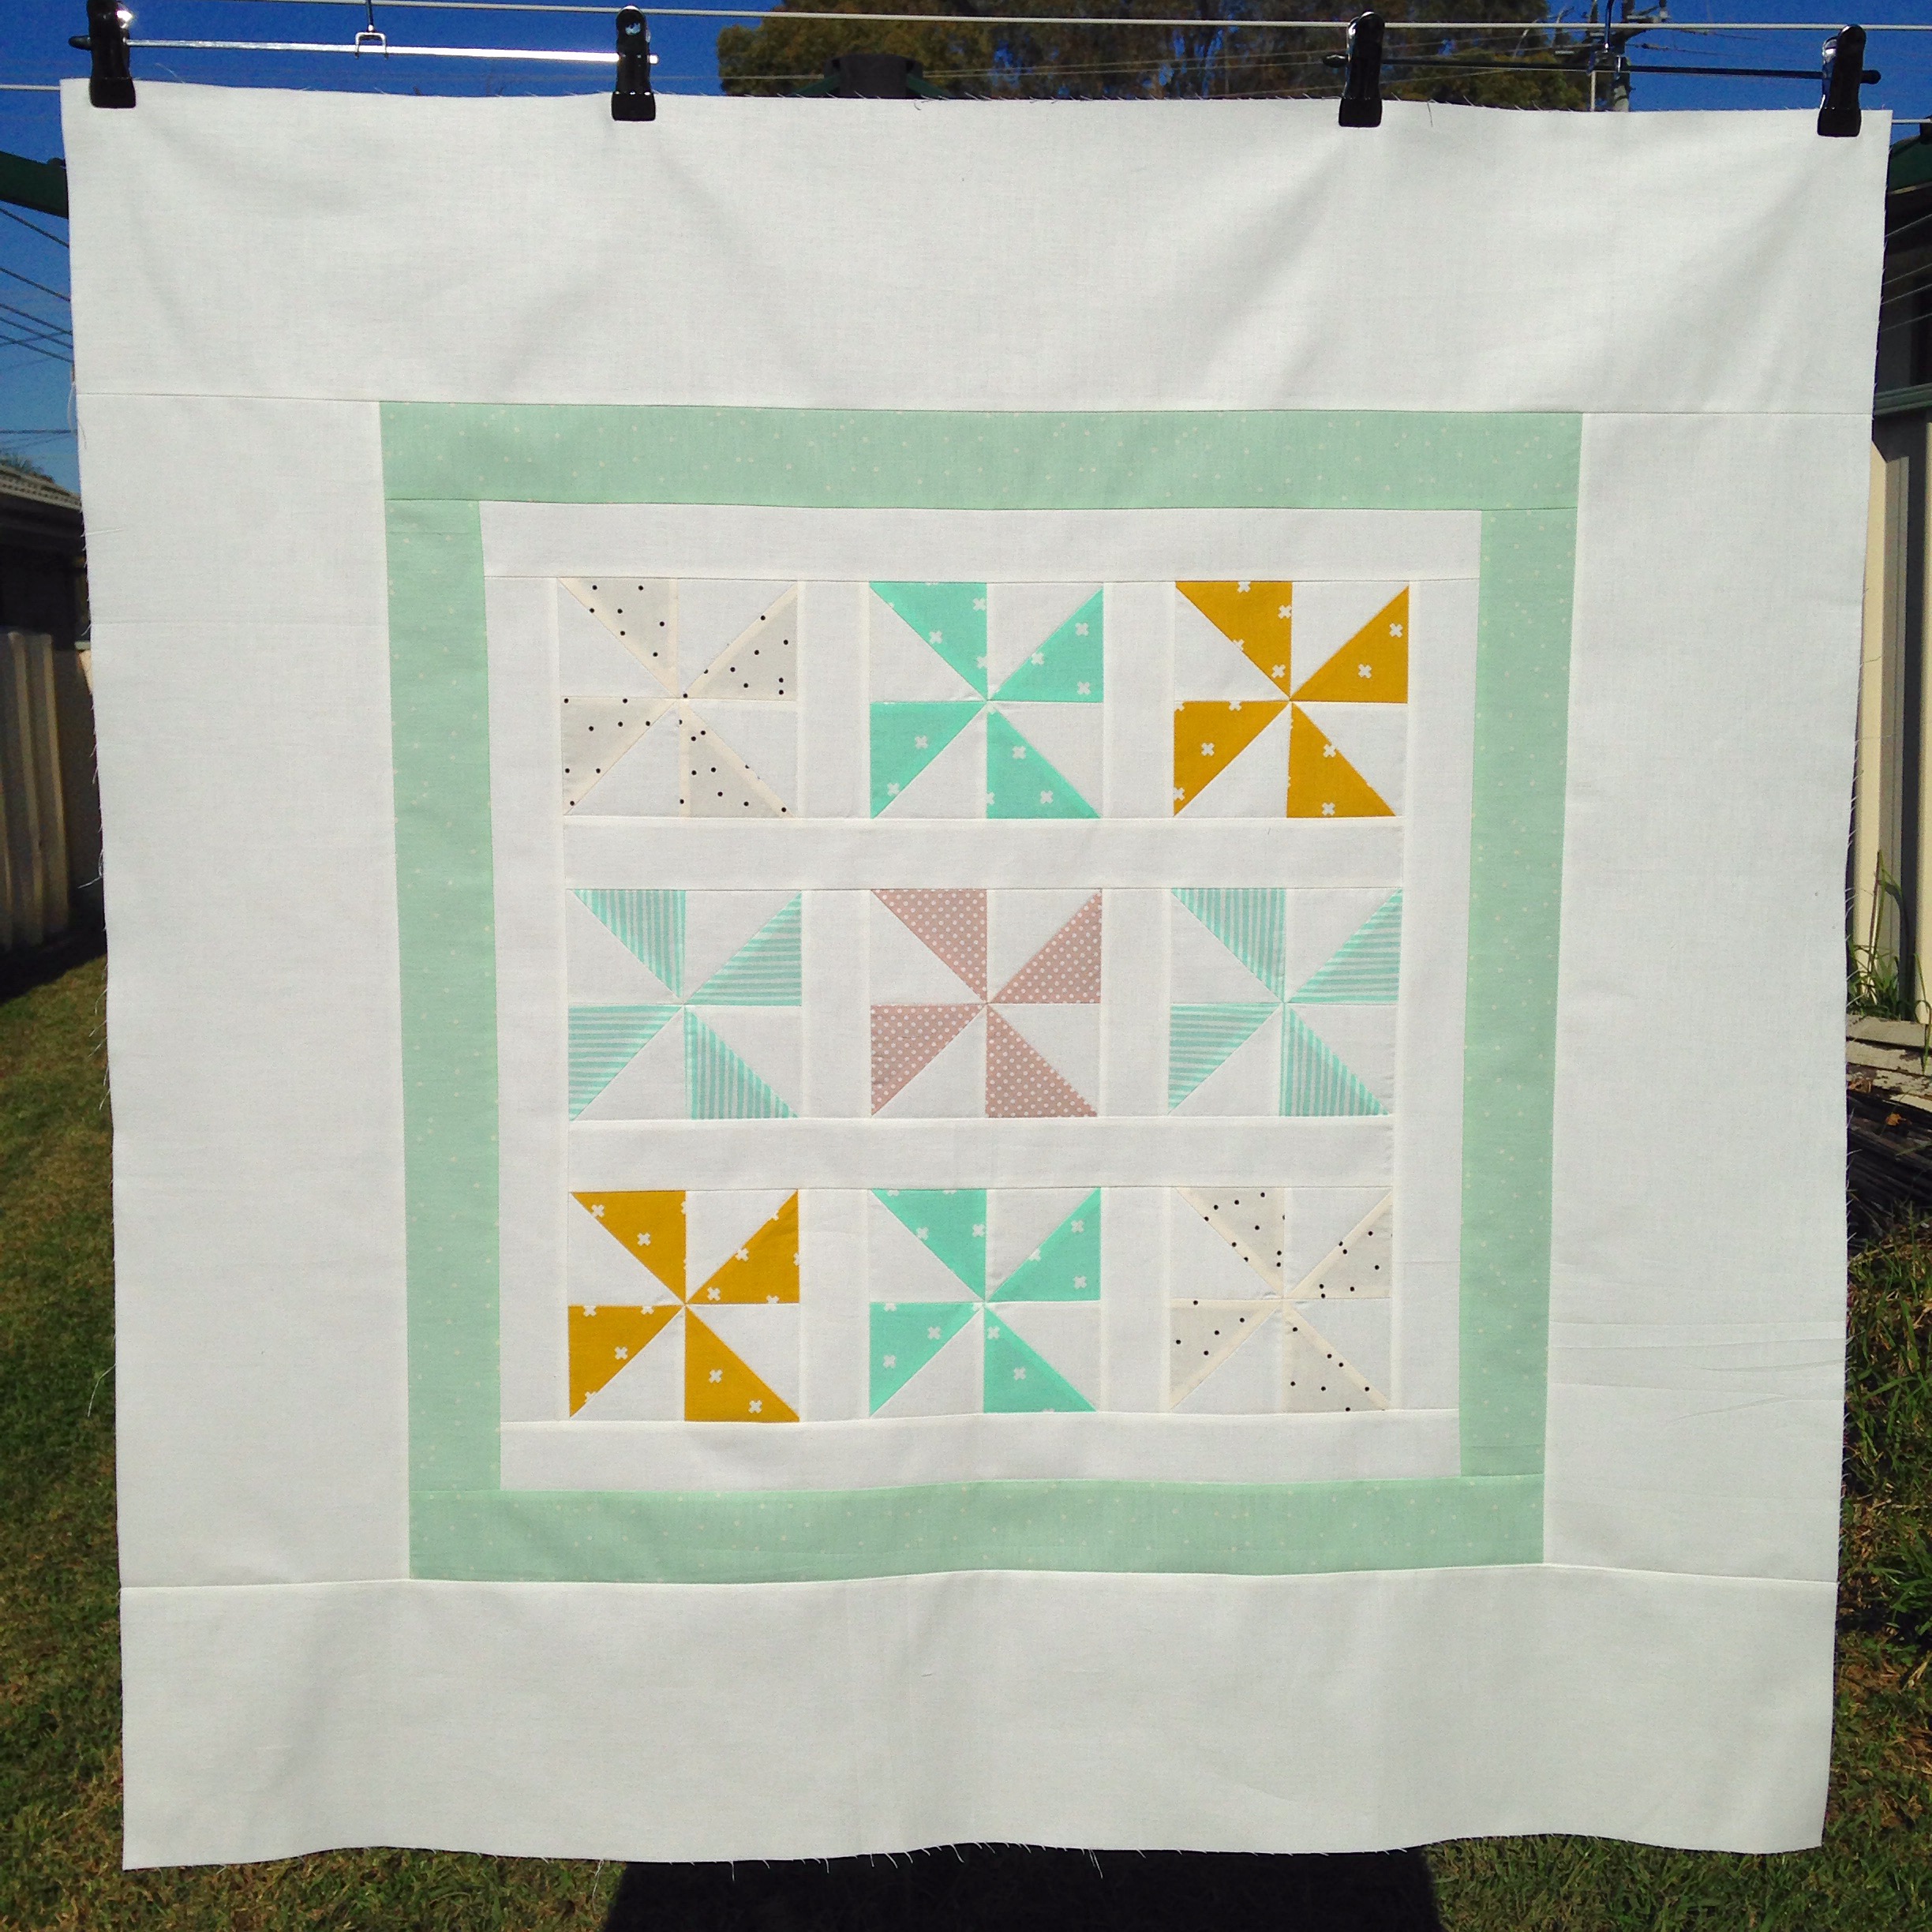
Over the weekend, I shared a new quilt block tutorial with you on my YouTube channel! This time round it was the super simple and insanely cute Pinwheel Block!
I thought it would be nice to share the uber-simple way I make my Pinwheels in a quick mini tutorial after using the block in the second of two baby quilts I’m making for a friend! Here’s that quilt-top for you now…
I’m hoping to set aside some time next week to get this baby quilt and the other one (the Granny Squares Quilt) quilted and finished! I have a fair idea of what types of designs I would like to quilt onto each, but I’m still up for being persuaded with something else if I see it on Pinterest!
And as always, I do a little shout to those of you will be giving this tutorial a go, to share your finished block with me on Instagram, Twitter or on my Facebook page! I love, love, love seeing what you make and in turn, love being inspired by how talented you are! 🙂
+++
Speaking of all things YouTube, sharing, talent and friendship, on Monday morning I woke up to my end-of-year goal surpassed by reaching over 5000 subscribers on my YouTube channel! What!?!?
I sometimes wonder just where all of you are coming from!
Although this number is practically minuscule compared to other channels that are out there, this number of people was something I never thought I would achieve! I was totally happy with just having 50, but 5000, gosh my brain hurts just thinking about how many people that actually is!
Thank you!
Thank you to each and every one of you for supporting, commenting, liking, encouraging, contributing, chatting, sharing and hanging out with me! I never actually thought anyone would watch or be interested in what I make or share. It truly, truly, truly means a lot and your support has given me so much more confidence within myself as a person and as a quilter! I feel so lucky and humbled by how many lovely friends I’ve made since starting this whole thing! It makes me so happy to be in touch with others who just ‘get it’! Who understands that rare passion, desire and drive we feel for making beautiful quilts, for swooning over richly designed fabrics, for buckling at the sight of beautifully nested seams and for making quilts for others, not for the glory or compliments it’ll give us, but because making and gifting a quilt for someone special is one of the best feelings you can give and receive.
So again, thank you!
And, just a heads up, make sure to be watching my channel this coming Sunday (12th July 2015) for a special GIVEAWAY (!!!) as a thank you for just how wonderful I think you all are!
+++
And now onto the last exciting bit of news for today!!
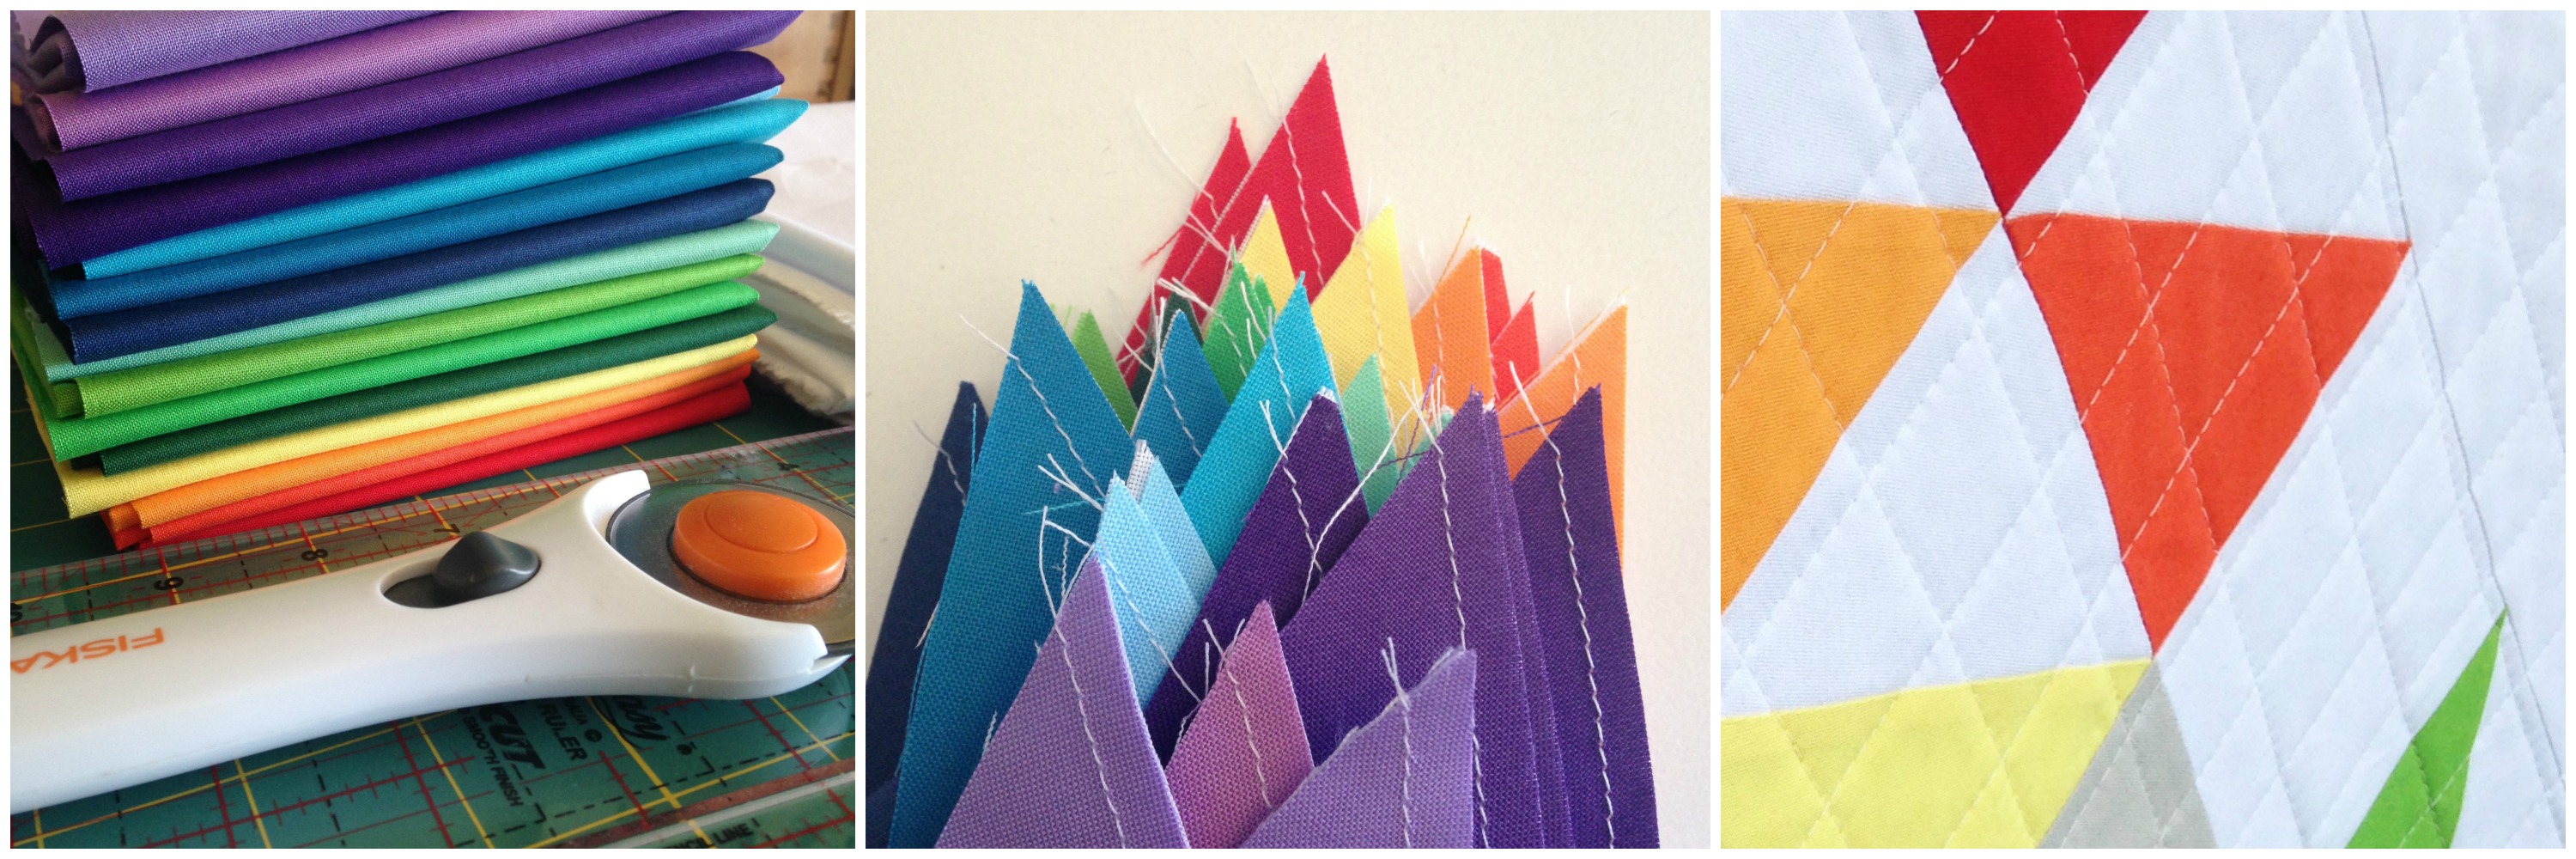
Tomorrow I’ll be publishing another fun little blog post where I’ll be sharing with you the finished Mini Quilt I’ve made using these beautiful coloured solids!!
Ooo, what could it be…??
All I know is that I’m completely in love with the finished result and I hope you will be too!!!
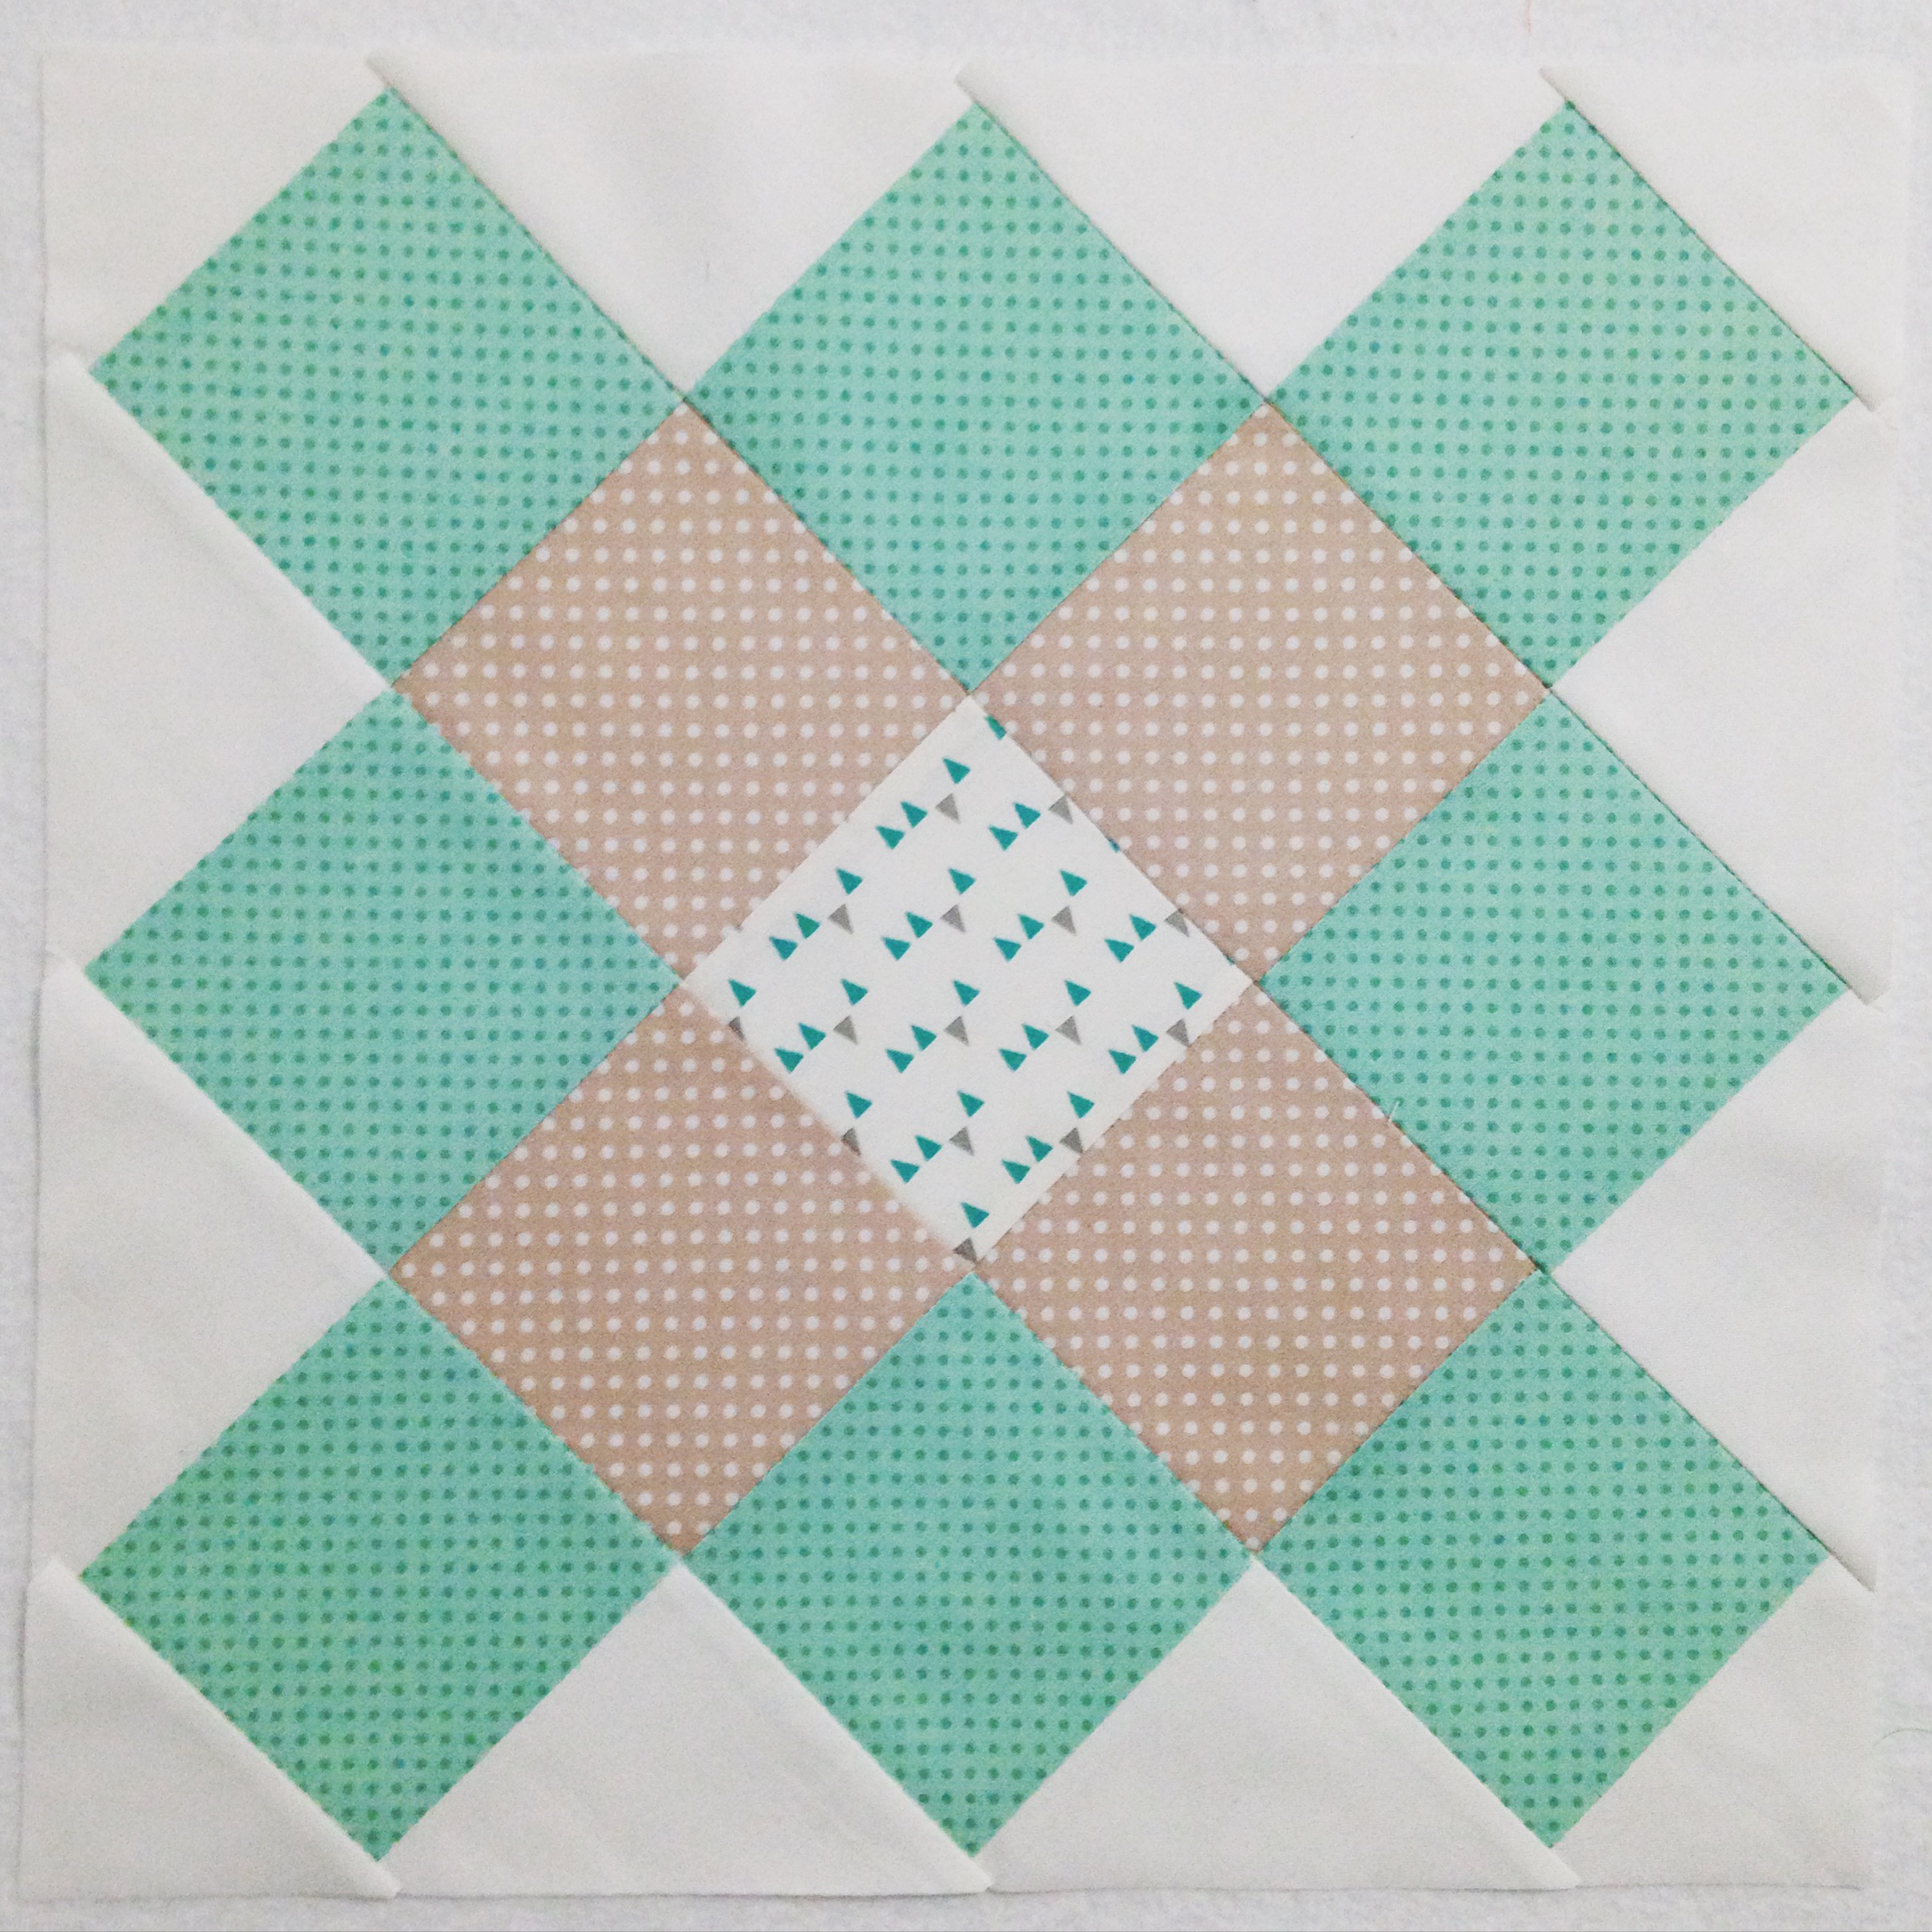
…Are just a few words I would use to describe this sweet, sweet block!
Previous to this, I had never made a Granny Squares Block, whether in crochet or patchwork. It was those funny little triangle edges that always threw me off… I just couldn’t understand how this block was constructed to be able to achieve those odd angled squares and triangle-ly bits. It was only after a quick search on Pinterest, where I saw this simple picture, that I finally experienced that moment of: “Ohhhhh! That’s how you do it!!” It was legit a great moment and I immediately got into cutting and piecing my first block together…
My First Granny Squares Block!
I cannot express enough at just how quick and simple this block is to construct! It’s purely just piecing squares together (in the correct layout order), pressing the seams, sewing the rows together and then squaring the block up! So. Easy.
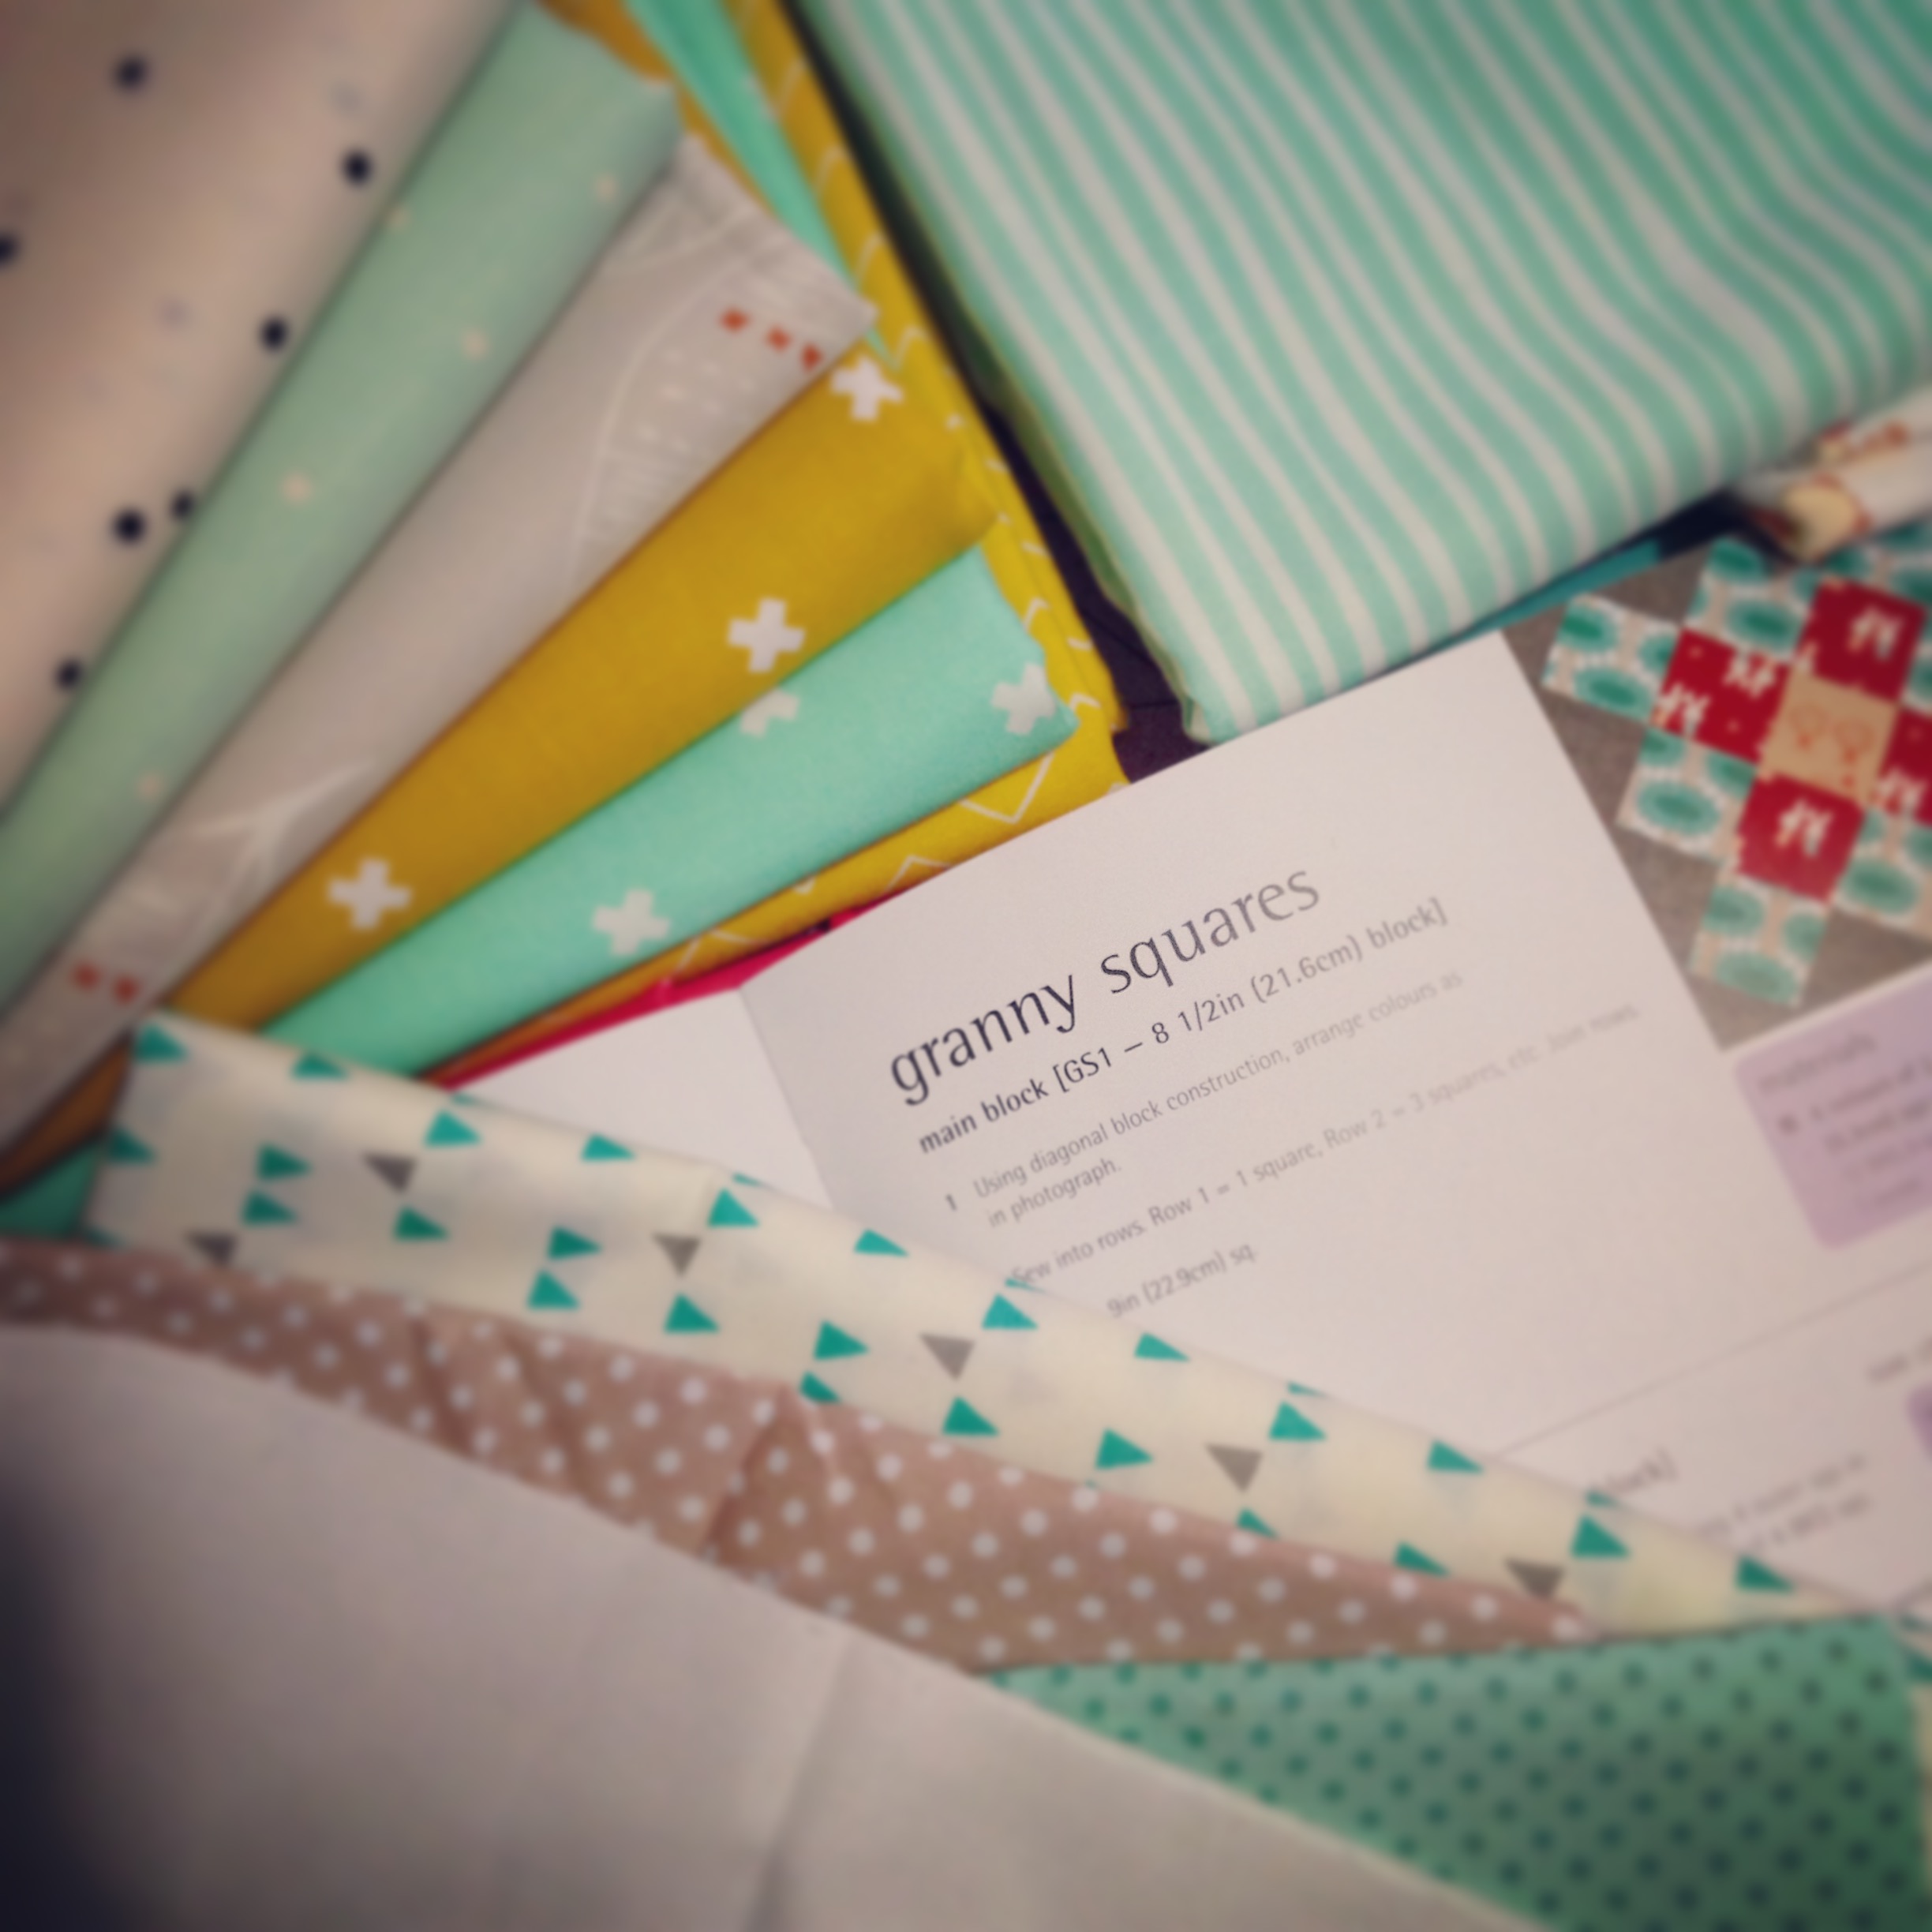
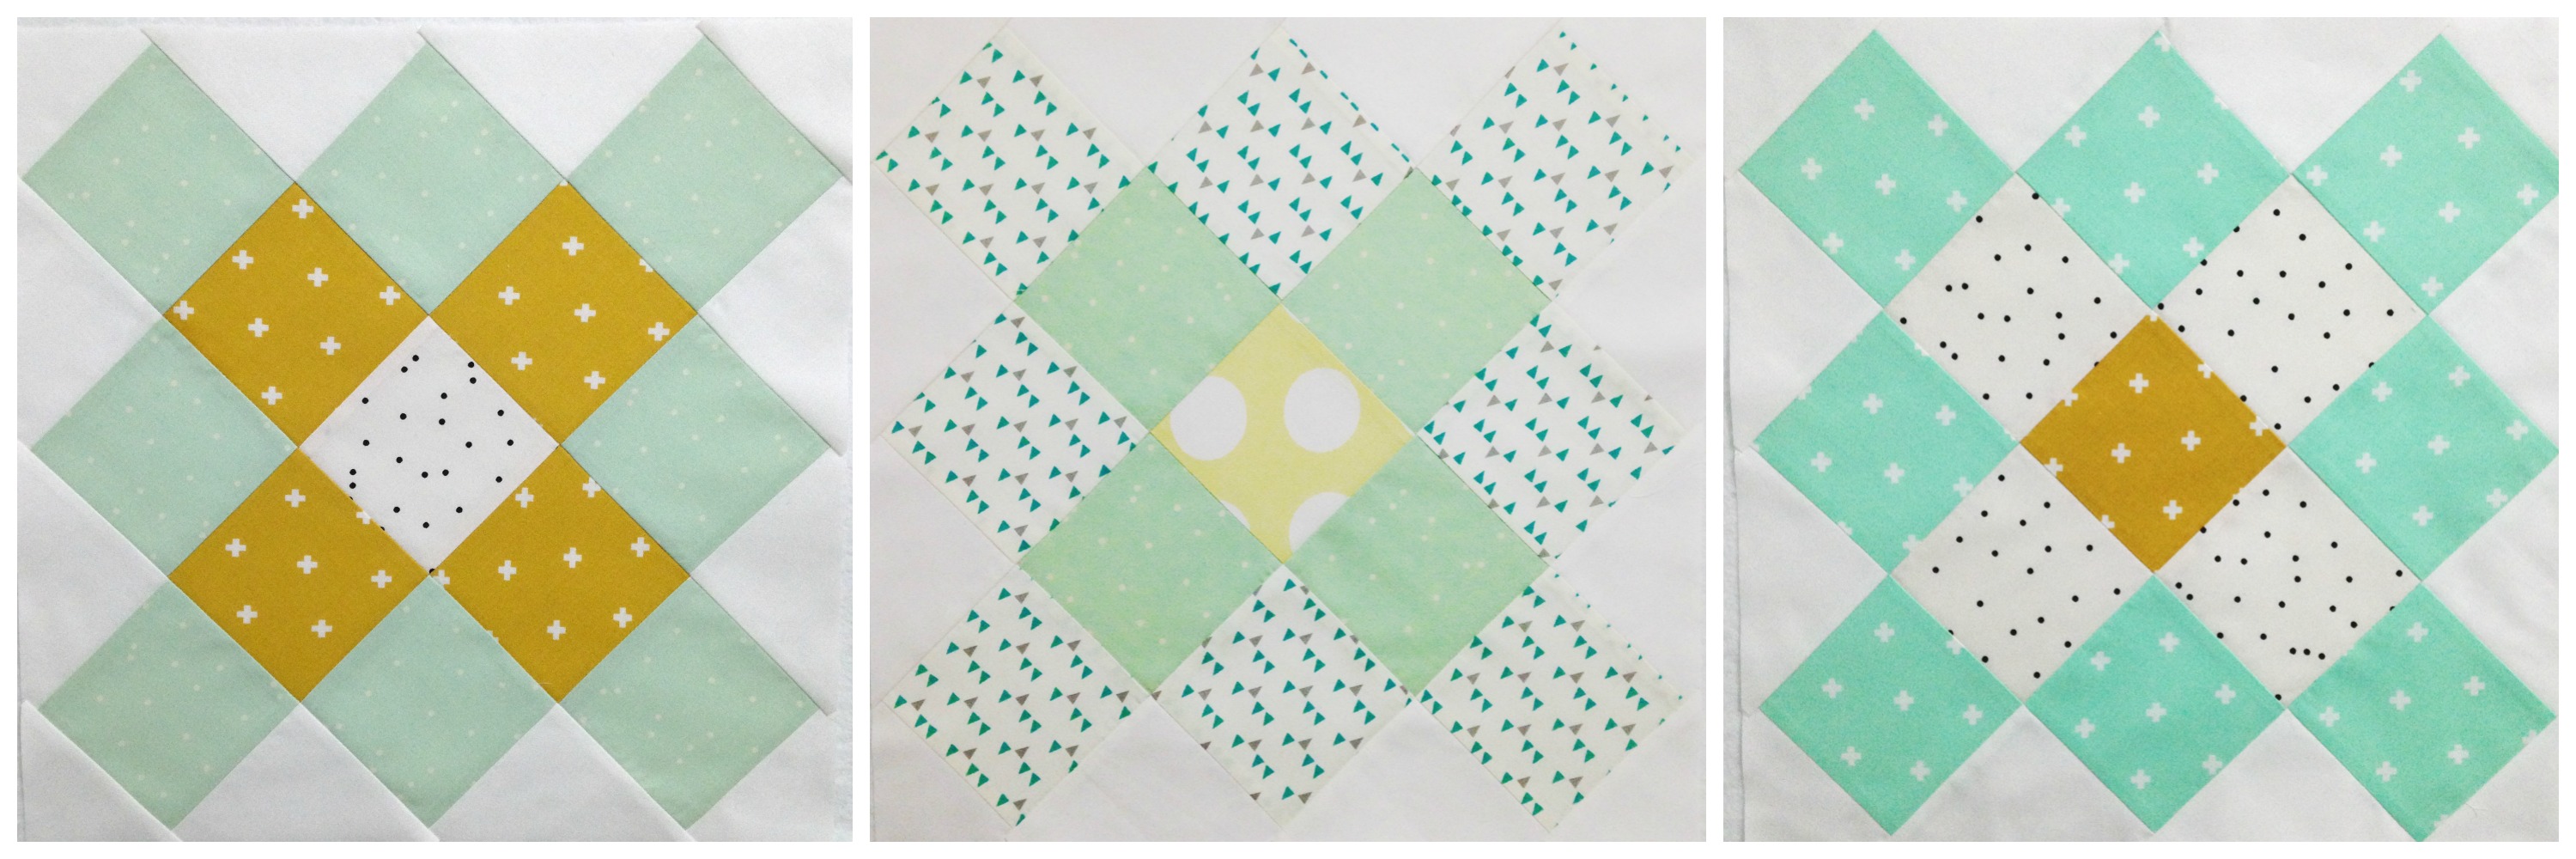
The reason why I’ve dived head-first into making Granny Squares is because of a commission I was recently ask to do for a friend. She has two friends who are expecting babies in the next few months and so asked me to make a baby quilt for each little bubba! This block will feature in one quilt and the other quilt is currently in the planning! Because both mums-to-be don’t know the gender of their babies, I’ve been sticking to a ‘gender-neutral’ colour palette of mint greens, creams, yellows and tans, with subtle, soft prints like polka-dots, little crosses and triangles. Some of the fabrics I’ve been using are from the Basics xoxo range from Cotton+Steel and the Hello Bear range by Art Gallery Fabrics. Both are such beautiful fabrics to use and blend in so nicely with each other throughout the other blocks I’ve made…
So smitten I was (and still am) by the Granny Squares block, I decided to make a tutorial for my YouTube channel on how to make one!
So here’s how you do it!
Measurements and Cutting info:
This block is made up of x25 3.5″ squares. (You can cut your squares bigger or smaller depending on how big you wish the final block size to be!)
The block is usually made using three to four fabrics. (I’ve chosen to use four.) But can also be completely scrappy if you wish!
Of each fabric you will need to cut:
~ x12 white squares for the background
~ x8 green squares for the outer section
~ x4 cream squares for the inner section
~ x1 mustard square for the centre
FINAL BLOCK SIZE: 13.5″ squared (approx.)
Fabric bought from Kelani Fabric Obsession
~ Natural Unseeded Homespun
~ Cotton+Steel Basic xoxo in Mint
~ Hello Bear by Art Gallery Fabrics: Firefly
~ Cotton+Steel Basic xoxo in Mustard
I hope you enjoy making this block just as much as I have and are able to create a beautiful quilt with them for someone special!
Welcome to the first instalment of my ‘Quilt-Along-With-Me!’ series! I’m so excited to get started and I hope you are too!
In part one, I introduce the block we’ll be piecing together (which is the Father’s Choice block!) along with showing you the way I like to prep and cut my fabric as well as how I choose to make a bulk load of HSTs and how I piece and press my blocks.
Now, if you find it hard to follow along with the instructions in the video, you’ll find everything you need to know in the pattern sheet above. All of the measurements, cutting instructions and steps to piece the block are there for you!
A few facts about this quilt:
– The quilt that we’re making together will feature four Father’s Choice blocks, each one measuring 23″ (58.5cm)
– The blocks will be pieced together using a sashing technique
– The final quilt top will measure approx. 59″ (150cm) squared
I first came across this block when I was flipping through the book 500 Quilt Blocks by Lynne Goldsworthy & Kerry Green and looking for inspiration for this series. I had never heard of the block until it’s star-like nature caught my eye. The block featured in this book was a little bit too small for the type of quilt I wanted to design and make with you all, so I doubled the measurements, made a test block and fell in love!
Father’s Choice Block
I was a little conscience to the fact that the piecing of this block could be a little tricky for beginners to manage. But once I made it and thought about it, I actually think this is a great block for beginners to try as it touches on some great basic technical skills that all patchworkers should learn and know. These include cutting basic squares, piecing and trimming down HSTs, basic forms of layout design (eg. learning how to make a four-patch unit), how to press units to achieve perfect nesting seams as well as how to manage piecing a large-ish block together.
{If you are new to patchwork and are going to give this block a go, let me know how you go! Tell me if you thought it was a bit hard or if you felt comfortable with the challenge…}
Also, don’t forget to show me your finished blocks! Tag me on Instagram or Twitter at @3and3quarters, send me an email or share them on Facebook!
In the next video I’ll be showing you how to sash all four blocks together as well as adding a boarder around the outside, completing your quilt top! You’ll find the pattern sheet with all of the information here once it’s uploaded!
Four Father’s Choice Blocks
If you have any questions or thoughts about this block, the finished quilt or the series as whole, please comment below and I’ll try my very best to help you out!!
Happy Sewing, Friends!
xx
PS. If you missed out on the Introduction post I published, you can click here to get up to speed! 😊
The first instalment to this series will be live later on today (Monday)! I’ll be publishing another post once the video is up that will have a link to the Part One pattern sheet along with a nice little written piece informing you on more about the block construction and what’s coming up next!
All of the pattern sheets will be available to download from here, my blog, each time a new video in the series is uploaded. Once the series is finished, the completed pattern will be available to download for free!
I hope that you’ll join me in making this idea a success!
Happy Sewing, Friends!
xx
PS. You may be wondering why everything is running a day late… Yes?
Well yesterday (Sunday) I had a chance to catch up with some of my dearest friends that I hadn’t seen for the past few months. We chatted and laughed over afternoon treats and then had a lovely dinner together! It was a great day!
So this obviously resulted in a late edit and I unfortunately ran out of time to upload it on the day I said I would. But everything is full steam ahead today and I’m so excited to get the first video up for you to get stuck into!
Now, I’m pretty sure I’ve shared with you just how much I love making mini sized versions of quilt blocks before… My Happy Quilt & Golden Trail Mini may jog your memory! And so today I want to take another opportunity to discuss and teach you how to make this one: the Snail Trail Block!
If you’re regular reader of my blog, you may remember me making this little mini last year…
July 2014
It was my entry into the Sydney Quilt Show. I was so immensely proud of it. It was the first mini quilt I had ever made and loved everything about it. (And still do, actually!) At the moment, this little mini adorns the door to my bedroom. It represents my love for modern quilting, my love for pattern, texture and direction as well as the love I have for mini quilt blocks!
The inspiration for this quilt block has come from my favourite quilt book in my library, 130 Mini Quilt Blocks by Susan Briscoe. I pour through the pages almost daily, looking for sparks of inspiration or for a reason to simply start cutting up fabric and piecing together a little block!
So after a request and a genuine want to share how this darling little block is made, I created this tutorial for you!
Now at the beginning, I have a small little chit-chat explaining a few little tips that I think will help you when you’re piecing… Then I dive right in and guide you step-by-step in how the Snail Trail Block is pieced together!
If you would like to make this block here are the measurements and cutting instructions:
From the PINK fabric you will need to cut:
– x2: 1&1/8″ squares (for the centre four patch)
– x1: 1&3/4″ square (cut in half, resulting in two triangles)
– x1: 2&1/8″ square (cut in half, resulting in two triangles)
– x1: 2&5/8″ square (cut in half, resulting in two triangles)
– x1: 3&3/8″ square (cut in half, resulting in two triangles)
For the BLUE fabric, cut exactly the same as the pink.
The FINAL BLOCK SIZE measures: 5″x5″ or 12.7cmx12.7cm.
NOTE: I will just say that the more experienced you are at patchwork, the easier the block will be to piece together, obviously. But if you are a beginner, I still encourage you to give this block a go! Take your time, read the measurements carefully and never be afraid to make mistakes! It’s only through our mistakes we learn how to do things better!
So, I hope you enjoyed learning how to make this block and have been inspired to make it yourself!