Our lovely second make in my House Block QAL is here! Say hello to the Three Terraces block. 👋🏠
Inspo for this one came from those sweet little inner city streets that are endlessly lined with rows of tall houses standing neatly together. Although they’ve all been built the same, each one is slightly different to their neighbour either through the exterior colours or how well they’ve been loved throughout the years.
Another option for this block that I think would look super cute – change the grass sections for yellow sand and turn the terraces into fun little beach huts! Or even change the grass sections into blue water and the paths into yellow sand trails… 🏖️
There’s so much room for creativity and fun with this block and I can’t wait to see how you all interpret the design and make it yours!
Don’t forget to share your finished block with me on Instagram…
Welcome friends to a muchly anticipated and very over-due Quilt Along!
I can’t quite believe the last Quilt-Along (the Mini Block QAL) I hosted was seven years ago – that was 2018! What!?!?
Well today, I’m so happy to be able to share with you the first block in this new House Block QAL!
The Original Homestead is a nod to the classic house block seen in both vintage and modern quilts and is relatively simple to piece together.
Take your time choosing the right colours and prints you want to use for your block and take advantage of the colouring-in page to explore and decide what works best!
Follow the tutorial below to learn how to piece this block together.
Don’t forget to share your finished blocks with everyone using the hashtag – #AmandasHouseBlockQAL as well as tagging me on Instagram @3and3quarters!
Sneaky hint for the next block in the QAL…
Block #2 is a Trio of fun! 🏠🏠🏠
Happy Sewing, friends!
PS. Just incase you missed it, here’s the Introduction video I shared chatting all about this new QAL! xx
Did you know that 2018 marks my seventh year of blogging?! Seven years! Where has the time gone from when I was a shy 23 year old, tentatively entering the scary waters of online blogging? It seems like a life-time ago!
Anyhoo! A new year has started (even though we’re four months in already!! Eek!) and my precious little blog has been screaming out for some love and attention.
November… November was the last time I sat down, logged on and typed my little heart away catching you all up on my Sewing Room Adventures.
With lots of fun and laughs in between, April (!!) has now rolled around and it’s time to put my 2018 Sewing Goals out into the void, hoping that each one will get accomplished before 2019 creeps up on us!
MY 2018 SEWING GOALS:
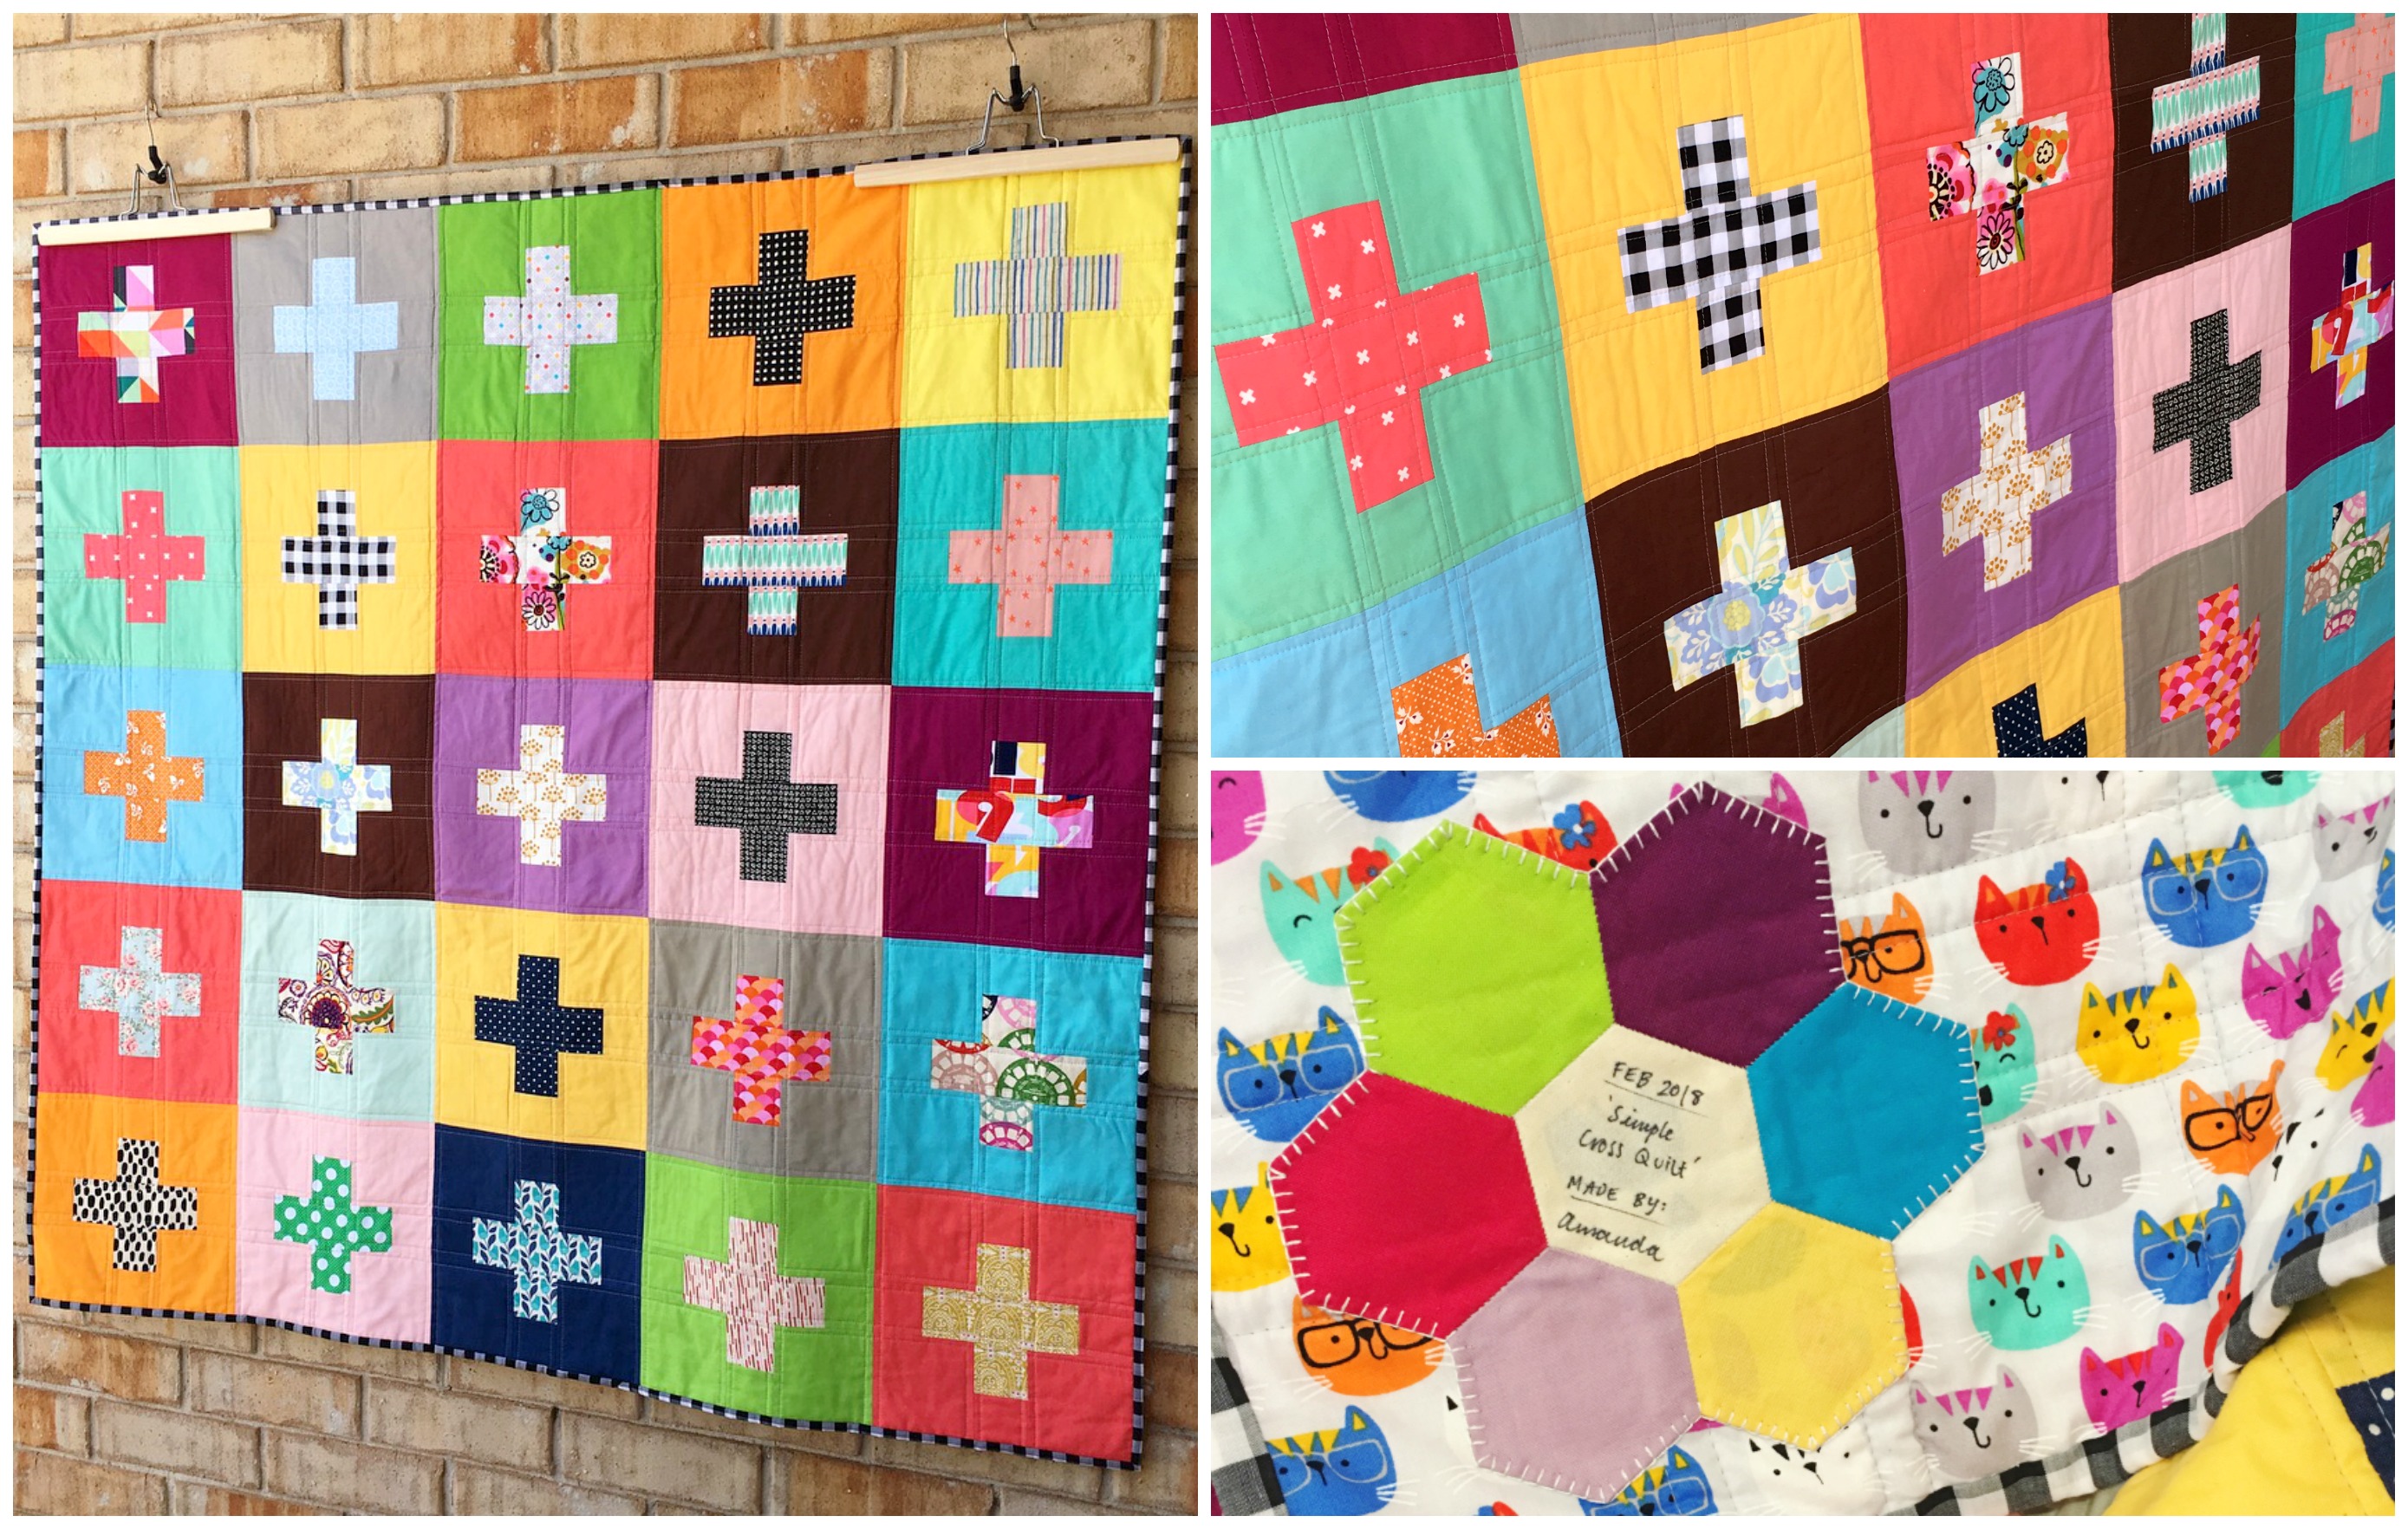
+ Simple Cross Quilt (My first finish for 2018! Whoo!!) +
What started out as a basic WIP first started in 2016, I dug these blocks out, quickly whipped up another nine to make the quilt top a 5×5 block pattern and as though it was just like over night, the quilt is finished, including a label! (Go me!)
I love everything about this quilt! The colours, the prints, the texture from the quilting, the kitty-cat backing (!!!) and the fun gingham binding finishing it all off.
This had to be one of the easiest and quickest (minus the blocks sitting unfinished for two years!) quilts I’ve ever made and I just adore it!
Wanna make this block?? Click here for the tutorial! (You’re welcome! x)
+ Pixelated Rose Quilt +
This little beauty of quilt has been on the go since May of last year. Over the past 7-8 months, I’ve been chipping away at building each individual block together to make up the whole. And now that all of the blocks have been joined together, a mammoth quilt top that I wasn’t expecting has emerged and the procrastination brakes have been applied at full force!
About a month or so has passed since the top has been finished and low and behold it’s still hanging in the same place (on a side hutch in our kitchen as it’s the only place big enough to house the size of this baby!). Every day I look at it and think, I really need to give this quilt top some more love!
It’s not that I don’t want to finish it… It’s just applying the time to rearranging the whole house to accommodate the size of the quilt so that I can back and baste it and then have the available time and space in my sewing room to get it quilted. (Whew!) I have a lot things happening in my little sewing room, so allotting time/space for sewing, filming tutorials, quilting etc, is a tricky one at best!
BUT, enough with the excuses!! Simple fact of the matter, is that this quilt top needs to be quilted and deserves to be finished (cos it’s soooo pretty!), by me, by at least the end of the year! (That still gives me some wriggle room to procrastinate a little bit more, right?!)
Wanna make this quilt?? Click here for the free downloadable pattern from the Riley Blake website! (You’re welcome! x)
+ Swoon Quilt +
Now this. This is what I’m working on right now and am absolutely LOVING IT!!
For ages I’ve wanted to dive in and make a humongous Swoon Quilt! I’ve lusted and envied over so many beautiful versions of it in my Instagram and Pinterest feeds. This year, I thought, what the heck! Let’s add another make into the mix and see how far I get with it!
You see, one of the main goals I had this year was to simply make more quilts. To find the time to do some more ‘me’ sewing. Projects that I make only for myself without doing a tutorial or some sort step-by-step guide on how to do it. I just wanted a few quilts that I could make for me and my itchy-hands! And this Swoon Quilt represents just that!
So far, I’m 8 blocks in to a 9 block quilt top, using fabrics that just simply catch my eye while making the Swoon design pop from afar!
Wanna make a Swoon Quilt too?? Click here to find the pattern! (You’re welcome! x)
+ Rediscovering ‘Like Diamonds In The Sky’ Quilt Top (Quilt name will be changing!) +
Within the last week or so, I rediscovered an old favourite quilt top that I started sometime in 2014. It features a block that I made as a tutorial on my YouTube channel called the Friendship Star.
I had started quilting this one but ended up really hating the choice of quilting I chose to do. (Free Motion Quilting really isn’t my thing!) I think it’s taken me about three years, on and off, to unpick all of the stitches to free the quilt top from the batting and awful backing fabric I paired with it. (Lot’s of decisions were made with this quilt that were just wrong, wrong, wrong!) Now the time has come to re-write those wrongs and finish this quilt to a beautiful standard that I’m absolutely happy with!
To be honest with you, I actually really love this quilt top. And always have! The blocks are bright and vivid while the overall design is still quite dark and subtle because of the navy solid background. It’s such a perfect balance.
I’m thinking for quilting, just to keep it really simple. Straight-line grid criss-cross across the entire surface (hey, it’s what I do best!) and then do a contrasting binding to bring everything together. Super easy!
Wanna make a Friendship Star block too?? Click here for the tutorial! (You’re welcome! x)
Now, moving onto a few quilts/projects that aren’t in the current making but are the list to do this year…
+ Christmas Quilt +
I am so determined to make a Christmas Quilt this year! If I didn’t have about a gazillion other things on my plate right now, I would’ve started it an hour ago!
Whenever Christmas rolls around, I’m always so bummed that I don’t have a beautiful festive themed quilt to pull out and enjoy throughout the season. (Even though Christmas in Australia is during Summer and having the need for a snuggly heavy quilt anywhere near you is totally out of the question!)
The pattern that I’m itching to start is one by Thimble Blossoms (the same lady who designed the Swoon Block/Quilt) called, Winterville.
It’s such a super cute pattern and I’ve already been collecting little bits of fabric for the houses and little Ohio Star blocks. It’s gonna look great once it’s finished!
+ Christmas Tree Skirt +
Another Christmas project I’ve been wanting to make for years now… A Christmas Tree Skirt!
I came across the perfect pattern quite randomly when I was replenishing our paper patterns stock at work one day. It’s a McCalls’s pattern (M7704) and features the sweetest gingerbread people paired with Christmas Trees and Christmas candies. I just thought the designs together were really lovely and are totally the type of design I love around this time of year.
The pattern looks quite simple and straightforward, with the option to mix lots of designs together into one final skirt for the tree. Perfect!
+ Winter Jacket +
This one was a project I had wanted to make for winter last year (so we’re looking at around May 2017 sometime…) but is yet to leave the bag it came home in!
I think I’ve written about this one before… But anyhoo, I just really wanted to make myself a really nice jacket that I could wear to and from work or on nights out during the colder months. I have made a winter jacket before when I was briefly at uni one year in my mid twenties. But it’s quite amateurish and the fabric I chose is really quite awful. Perfect excuse to make another one, right? Right!
The pattern I hope to make/follow is by Simplicity (1254), is fully lined and has a weird collar/hood thingy that looks intimidating as heck to make!
I’m no dressmaker and possess very little patience for it, but with grit and determination, I’m gonna give it a go and see where I end up!
(Please send chocolate and lots of encouraging hugs! Thanks! x)
+ New Sewing Machine +
So I treated myself to a new sewing machine a few months ago… Yep. All for the sake of being able to quilt my massive Pixelated Rose Quilt that I haven’t started quilting yet.
In all honestly, I was ready for an upgrade. My previous machine (a Brother Innovis 200QE), as brilliant and perfect it is, was becoming a bit too small for the types of quilts I’m moving into making this year. (They’re all big ‘uns! God help me!) My new Brother (a PQ1500SL) is huge! It’s powerful, fast, roomy, does everything I ask of it and more and I just want to use it all day, everyday! (Hence all of these beautiful Swoon Blocks popping up in my Instagram feed!)
If you didn’t see it, I recently filmed a very honest review about this machine on my YouTube channel. (I also did an unboxing vlog too if you’re interested!) I went through the pros and cons I’ve found with the machine along with elements I’ll get used to as I sew with it more. From the comments left on the video, I think it’s been quite insightful for people to watch especially those who were/are planning on buying the same sewing machine.
+ YouTube Catch Up +
While on the subject of my YouTube channel, I’ve been uploading lots since I last wrote on here…
Vlogmas – 2017
We’ve had Christmas where I did a thing called Vlogmas. Basically I vlogged everyday during December right up to Christmas Day (which I also filmed!). I really thought I would struggle do it but I actually really enjoyed it and fell in love with vlogging and creating that kind of content for my channel. Everyone who watched was so supportive and encouraging and I think we kinda bonded a bit more which I love!
In January I went to New Zealand and vlogged it too! I went with my parents and some family friends and had an absolute blast! I can’t wait for the day I get to go back and explore more!
February and March have been a mix of a few more vlogs, some tutorials and stuff all about my new sewing machine!
Over the next few weeks, I’m hoping to launch a new Quilt Along series on my channel (and here on my blog too)! Inspired by a viewer, this time around we’re focusing on mini block designs, with all of the blocks we’ll be making measuring a sweet 5″ square! Each block pattern has been written up and (somewhat) finalised, I have just a few smaller details I need to sort out before realising the series out into the world, block by block as I’ve done in the past.
Stay tuned for that coming very soon!
+++
So that’s everything! It’s been a world-wind few months and so much stuff has been crammed in. (With more to come!)
I’m hoping I’ll also be able to dedicate some more time to writing here, on my blog. I’ve always enjoyed the process of blog writing and feel so relaxed and lighter once I hit that ‘publish’ button. I love sharing what I’m doing and hope to do in my sewing room with you and love hearing the awesome feedback you guys always give me!
Let’s make 2018 a productive one full of lots more quilts, crafty projects and good times with family and friends!
Ooo, I love a good sewing/quilting related meme! When you find a fab one that you achingly relate to, it’s like finding gold right underneath your bobbin case! (I wish! Ha!)
In this post I wanted to share with you a few of my favourites I’ve been able to come across on Pinterest. Some of them are incredibly (and very scarily) accurate while others are just down-right hilariously true!
I tell ya, it’s the pop culture memes that really get me! Anyway to have quilts, quilting, references to patchwork and so on mixed with movies and characters that I love, I’m hands-down in! This Yoda meme is a perfect example. Us quilters really are quite crazy in one way or another! 😀
I’ve felt this feeling way too many times before! When I finally finished my Happy Quilt, this feeling resounded in me like never before! I was so completely lost, but in a good way, you know?
Take note boys! This is how you win over this quilter’s heart! 😉
And then this last one is dedicated to all of you who read my blog, watch my YouTube channel and share with me your wonderful makes on Instagram and Facebook!
Current obsession: making as many Simple Cross blocks as I can in one day! Today’s record is five in one afternoon! Woo!
This has become quite an unexpected Work-In-Progress that I’m thoroughly enjoying! I love rummaging through my basket of solid fabrics and choosing the next bright colour to work with and then matching it with a fab print fabric!
I can’t decide whether to keep it as a simple nine block lap quilt (as it is now) or to keep adding more blocks to it turning it either into a 16 block quilt or a 20 to 24 block mega quilt! What do you think?? I would love your opinion! Currently the quilt top measures: 32″ (82cm) squared without the blocks being pieced together…
To be honest, I really wouldn’t mind turning it into a 20 to 24 block quilt… The block is super simple and deadly quick to cut and whip up. And goodness knows I have enough fabric to do the job! Even now I have a bunch of print fabrics in mind that could go so well with the rest of the aesthetic this quilt top has going for it! Yay! Such fun!
It’s always so lovely to find the time to sit and write and share and catchup with you!
I must admit, my blog has very sadly been neglected over the past few months… Life has seem to find the accelerator pedal and made the past few weeks just fly by! (I mean, can you believe it’s the middle of February already!! Geez!)
So as always, there are lots and lots of new exciting things to catchup you up on – so let’s dive in!
first update – floristry!
I’m a student once more and no ordinary student at that! I’m learning how to become a Florist!
I’ve always wanted to study floristry ever since I was in my last year at high school. (I’ve also always been into gardening and growing my own plants, veggies, herbs and fruits. A trait inherited from my dad and paternal grandfather.) But things and experiences prevented me from pursuing it until late last year when I was very randomly reminded of my early interest in wanting to do it. So I did some research and found out that one of the local TAFE colleges in my area offered the very course I was interested in! Yay! So I applied and begun the course on the 1st February!
If you follow me on Instagram, you may have seen some new photos of flowers and arrangements and be thinking, ‘why?’…. And now you know! Of course I’ll keep posting pictures of my sewing adventures and life adventures and other sorts of things, but now pretty florals and bouquets will be added to the mix as well!
+++
second update – youtube
Now, you may be thinking if I’m studying floristry does that mean no more tutorials, videos, blogging, sewing, crafting…??!!
No. I will never stop sewing! Patchwork and quilting is my life! I’ve found that if I’m ever having a personal crisis or have had a bad day or am feeling blue or even 100% happy, I know that I can always rely on sewing to cheer me up, to put me back in the right mind set and to remind me that life is good. 🙂
And I love sharing that with you! I love teaching and helping you out. I love inspiring you and watching you grow in your skills and confidence. I have so many great things planned to share with you on my YouTube channel and blog this year and I’m so excited to get stuck into them!
However, now that my time is being shared with my studies there will be times when videos may be late or go up on the wrong date or not go up at all from week-to-week. (I may even change my upload day soon – I’ll let you know when and if I do!) It really will depend on how busy the week gets with study, family life, prior commitments etc. But just know I will always do my best to get something up and out to you each week!
And just as a sneak-peek to those of you who read my blog, here are a few of the tutorials/videos coming up on my channel over the next month or so… (in no particular order, btw!)
– My Mini Quilt Collection
– Ocean Waves Block Tutorial
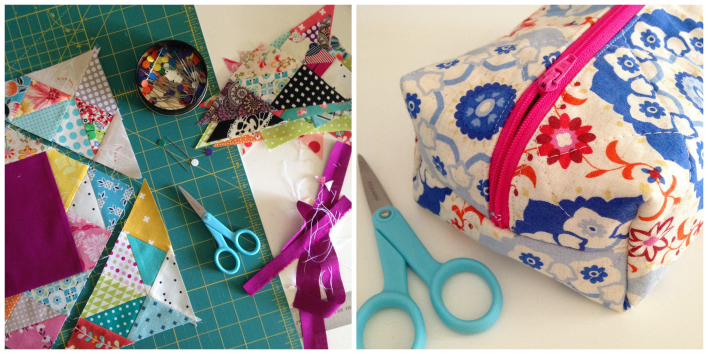
– Boxy Zipper Pouch Tutorial
– February Favourites
– Behind the Scenes: The Tutorial Edition*
(*This will be a video showing you how I film, edit and produce my block tutorials. It’ll be the behind the scenes of the Ocean Waves block!)
– And there’s the potential of a mini Spotlight Fabric Haul if you would like to see it… Let me know if you do!
+++
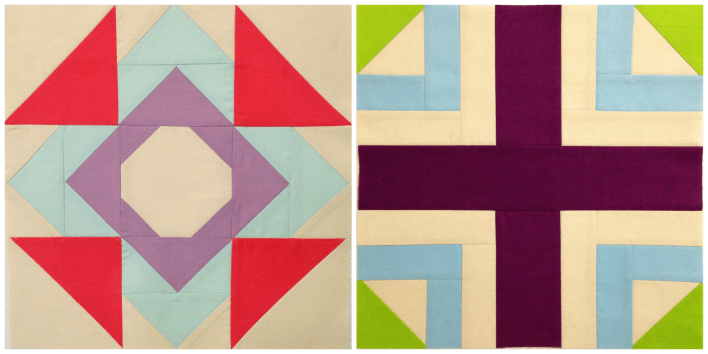
third update – sugar block club
This year I decided to jump on the band wagon and join in on one of Amy’s from Stitchery Dickory Dock Sugar Block Clubs. (Click here if you want to learn more about it!)
These are the two blocks I’ve made so far for January and February – Churn Dash and Log Cabin variations!
I’ve decided to use solids for each of my blocks as I absolutely love using them at the moment! (Plus, I have lots of solid fabric to get through!) I’m sticking with a neutral creamy colour for the background which will help each of the colours I choose to sing and show off the designs in each block. I’m so excited to see where this quilt will end up!
+++
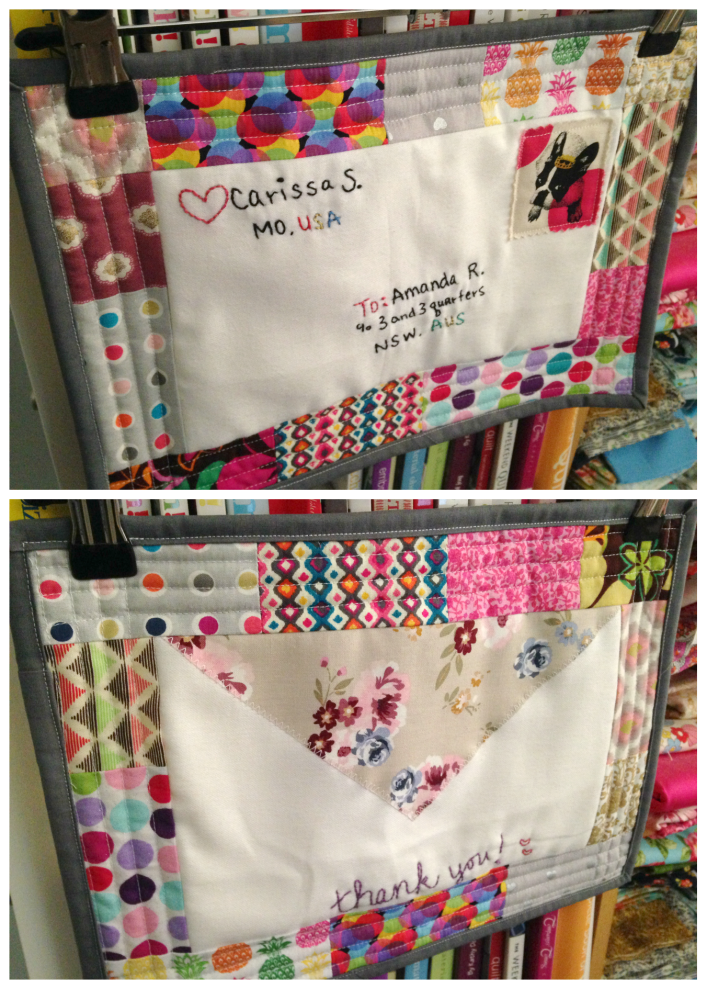
fourth update – happy mail!
Although I’ve already thanked her, I just want to acknowledge and share this lovely gift that a wonderful friend, reader and viewer sent me last week!
Carissa made me this super cute little ‘thank you’ wall hanging/mini in the design of an envelope, featuring hand embroidered details, beautiful little sample fabrics from her HST Sampler Quilt along with a gorgeous little frenchie bulldog fussy cut for the fabric postage stamp!! Ahh, soooo cute!!
Along with this, she so generously sent lots of fun things like Pop Tarts and a selection of American candies, binding clips, a Buzz Lightyear Mug (!!) and so many other awesome little things!
And so again Carissa, thank you so much for sending me such a lovely, generous and thoughtful package! You’re truly the best! (Can you tell I’m still on a bit of a high from all of it?! Te-he!)
+++
And that’s the update done! (There’ll be a fifth update but I’m going to make that into a separate post – it’ll be all about my Four-Patch Love Heart Block tutorial!)
I’m so looking forward to completing my floristry course and perhaps sharing some flower care and construction tips with you some time!
And, I’m quite eager to get those tutorials underway and share them with you asap!
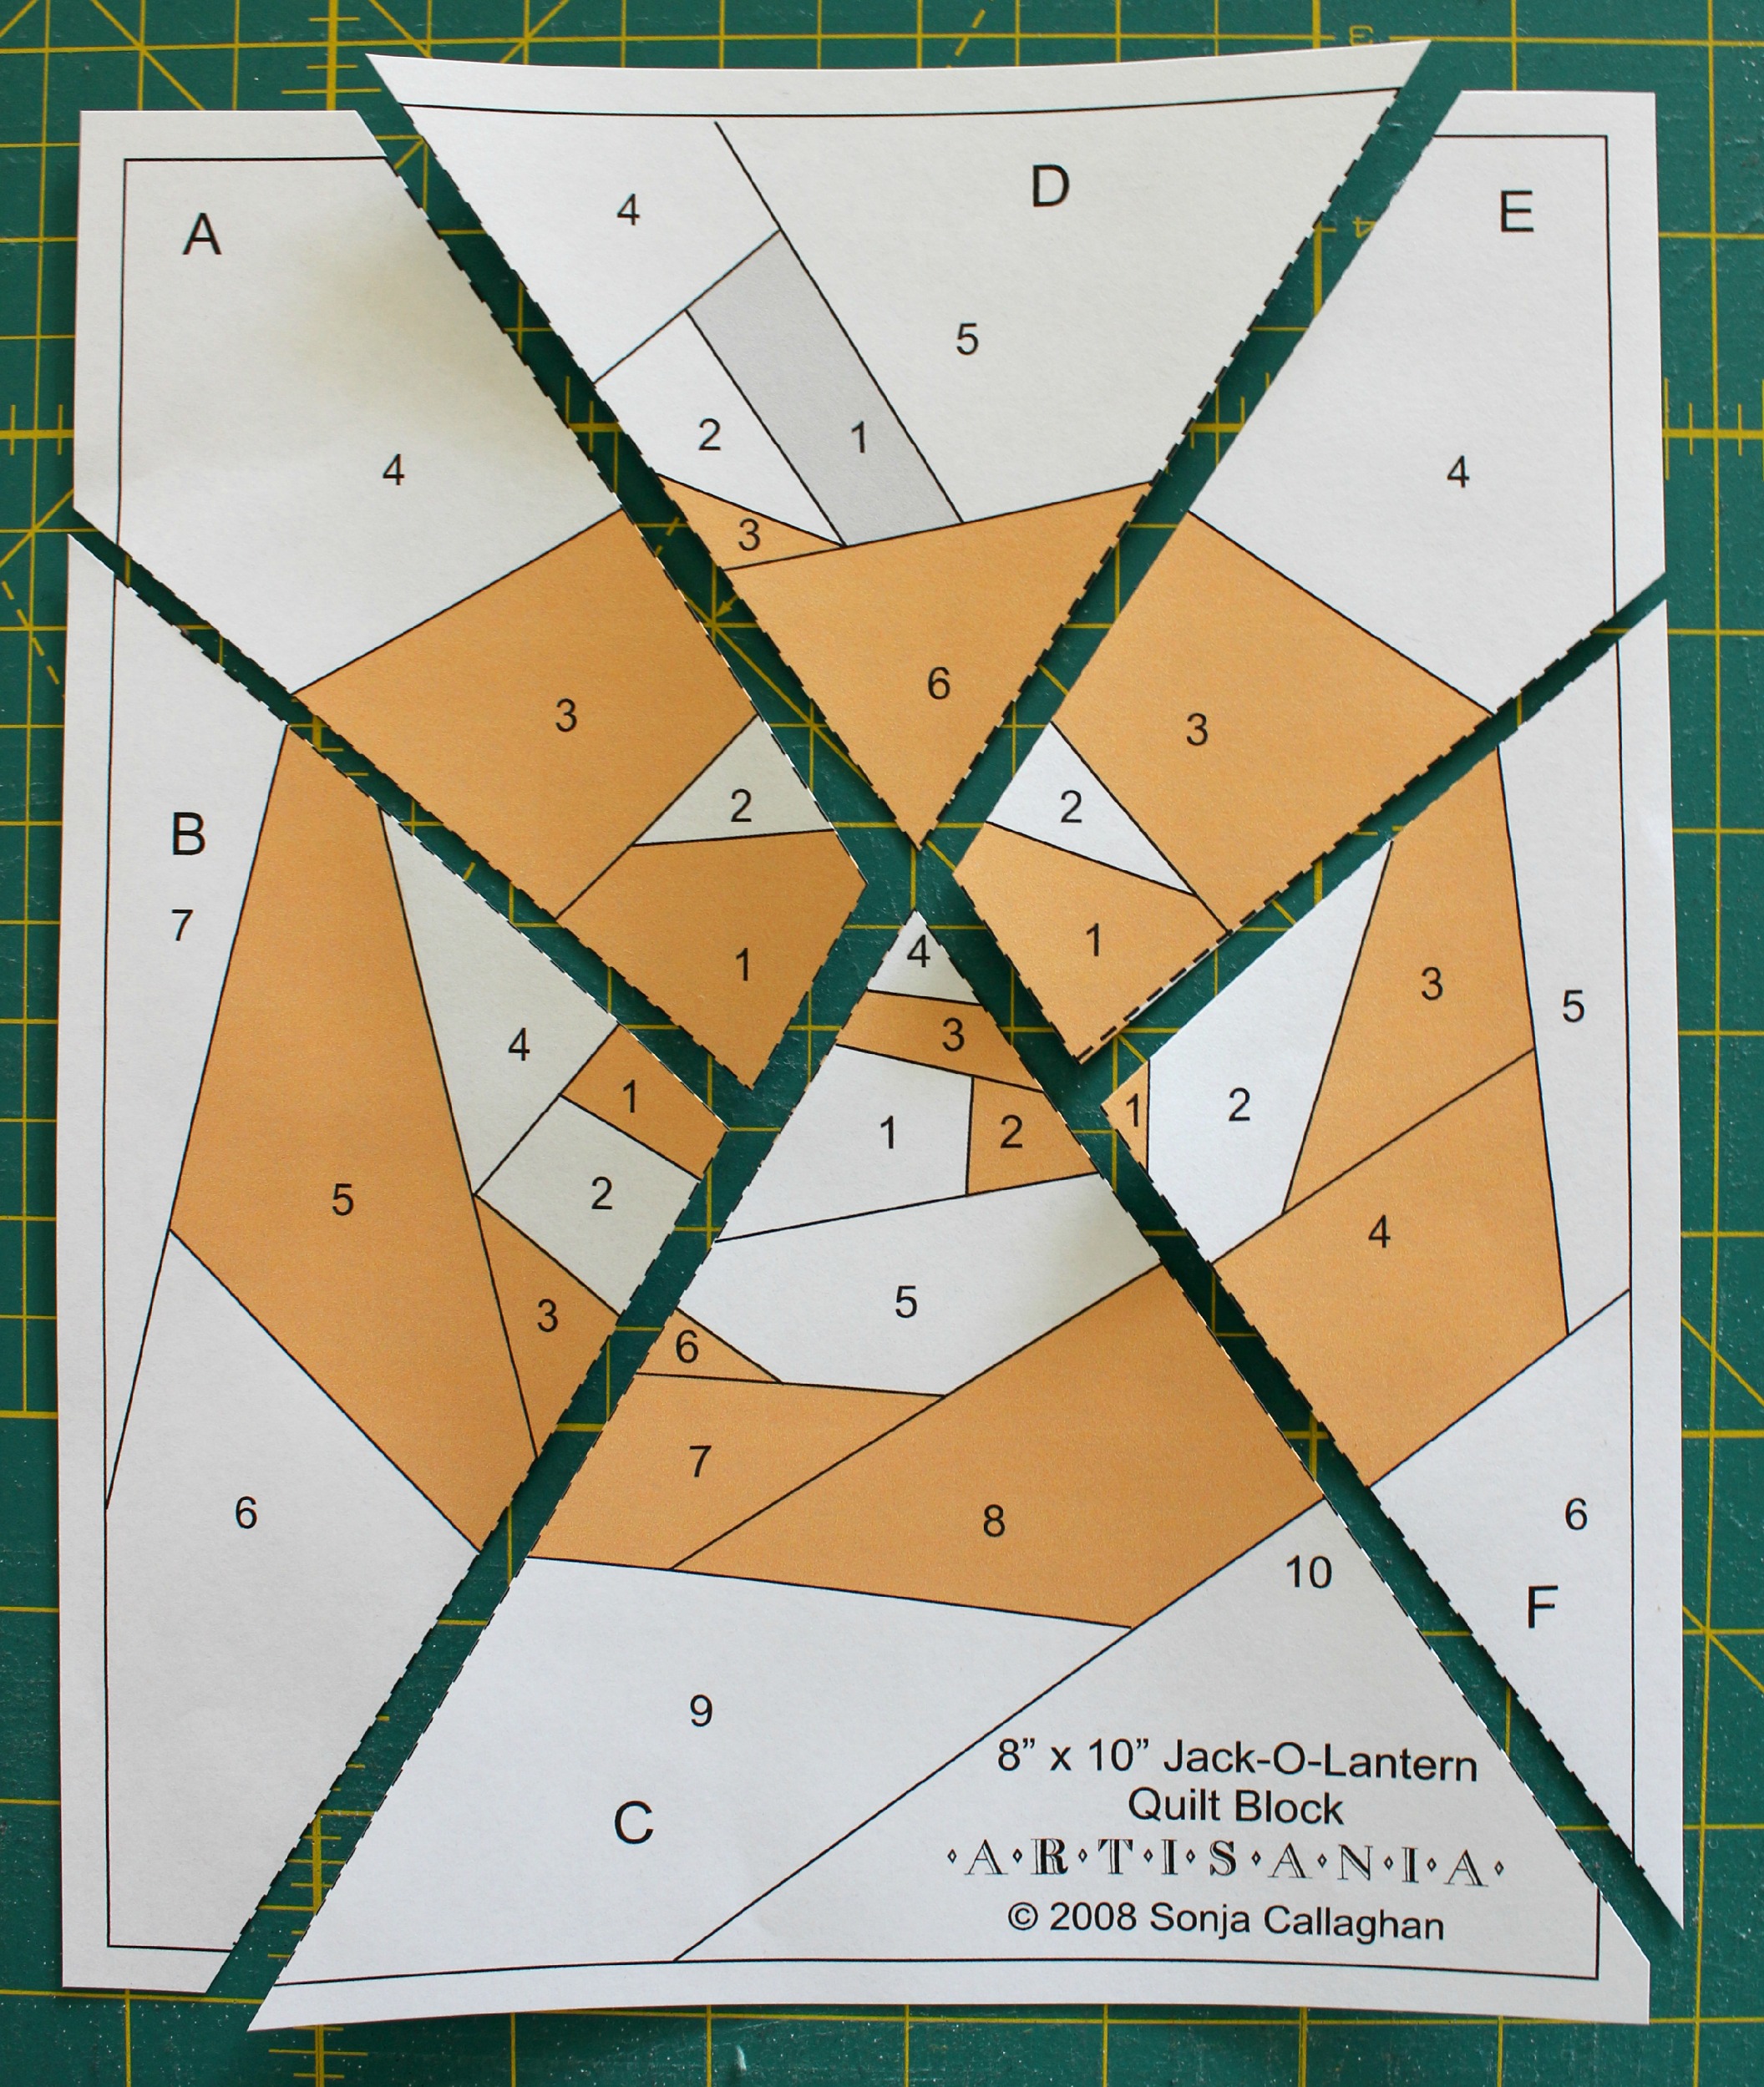
The other day, while wasting time on Facebook, I came across a link that was shared to this awesome little FPP Jack-O-Lantern pattern by Sonja Callaghan from the blog Artisania. And with Halloween coming up very soon, I just knew that I had to print it off and give it a go!
Firstly, I printed off the pattern at a scale of 90% so that I was sure the pattern would fit comfortably on a A4 piece of paper. Then I sat down for a bit, trying to figure out the best way to make it as I’ve never attempted a FPP pattern this intricate before!
Once confident of how to start and what steps I had to do to be successful at the end, I picked out some fun autumnal RJR Supreme Cotton Solids and jumped straight into making!
Here are a few tips that I think might help you when making the block yourself…
No. 1 – The block is divided into six sections labelled A to D. So you need to carefully cut the paper pattern into the sections before you can start any sort of piecing! (See Photo #2) I also cut an extra 1/4″ seam allowance around the outside line of the pattern so that I wouldn’t get caught out not having enough fabric to cover each section. (See Photo #1)
Photo #1
Photo #2
No. 2 – Another prep step before starting: Using a Clover Serrated Tracing Wheel and a ruler I perforated all of the lines in each section that I’ll be sewing on top of. (See Photo #3) Doing this simply helps to ensure that the paper will rip away smoothly from the back once the block is finished.
Photo #3
No. 3 – I found it really helpful to initial each numbered section of the colour that was to be used so that I wouldn’t get confused!
W=White, O=Orange, B=Black and G=Green.
No. 4 – I was really relaxed with sizes of fabric I cut for each section. I found, that because a majority of the numbered sections were quite small, I was able to use quite a lot of fabric pieces from my little scrap pile I was creating from the other sections I had finished piecing. And due to that, the block came together really quite quickly!
No. 5 – As you piece each section together, make sure to leave enough fabric over the edges so that you can trim the block down with a 1/4″ seam allowance around each side. For this pattern to come together perfectly at the end, you need to cut a 1/4″ out from each edge on all six sections (excluding the edges you cut around before on the outside of the pattern)…Hopefully Photo #4 will help you understand a little better…
Photo #4
No. 6– Once you’ve come to the part where you’re ready to piece each section back together, I found doing it in this order the easiest…
Sew section A to section B, then section C to the other side of B. Remove the paper from the back and press the seams either to one side or flat open. Then sew section D to section E and then section F to the other side of E. Again, carefully remove the paper from the back and press the seams in the same way as before. From here, piece the two sections together to finish the block.
TIPS: When piecing each section together make sure to line up the seams around the outside of the pumpkin and around his mouth to achieve clean crisp lines. It may take a little bit to get these parts aligned and sitting perfect but trust me, it’ll be worth it in the end!
Finished block size: 7.5″x9.5″ (19cmx24cm)
So to sum it all up, despite a few mistakes on my part resulting in the seam ripper to make an appearance more than once, this was a really fun FPP pattern to piece together! Believe it not, I did learn a few new things and expanded my knowledge on the way I should tackle these types of tricky pattern designs! I also felt like a slight rebel making this little guy as Halloween isn’t widely celebrated in Australia as it’s seen as more of an ‘American’ tradition. But I like Halloween – it appeals to the crafty and creative side to me! Hence why I loved this making little guy!
If you like the look of this guy and would love to make him yourself but don’t know a thing about Foundation Paper Piecing (FPP), then check out this tutorialI made a little while ago taking you through the steps of how to do it!
Of course, if you have any questions about this block or are stuck on any step, please don’t hesitate to ask! I’m always here to help!
Best of luck to all of you who are going to print this little guy off and give him a go! Don’t forget to share your photos with me!
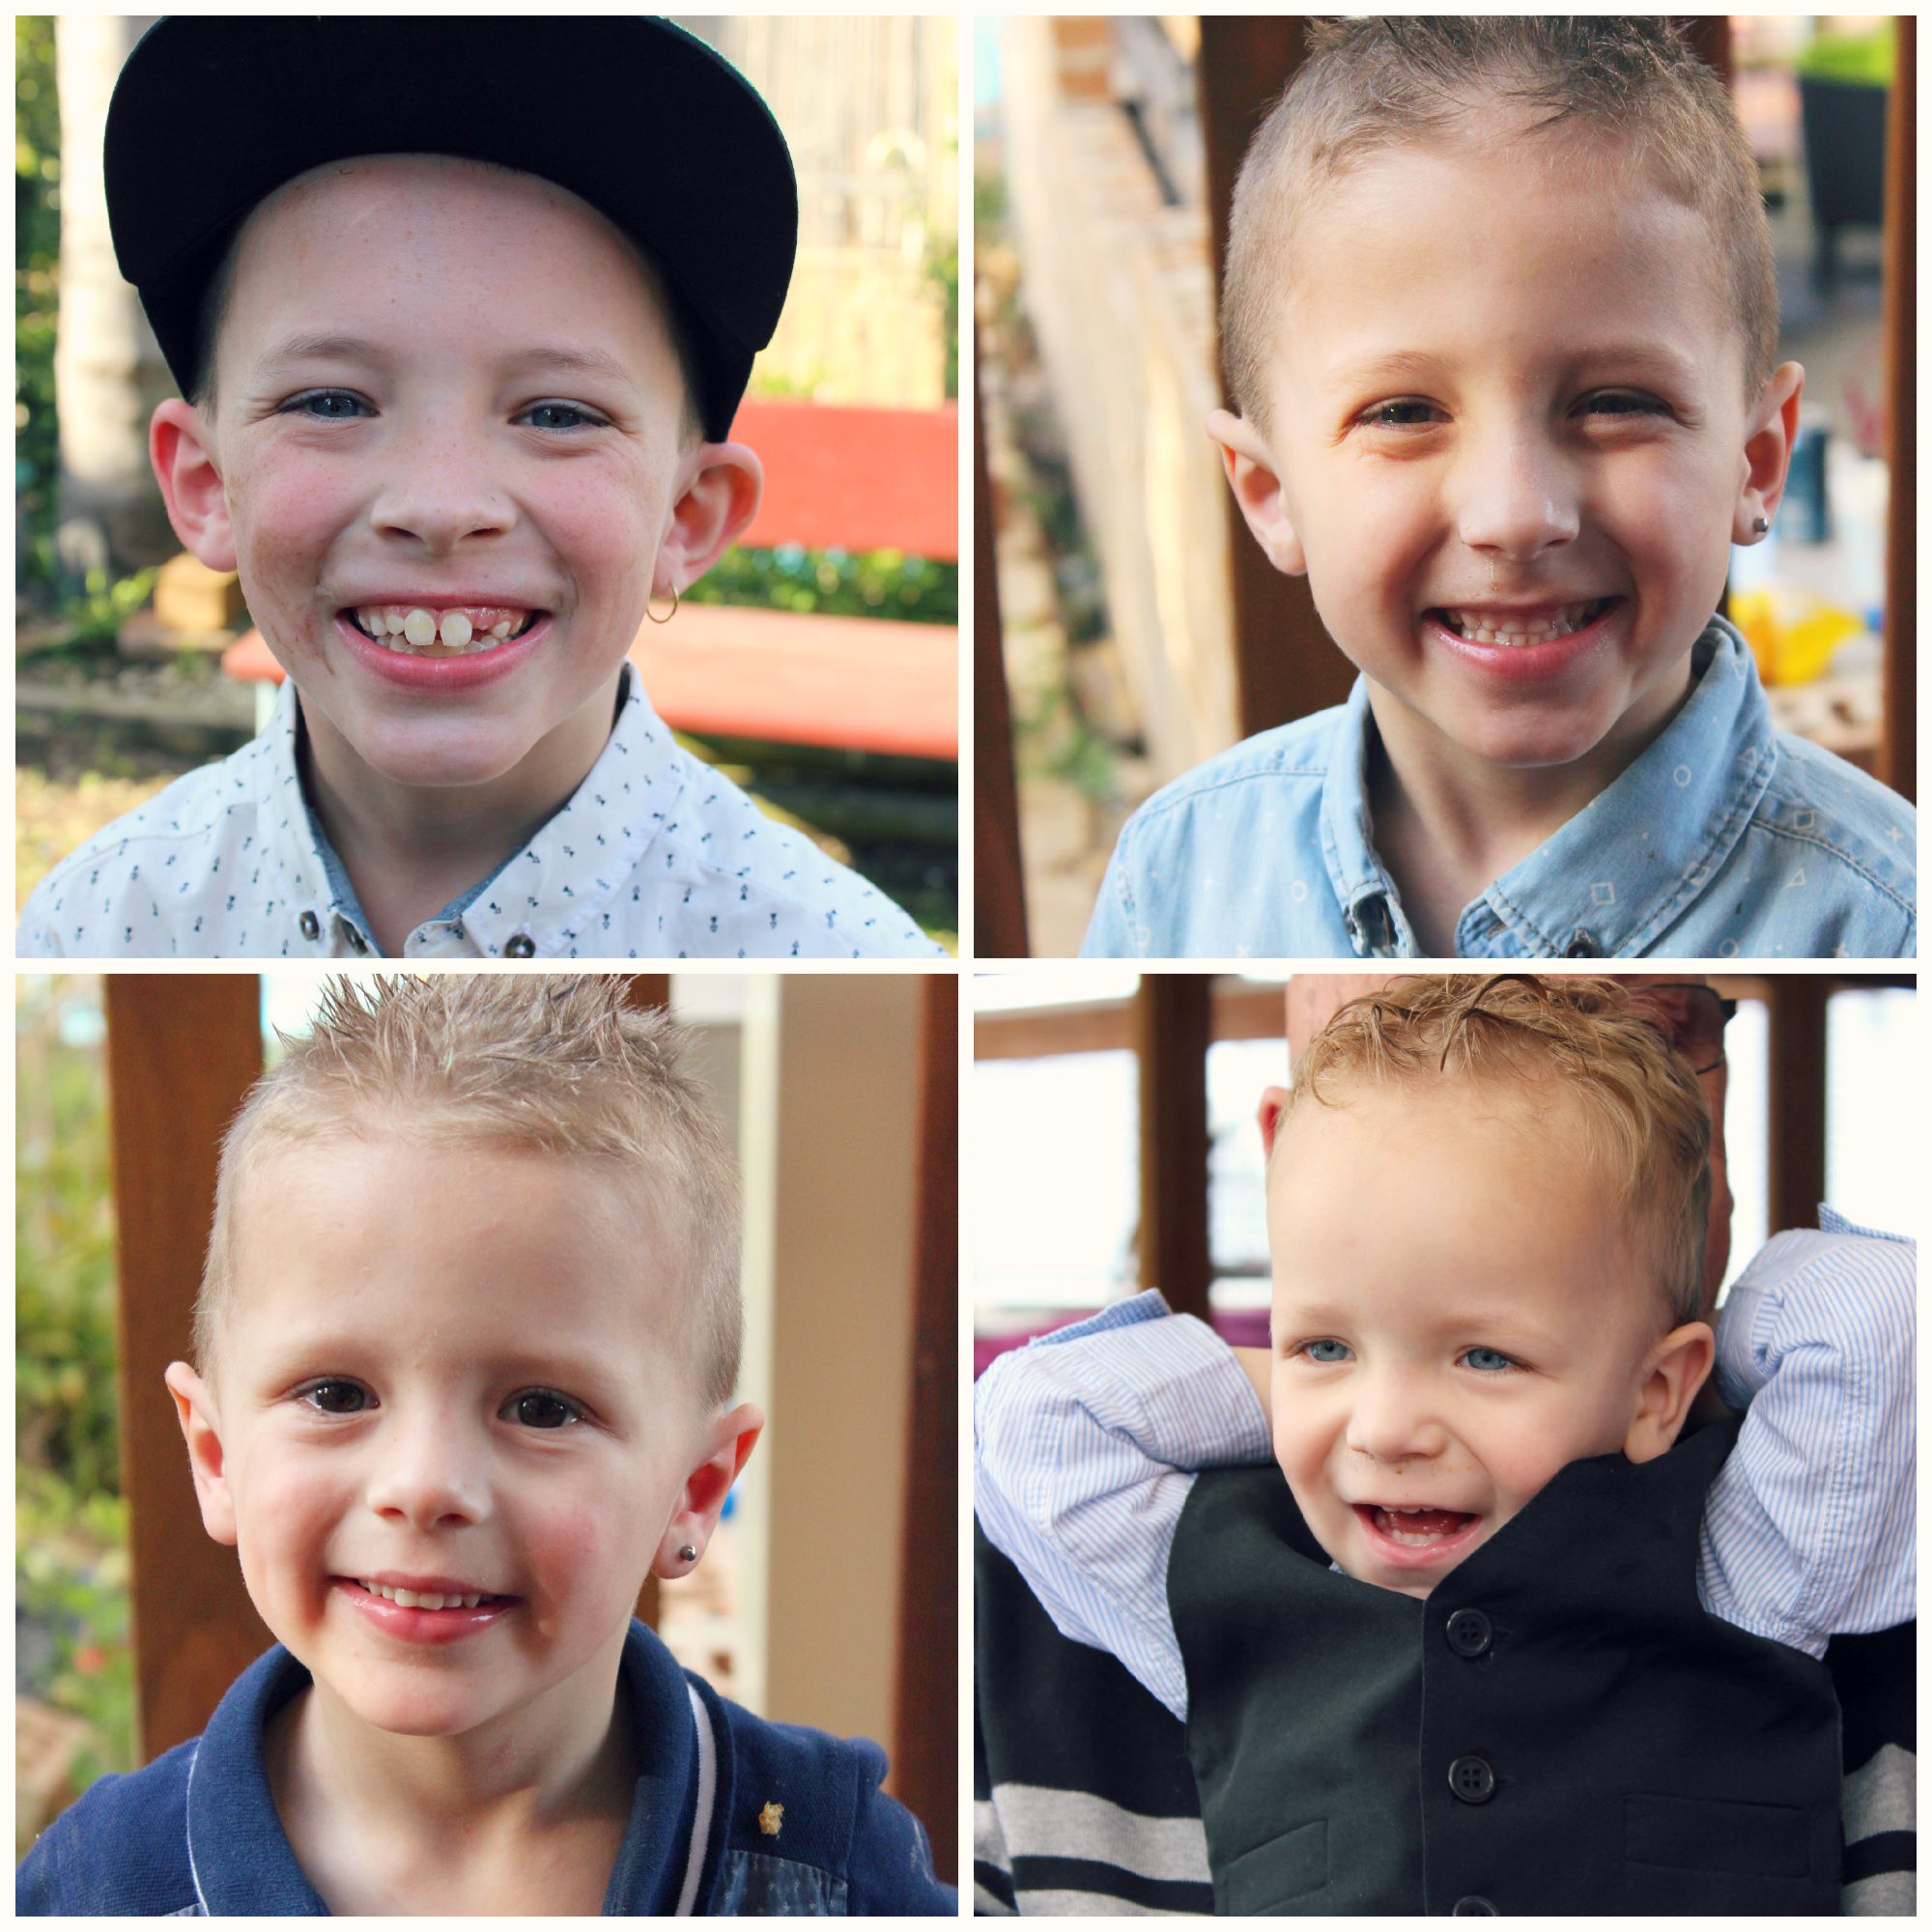
Today was spent celebrating the lives of my nephew Xavier and niece Amelia at their Christening Day! The ceremony was lovely, very hands on and inclusive with their older brothers, godparents and grandparents.
Both kiddies were dressed beautifully, with Xavier sporting a darling suit vest and collared shirt and Amelia wearing a darling white dress with purple flowers and shiny white Mary-Janes! Oh so cute!
Here are a few of my favourite photos from the day…
The joys of photographing little people! One’s blowing a raspberry and the other is looking at anything but the camera!
Xavier and his Poppy (aka: my dad!)
The Boys: Caleb, Ayden, Noah & Xavier.
My eldest brother Kevin and his beautiful family!
+++
So on the to-do list this week in my sewing room is:
Get the Mountain Block tutorial finalised and uploaded for you to enjoy!
Finish my Notting Hill House Mini Quilt so that I can hang it on the wall and swoon all over it!
Re-think the ‘Wildwood’ Quilt…
The initial idea I had in my head to make with those gorgeous Cloud9 fabrics I keep going on about, hasn’t been sitting right with me all week. I’ve sort of got half way through piecing together the quilt top and realised I’m just really not feeling it…
Hmm…Perhaps I need to re-jig the layout to get the excitement back for this quilt…?
What I’ve done so far just doesn’t excite me, resulting in me losing interest and motivation to get it finished. Boo! So, I’m gonna have a bit of a re-think about, scrap the idea I’ve already begun and start a fresh! Last night I came up with the idea of perhaps re-visiting the Spinning Stars pattern by Anna Maria Horner or even trying out that Octo pattern by Zen Chic I bought the other week from FQS! Hmm, it’s definitely back to the drawing board with this quilt and fabrics. I’m determined to get a beautiful quilt out of them one way or another!
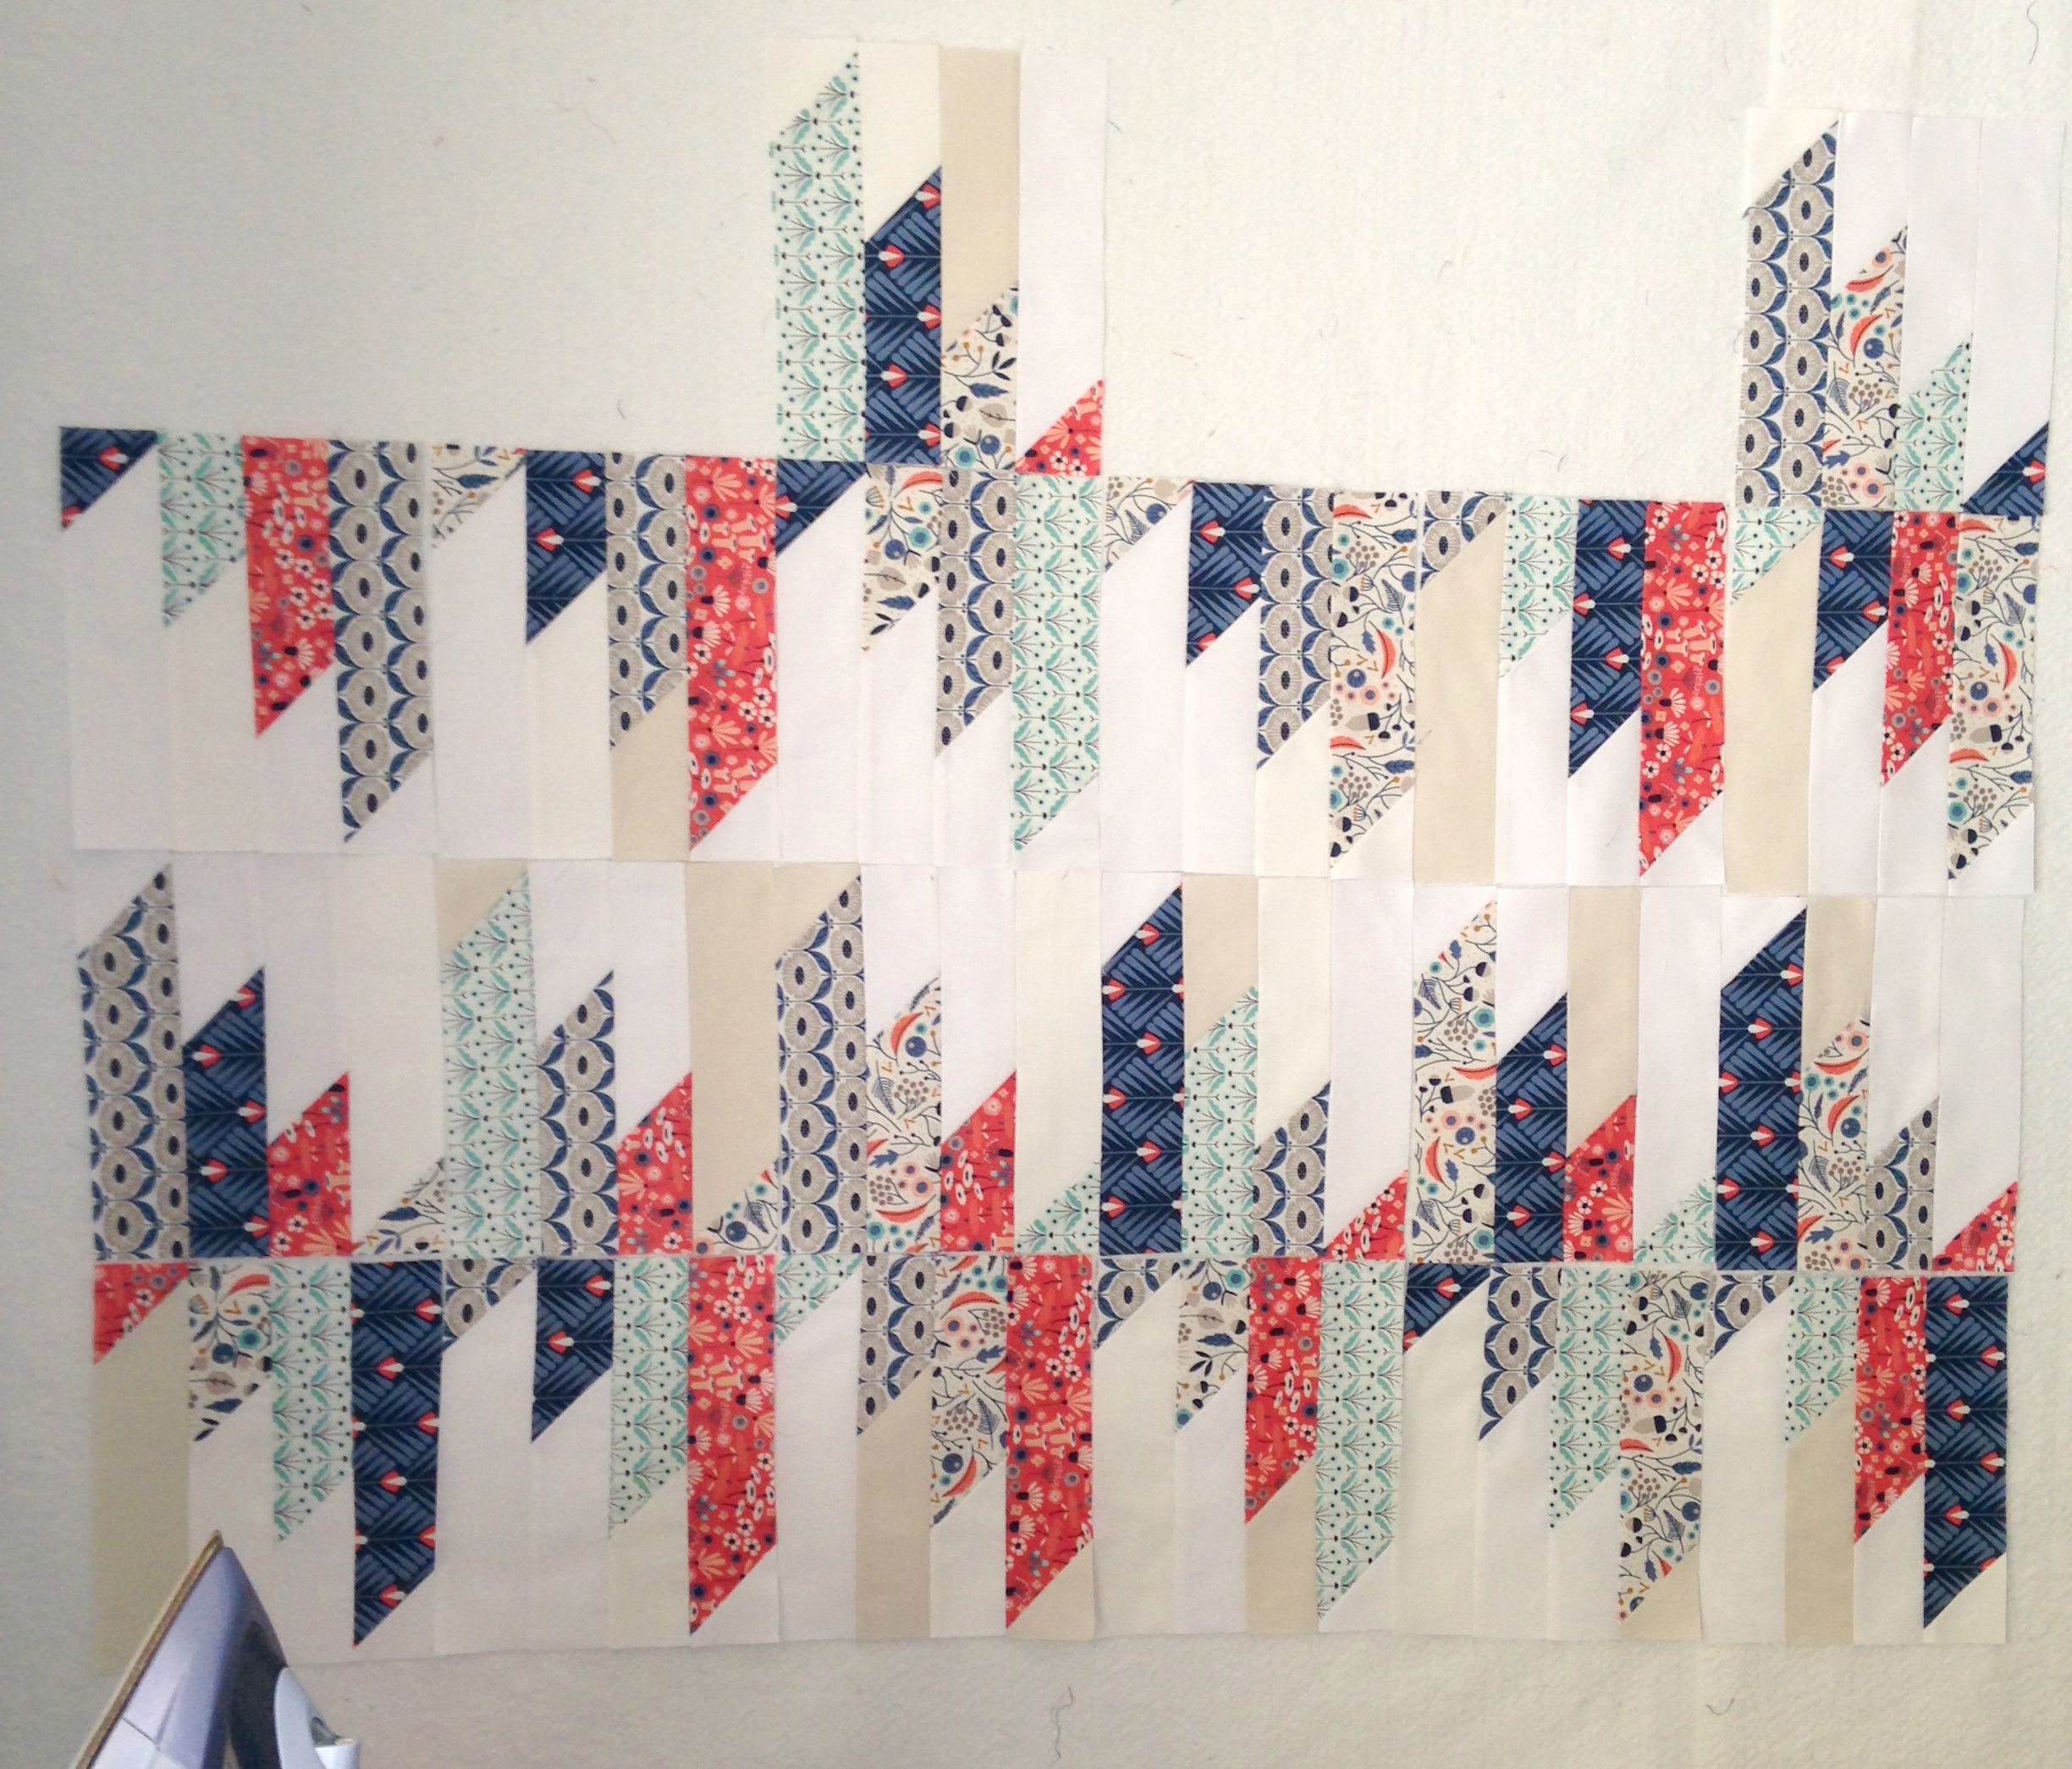
Another sunny weekend-day has come to an end and today I finally got stuck into some sewing!
As the early afternoon rolled over, I fired up the iron, got my machine in working order (new needle, full bobbin and full thread on top), pressed all of my fabrics and begun the task of making my Notting Hill House Mini!
Ooo, isn’t it just the loveliest thing!!
I found, just like the Pandamonium Mini Quilt, there was a lot of cutting before the sewing could begin. But being as I’m a total loser for cutting (it’s one of my favourite steps in quilt making!), I was in my element as I meticulously checked and re-checked the measurements, lined up the fabric on my mat and then cut, cut, cut!
Piecing it together was a piece of cake! At almost every step in the pattern, there is a little diagram showing you what, where and how to piece all of the little pieces together to create the door, the windows and the roof and then how to bring them all together to complete the quilt top! Fab!
I was saying in yesterdays post, I wasn’t too sure on the fabrics I had chosen to use for this mini. But you know, I looked at the choices this morning with fresh eyes and didn’t change a thing! I could see that all of the fabrics I had pulled out would work brilliantly with each other!
All in all, I’m really happy with how everything came together. The door and stair section is a little wonky, but hey, it adds character! Now, I think I’m going to add a little border sashing around the outside of the house (even though the pattern doesn’t suggest that), just so that it stands out a little bit. I’m not too sure when I’ll have the time to quilt it as the week ahead is a busy one along with the weekend! I may have to pull some late-nighters to see it finished! But what ever happens, I’ll keep you in the loop!
Happy Sunday friends and I hope you all have a lovely week ahead!
So I was originally going to call this post, ‘Weekend Sewing’ or something similar to that, as most of these sweet little minis were started on a weekend! But I thought not. Instead, I chose to capture the flourishing obsession that’s been growing inside of me lately for making mini quilts!!
Gahh! Isn’t she the sweetest?! I smile like a Cheshire every time I look at it!
I chose to keep as close to the true colours that are in the original pattern, using a few subtle print fabrics for the white and pink parts and keeping the rest as basic solid colours. I stuck to my ‘traditional’ version of straight-line vertical quilting, backing it with a black and cream floral print fabric that was the perfect find within my stash! (I had one of those, ‘Oh, I forgot I had this fabric! It’s absolutely perfect for this project! Yay!’) I then finished it off with a green binding, a lot like the one in the pattern.
This little beauty now hangs on my bedroom door, where I pass it every day with a smile as it captures everything I love about quilting… pattern, texture, line, colour, shape, geometry and creativity!
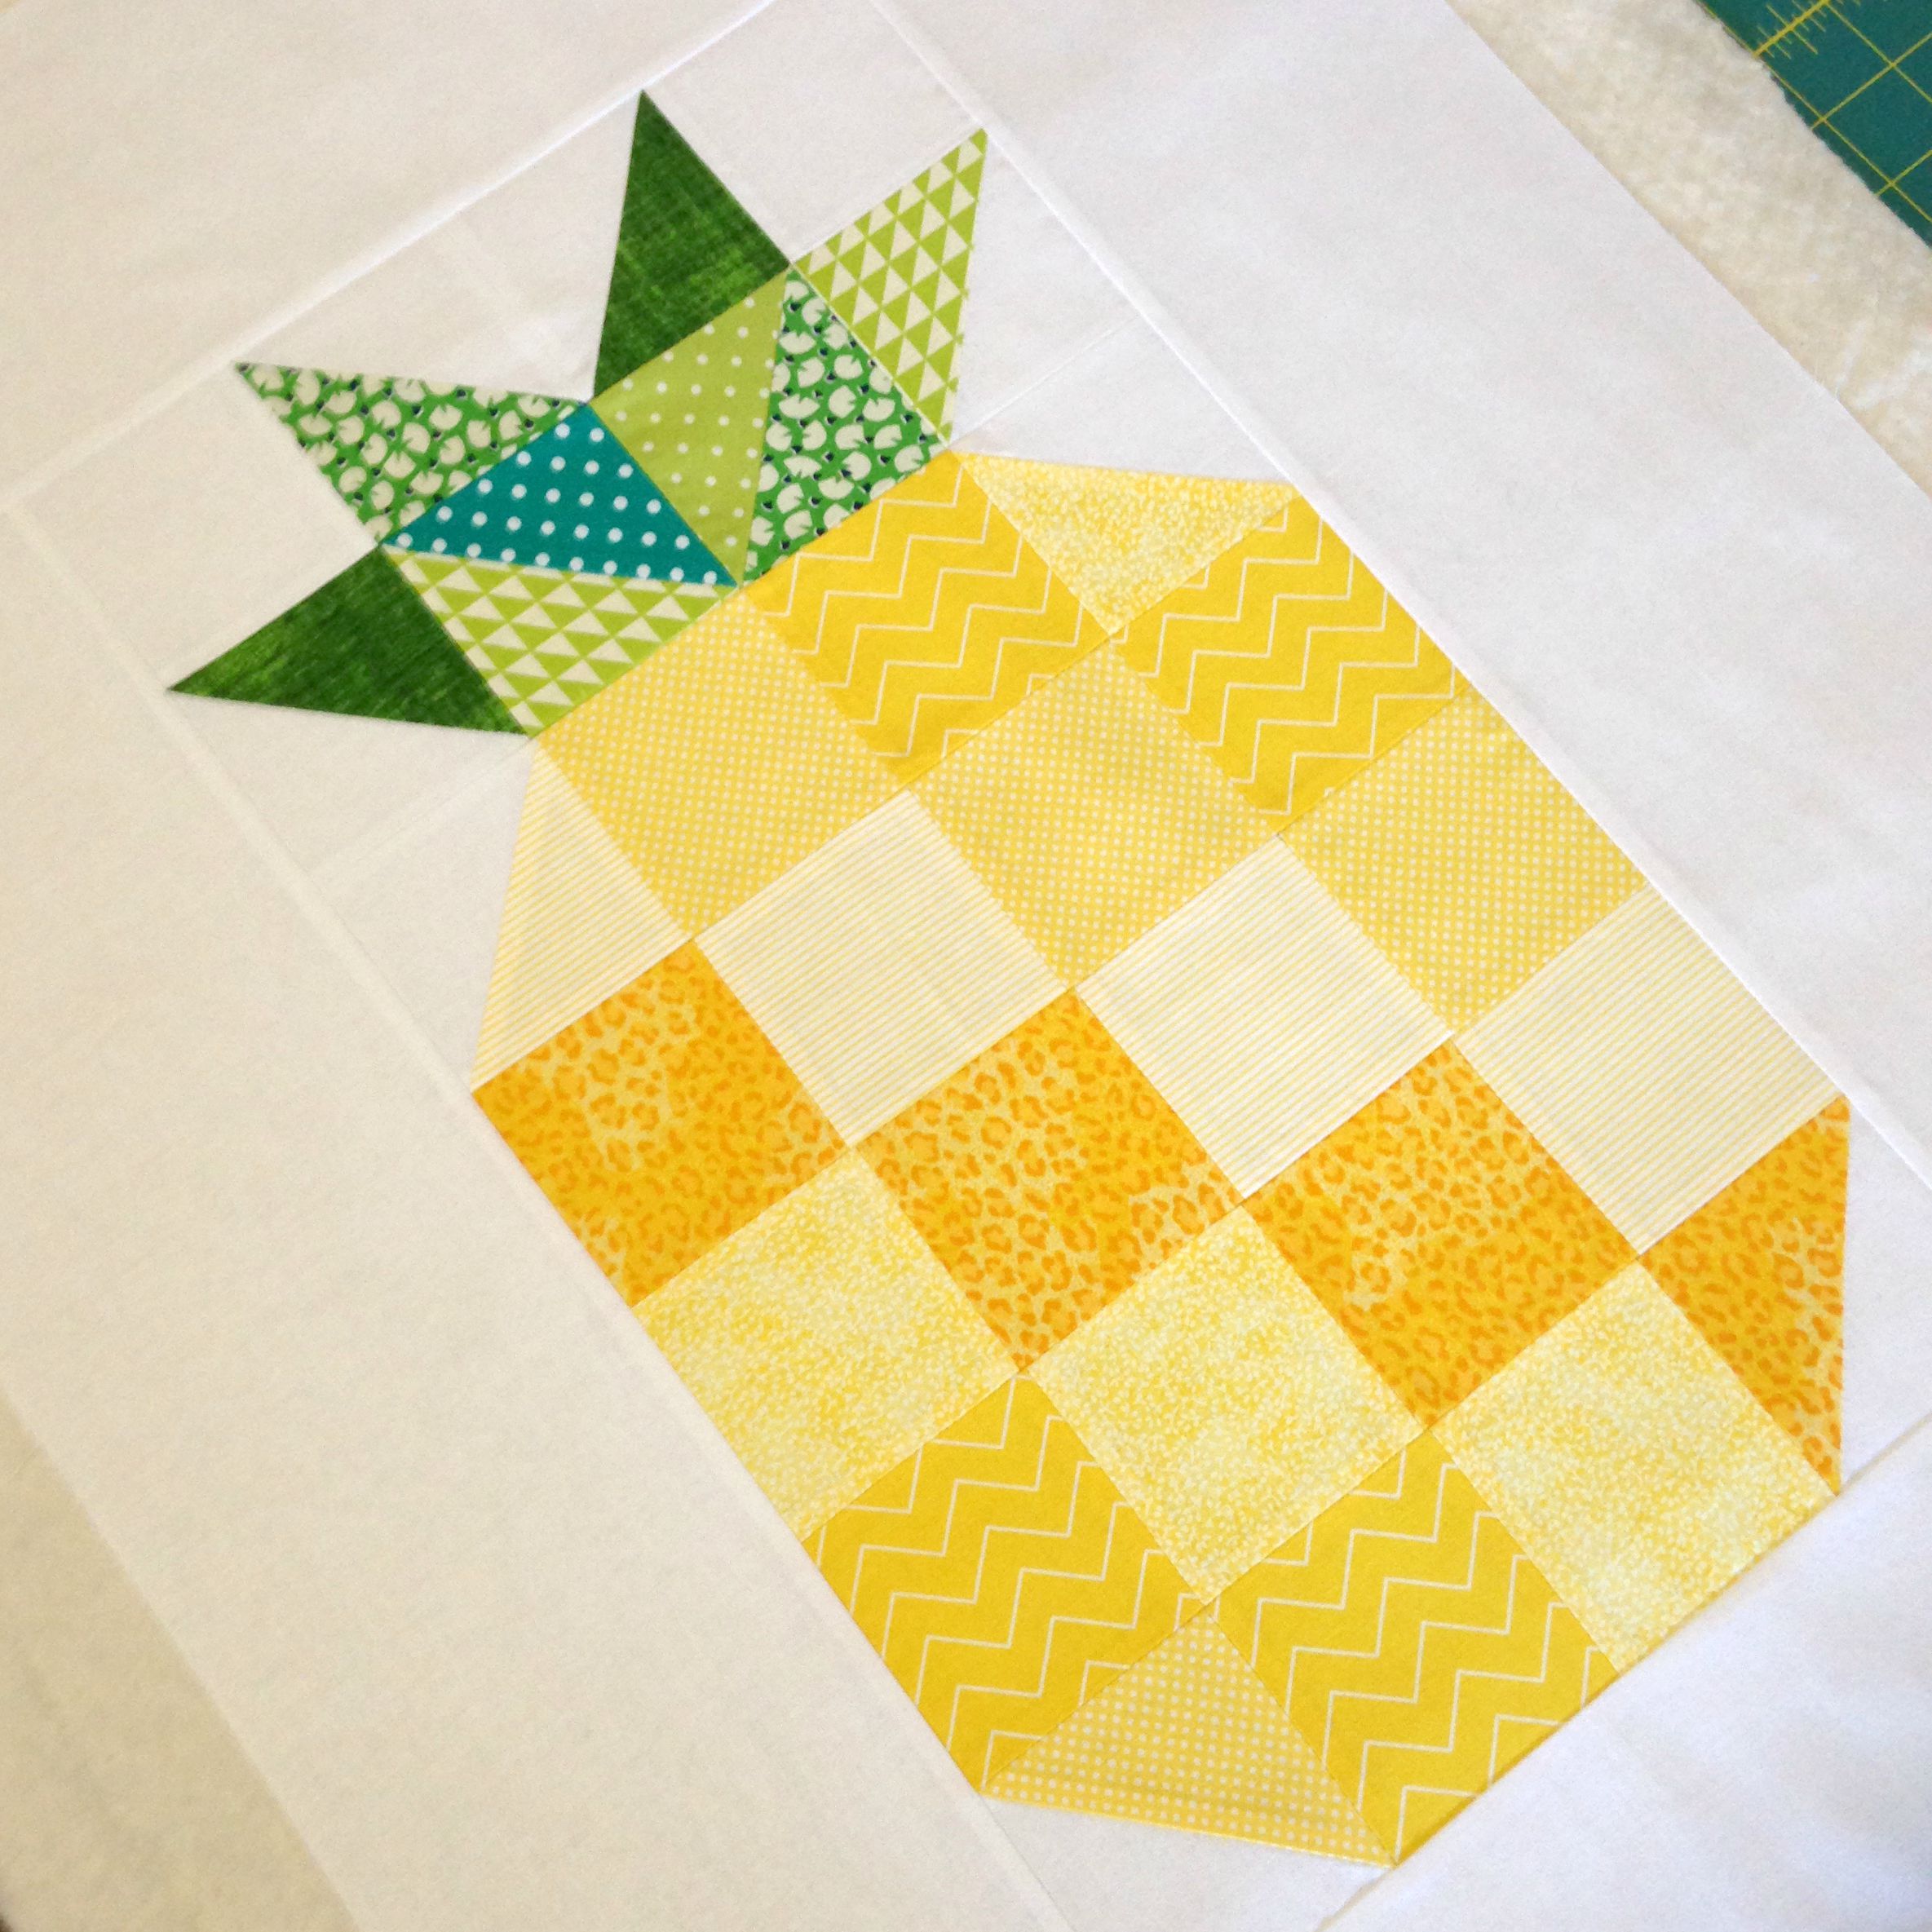
I’ve only quite recently become partial to the odd pineapple design or two, whether it be on fabric, on a t-shirt, in the kitchen, in ornament form or as a fun little quilt pattern!
I think I first came across this design on Pinterest. Then on Instagram. And then again on Facebook. I saw it as a sign and thought I should investigate it more… As soon as I saw that it was a FREE pattern, I knew then that I just had to make it!
And so I did!
Now I must admit, I did alter the pattern a little bit – I made mine slightly bigger than what the pattern says to make it. Instead of the finished mini measuring 8.5″x11.5″, mine measures 19.5″x27.5″! I simply wanted to make it a bit bigger so that it would fit the space I’m planning on hanging it. I think one day I’ll make it to the true size of the original, but at right now, I’m super-happy with the results I have with this one!
I chose to quilt a simple design, echoing the patchwork squares that make up the main body of the pineapple. Now I just have to finish hand sewing the binding to the back, make and stitch a rod pocket to the top, give it a good press and then hang it into place! Yay!
+++
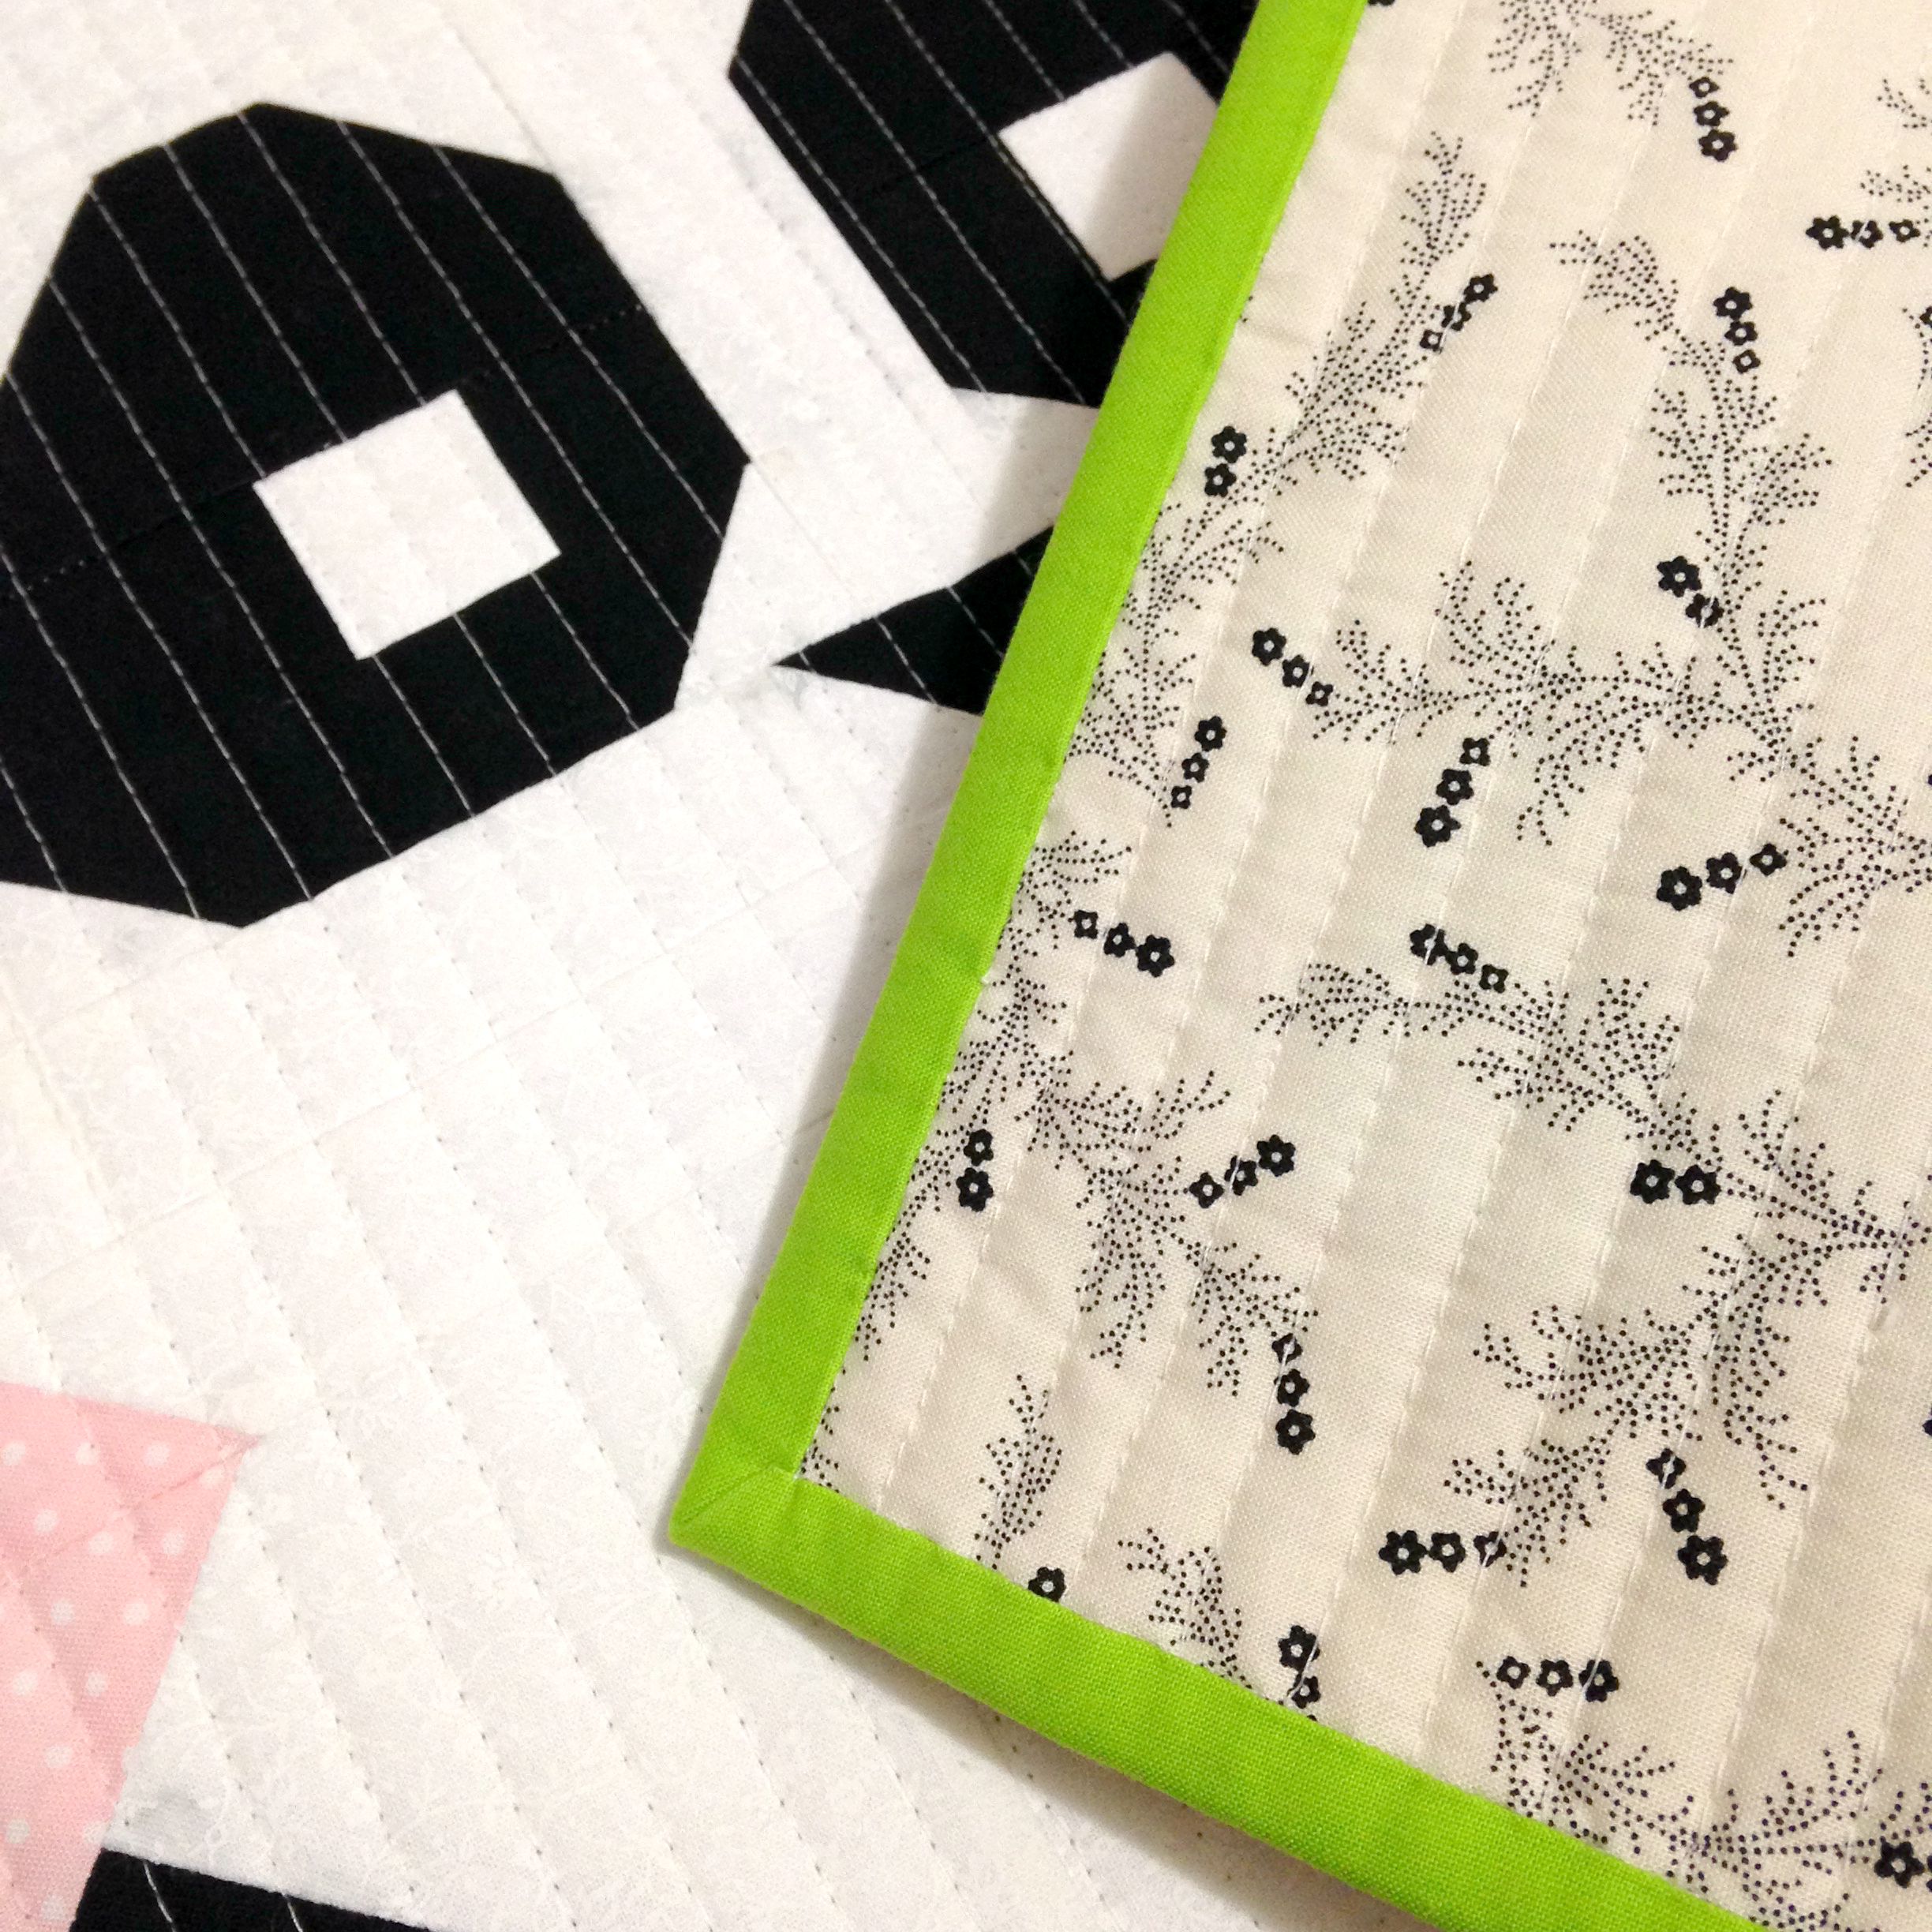
And the last mini that has been making my life happy and one that I’m pretty sure I’ve over-shared these last couple days/weeks is my Crown of Thorns Mini Quilt!
I’m so darned proud of this little beauty and I’m so happy that you all seem to like it too! All of your lovely feedback and comments about it have simply blown me away, making me so thankful for such delightful and supportive readers, viewers and friends! Thank you!!
So I really hope you don’t mind me sharing a few more photos with you… This last one is where the quilt has ended up – on the wall above my sewing table, where I can admire it as I design, cut, sew, quilt and daydream!
If you would like to make this yourself, you can check out the tutorial I made here!
+++
Have you been making any fun little Mini Quilts lately? Let me know! I would love to be inspired by you!
😀
Happy Sewing, Friends!
xx
PS. Don’t forget to enter my RJR Fabrics GIVEAWAY! Click here to find out how to enter! Entries close: Friday 7th August 2015!