Our lovely second make in my House Block QAL is here! Say hello to the Three Terraces block. 👋🏠
Inspo for this one came from those sweet little inner city streets that are endlessly lined with rows of tall houses standing neatly together. Although they’ve all been built the same, each one is slightly different to their neighbour either through the exterior colours or how well they’ve been loved throughout the years.
Another option for this block that I think would look super cute – change the grass sections for yellow sand and turn the terraces into fun little beach huts! Or even change the grass sections into blue water and the paths into yellow sand trails… 🏖️
There’s so much room for creativity and fun with this block and I can’t wait to see how you all interpret the design and make it yours!
Don’t forget to share your finished block with me on Instagram…
Words truly fail me when I think of just how fast this year has gone…
I can very clearly, to the day, remember exactly what I was doing this time last year in the lead up to Christmas, almost as if it was yesterday! Yet so many things – moments, milestones and memories – have past in between and it’s hard to believe that we’re only days away before starting a new year all over again!
To me, December always feels like if you blink you miss it, you know? This December has been no different. With a time demanding retail job, everyday life responsibilities, sickness, YouTube content to shoot, edit and upload along with the ever-looming Christmas Day deadline to buy presents, bake, cook, clean and sing at Carol nights, I’m surprised I’m still able to get up early in the morning and get the day started!
+++
To start this post off, I would first like to issue an apology. Everyone reading this who is following along with my latest Quilt-Along I’m so sorry for taking aaaaaages to get Block Eight up. My excuse is muddled up somewhere in the last paragraph! 😓
But in all seriousness, I honestly haven’t had the time to film the bulk of the tutorial because of my work schedule and a few other life-y type things. This week, leading up to Christmas has just been the busiest. I’ve practically been living at work due to extending trading times and such while attending Christmas lunches and parties. So in between that, Carol services, gift buying and sleeping, all of my video and tutorial making have been temporarily placed to one side ready to be picked up again early in the New Year.
Another thing I was hoping to get done and show you was a Christmas themed Stop-Motion Embroidery video. (A bit like this…) The pattern was chosen, the beautiful white linen fabric and gorgeous coloured threads to match were bought and the pattern was meticulously transferred onto the fabric. And that’s how far I’ve gotten. Boo!
I was so excited to get stitching and enjoying watching the pattern come to life through my numerous photos. But again, that tricky life element called ‘time’ has killed my dreams to their core and made the project flop graciously on its head. Anyway… I’ll keep it in mind to do for next Christmas!
Let’s move on from my hum-drum excuses and complaining onto some more exciting news! In the next week or so, the 2nd of January to be exact, I’m going on holiday! I’m going on a week-long cruise with my parents down to Melbourne and around Tasmania on the Emerald Princess! Words aren’t enough to describe just how excited I am – I’m so desperate for a holiday! We booked this cruise all the way back in 2014 sometime, so it’s been a long time coming! I hope to be able to take lots of photos and even film a little bit for you to make into a Holiday Vlog just like I did for our Fiji cruise in 2014. I even bought a fancy new camera for the occasion so there are no excuses to capture something to show you!
And speaking of something to show you… I recently filmed something fun for my channel that I haven’t done in quite a while. It’s a ‘What’s In My Bag?’ video! I’m not sure if you’re at all interested in what I keep in there, but for those of you are a little bit nosey like me, I think you’ll like it! It’s just something a bit fun and lighthearted for this time of the year and gives an opportunity for you to get to know me more! If you wanna have a glimpse at the things I carry around with me all of the time you can see it right here!
+++
So now that another year is over, it’s time to start planning for the next!
I will be continuing with my Quilt Along series in January – we’ll get all 12 blocks finished and then piece, baste, quilt, bind and label the quilt and admire it and cherish it forever! There are lots more tutorials and other content I want to make next year too – hopefully with a mix of sewing, crafting, floristry and lots more lifestyle and vlogging elements!
While still working at Spotlight, I’m planning on enrolling and studying the next certificate level up in Floristry where I’ll learn more complex designs and arrangements as well as explore the ins-and-outs of business management! Ooo!
Along with that, I have two very good friends who are getting married next year, another wedding where I’ll be doing the flowers AND I’ll be also turning the big THREE-OH in September! Crazy!!
It’s gonna be a great year! I can feel it already!!
Happy Festive Sewing, Friends!
xx
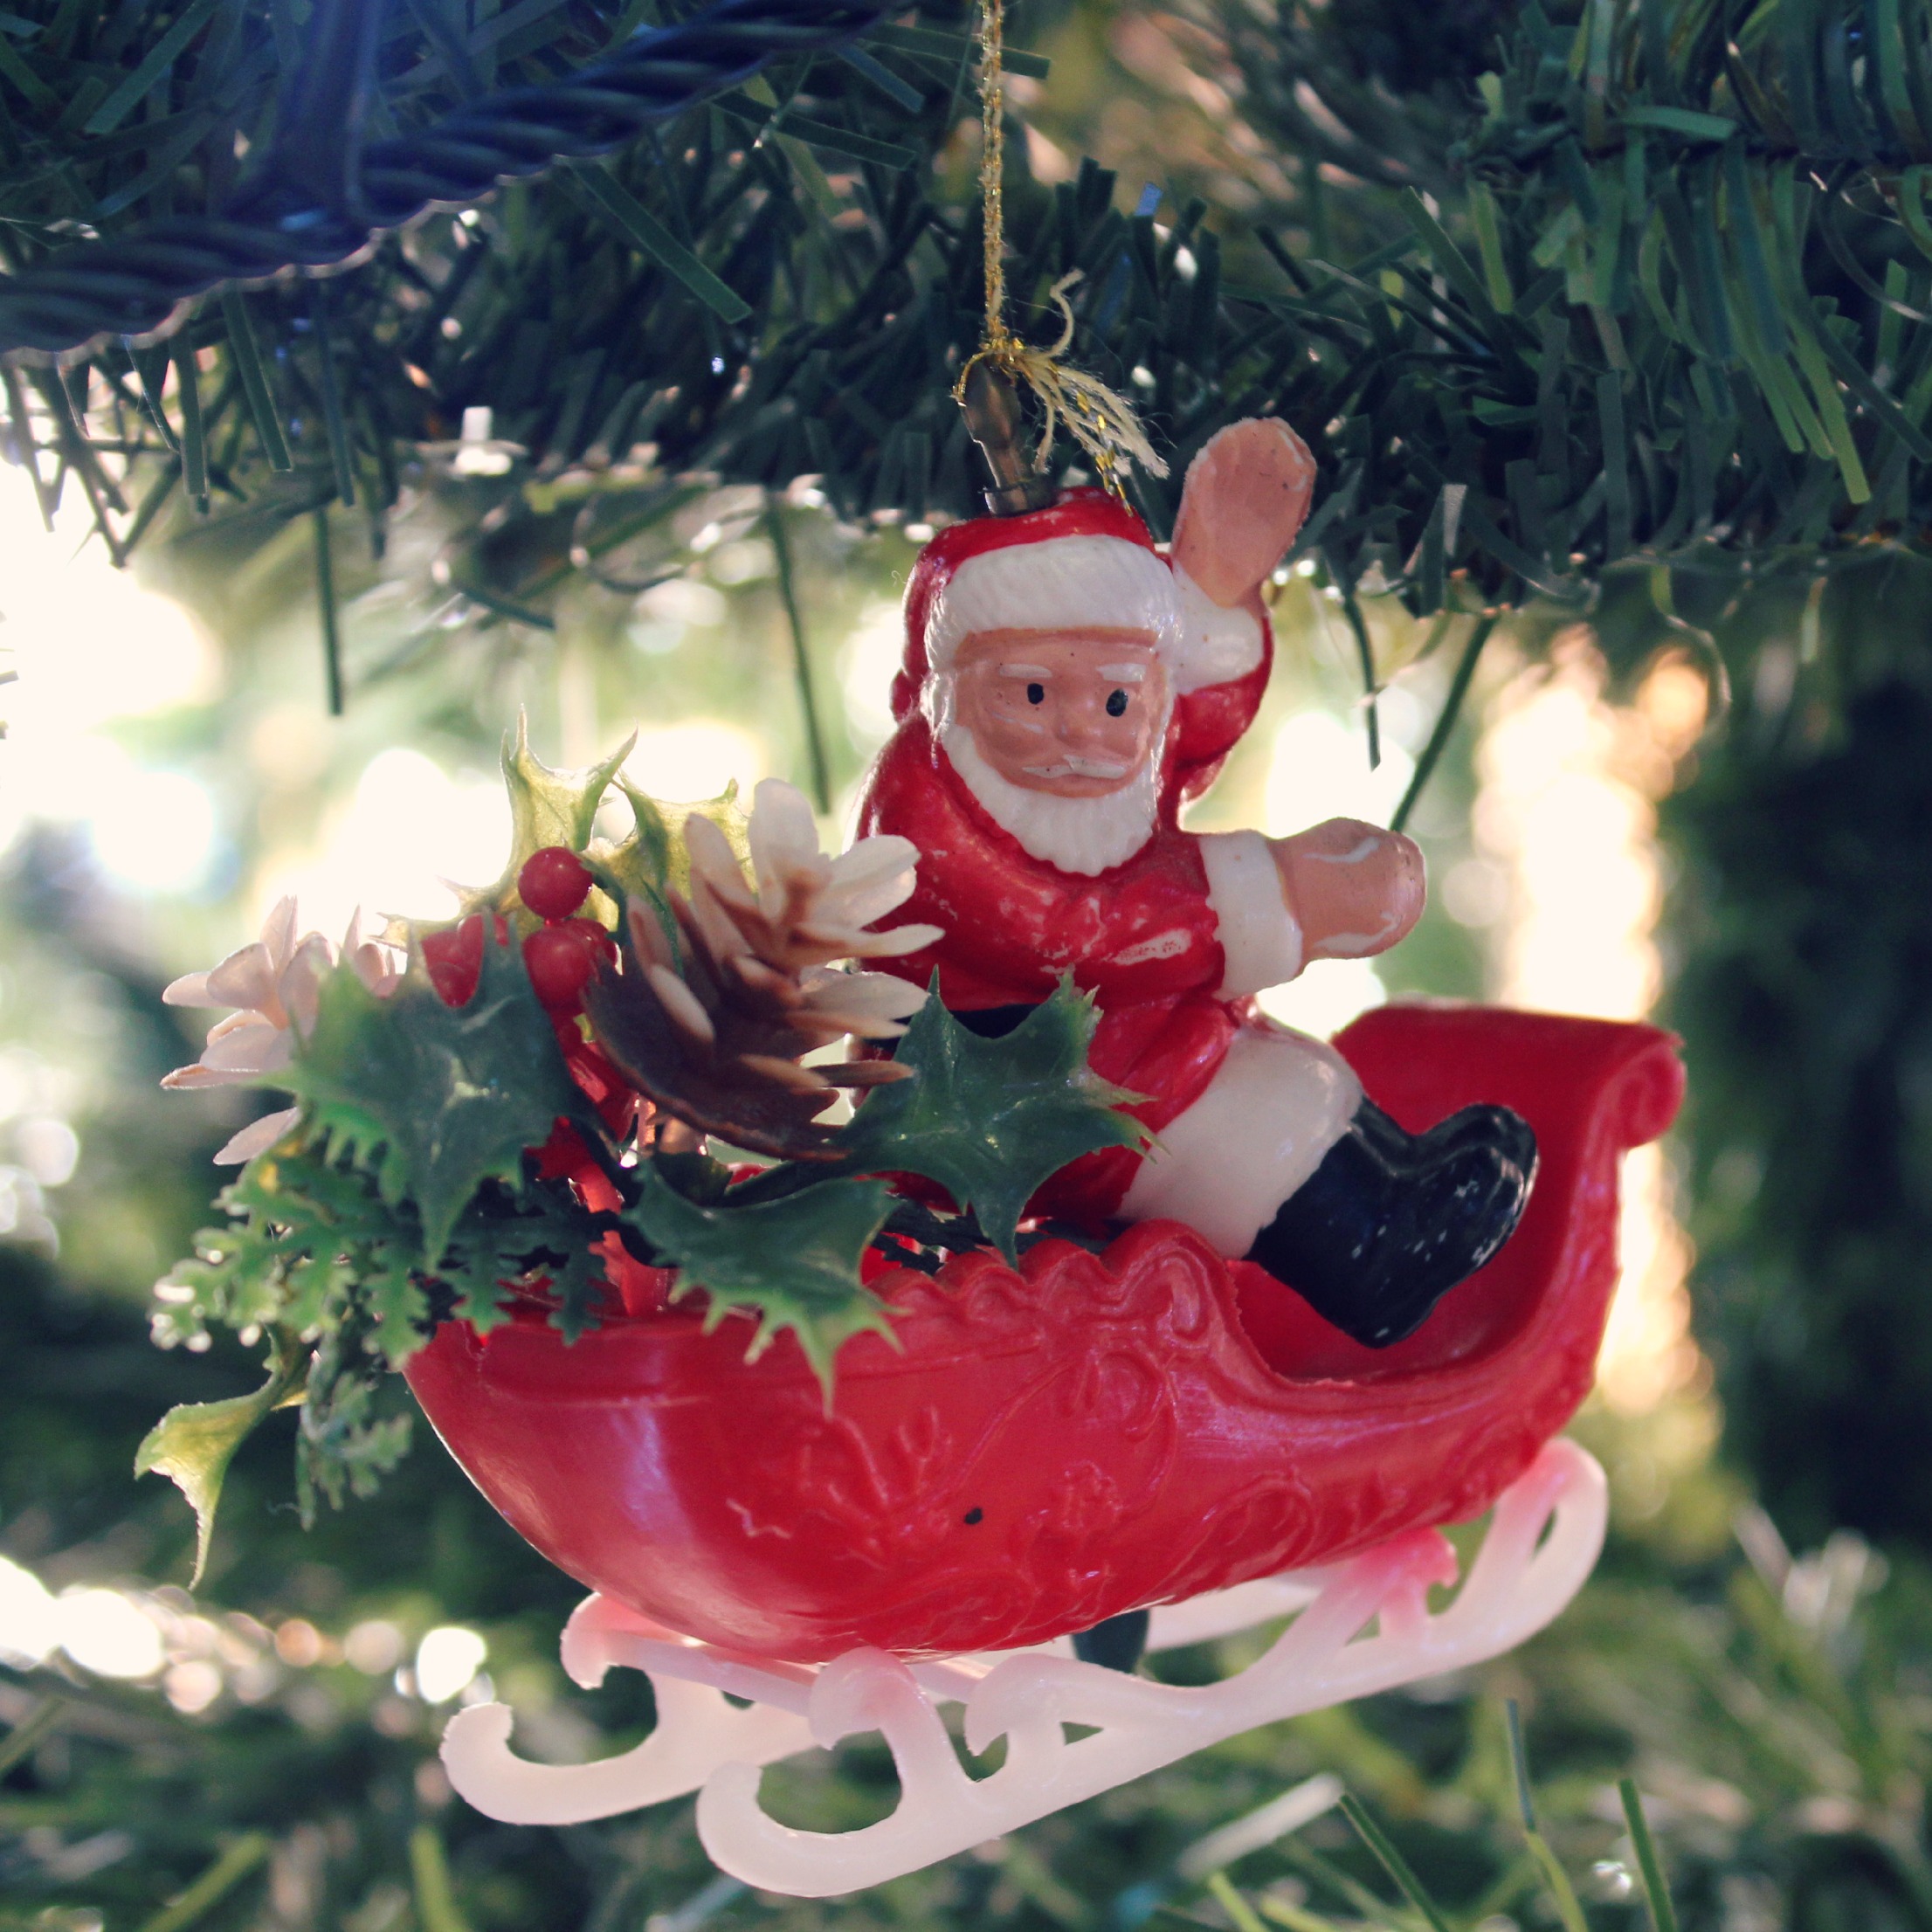
PS. Oh! I almost forgot! I have actually managed to finish one Christmas project that I started a few weeks ago! You may remember this darling appliqued snowflake design I shared on my Instagram all ready to be stitched into place on the machine…
I have since backed it with a matching chevron print fabric, stuffed it with a ginormous cushion insert and placed it on the lounge to be snuggled against, leaned on and comfortably squished by all ranges of backsides! I’m so happy with how it turned out!
Hello and welcome to week two in my Everyday May series!
I thought for this week, I would dedicate it to writing more about my sewing room and addressing a few of the requests from you guys about organisation, how to set up or layout your work space as well as a few other fun things I think might be helpful!
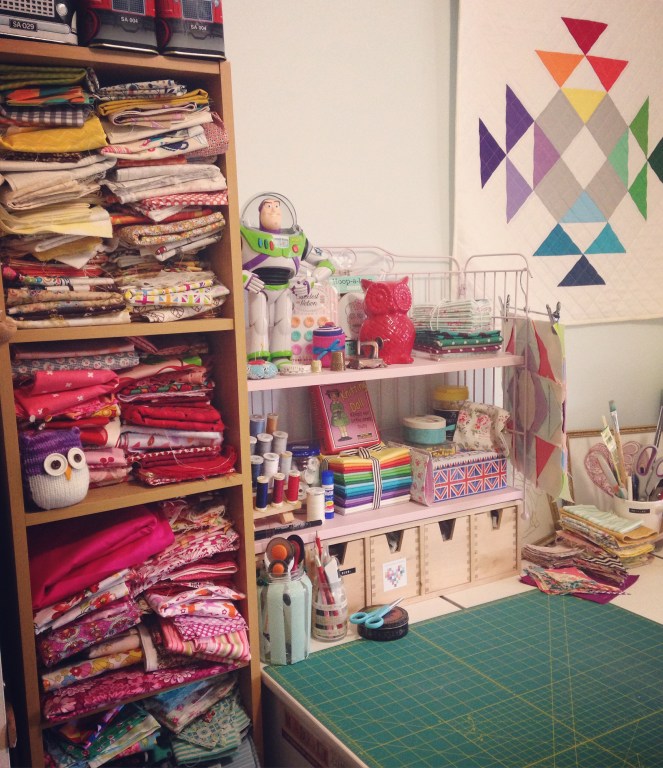
So first off for today I wanted to share with you a simple tour of my sewing room.
A few of you might’ve already seen this, but I uploaded this video onto my YouTube channel a few weeks ago showing you some of my most favourite nooks and crannies and bits and bobs that make this room a happy and inspiring one for me and for my quilting!
To be honest, there really isn’t much more to add to what I say and show you in the above tour… In it, I just really wanted to try to capture the essence and those little things that matter the most. Such things include my ever-watchful Buzz who guards the room so diligently, some of my favourite pieces of stationary, the way I like to store my embroidery threads in colour order, the cherished photo of me with my parents along with the sewing machine that helps me bring my thoughts, designs, dreams and passion into something brilliantly tactile and real!
I’m so grateful that I have the opportunity to have this space at all! (You can read a little about the back story here!) And never a day goes by where I don’t spend a good couple of hours in here! It’s like my safe haven, my hub, my happy place. 🙂
No matter where you plan, design, cut, sew and work I hope that you enjoy the space you occupy when creating! Tell me about it in the comments section – I would love to know!!
Oh man, I knew it would happen! Our Internet conveniently died yesterday, ruining my good run of publishing a new blog post everyday during September! I did try to attempt to get onto WordPress yesterday, but all I was met with was a blank screen and that annoying little circle of lines that goes round and round when you’re waiting for something to refresh or load! Oh well, it is what it is!
So now that we have our Internet back in all it’s beautiful high-speed glory, I can share with you today what I was going to share with you yesterday!
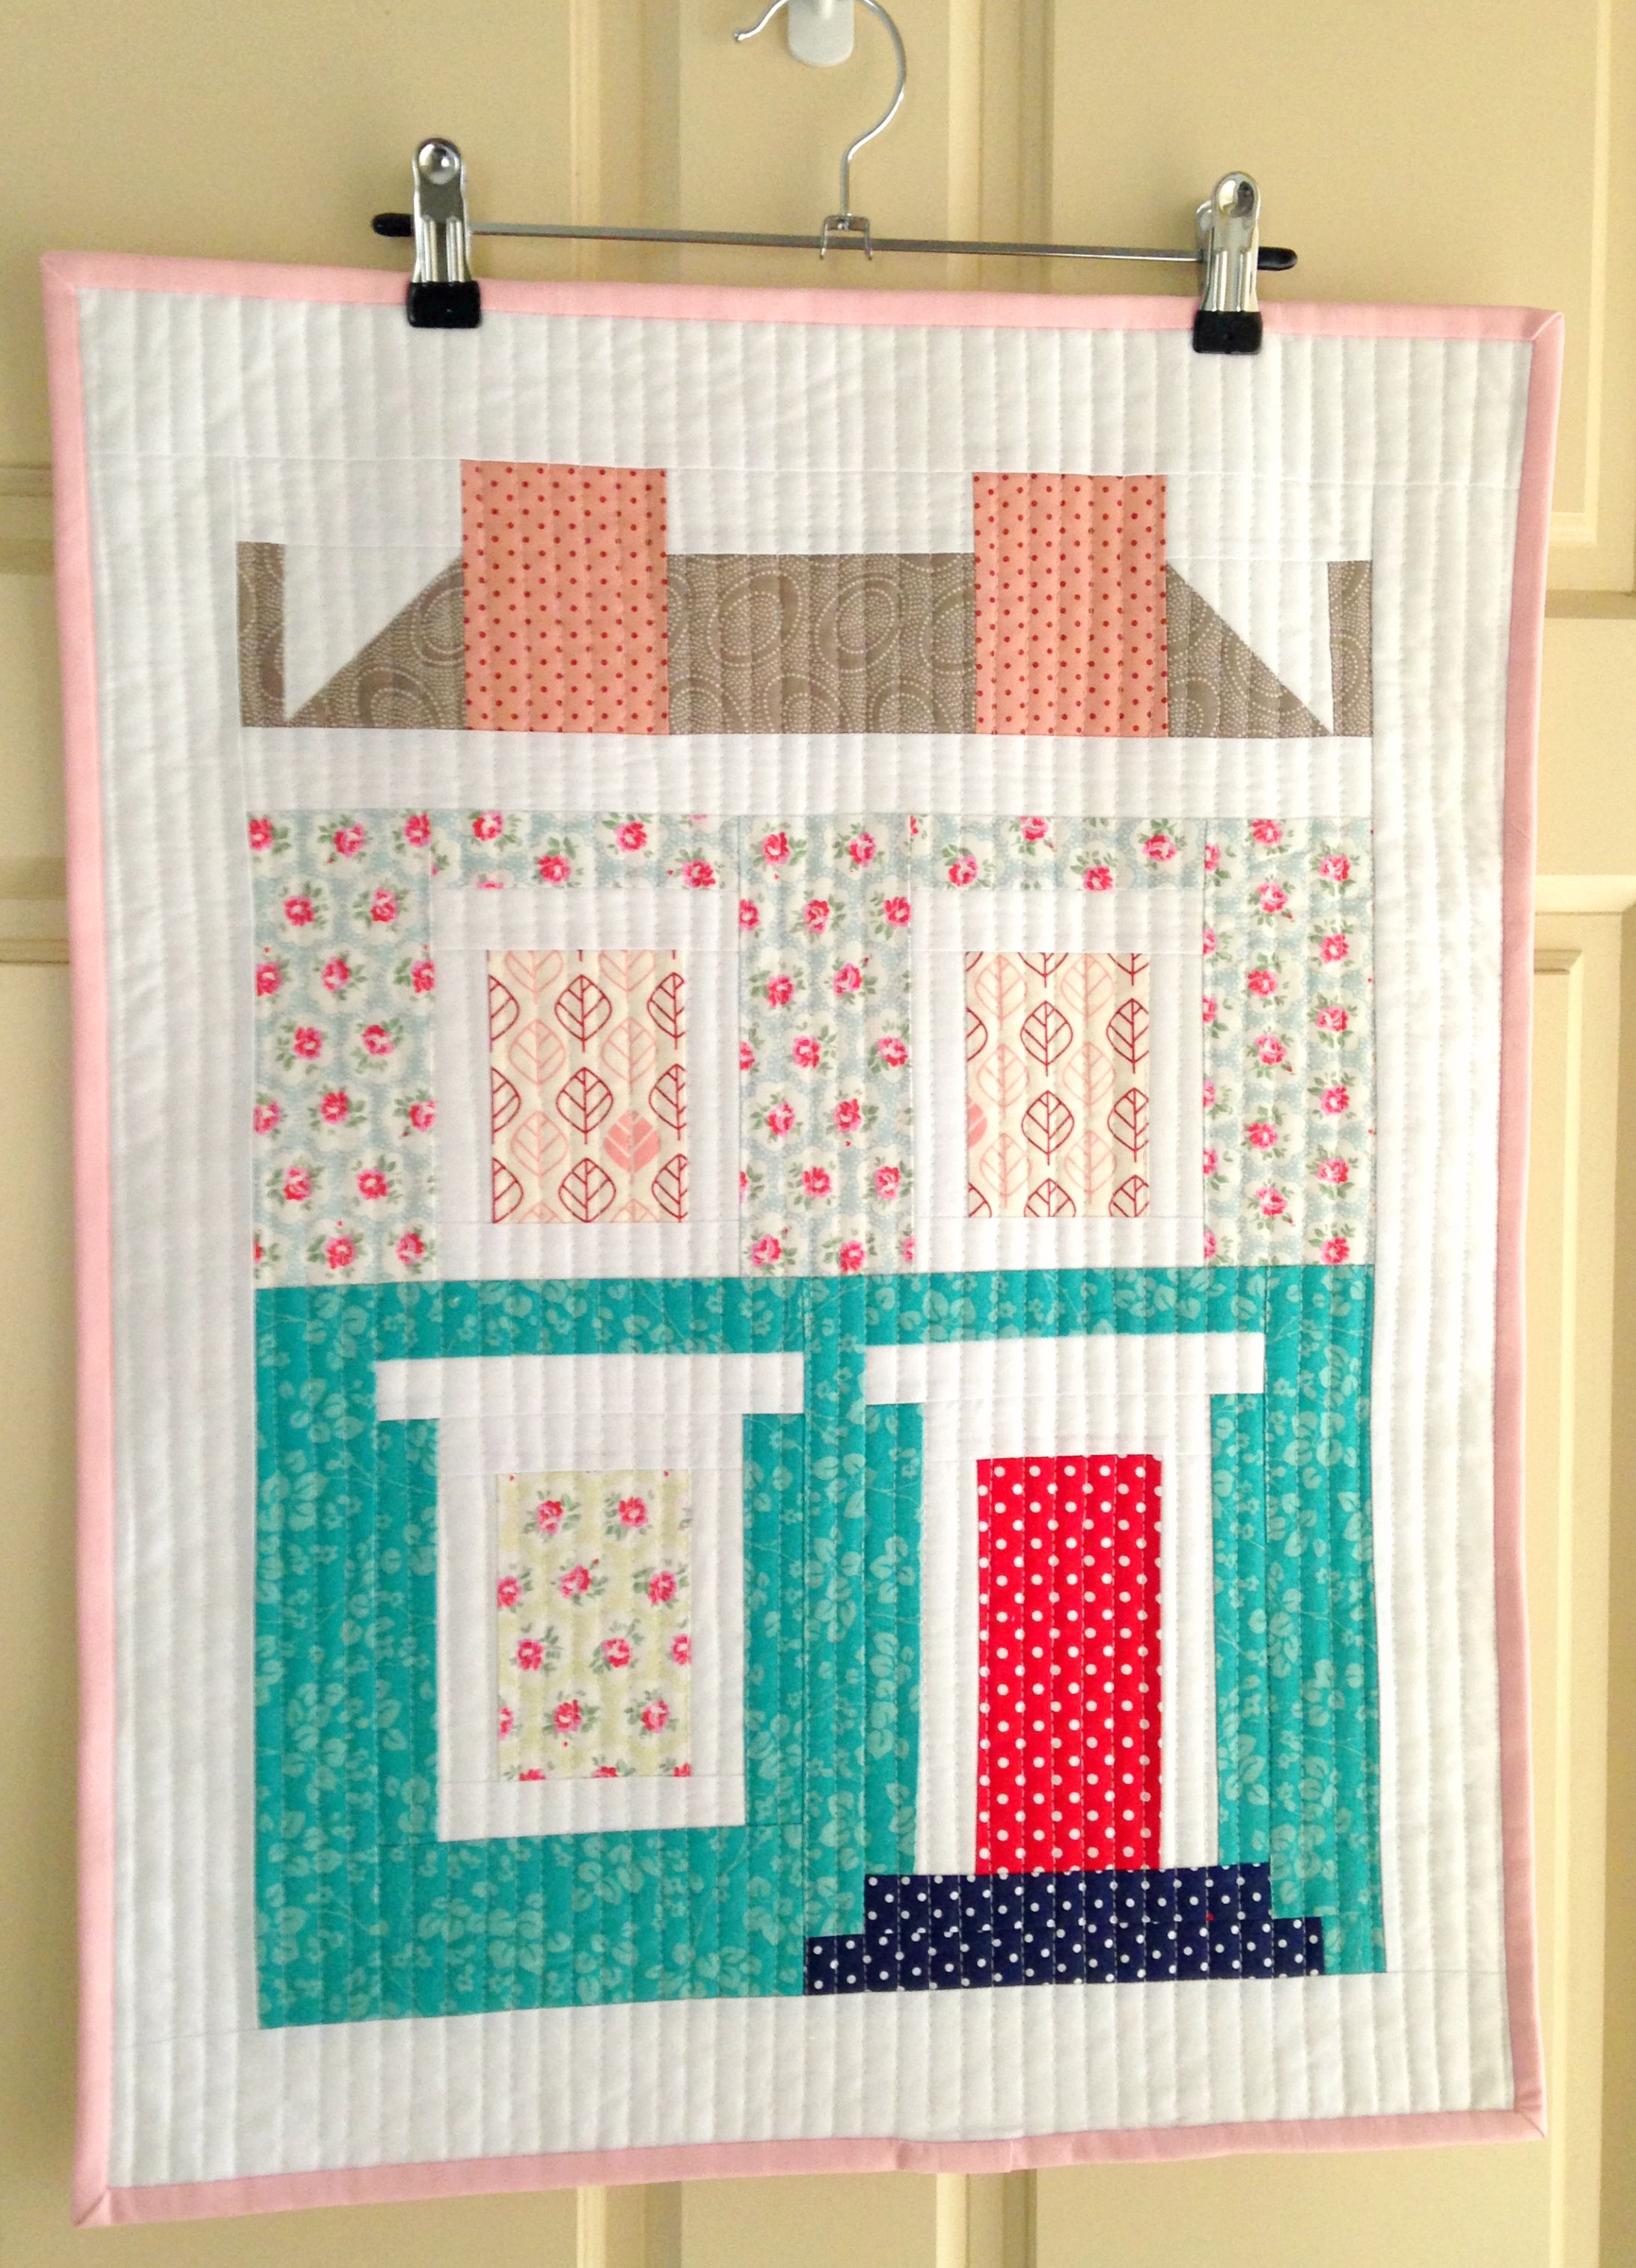
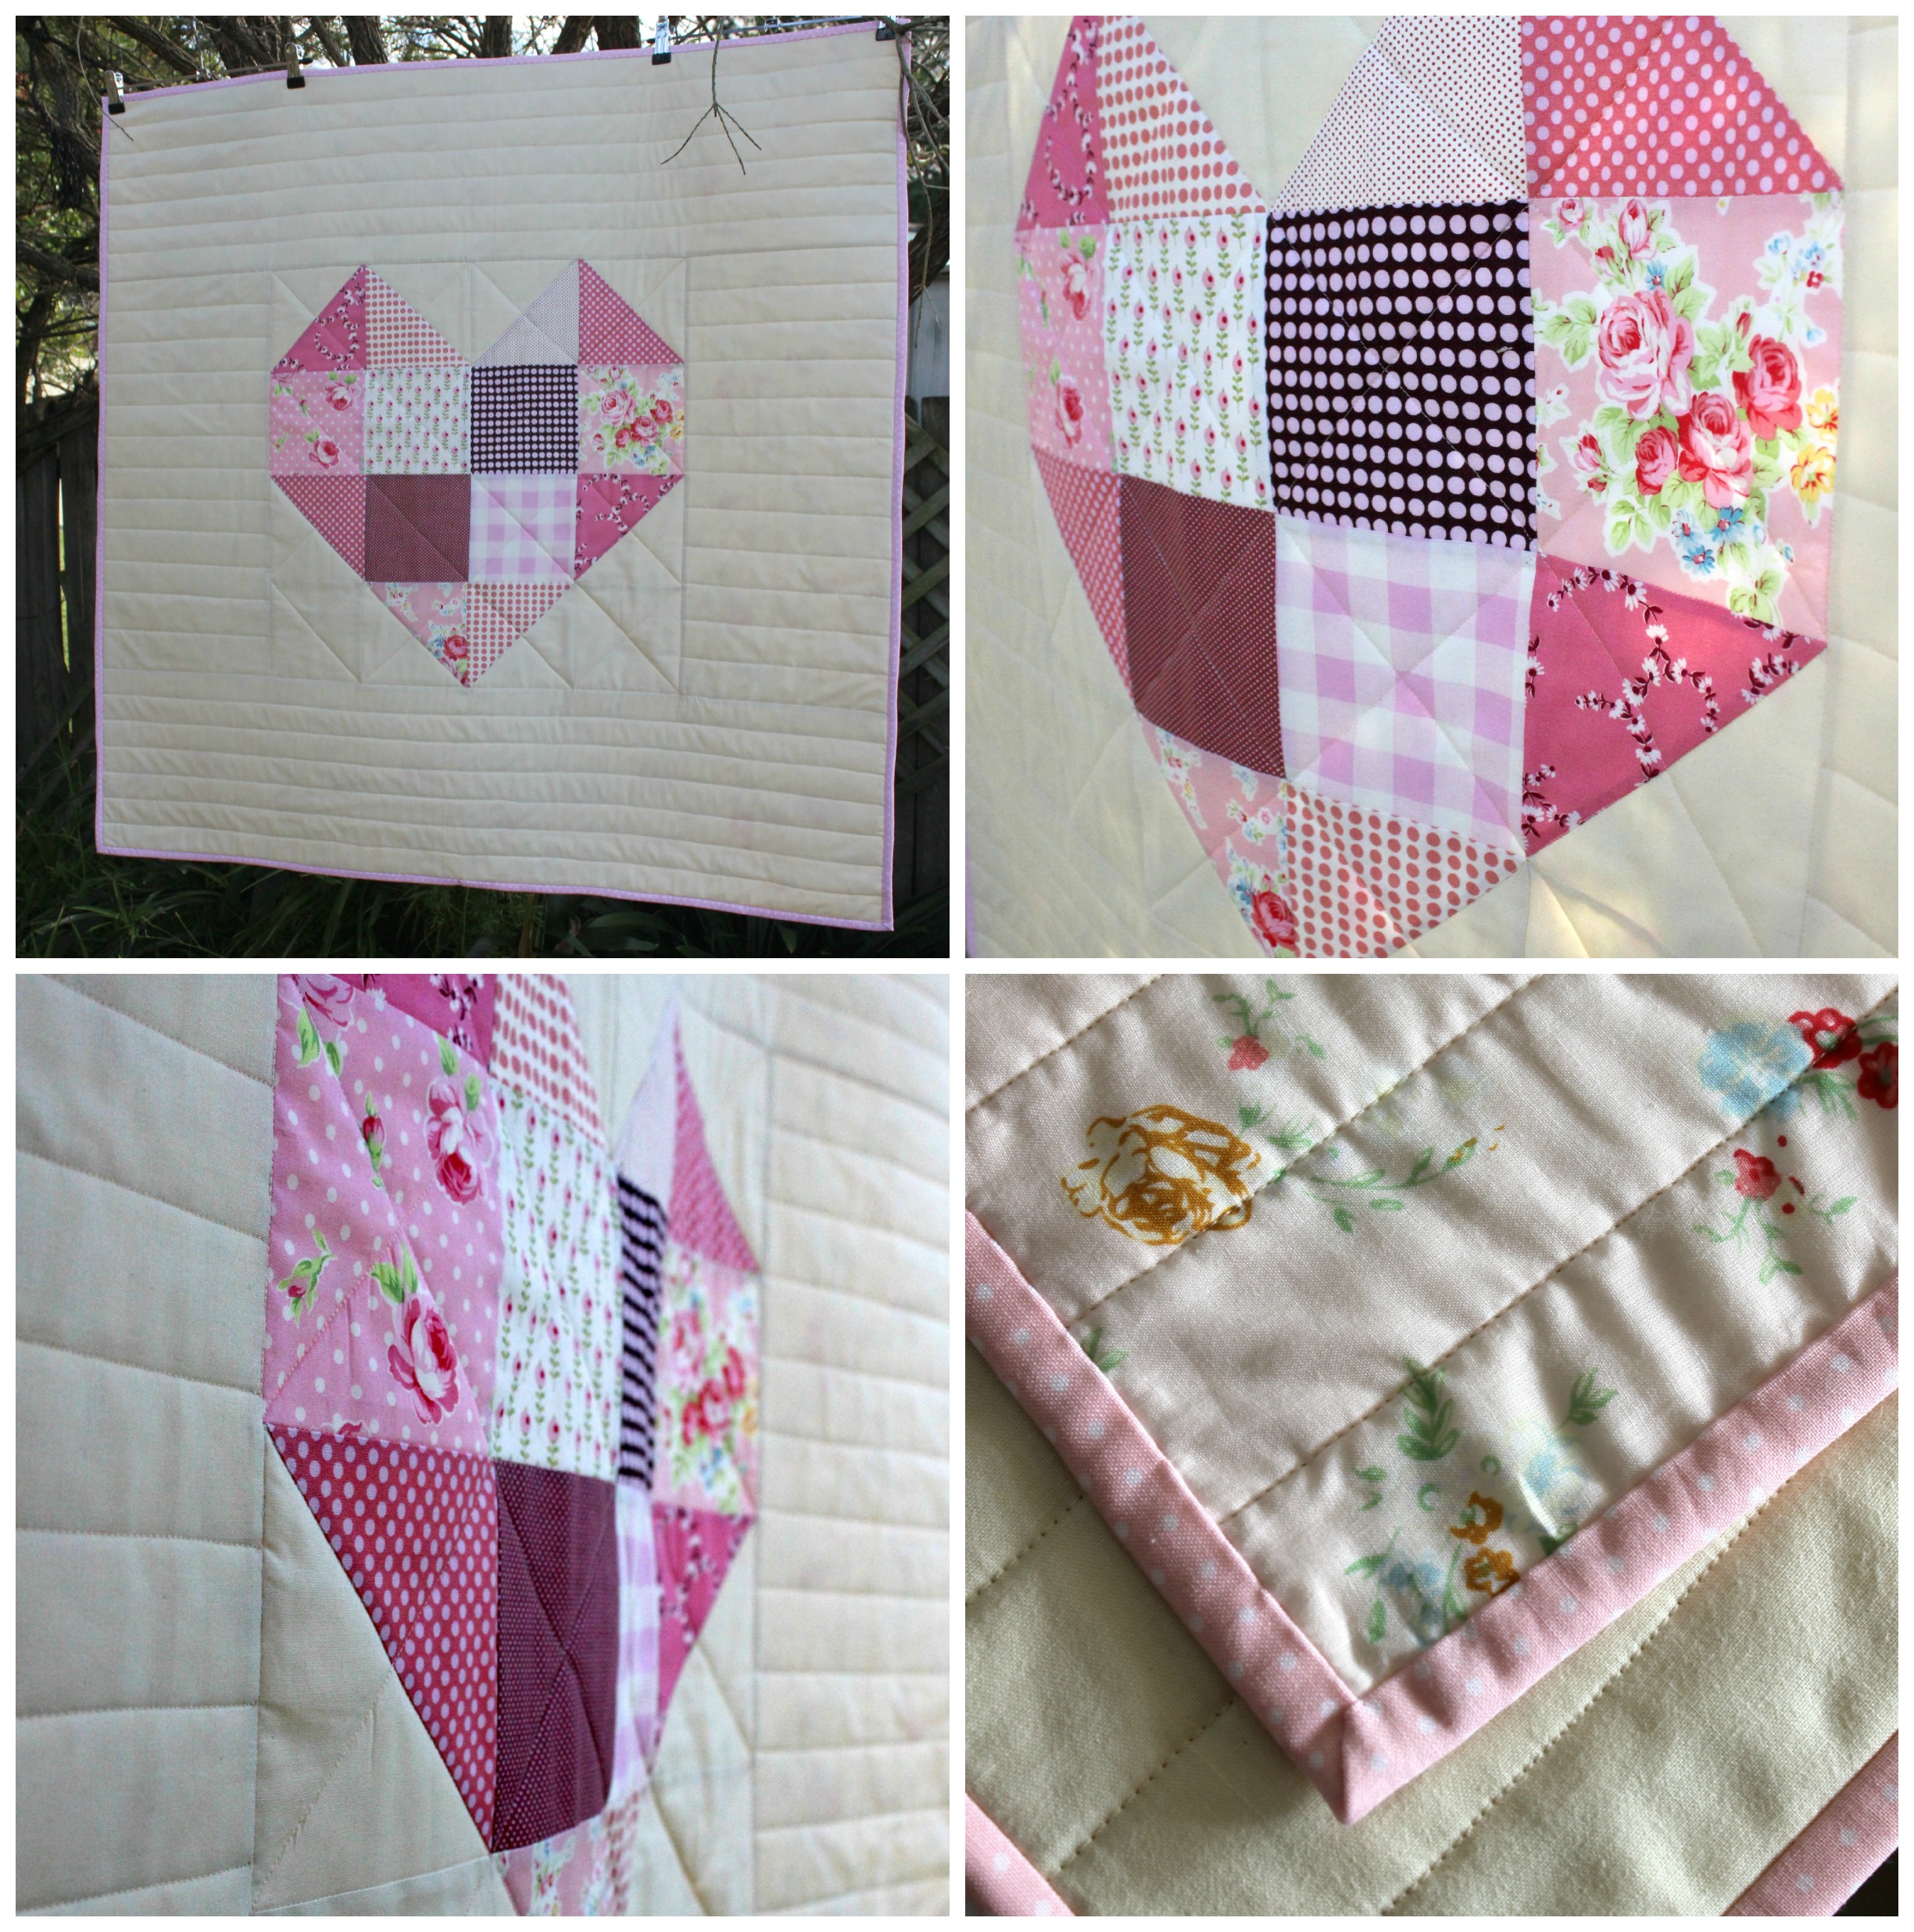
My Notting Hill House Mini is finished!! Yay! (Well, no. A slight lie there. I still need to attach a rod pocket so that I can hang it up. But other than that, it really is finished!)
Oh, I swoon! It’s just so lovely! I can’t believe I was so unsure about the fabrics I picked – but they all work so well with each other! Hooray!
I was planning on quilting it in a grid-like pattern, similar to the original but on the day I quilted it I was more in the mood to stick with my classic straight-line quilting style than to branch out of my comfort zone! I’m really am so happy with how it worked out though. Super modern. Super chic. Super darling!
And today I caught myself gushing even more about this Mini in my September Favourites video! It’s been a while since I shared my monthly favourites on my blog! I hope you enjoy watching it!
Here’s a list of the things I chatted about in the video…
My September Favourites
Florence + The Machine Album, ‘How Big, How Blue, How Beautiful’ (2015)
Petal Pincushions / TUTORIAL
Notting Hill House Mini Quilt by Nadra Ridgeway HER WEBSITE THE PATTERN ‘Be Brave. Be Bold.’ Book from Kikki.K
Revlon Highlighting Palette in 020 Rose Glow
Photography / CAMERA: Canon EOS 600D DSLR
+++
I hope you all have a wonderful weekend wherever you are in the world and use the time to sew til your hearts content!
Have you ever had one of those weeks where you’ve had so much planned to do but by the end of the week, hardly nothing has been done?
Yeh, that’s one of the weeks I’m currently experiencing!
Here it is, a windy, chilly Thursday afternoon and I find that my sticky-note to-do list is still full of those task I wanted to get done on Monday! Gahh!! When did life get so busy and full?!
Anyway, let’s all calm down and allow me to use this small amount of time I’ve discovered this afternoon to write this (late!😁)* post and share it out to the world! Yay!
So quite recently, I’ve been asked by a lot of you to share the way, the method and/or the steps I take when matching fabrics for a block/quilt. I thought, ‘what a great idea! I’d love to share that with you all!’
So over the past weekend I made and uploaded the following video onto my YouTube channel, giving you an insight into how I do this when starting from just one main fabric. I decided to use three different print fabric examples in the video so that you could get the gist of how I do it!
If you have a particular method or style when it comes to matching your fabrics, please free to share it in the comments below!
Happy Matching, Friends!!
xx
*It’s okay, I know you all don’t mind that I write and publish out blog posts a little later than usual. And I know that you understand that life’s a busy ol’ mess and sometimes things don’t go according to plan. And you know, that’s okay, because there are situations in life that could be a whole lot worse than a busy and unstructed week. (Wow, I just got all like deep-thinkery and stuff about the situation and I scared myself a little bit… ohh… It must of been the 85% Dark Chocolate I nibbled on earlier. Which, may I say is horrible! Ergh! It was way too bitter! My disappointment levels are sky high right now!!! All I wanted was a nice little piece of chocolate with my afternoon cuppa, but instead was hit with a mouth full of saliva-sapping cold-hearted bitterness! 😭 Oh gosh, I’m rambling now…. I’m sorry. Must. Stop. Typing. Uhhh….yep…I’m going…I’m stopping…right now… uhh… Bye!)
The first instalment to this series will be live later on today (Monday)! I’ll be publishing another post once the video is up that will have a link to the Part One pattern sheet along with a nice little written piece informing you on more about the block construction and what’s coming up next!
All of the pattern sheets will be available to download from here, my blog, each time a new video in the series is uploaded. Once the series is finished, the completed pattern will be available to download for free!
I hope that you’ll join me in making this idea a success!
Happy Sewing, Friends!
xx
PS. You may be wondering why everything is running a day late… Yes?
Well yesterday (Sunday) I had a chance to catch up with some of my dearest friends that I hadn’t seen for the past few months. We chatted and laughed over afternoon treats and then had a lovely dinner together! It was a great day!
So this obviously resulted in a late edit and I unfortunately ran out of time to upload it on the day I said I would. But everything is full steam ahead today and I’m so excited to get the first video up for you to get stuck into!
If you’ve been scrolling through my Instagram feed, following my weekly uploads on YouTube or reading this here blog lately, then you might know that I’ve recently come back from a very long-awaited holiday/cruise to Fiji!
Over the past few weeks or so I’ve been promising to share with you some photos from my adventure and have spectacularly failed to follow through with that promise! So I’ve set today aside to organise, edit, collage, write and publish this post for you. (And yes, it really does take me a whole day to write, edit and perfect a blog post because I’m a hardcore perfectionist who pretty much needs everything to be perfect before hitting that Publish button!)
So I’m not going to bore the living-daylights out of you and document every single thing and every single port that we visited. Instead, I’m just showing you the highlights, the places that I loved the most and the cherished moments I spent with my parents sailing the South Pacific.
Lifou / Loyalty Islands
Lifou, a little island town within the Loyalty Islands was our first port of call. Both me and my parents have been here twice before but have never visited the little beach that is right near the island’s pier. For a few hours we drunk up the South Pacific sunshine, dug our toes into the cool white sand and observed the cultural uniqueness of it’s people. I didn’t swim at this beach but instead took the opportunity to film a few clips for my vlog.
Port Denarau / Fiji
Our first stop in Fiji was Port Denarau where our ship, the Sun Princess was anchored just out side of the bay. From the ship we were loaded onto a super-sleek catamaran and whisked off on a pre-organised tour to a private island called South Sea Island. As we approached the island we were welcomed with traditional song and numerous shouts of ‘Bula!’, which is Fijian for ‘Hello’!
There we did our best to avoid the horrid humidity by swimming in the crystal clear blue water, gently bobbing up and down while watching soft waves roll and crash onto the coral ridden sandy shore. We peacefully watched other people snorkelling, kayaking, swimming and doing their very best to conquer the challenge of the painful coral underfoot. (We didn’t think to bring along any reef shoes so we suffered painfully with them!)
The locals on the island then made us a big BBQ lunch and treated us to some awesome traditional songs and dances as we ate. (You can see more of this in the vlog at the end of this post!)
The time came for us to say our farewells and thankyous for their generous hospitality and entertainment. We all hopped back onto the catamaran where we were safely jetted back to our ship.
SavuSavu / Fiji
This was the only photo I took when we visited SavuSavu. The majority of the time I filmed for my vlog. But, apart from the thick humidity and looming storm clouds, I really liked this little town. The locals seemed friendly and welcoming and there were stalls upon stalls upon stalls of people selling souvenirs and locally handmade crafts. (I’m such a bad tourist, as I didn’t buy anything.)
Thankfully in the afternoon, we had a pre-organised tour to join where there was a very welcoming air-conditioned bus that took us on a short ‘sight-seeing’ tour of the town before taking us to visit a traditional Fijian village called Nukubalavu. As we pulled up outside we were greeted with a traditional welcoming song sung by the village elders, leaders and children. Our village guide showed us a few of their homes, chatted to us about their Catholic beliefs and then allowed us to tour their little Kindergarten that has been set up in their village for the children to learn how to read and write.
We then had the privilege to watch some of the villages do traditional dancing and singing, perform a sacred ‘Kava Ceremony’, weave baskets out of palm tree leaves and witness a man climb a very tall coconut tree!
Dravuni Island / Fiji
Dravuni Island was definitely the biggest highlight for me! It was the place that came the closest to what I had imagined a Fijian beach island to be like… Tall gentle swaying palm trees, cool crystal blue water, soft smooth sand and a laid back quiet atmosphere. Ahh, bliss!
We came ashore on a delightfully sunny Sunday afternoon (which possibly explains why the place seemed so quite and tranquil!) and had a look around the little Kindergarten and school that had been built for the local children before making our way back onto the beach opposite to where our ship was anchored. There we spent about an hour taking photos, relaxing under the palm trees and soaking up the experience of our last Fijian port.
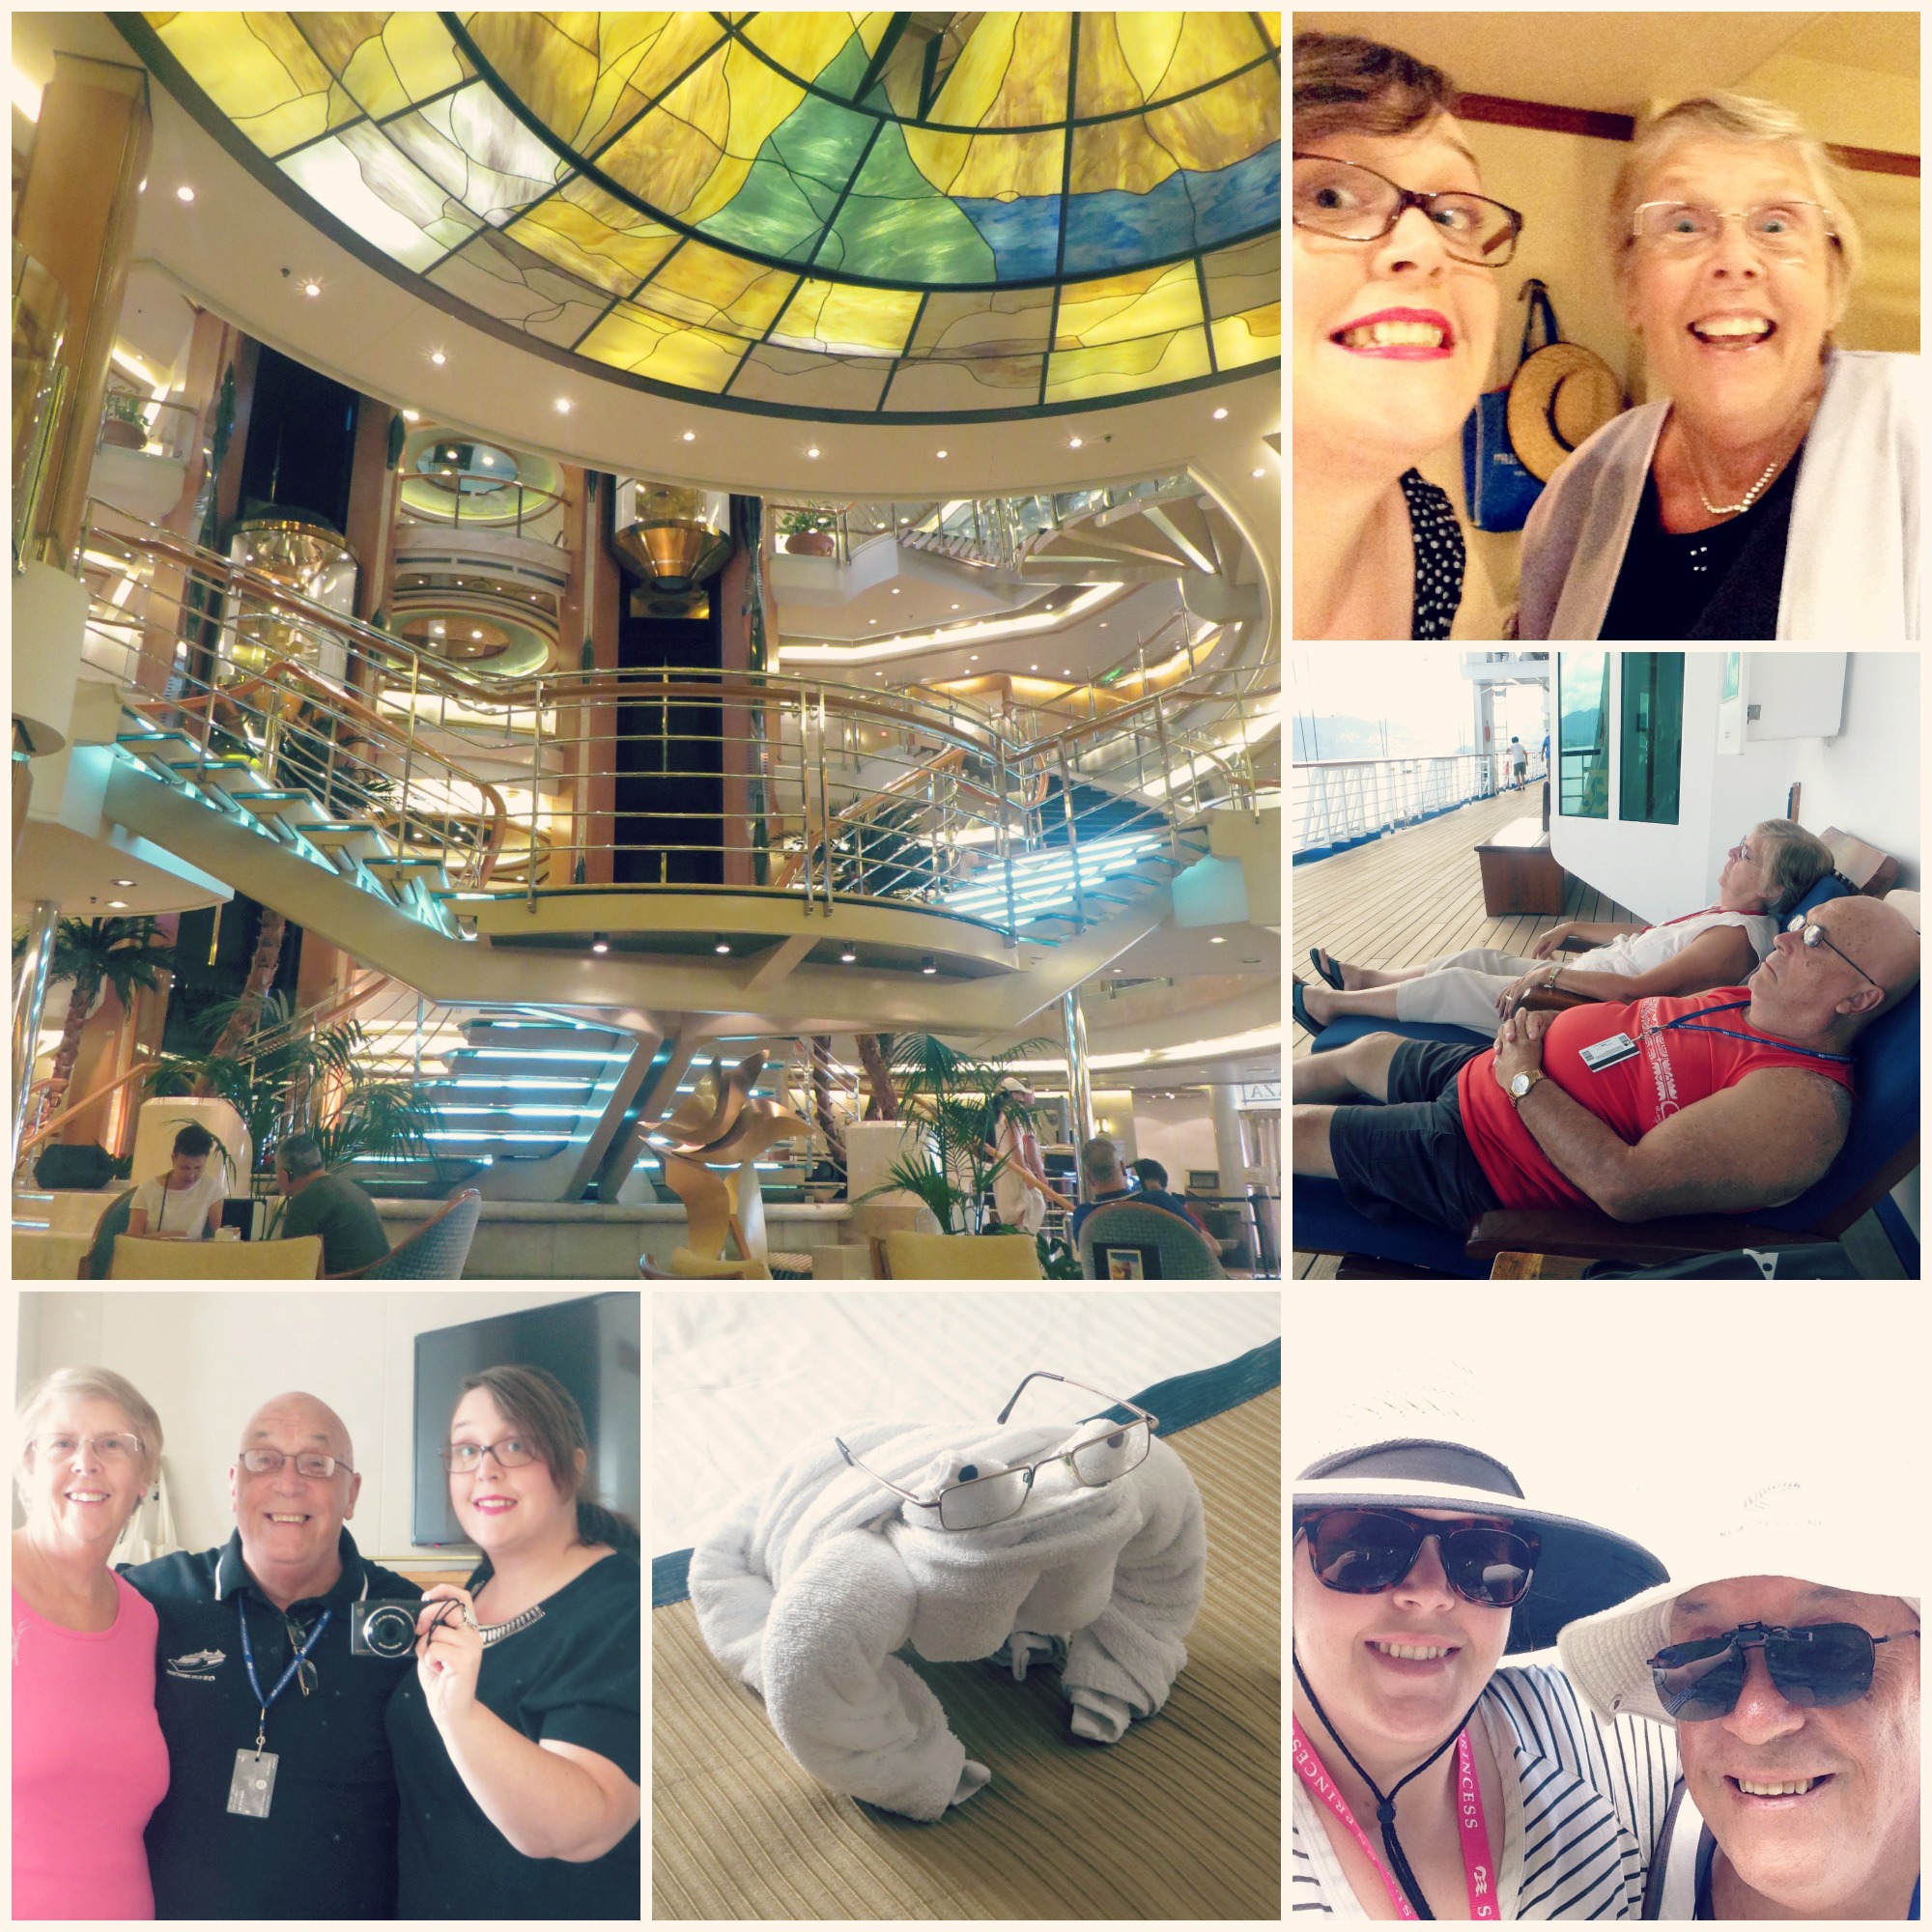
Life Onboard
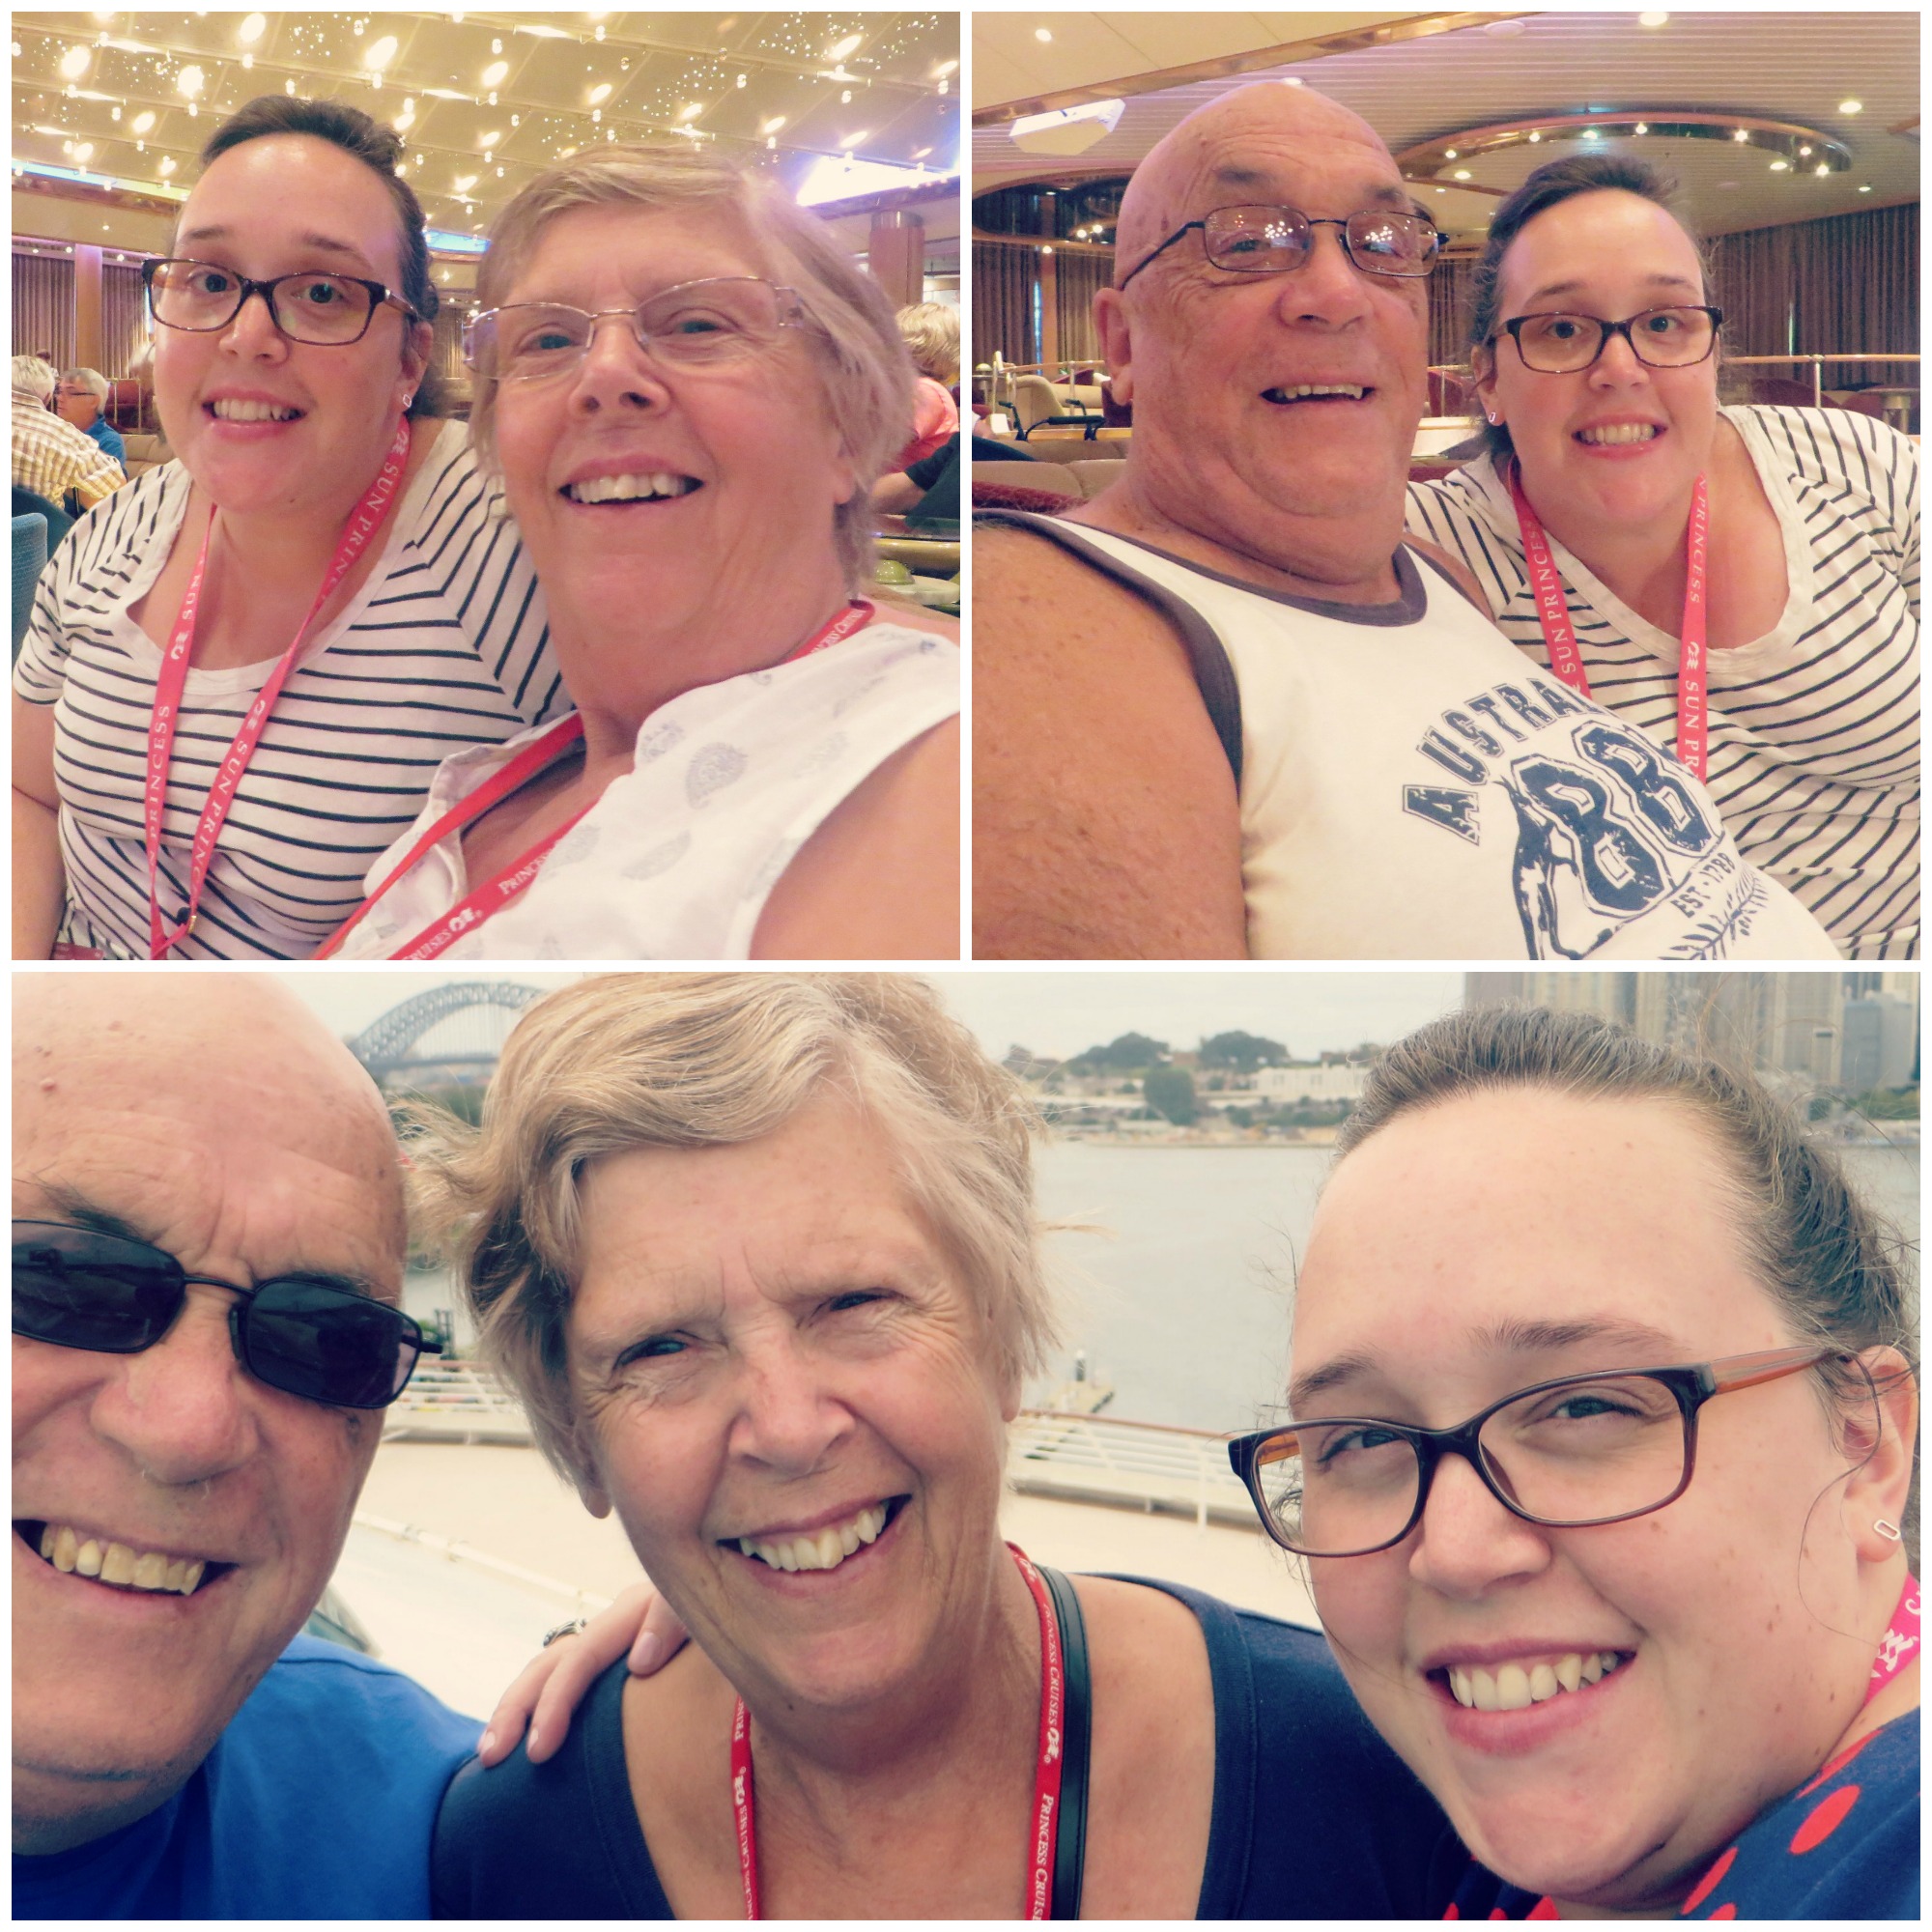
Here are just a few happy snaps I took while we were onboard. We don’t really go crazy when we cruise… We don’t drink or visit the casino nor do we stay up and attend all of the parties (bore, I know!). We’re the simpleton type who like to read (or embroider in my my case) all day, do the occasional deck swim and sunbake, eat and drink tea as many times as possible during the day, watch all the shows and entertainment in the evenings and generally enjoy our holiday away from reality!
Photos from left to right, top to bottom – 1&2: Posing for photos with Mum and then Dad, 3: Selfie on deck before sail away from Sydney, 4: Sun Princess Atrium, 5: Mum and I having a silly-smile selfie before dinner one night, 6: Mum and Dad ‘relaxing’ on deck while anchored in SavuSavu, 7: Mirror Selfie in our stateroom, 8: Towel Toad sporting Dad’s reading glasses, made by our cabin steward, 9: Father and Daughter selfie in Lifou.
Home / Sydney, Australia
Unfortunately, like all things, our holiday had to come to an end. I had mixed feelings about wanting to come home… I just felt like I wasn’t quite ready to let go of that brief period of time where you don’t have to worry or stress about the realities or responsibilities of life. Yet on the other hand, as we begun the slow heading into Sydney Heads I couldn’t wait to savour the moment of gently sailing past one of the most beautiful harbour cities in the world. Sydney, my home, quiet, still and delicate, only just beginning to wake to another busy day. Honestly, the whole thing makes me feel all a bit emotional… My city, quietly welcoming me home in the gentle cool hours of the morning, the breeze whispering, ‘welcome back’ and the familiar sounds of cars, trains, ferries and planes soothing my suburban soul. It’s a moment in time that I will never tire of.
***
As I mentioned throughout, I filmed quite a lot of the things I experienced and only just recently uploaded the finished vlog to my YouTube channel. So here it is if you wish to see more of my adventure!
Also, here’s a list of the filming equipment I used to record my holiday if you’re interested…
So that’s just the brief lowdown of my holiday/cruise to Fiji! I enjoyed every moment and will cherish this time I was able to spend with my parents for the rest of my life!
Over the last little while, I’ve been asked some wonderfully awesome questions all about sewing machines. With questions ranging from…
What is the best sewing machine to use when I’m quilting?
How do I use a walking foot?
Can I make a large quilt using my small sewing machine?
What are the best types of threads to use for patchworking?
How much money should I spend on a good sewing machine?
And so many more!
So to answer these questions, I made a video where I sat down and went through all of the basics things there is to know about sewing machines!
Now you may be thinking, ‘how is it that she knows all this stuff!?’
Well, for about six years I worked in a very well know craft/fabric store here in Australia called Spotlight. There, I worked in the fabric and haberdashery department where we also sold sewing machines!
About twice a year, we would have intensive training days with sewing machine reps who taught us everything there is to know about sewing machines, inside and out. We learnt how to demonstrate and talk to customers about sewing machines, how to troubleshoot problems they were having as well as understanding what machine was best for a particular end use i.e. dressmaking, quilting, heavy duty sewing etc.
So because of this, I feel confident in myself and in the knowledge I’ve learnt over the years to answer these questions for you. I am aware that I do not know everything and nor am I ever likely too! I myself, am still learning about the endless possibilities and all of the little intricacies that my sewing machine has to offer and I really love that!
If you have any questions about anything I say in this video or are unsure of any features/functions on yours or are having any issues, please feel free to ask/comment below! I will try my very best to answer you as honestly and as simply as I can!
Also, if you have any tips or nuggets of knowledge that you would like to share with me and others, please comment as well!!
Happy Sewing Friends!!
xx
PS. If you would like to see a few fun little moments where I stutter, mumble, make weird faces and struggle with my words, then you can catch the Bloopers video right here!
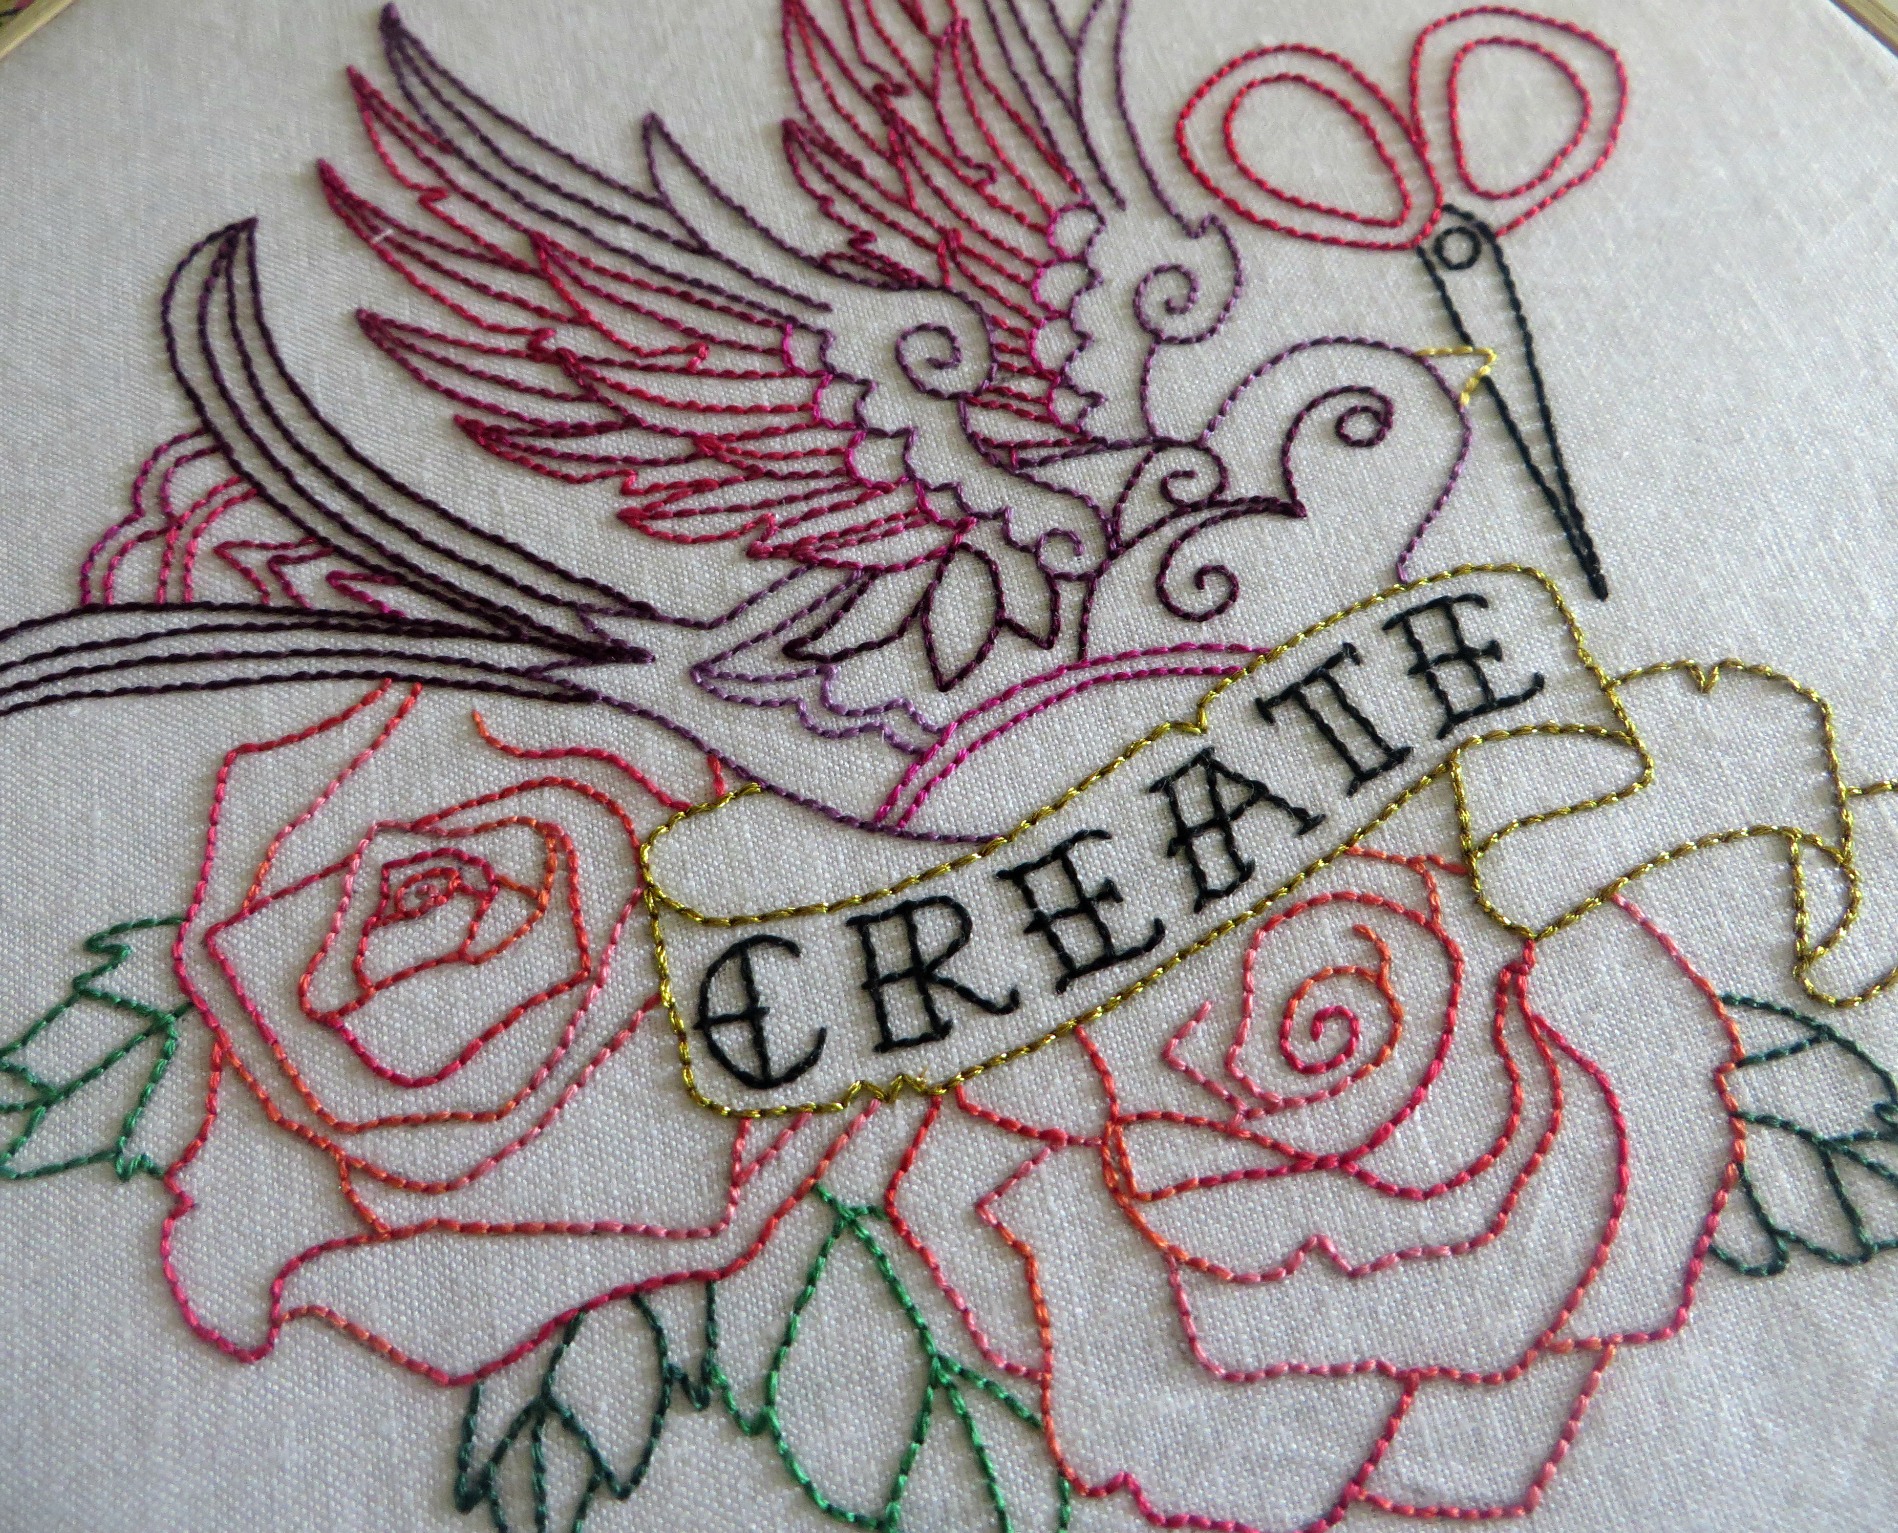
Every few minutes or so I would ‘down tools’ and take a photo of how far I had progressed in completing this little embroidery.
This was the result…
In all honesty, I have no idea how long this actually took me, as it was one of those projects that I kept coming back to over a period of three months.
But know this… While I was making this embroidery I watched all four season of Downton Abbey (love that show!!) as well as childhood movies like Hook! (one of my favourite Robin Williams movies) and Peter Pan (oh, to never grow up!).
Here’s a bit more info about this embroidery…
– Music: ‘Mermaids’ by Jinja Safari
– Pattern: Urban Threads http://goo.gl/WB4XfF
– Embroidered onto 100% Cotton Linen
– Backed with light-weight fusible interfacing
– Traced using a HB lead pencil
– Hoop: Semco, size 260mm (10″)
– I use DMC threads/floss with a no. 7 sized embroidery needle
– Captured using a Canon Power Shot SX280 HS camera
– Embroidered using back-stitch
I’ve also made two other Stop-Motion Embroidery videos. Here are the links if you wish to see them as well!
On a warm Friday night three years ago, I plucked up the courage to begin writing this here humble quilting blog.
Now here we are, 1,093 days later and I’m still just as dedicated and proud of my little slice of the internet as I was the day I created it.
As I’ve done in other past ‘birthday’ type posts, let’s recap the year that was!
Firstly: YouTube!
This year, I’ve dedicated a lot of hard work into developing my YouTube channel(and with some very pleasing results thus far!).
I’ll also be the first one to admit that I’ve spent so much time planning and creating content for it, that my blog has had to fall-by-the-way-side so speak and become the second child. But! In saying this, my blog has never been too far out of my mind! Along with my YT channel, the welfare of my blog is always on my mind and I’m constantly developing ways in which I can improve its quality! Hence my little foray into making video tutorials!
Thanks to YouTube, my confidence in my patchwork/quilting skills has improved, I’ve felt confident in delivering and teaching skills to others and I’m continually being challenged in both my sewing skills and editing/technical skills.
Hooray!!
Here’s a list of some of the most challenging videos I’ve created this year…
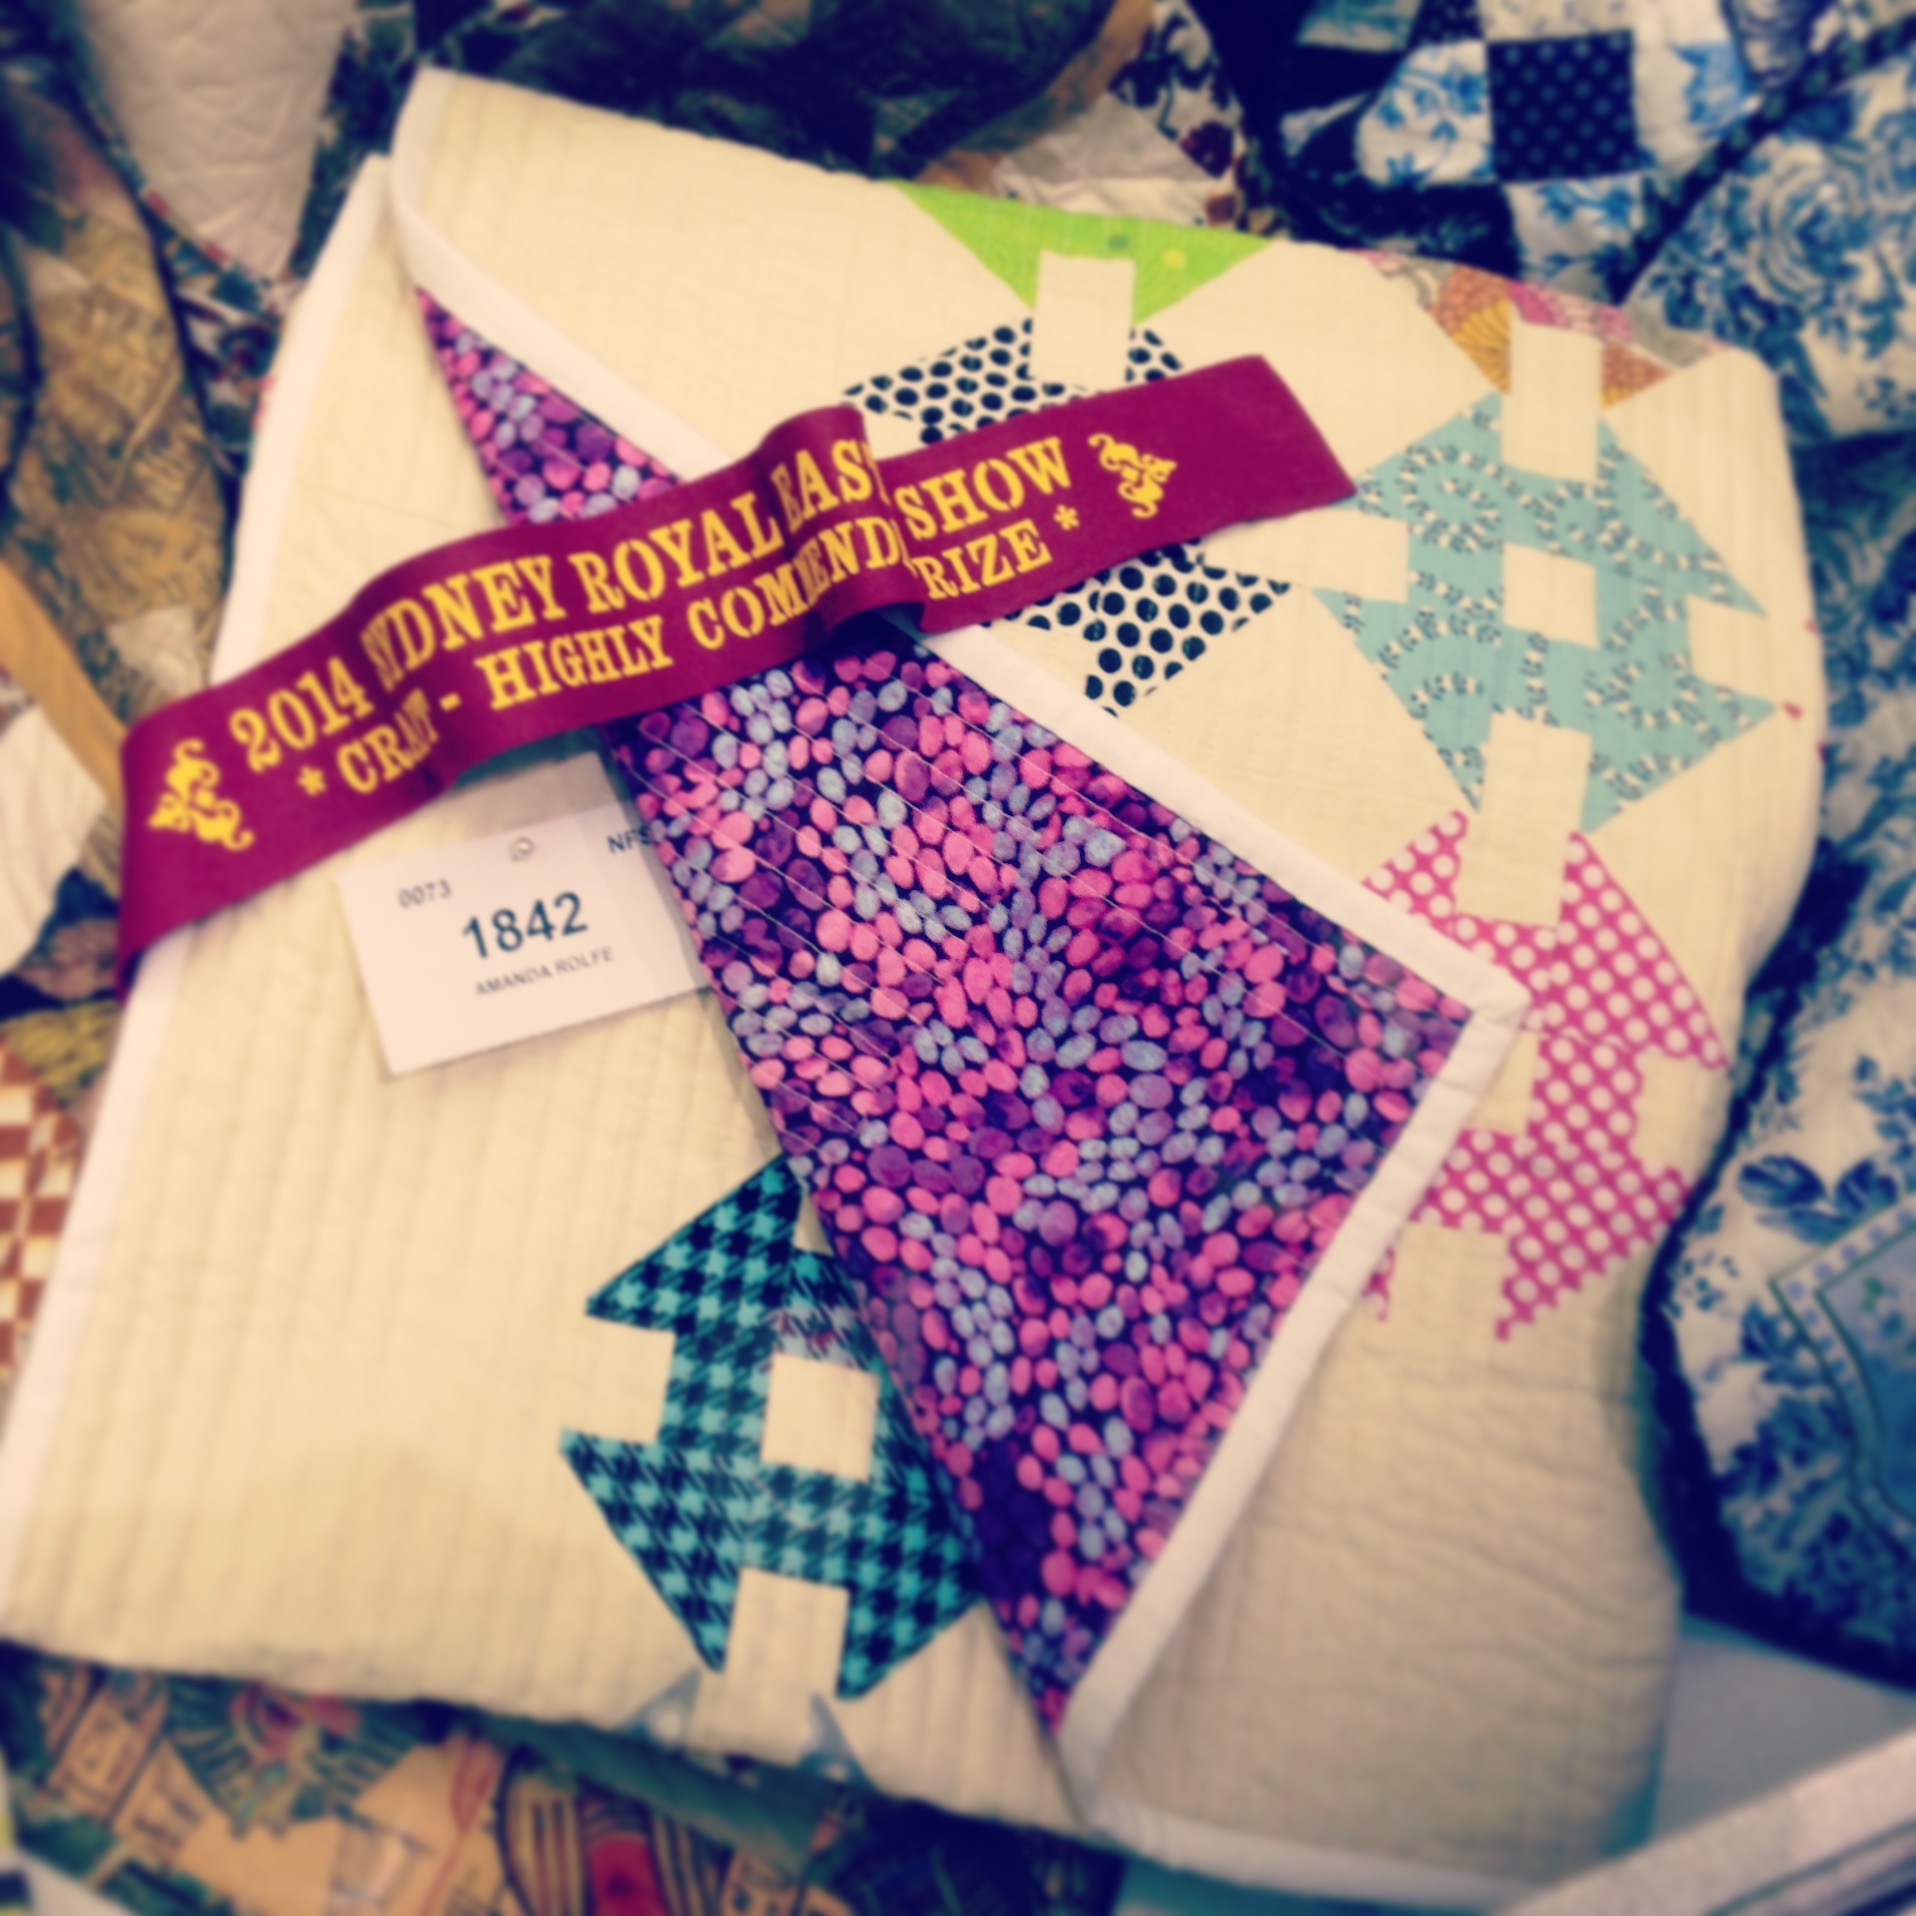
Although I had been quilting for over 7 years, 2012 was the first year I was confident enough in my work to enter them into shows.
This year, I struck a goal off my list and entered a few items into the prestigious Sydney Royal Easter Show in April/May. And would you believe it, one of my quilts received a highly commended ribbon!!
No way did I think I would receive anything in my first year of entering! Not in the least! But I’m so greatly humbled that my sweet little ‘Happy Quilt’ was noticed and received the love it’s owed.
Now this quilt hangs in my room and I use it as a backdrop for quite a lot of my videos! (Just like this one!)
And like last year, I entered a mini quilt into the Sydney Quilt Show during July. Although it didn’t receive any ribbons, I’m still chuffed to bits that my little quilt was invited to hang in an enormous room filled with many, many, many beautiful quilts!
Thirdly: Projects!
As I began brainstorming and planning the things I would write for this section, a pang of guilt was slowly rising inside of me. I felt that I really hadn’t ‘made’ or ‘done’ very much sewing/patchwork/quilting/crafting wise to really reflect and chat about.
However, after having a quick squizz through all of the post I’ve published over the last year, so many little projects kept popping up with me exclaiming out loud, ‘Oh yeah! I totally forgot about that one!’ Hence highlighting the reason why I chose to begin writing a blog! My mind really is like a sieve sometimes!
So here are some highlights of the creative things I’ve began and/or finished over the past 12 months.
Halloween Crafts: This is the first time I’ve ever got into Halloween crafting. Halloween isn’t widely celebrated in Australia but it’s very slowly (some may say very quickly!) catching on!
Dressmaking: I’ve made a few little things in the past (a coat, aprons, dresses) but over the last month or so I’ve really enjoyed the process of making simple t-shirts through preparing the pattern, pinning it down, cutting it out and then constructing a 2D material into a 3D wearable garment.
Plus, there’s an element of pride in wearing something that you’ve made and then having others compliment you on how well it looks! (Modest much!?)
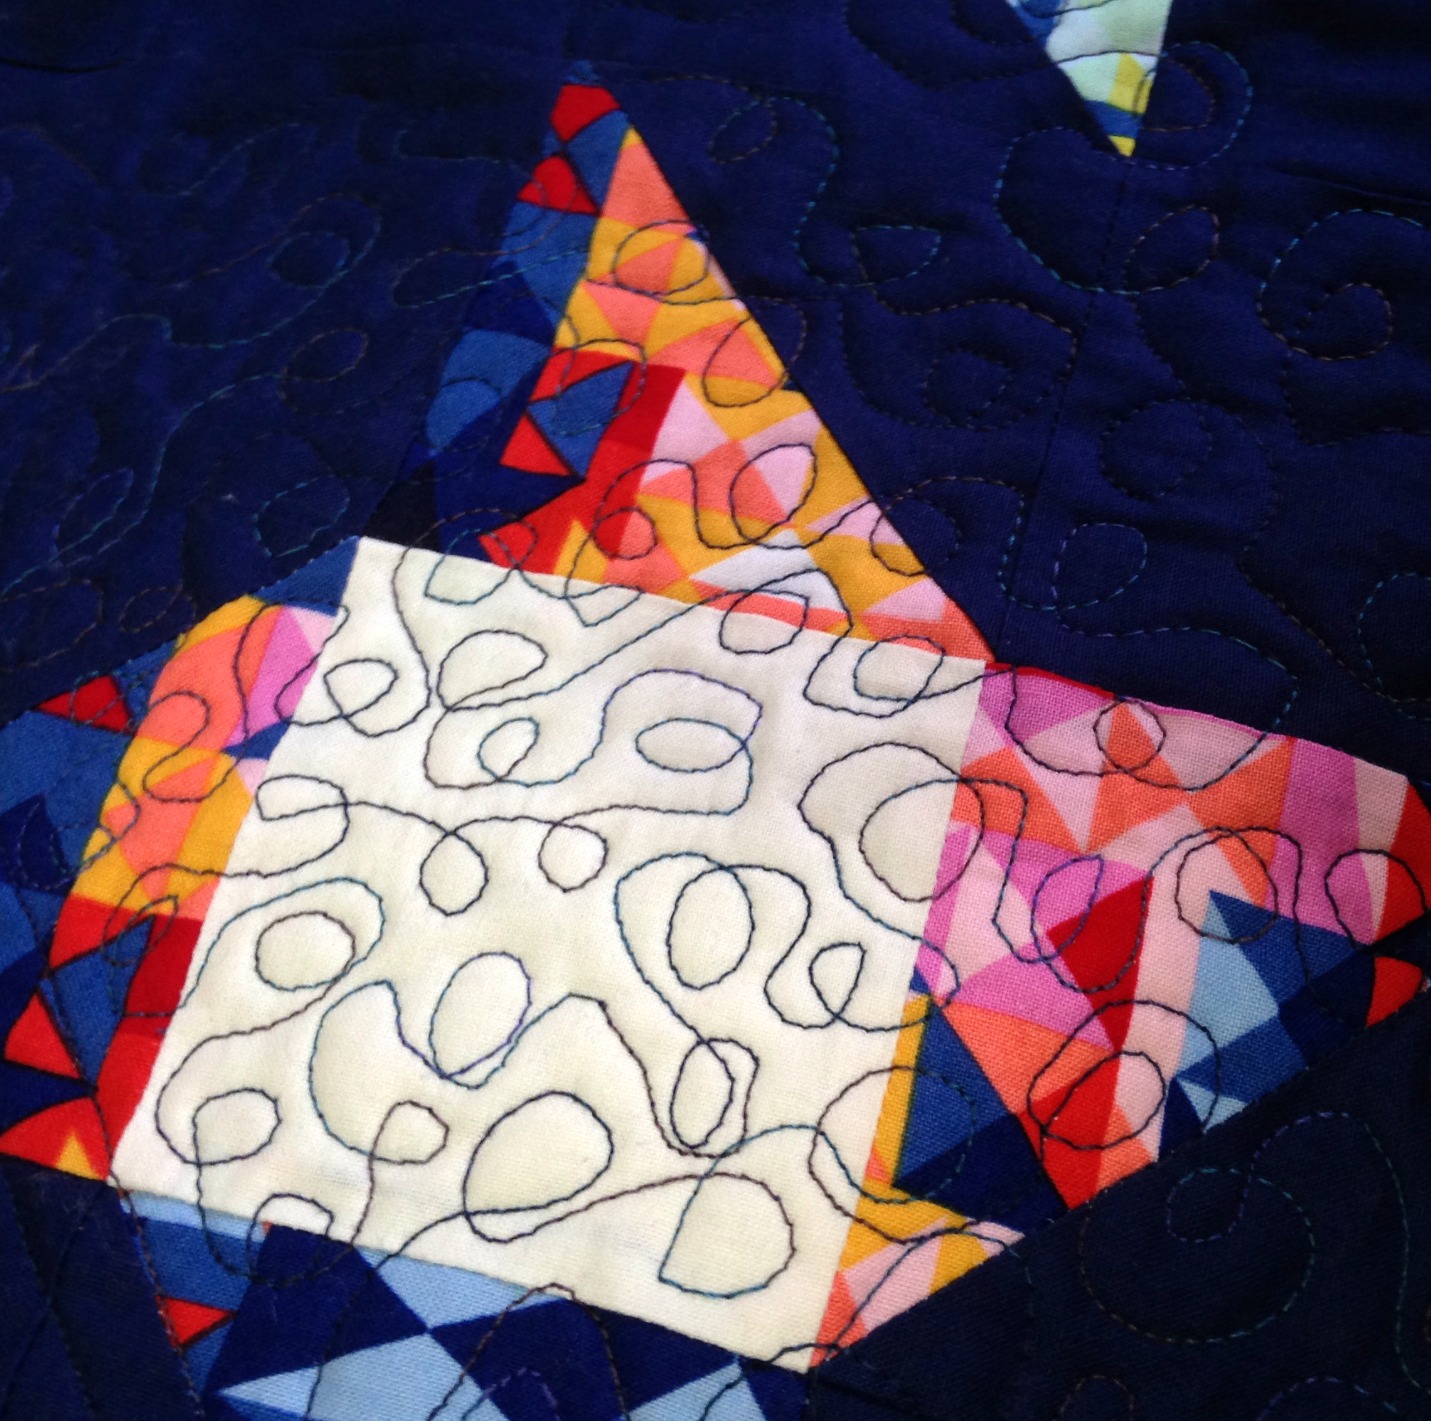
Struggling with WIPs: At the start of the year, I made a pledge to try and finish all of my WIPs. It’s safe to say that promise went out the window two weeks in! To add to the pile is a Plus Block Quilt and my ‘Diamonds in the Sky’ Quilt that I totally ruined with some ridiculous experimental quilting!!!
Oh! It’s so horrible!!
(I haven’t the heart or patience to unpick this yet! I’m still in mourning!)
It’s still listed, waiting for the perfect buyer. Do you know anyone having a little baby girl soon? Perhaps this is what you’ve been looking for! (A little bit of promotion on my blog never hurt anyone, right?)
Another quilt that is currently under way is one I’m making for my niece who is due to enter our family in early December!
And here’s a little bit of trivia for you: one of the blocks in this quilt is the very one I made in my Bear Paw Block tutorial! Yep!
Embroideries: I’ve stitched a few more embroideries including this one which I made into video!
Little Purses: These little guys are always my best seller when I list them up onto my madeit store. They’re super easy to make and the design possibilities are endless!
I have quite a few listed at the moment if you’re interested… Unfortunately, they’re only available for Australian residents. Postage is insanely pricey for any international sales. You’ll find the postage will be more expensive than the purse itself!
Fourthly: Goals for the coming year.
I think one of the main things I want to achieve over the next 12 months is a steady growth in my sewing skills, gain confidence when it comes to teaching and filming for my YT channel as well as to take on opportunities that are given to me to develop my creativity and voice in the world.
There are also some big quilts I want to attempt too!
One being a hand-applique based quilt that will feature this design…
Sampling the planned design!
(I’m thinking of entering this into the 2015 Sydney Royal Easter Show if I finish it on time!)
I’ve always, always, always admired these quilts. The technical skills and patience to make this is incredible to think of! But, I feel that I could tackle a quilt of this magnitude and do a good job of it too! (Famous last words??)
So there are two quilts with some pretty intense types of skills that I’ll need to teach myself and hone but I’m ready for the challenge and ready for downfall! (If that happens, of course!)
So there is the year that’s past. Looking back over previous posts from this year, I’ve open up a lot about myself to you all (check this post out), have shared where I get my inspiration from, have studied a heck of a lot, re-joined the retail working-class and shared the lovely things I have in my life.
But lastly, to all of you who follow my blog in one way or another, I would like to thank you for your most wonderful support, for your always kind words of encouragement and for simply ‘liking’ my posts!
Every little bit of interaction from you (whether you’re just browsing or seriously analysing my every word) brings me immense pleasure and happiness! I truly am lucky to have like-minded people interested in the things I write, make and photograph.