MINI BLOCK QAL | Finishing Touches

VERSION #1 PATTERN SHEET: MiniBlockQAL – FinalLayout
VERSION #2 PATTERN SHEET: MiniBlockQALFinish V2

It’s been a long time coming, I know, but the very last tutorial in my Mini Block Sampler Quilt Along is here! Finally!!

It’s been a long old road with this one but I couldn’t be happier with how everything has come together to create a beautifully quirky little quilt-slash-wallhanging!

As you may’ve noticed, I’ve provided two different quilt top layouts that you can choose from. I decided I wanted to do something just that little bit different. I shuffled my nine sweet mini blocks down into the right hand corner, enlarging the top corner border pieces creating some luscious negative space to fill will lots of directional quilting lines.

And I have to say, I think the gamble paid off! It’s added another interesting twist to the overall theme of the quilt. And it’s the perfect size to squeeze on a wall somewhere in our house!

As I mention at the beginning of the tutorial below, it’s completely up to you how you would like to finish your quilt top. Choose one of the versions I’ve provided above or reject both and do your own thing! (I really won’t mind if you do!) Be creative. Have fun. Be happy with your choice!

+++

Just like a broken record, I want to take another moment to thank everyone who participated in this QAL, who learnt learnt some new skills and had fun along the way!

You’re all such wonderful people and mean so much to me! Thank you!

And for the last time – share your makes with me on Instagram!

#AmandasMiniQAL

Happy Sewing, Friends!

xx

A Block Review // Mini Dollhouse

DollHouseBlock1The other day, I was looking for a challenge… A block, that I’ve never before constructed, was a bit cutesy in design and was a possible candidate for a future block tutorial.

So when a challenge is needed, I go straight for my trusty, most favouritist, well spoken about quilting book – 130 Mini Quilt Blocks by Susan Briscoe!

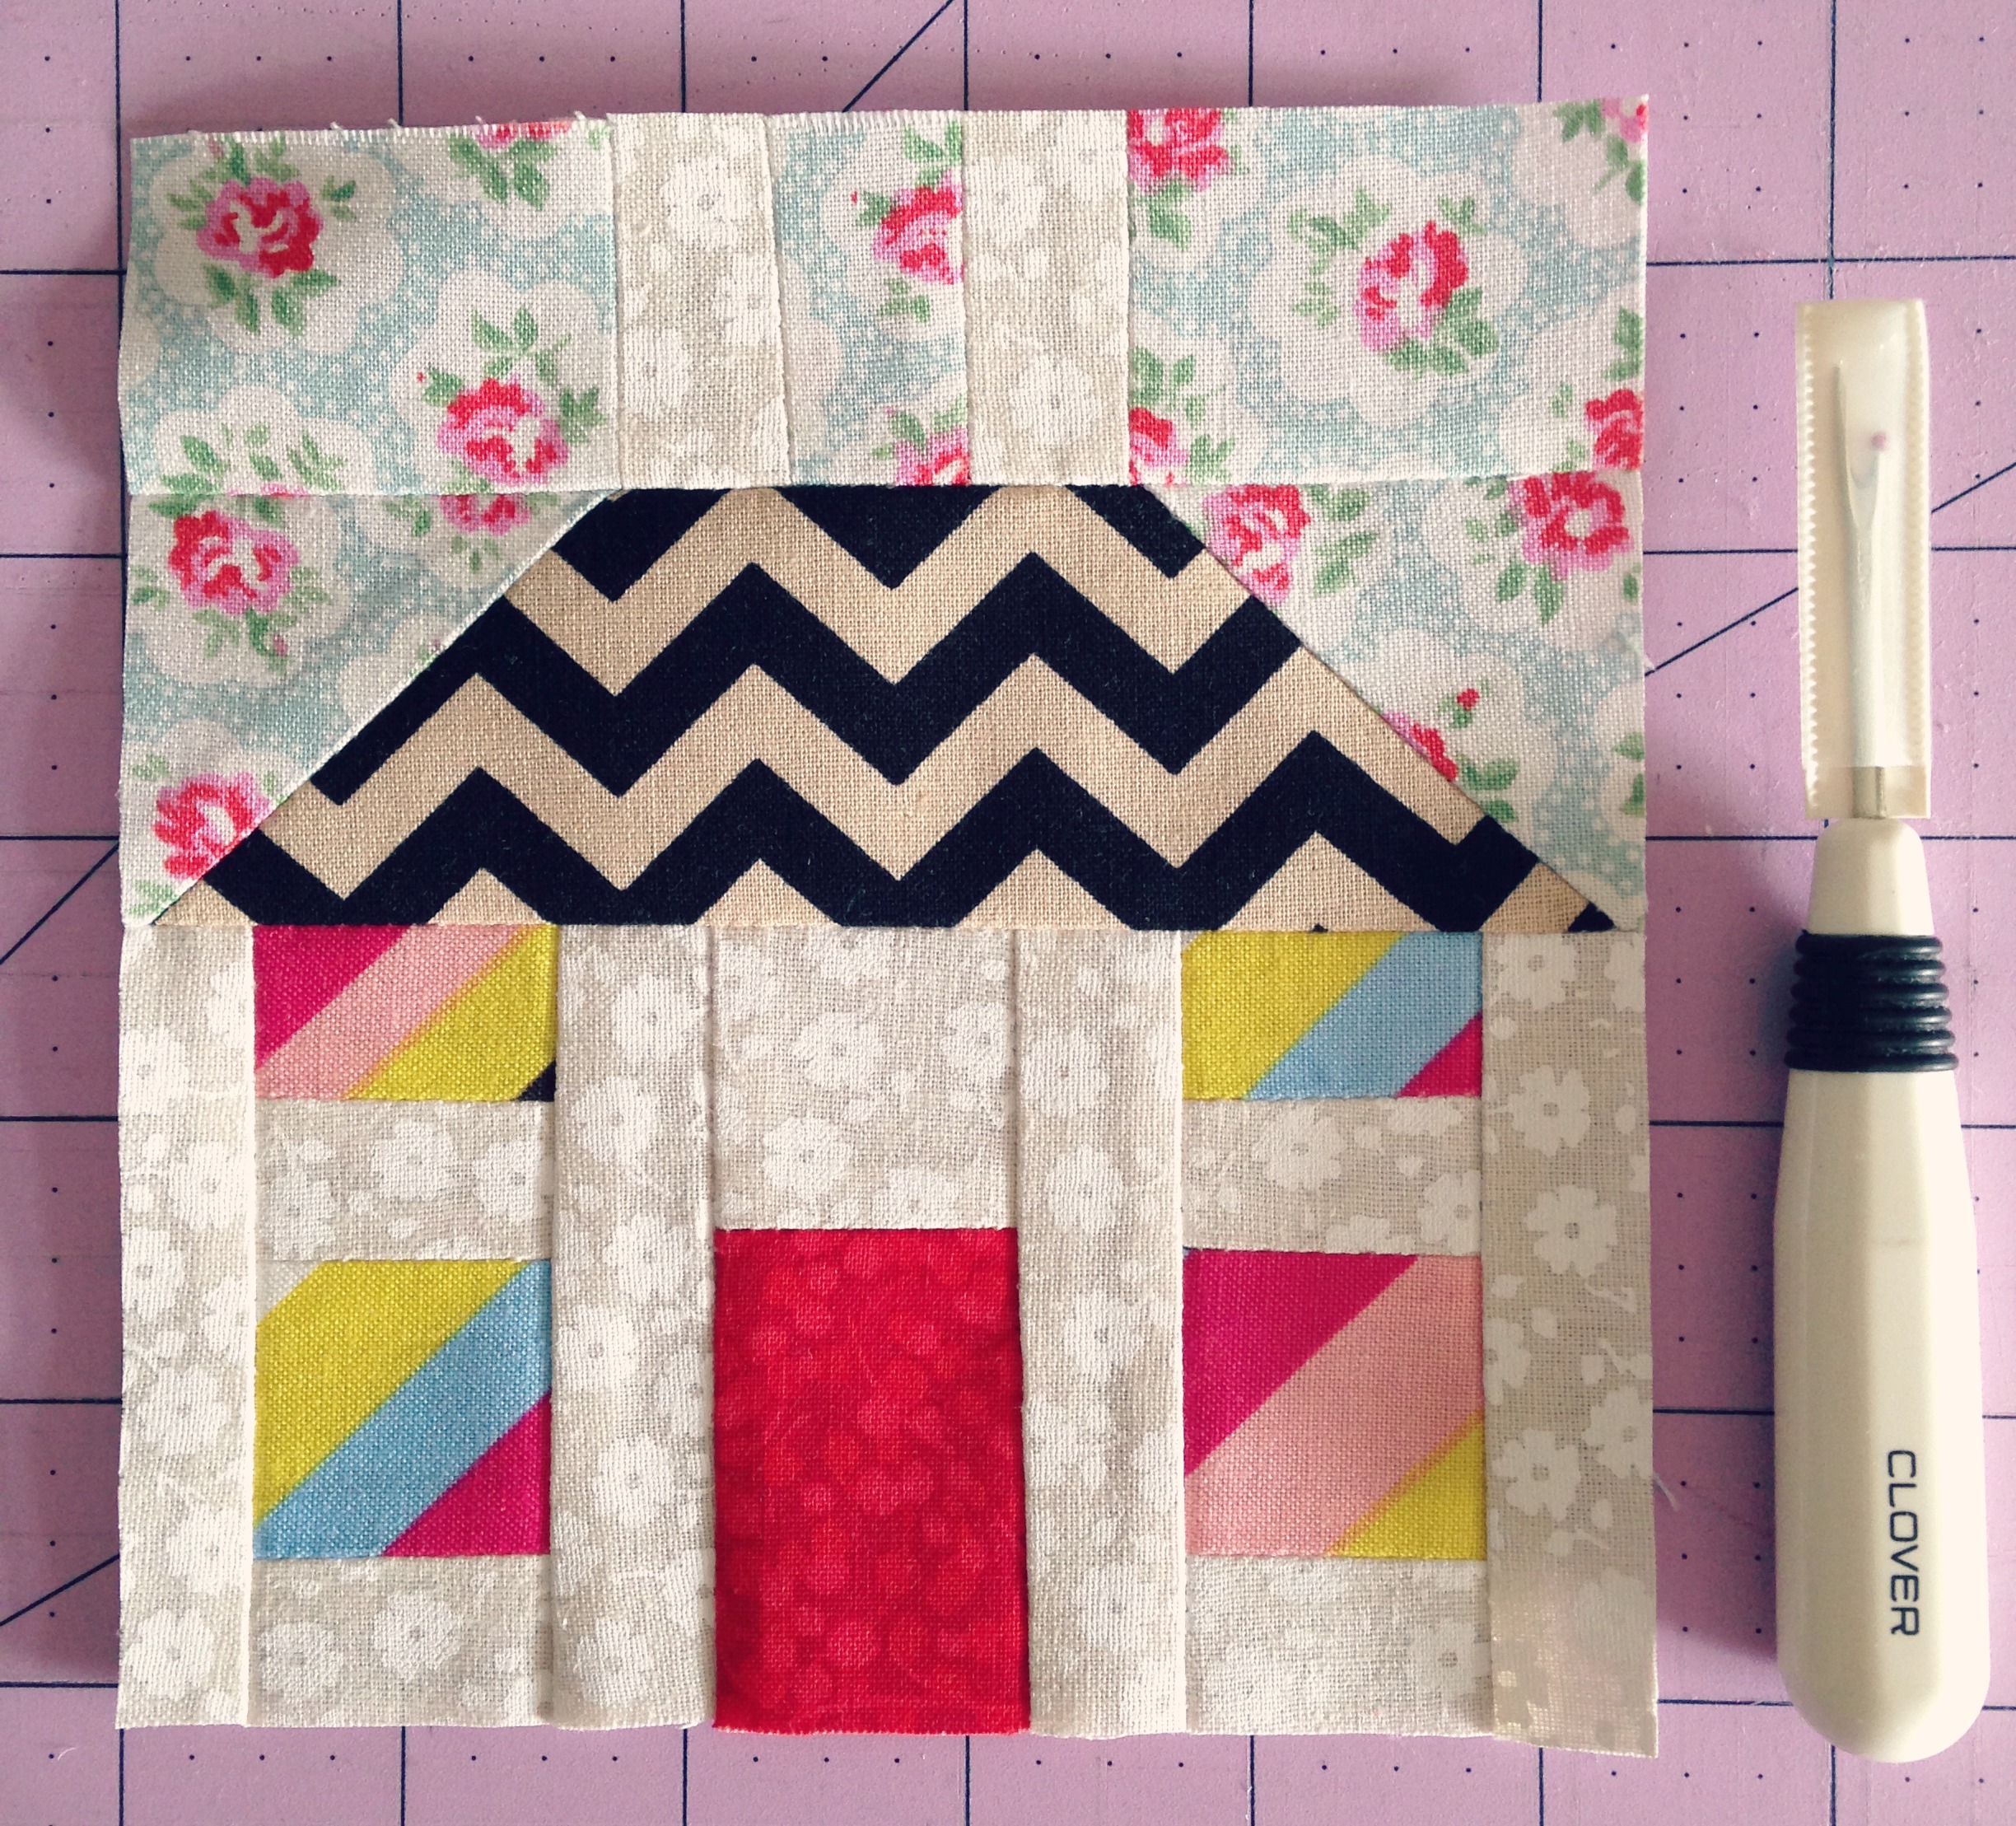
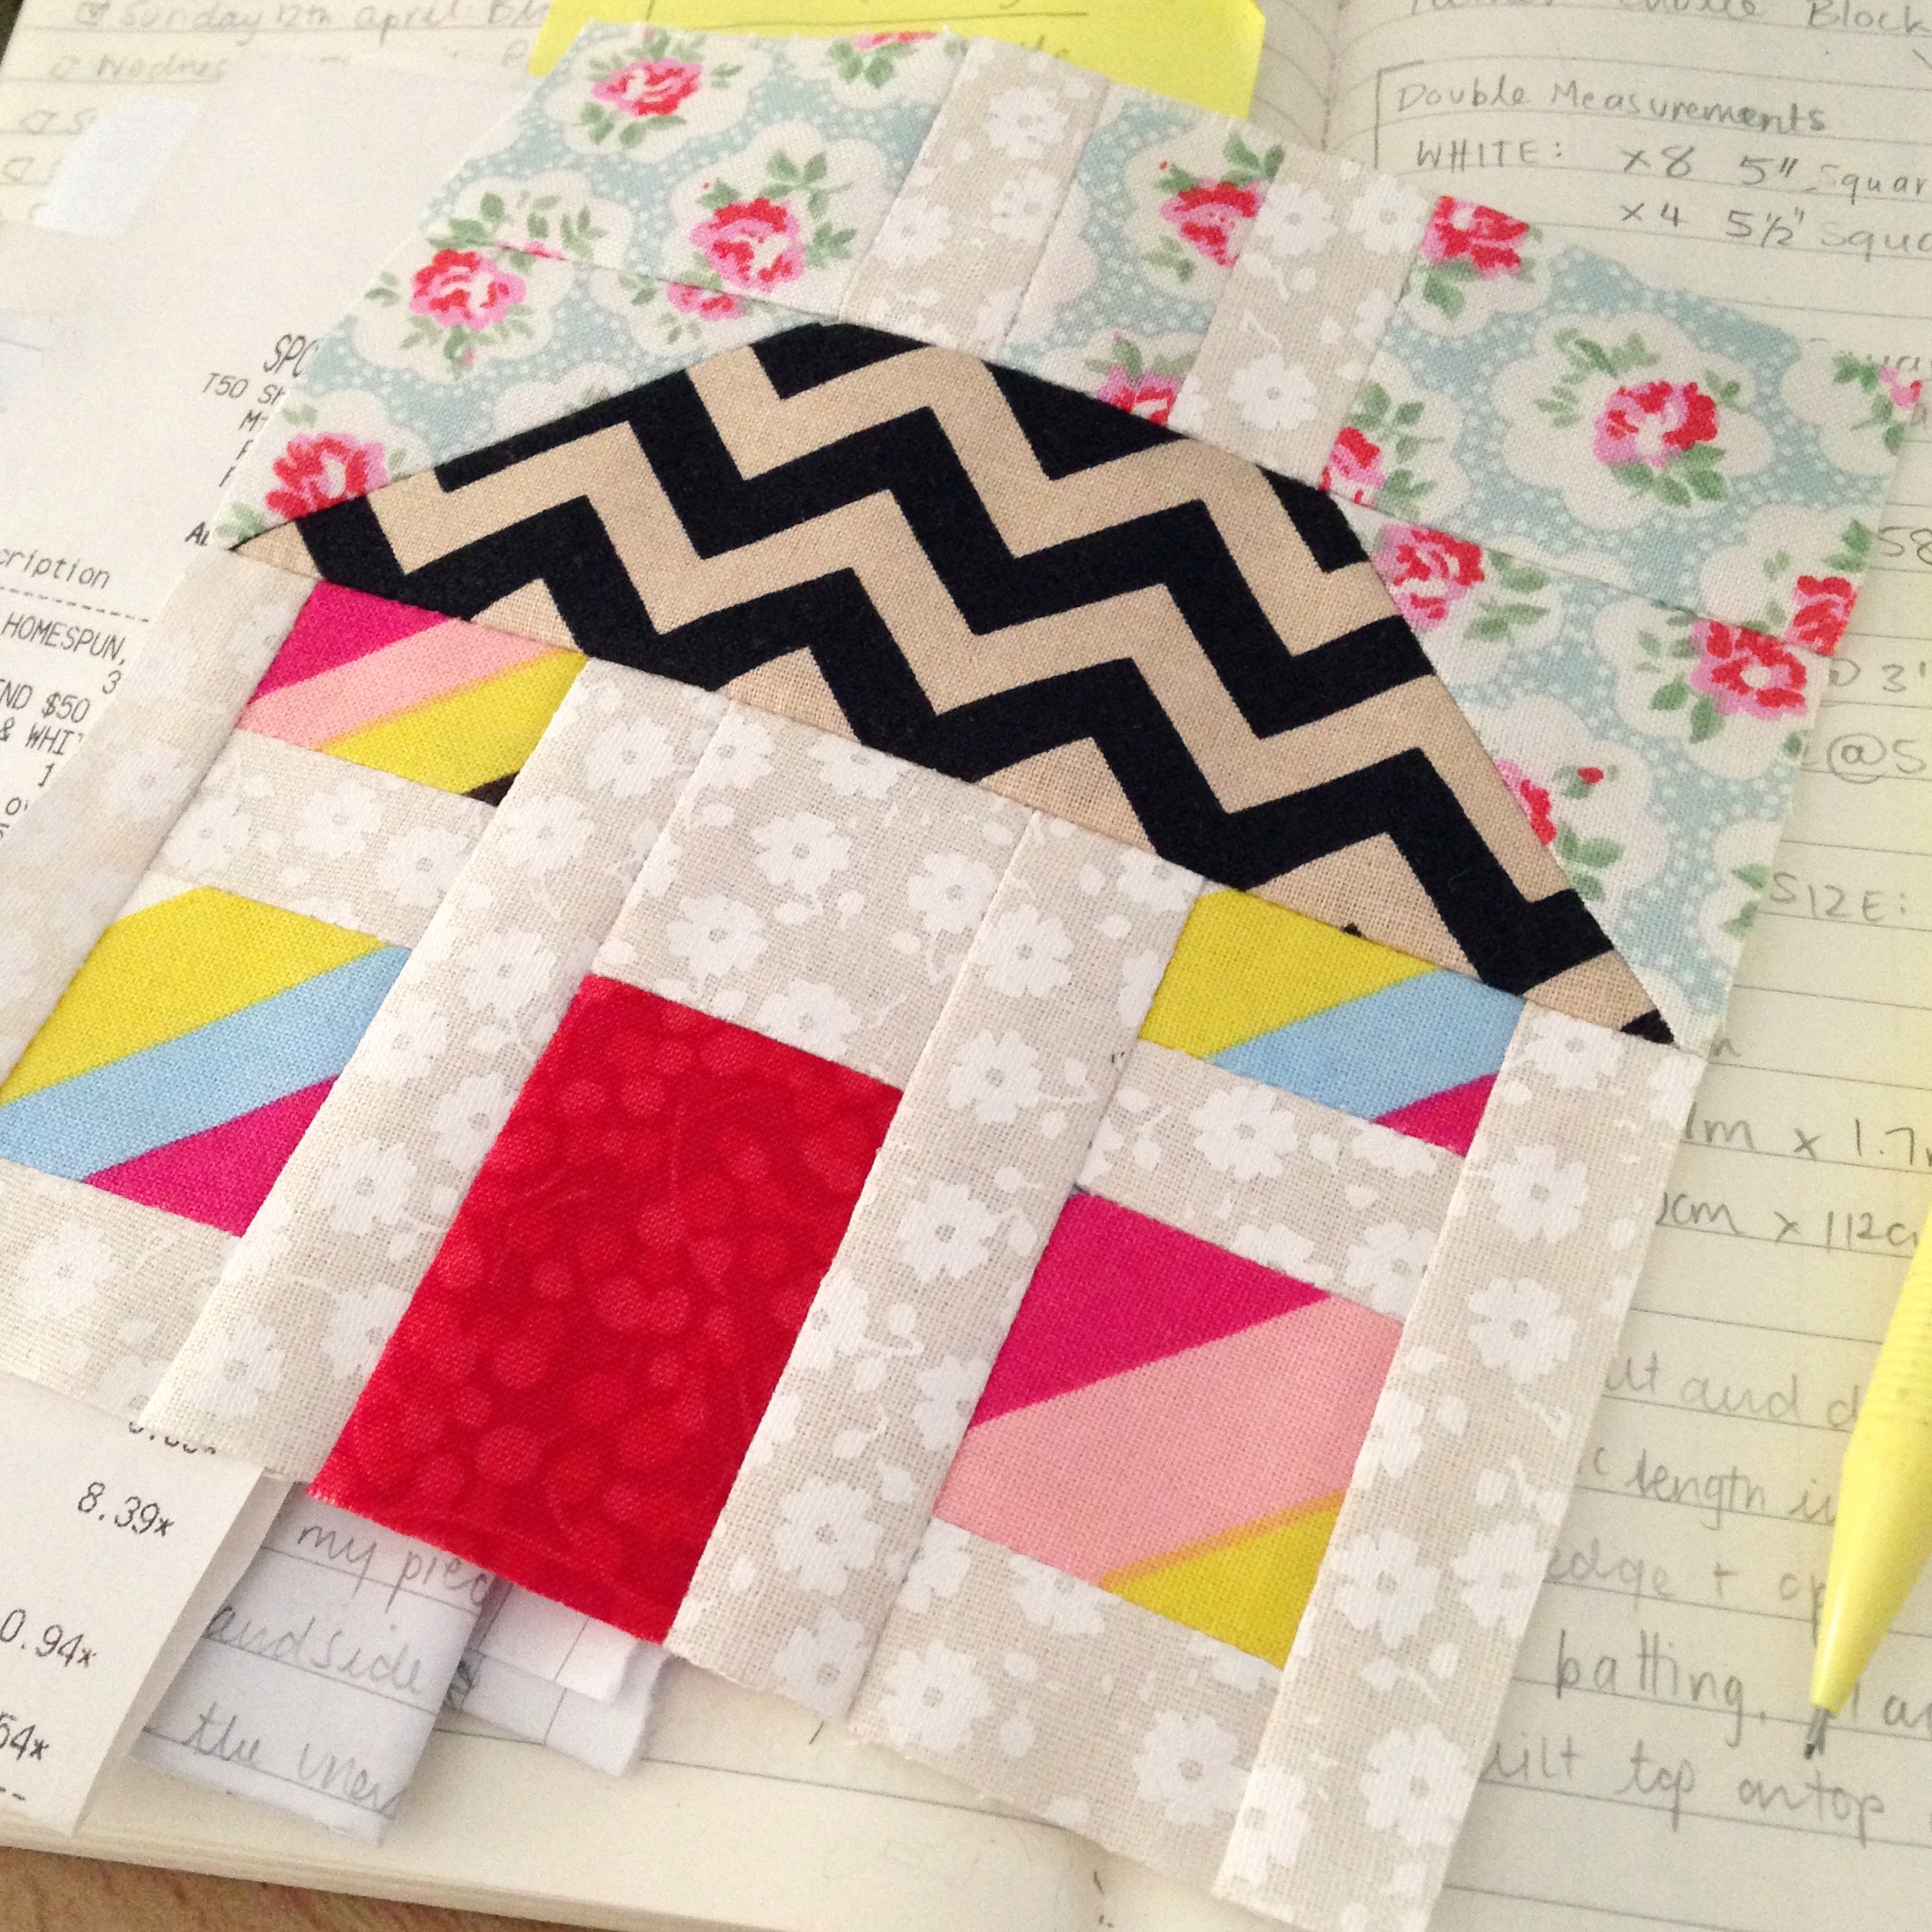
In there was this block: the Dollhouse. A sweet little House on the Prairie type design, that immediately ticked off all the boxes in my head.

As I was making it, I really wanted to share my honest thoughts and experiences about how the block came together…

So here is my honest review of the Mini Dollhouse Block.

Because it’s a mini block, I knew that the measuring and cutting would be intricate and that I would have to be patient with it. There are a lot of different little pieces that make that up this block which requires quite a bit of concentration to keep track of everything you’re cutting and where it should go.

I did find that a few of the measurements seemed a little bit off. But I trusted the pattern and cut my fabrics according to what was published after checking back several times! At the time, the pieces that seemed a little odd in size included the square-triangles that were to be pieced to either end of the roof piece and the length of the two chimney strips.

When I began piecing, I first started with the bottom half of the house, joining together the windows, walls and door. I had no issue with these until it came time to adding on the four vertical 1″ strips separating the window and door strips. Although the length of these strips fit perfectly with the door strip, the window strips were too short, leaving a gap of about half an inch. ‘No problem’, I thought, as I would just simply trim the bottom edge so that it was even with the length of the window strips.

Moving on to making the roof, I had issues understanding how two 2&1/2″ squares were to be stitched diagonally on either side of a 2″x5&1/2″ rectangle. So I decided to cut the two squares down to 2″, drew a line through the middle of each and sewed them onto the ends of the rectangle roof piece. After trimming off the excess fabric from each end (the seam was cut to a 1/4″ allowance) and giving the section a good steamy press, I then attached the roof to the top of the house section. These two parts came together seamlessly and had very little over hang.

MiniDollhouseBlock

The part where I had the most difficulty was matching up the two chimney strips with the top edge corners of the roof. After piecing the allocated pieces together, I realised the centre square separating the two chimney strips was about half an inch too wide! So out came my trusty seam ripper and I patiently picked the two seams on either side of the square apart. (Remember, these pieces are super tiny, so my big fat fumbling fingers got in the way very easily!) I made the decision to cut a 1/4″ off from either side of the square, thus getting rid of the perforated surface that the stitching tension had caused and proceeded to try again. Success! Even though the pattern said to cut one 1&1/2″ square for this section, it ended up only needing a 1″x1&1/2″ strip.

So once I trimmed and squared off the edges, the finished block came to a size of 5&1/4″x5&5/8″ compared to the size of 5″ squared as stated in the book.

So that was my journey in making this block.

Now I must state, that everything I’ve written in this post is my own opinion. I simply wanted to document my experiences, triumphs, failures and the thought process behind this block as it was taking shape.

As I was writing this, I was conscience of not sounding too harsh or judgemental over the pattern being published slightly wrong. (Who knows, maybe it was just me getting things wrong…?) But to be completely honest, I was a little bit disappointed by it as this is the first block in this book to let me down! And that’s a real shame because the endless possibilities of creativity behind this patchwork book is brilliant! But I guess it’s also important to remember that not everything can be perfect. Mistakes happen. Information can be misplaced and be so easily entered in wrong. Perhaps that’s what’s happened in this case…?

So sometime very soon I will re-make this block using the measurements that I found worked out better as well as picking out a range of fabrics that go together a lot nicer in comparison to the block above. And once I’m happy with that, I’ll more than likely create a tutorial showing you how to make it!

Happy Sewing, Friends!

xx

IMG_3996

TUTORIAL: Mini Snail Trail Block!

Now, I’m pretty sure I’ve shared with you just how much I love making mini sized versions of quilt blocks before… My Happy Quilt & Golden Trail Mini may jog your memory! And so today I want to take another opportunity to discuss and teach you how to make this one: the Snail Trail Block!

IMG_3774

If you’re regular reader of my blog, you may remember me making this little mini last year…

Start to Finish | Mini Snail Trail Block

July 2014
July 2014

It was my entry into the Sydney Quilt Show. I was so immensely proud of it. It was the first mini quilt I had ever made and loved everything about it. (And still do, actually!) At the moment, this little mini adorns the door to my bedroom. It represents my love for modern quilting, my love for pattern, texture and direction as well as the love I have for mini quilt blocks!

The inspiration for this quilt block has come from my favourite quilt book in my library, 130 Mini Quilt Blocks by Susan Briscoe. I pour through the pages almost daily, looking for sparks of inspiration or for a reason to simply start cutting up fabric and piecing together a little block!

So after a request and a genuine want to share how this darling little block is made, I created this tutorial for you!

Now at the beginning, I have a small little chit-chat explaining a few little tips that I think will help you when you’re piecing… Then I dive right in and guide you step-by-step in how the Snail Trail Block is pieced together!

If you would like to make this block here are the measurements and cutting instructions:

From the PINK fabric you will need to cut:
– x2: 1&1/8″ squares (for the centre four patch)
– x1: 1&3/4″ square (cut in half, resulting in two triangles)
– x1: 2&1/8″ square (cut in half, resulting in two triangles)
– x1: 2&5/8″ square (cut in half, resulting in two triangles)
– x1: 3&3/8″ square (cut in half, resulting in two triangles)
For the BLUE fabric, cut exactly the same as the pink.

The FINAL BLOCK SIZE measures: 5″x5″ or 12.7cmx12.7cm.

NOTE: I will just say that the more experienced you are at patchwork, the easier the block will be to piece together, obviously. But if you are a beginner, I still encourage you to give this block a go! Take your time, read the measurements carefully and never be afraid to make mistakes! It’s only through our mistakes we learn how to do things better!

So, I hope you enjoyed learning how to make this block and have been inspired to make it yourself!

Happy Sewing, Friends!!

xx

TUTORIAL | Mini Double Wrench Block

This is the third tutorial I’ve posted in row here on my blog – it’s as though I do nothing else!

Anywho – requests came through for me to demonstrate this block after the quilt I made this block with received a prized ribbon at the Sydney Royal Easter Show in April!

The Happy Quilt!
The Happy Quilt!

This particular block comes from one of my favourite patchwork books – 130 Mini Quilt Blocks by Susan Briscoe.

So enjoy watching and let me know if you’re going to give this block a go, I would love to see what you create! **see below of how to reach me**

Happy Sewing Friends!

xx

PS. Show me your finished blocks here:

TWITTER | @3and3quarters

or

INSTAGRAM | @3and3quarters

or

EMAIL | 3and3quarters@gmail.com

TUTORIAL | 7 Basic Embroidery Stitches

I’ve had quite a few request to make this video over the last few months, so I thought I’d finally get my act together and do it for you!

The stitches I cover include:

Back Stitch
Split Stitch
Stem Stitch
Chain Stitch
Blanket Stitch
Satin Stitch
French Knot

It’s quite a quick and very visually jammed-packed kinda video…

Let me know if you could keep up!! 😀

In this tutorial I use:

DMC thread/floss,
A no.7 embroidery needle
White 100% cotton homespun fabric
A 125mm/5″ round wooden embroidery hoop

And these are the books I recommend for any beginners out there:

‘The Stitch Bible’ by Kate Haxell

‘Embroidery’ by Penny Black, India Flint and Vicki Porter

‘Doodle Stitching’ by Aimee Ray

***

There are lots of other things beginning, growing and expanding in my sewing room atm!

This being one of them…

HSTs in progress!
HSTs in progress!

Think a ton of 2″ (ish) HSTs, lots of scrappy fabrics and a colour way of pretty blues & greens!!

Such fun!

Cheerio Friends

&

Happy Sewing!

xx

PS. Have you noticed something different??

My lovely blog has had a little make over!

Modern, clean and simple yet still keeping a lot of the features from the previous themes I’ve had.

This particular theme is called ‘Sorbet’ (ohh, lovely!).

x

‘Golden Trail’ Eye Candy!

My Golden Trail mini quilt is that next step closer to be completed.

All I need to do now is sew on the back: a hanging sleeve and label to be Show ready!

IMG_0739IMG_0730IMG_0736IMG_0741IMG_0733IMG_0737IMG_0726

Happy Sewing Friends! xx


Excuse Me, My Quilt Nerd Is Showing!

QShow 1

I tell ya, there’s nothing like receiving Quilt Show entry forms in the mail to get you back into the swing of quilting again!

After a lull of about three weeks or so of near to no sewing or quilting, it was a wonderful feeling to get back on the machine.

I admit that over the past weeks, I’ve been giving more of my time to my YouTube channel than to my sewing machine. This is due to –

a) a lack of enthusiasm

b) the horrid Australian humidity that’s been hanging around

But once that burning desire to get stuck into some quilting rose up in me early this morning, I was truly back in my ‘happy place’!

So over the course of the day I got lickety-split into finishing my Sydney Quilt Show entry.

Before basting the mini-quilt up, I instagrammed a photo of the heart-racing intricacies that are on the back of the quilt-top.

IMG_2427

So divine! So intense! So lovely!

I absolutely love the way that the shapes fit and conform next to each other as well as the differing lines and textures the seams create! But at the same time you can differentiate the shapes that form the block… (Excuse me, my Quilt-Nerd is showing!) It’s these little things that capture my heart and passion for patchwork (and quilting!).

After today, I believe I can honestly say that I am hands-down, cross-my-heart in love with making mini-quilts! They’re easy, fast, non-fussy and oh-so cute!

I tried to capture just how small this little mini is when I was quilting by comparing it with the size of my hand…

Hand vs. Mini Quilt
Hand vs. Mini Quilt

This quilt is itty-bitty and I love it!

QShow 2

I’ve decided that the quilt will be entered under the name Golden Trail – I think that works best.

It’s currently hanging up to my left ready for me to lovingly finish hand-stitching the binding and hanging sleeve!

QShow 3

Excitement is at its maximum tonight!!

Oh gosh.

I just love quilting!

Best hobby ever!

Oops! There’s my Quilt-Nerd showing again! 😀

Happy Sewing Friends! xx

WIP Weekly Update | #3

Okay.

Confession time.

I haven’t done as much as I had hoped for this past week on the Rail Fence Quilt.

I did do a few more lines of quilting here and there over the days but not to the point where it’s worthy for a WIP photo opportunity…

In the moments after I finished writing the previous sentence, I had a quick squizz at my quilting efforts on the R.F Quilt and felt compassion. (Weirdo alert!!)

So here is an up-to-date ‘progress-report’ image…

Current State | 27/01/14

Yeah….there’s not much difference from what it looked like last Monday.

I also must confess that I have been giving my time to another (new!) project.

I received an email Saturday morning from the NSW Quilting Guild containing information and forms for this year’s Sydney Quilt Show.

A more-than-mild wave of panic washed over me at that moment.

I hadn’t at all begun planning my entry for this show; the thought had always been at the back of mind but nothing else!

Although the Show isn’t until early June, it’s always nice to have things on-the-go from an early start!

Of the categories in the show, one or two stood out: Amateur Small or Wall Quilt (minimum size 40cmx40cm) as well as an Open category named Miniature (a quilt with a scaled down pattern with a perimeter of 200cm).

So early Saturday afternoon, I picked out a bunch of pretty and modern fabrics and raided my quilt book library for some block inspiration.

I had the thought of pairing two contrasting modern fabrics together and patch them together into a ‘traditional’ block formation.

In one of my favourite patchwork/quilting books, 130 Mini Quilt Blocks by Susan Briscoe, on page 46, I discovered an itty-bitty version of the Snail Trail Block that had a finished block size of 12.7cm or 5”! Perfect!

I have made this block before a few years back so I felt pretty comfortable tackling it.

Start to Finish | Mini Snail Trail Block

I quickly drew up a sketch to make sure the colours would sit well together – and they did!

The next hour or so I cut out all of the tiney-tiny pieces and begun sewing mini squares and HST together.

Four blocks were completed by yesterday; they were quickly sashed together and the quilt top is now ready to be quilted!! Whhhaaattt?!?!

(You know, I’m really liking this Mini-Quilt making thing – it’s quick, easy and non-stressful!)

The size of the quilt top measures 46cmx46cm or 18”x18” and fits into both Show categories as previously mentioned. I’m just not sure which one I’ll choose yet.

I’m also torn on what I’ll name this sweet little mini; I have two in mind…

Golden Trail

— OR —

Yellow Brick Road

Which one would you choose??

So there we have it.

Perhaps next week I’ll have more progress on my R.F Quilt to show and not have to confess that I’ve been distracted (again!) by other things.

Happy Sewing Friends! xx

Christmas Crafts & Itchy Fingers

Last Thursday eve I helped host a Christmas Craft Evening at my local Spotlight store. Together with staff and customers we had a very festive evening full of Christmas crafts, sweet treats and some lovely lady chats.

Here’s what we made!

Felt Bunting, Embroidered Homespun Ornaments, Fabric Scrap Quilted Christmas Tree Wallhanging
Felt Bunting, Embroidered Homespun Ornaments, Scrappy Quilted Christmas Tree Wallhanging
Hessian Birdy Ornament with hand stamped JOY
Hessian Birdy Ornament with hand stamped JOY message

The Christmas felt bunting along with the embroidered/sequinned homespun ornaments were the biggest hits as everyone was welcome to sit down, make and take what they had created.

Everyone did such a wonderful job – the amount of creativity that there is out there is just phenomenal!

+++

This week, like a moth to the flame, I found my way back to my Double Wrench Mini Block quilt and have finally started quilting it! Huzzah!

The quilt in it's current state!
The quilt in it’s current state!

As usual, I’m feeling very impatient to get it finished so I can share the sweet success of completion with you all!

My itching fingers have also found their way back to my Yellow Sampler Embroidery, which has been an ongoing project since earlier this year.

IMG_2185

I’m on the home stretch to finishing it that today I bought a second-hand frame for it, ready to be hung quietly somewhere in my house!

Over the next few weeks, as Christmas inches ever so closer, I’m planning on filming a few Christmassy | Quilty | Crafty videos that I hope to upload onto Youtube (it involves hexies!!)

I’ll too begin planning for my 2nd Annual Handmade Christmas – a pledge to make and give only handmade gifts and cards for Christmas.

(I made this pledge last year: you can read Part 1 and Part 2 here.)

So I shall say farewell! (As I quietly freak out to myself about how fast the Christmas Eve deadline is approaching! eek!)

Happy Sewing Friends! xx

Here We Go Again…

…And off I go again, making some more mini Double Wrench blocks on this glorious Spring morning!

This setup looks familiar...
This setup looks familiar…

If I didn’t think making 42 mini blocks was enough, I finally made my mind up to add another 14 blocks to the mix; totalling the block count to a grand total of 56! (That’s a whole lotta little 1.5″ squares!)

Lots of little squares...
Lots of little squares…

I  really didn’t plan on making this quilt bigger than what it is now slowly becoming…

…Oh well.

It has been a while since I’ve actually pieced and finished a big quilt – the last one being my Jacob’s Ladder Quilt, which I completed in December last year! (Ohhh, I just love that quilt!)

So the iron’s ready to go, my blocks are lined up ready to be pieced and a great playlist of songs are ready to be (badly) sung along with…

…And off I go!

Happy Sewing Friends! xx