MINI BLOCK QAL | Finishing Touches

VERSION #1 PATTERN SHEET: MiniBlockQAL – FinalLayout
VERSION #2 PATTERN SHEET: MiniBlockQALFinish V2

It’s been a long time coming, I know, but the very last tutorial in my Mini Block Sampler Quilt Along is here! Finally!!

It’s been a long old road with this one but I couldn’t be happier with how everything has come together to create a beautifully quirky little quilt-slash-wallhanging!

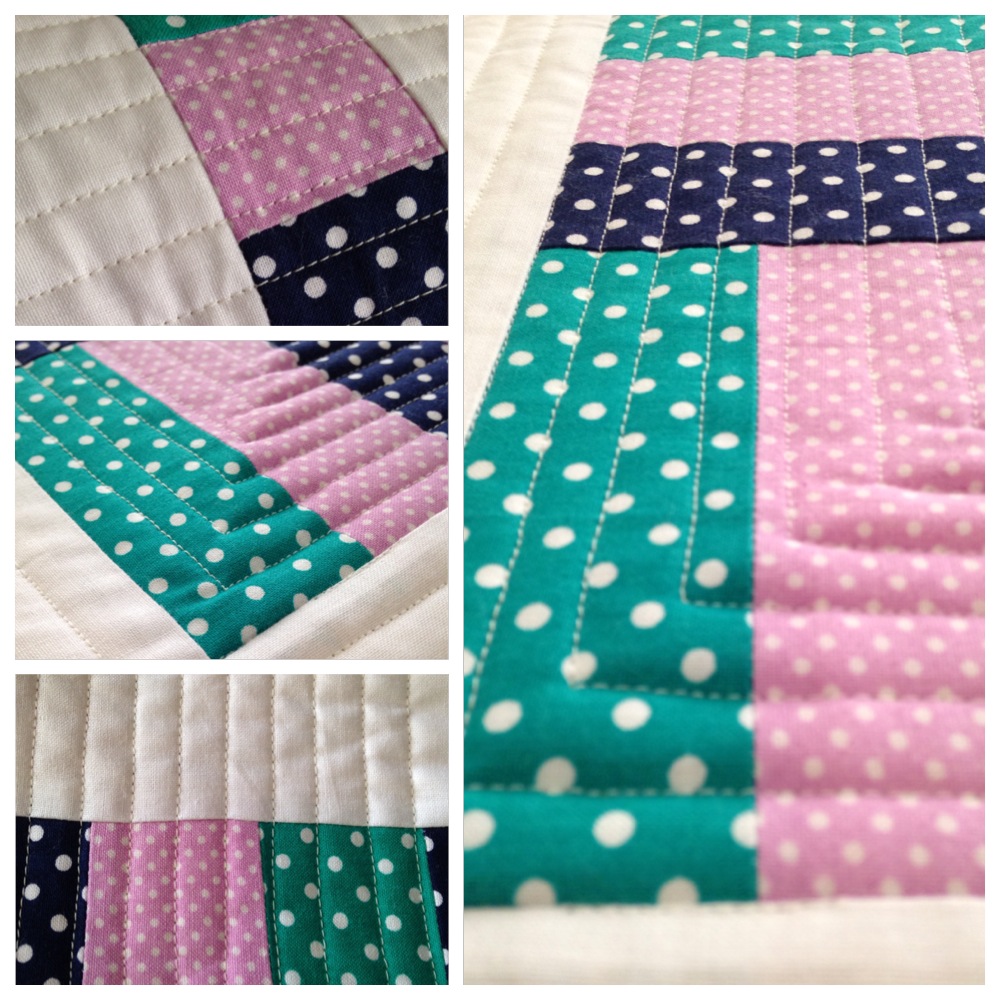
As you may’ve noticed, I’ve provided two different quilt top layouts that you can choose from. I decided I wanted to do something just that little bit different. I shuffled my nine sweet mini blocks down into the right hand corner, enlarging the top corner border pieces creating some luscious negative space to fill will lots of directional quilting lines.

And I have to say, I think the gamble paid off! It’s added another interesting twist to the overall theme of the quilt. And it’s the perfect size to squeeze on a wall somewhere in our house!

As I mention at the beginning of the tutorial below, it’s completely up to you how you would like to finish your quilt top. Choose one of the versions I’ve provided above or reject both and do your own thing! (I really won’t mind if you do!) Be creative. Have fun. Be happy with your choice!

+++

Just like a broken record, I want to take another moment to thank everyone who participated in this QAL, who learnt learnt some new skills and had fun along the way!

You’re all such wonderful people and mean so much to me! Thank you!

And for the last time – share your makes with me on Instagram!

#AmandasMiniQAL

Happy Sewing, Friends!

xx

Advertisement

May 6th: Simple Cross Block Tutorial

As the weekend greets us on this fine Friday afternoon, I thought I’d share with you a lovely and simply modern block that you can easily whip up in under half an hour as you unwind from the working week!

SCBlock2

I’m calling it the Simple Cross block. It’s basically just a modified version of the X Plus Block but without the ‘X’ bits in each corner. They’ve been replaced with four 4.5″ squares.

So here’s a guide on how to make to it!

+++

First, using two contrasting or matching fabrics, cut the following measurements from each one.

SCMeasurements
*Grey = background / Blue = main print

Next, pair up the two 2.5″ blue squares with two of the 2.5″ grey squares. (Image 1)

SCStepOne

Flip and pin each pair together and then sew a 1/4″ seam down the side that’s pinned. (Image 2)

Then press the seam on each duo towards the darker side of fabric with a medium steamy iron. (Image 3)

Next, take the rectangle piece and the two left over 2.5″ grey squares and sew each one to either end. Press the seams outwards towards the darker side of fabric. (Images 4/5/6)

SCSteptwo

After that, take two of the 4.5″ grey squares and place one of the blue/grey duo rectangles in between them. (Image 7)

SCStepthree

Flip and pin the duo to one of the sides of either square and then sew a 1/4″ seam along it. Press the seam outwards towards the 4.5″ corner square. (Images 8/9)

Then, sew the other 4.5″ grey square to the other side of the blue/grey duo. Make another row with the left over pieces, resulting in two identical rows. (Image 10)

SCStepFour

 Next, sandwich the row with the blue rectangle in between the top and bottom and rows. (Image 11)

SCStepfive

Pin the centre row evenly to the top edge of the bottom one and then sew them together using a 1/4″ seam. Neatly press the seam inwards towards the centre row. (Images 12/13)

Lastly, pin the top row to the top edge of the centre row and sew them together. (Image 14)

SCStepsix

Press the seam inwards again to finish the block.

SCBlock

The finished size of the block is: 10.5″x10.5″ (26.5cmx26.5cm).

+++

 Share your finished blocks with me on Instagram or on my Facebook page!

Happy Sewing, Friends!

xx

Inspiration: 500 Quilt Blocks by Lynne Goldsworthy & Kerry Green

TUTORIAL | The Plus-Sign Block

I present to you another one of my Quilt Block Tutorial videos!

When I’m browsing on Pinterest (which is practically all the time!), I always seem to come across beautiful quilts made with this block.

Links to these quilts are at the end of this post!

And they’re always so pretty and effective!

I ummed-and-aahhed between calling this block the Plus-Sign or (Modern) Crosses block as it can be referred to as both these names.

In the end, I settled on the Plus-Sign block as this particular design looks more like a plus-sign (+) than a cross (x).

Lately, I’ve been receiving some wonderful and very encouraging feedback about my tutorials (which I love!) and in the way that I present them.

People are torn between the narrative style I’ve done in the past and the annotated versions I’ve been doing of late.

Let me know what you think!

I would love to know where and what I can improve on to help you understand and enjoy my video tutorials!

The next video tutorial in the works is a Foundation Paper-Piecing idea that I said I would do in my Craft Haul video!

I’m super-super excited to get that underway!

So I here I leave you for the day…

I wish you all a splendid weekend!!

Happy Sewing Friends! xx

~ LINKS ~

The quilt by cluckclucksew

The quilt by Custard Bean

The quilt by allbuttonedup

The quilt by craftyblossom

WIP Weekly Update | #2 & Rail Fence Block Tutorial

Jeez, a week sure can creep up on you in an instant!

I’m deeply baffled at how it can be the fourth-ish week of the New Year already! *WOW*

In the last seven days since we spoke, some quilting progress has been made to my Rail Fence Quilt…

Delicious quilty lines!

Predictably, I’ve started quilting my usual straight-line formation. (It’s easy and I’m lazy!) I’ve opted for a pattern quite similar to the way I quilted my Jacob’s Ladder Quilt, but on this one the quilty lines are a lot closer creating more of an intense surface design and texture.

To go along with this R.F Quilt, I’ve filmed and uploaded a very simple and informative tutorial on how to make the Rail Fence Block. I tried to make it as down-to-earth and helpful as possible especially for all you beginner quilters out there.

Let me know what you think of the video – I’m 100% open to any positive constructive criticism. I would love to know what I could to do improve my teaching skills and/or production/filming/editing skills.

Do you have any suggestions for quilt blocks that you would love to see me demonstrate?

Comment below and I’ll definitely take your ideas onboard!

Well, it’s now time to go and enjoy this glorious summer afternoon with a lovely icy-cold beverage, finger-licking snacks and a heart-warming rom-com!

Happy Sewing Friends!! xx

Day 1 of 12 Days of Christmas Crafts

The day is finally here to begin sharing with you what I’ve been busily been working on over the past weeks!

Introducing Day 1 of 12 Days of Christmas Crafts with 3and3quarters! Enjoy!

Happy Festive Sewing Friends!! xx

Busily Quietly Quilting

Uh-Oh!

It’s been so long since I last blogged!

Well, just a little under two weeks to be exact but there’s like being a tad over dramatic about these things!.

But I do promise that I’ve been working very hard over the last couple weeks.

For starters, I’ve made another video! (Yay, go me and my evolution with modern technology!)

This one is a tutorial of sorts where I show you the method of how I make hexies! (Oh gosh, I just looove making hexies!)

Apart from that, I’ve been busily getting ready to take part in this years Quilting Expo at my local Spotlight store!

Quilting Expo Poster

There I’ll be demonstrating to the masses (!) how to cut, piece and sew up some classic quilt blocks as well as some quick and simple crafty/sewing projects.

I’ve chosen some really sweet fabrics to work with and if I get the ok, I’ll post up some pics from the day!

A few other projects are currently along the way, but I’m not quite ready to share them with you just yet…

Oh, ok! I’ll share!

But only just a little glimpse!

Ohh, a mystery quilt!!
Ohh, mystery quilt!!

Happy Sewing! xx