Welcome to week four (!!!) in my HST Sampler Quilt Along series! This week we’re starting a little later than usual thanks to the few days I had off to recover from my dental work on Monday.
So block no.7 in the series is a fun little variation of the Churn Dash block! The only thing that’s different with our block compared to that of the original is that the rectangle elements in each row have been replaced with squares. Thus resulting on our block looking more like a doughnut than a wrench-type looking thing.
Just like a few of the other blocks we’ve made so far, this one is pieced together as a simple 9-patch block. (Our very last one in this series! The last two blocks after this are both 16-patch!)
As always you’ll be able to find all of the measurement and cutting details, along with the fabrics* I’ve used to piece this block together as well as a diagram of the block layout, in the pattern sheet linked at the top of this post. If you would like to use the same 12.5″ set square as me, you can find it here:June Tailor Get-Squared 12.5″ Ruler.
+++
Thank you to everyone who wished me luck and sent me get well soon messages concerning my dental appointment on Monday! You guys are so sweet and so lovely to me! 🙂
As I mentioned in the video, block eight (Open Window) will be out in the next few days (I’ve penciled in for Sunday to be my deadline!) as I’m running a few days behind schedule due to Mondays adventures!
The variation of the Open Window block we’ll be making is somewhat different to the one I’ve shown before – this one involves more colours and a slightly different layout that could get confusing when piecing together our HSTs. But all will be revealed very soon!
Happy Sewing, Friends!
xx
*A big thanks to Australian wholesale supplier and fabric distributer Dayview Textiles for supplying me with such beautiful fabrics! If you want to see all of the fabrics I’ll be using in this Quilt Along, check out this post where I share them all with you!
Last week, on the 4th November, my darling little blog celebrated it’s 4th anniversary!
You know, there really are times when I can’t believe it’s been four years since I begun writing and sharing all of my quilty adventures! So much has happened between then and now (naturally) and in no way did I think that my blog would ever be as rewarding as is it today!
So as I’ve done previously in my past yearly anniversary posts, we’re gonna take a look and recap all of the highlights from the past year – starting with the birth of my niece last year…
With the news of my first niece due to be born in early December, I got cracking immediately onto making a quilt to give to her and the family at her Baby Shower. I opted for a block that I had previously made very early on in my patchwork-y venture, the Bear Paw block(one of the first blocks I ever made HSTs for!). The vision I had for this quilt was traditional-meets-modern (which is pretty much my approach for all of the quilts I make) and wanted to have the quilt top be a concentrate of richly deep solid fabric colours; grey and pink.
I added a beautifully matching modern floral print as the backing and made a one-of-a-kind embroidered label with her name and best wishes from her Auntie. And now with her 1st birthday rapidly approaching, this little gorgeous little girl is one of the most sweetest and cheekiest little things who loves blowing raspberries and is ready to get exploring on all fours! Such a darling!
+++
In February, I had a lovely break away from reality and went on a cruise holiday to Fiji and New Caledonia, sailing on Princess Cruises. It was a holiday I was very much in need for and I enjoyed every minute of it! If you like to re-experience the places we visited, you can read the post I wrote or watch the vlog I made!
Dravuni Island, Fiji
And while sailing around the big blue Pacific Ocean, I also had the chance to chill out and stitch up this fun tree embroidery pattern that I had purchased from Urban Threads.
Delicate Tree (2015)
Admittedly, I haven’t done as many embroidery projects as I would’ve liked to this year, but this one turned out so lovely that I’m quite content with it being the only one I’ve made so far!
+++
Okay, so let’s get into some of the quilts I’ve made over this past year! Happily, I’ve made more quilts this year than I did last year which really is wonderful! I had made a secret new year resolution to myself to make more quilts this year and the amount that I’ve made has made me quite happy!
The first two that shine like little gems in my mind are the commissioned baby quilts I made for a friend back in July. The brief was that both mums-to-be didn’t know the genders of their babies so each quilt needed to be gender-neutral and super cute!
And these are what I ended up with! Words really can’t describe how lovely they equally turned out. Everything about each one I was so happy about: the quilting, the fabrics, the binding, the neutral-pastel tones, the sizes and their sheer cuteness! From what I’ve been told, both mummies loved their little quilts and each bundle-of-joy arrived safely and happily!
The next quilt that I’m equally thrilled about making was Donna’s 50th Birthday Quilt using the Diamond Square block! Although gifted a few weeks after the big day, she thankfully loved it!
Donna’s 50th Birthday Quilt (2015)
Knowing that her favourite colour was blue, I raided my sash and pulled out a number of contrasting blue prints that I knew would look really effective against each other. After cutting and piecing over 120 HSTs into this all-over quilt top design, I chose to quilt it with a design I’d been seeing everywhere on Pinterest but had never actually tried. It’s where you quilt a line on either side of the seams, creating this super effective spaced-out grid type pattern. I absolutely love it! It was so quick to do and really suited the over-all feel of the quilt.
The amount of support and love I received from all you in regards to the series and the finished quilt is something that I will cherish for a very long time to come! And because of that wonderful participation and encouragement, you gave me the guts to start another Quilt-Along! Although we’re only half-way through, the HST Sampler Quilt Along is going great-guns and I couldn’t be more happier with the amount of people who are giving it a go and who are learning and growing in their patchwork skills!
+++
Two very exciting opportunities that happened over the past year was the chance to join in on two very special Blog Hops! Both opportunities were so much fun to be involved in and I’m so grateful to have been invited and put my two-cents into the ring!
The first one I was invited to join was the RJR Supreme Cotton Fabrics Blog Hop! For this one I made my darling Crown of Thorns Mini Quilt using some of their deliciously bright and rich solid fabrics.
Crown of Thorns Mini Quilt (2015)
What I loved about this one was the beautiful harmony between traditional and modern. The Crown of Thorns block is very traditional in nature and is known by many other names. With this mini quilt, I simply turned the block onto a point, added some richly modern colours to the mix and voila, a thoroughly modern little mini!
Paired with a white solid fabric and matching red binding, I cut and pieced each Jolly Bar into 12 Open Window blocks resulting in this warming quilt! (And this quilt has a very happy ending: It now lives in America with a family who will cherish and love it for years to come!)
+++
Ooo, we gotta touch on some of the darling little mini quilts I’ve made this year! I have a huge love, appreciation and possible obsession when it come to mini quilts! What can I say, they’re just so darn fun and quick to make!
The highlights from the year have to be these three little darlings!
So now, because of my mini quilt obsession, the walls in our house are overloaded with precious pictorial mini quilts greeting people as they walk through the house. There’s nothing wrong with that, right?
+++
And lastly, the one other thing I want to reflect on and share with you is the wonderful support and growth of my YouTube channel. It’s crazy to think that there are so many people out there who share the exact love and passion that I have for patchwork and quilting! (For a while there I thought I was the only one!) It’s been so lovely to be able to reach out and chat to other like-minded people whom I can share my exciting successes with and swoon together over delightful fabrics and fun new patterns!
The reason why I chose to start a YouTube channel was to simply have another avenue to create content for my blog. I was ready to venture out and challenge my creativity with a new medium to share and teach my love and skills in patchwork, quilting, crafting and baking. It was also an opportunity I took to strengthen my self-confidence in speaking out-loud and to grow and challenge my teaching skills. And I can happily say today that in each of these things I have grown tremendously and have gained a few thousand new friends along way!
So a big THANK YOU to each and everyone of you who watches, comments, likes and supports everything that I do both on here on my blog and my channel (and Instagram!). You’re all such wonderful people and I’m so glad to call you all my friends! Yay! 😀
+++
If you would like to take a squizz at the past three yearly recaps I’ve written, here are the links for you to follow:
So here’s to another successful and fun year of making quilts, making mistakes, saying Yes! to every opportunity that comes my way, making new friends and strengthening the bond with old ones!
Happy Sewing, Friends!
xx
+++
2015 Blogging is dedicated to my darling Lucy. A beautiful soul that I miss dearly everyday.
First of all, a big thank you to everyone for your patience in waiting for this block to come out. The past few days have been a bit rough and I didn’t quite find the time to get edits and things done. But not to worry, block six is finally here and it’s the one that I warned you about that could be a bit tricky for some to piece. (Don’t worry, I was one of those ‘some’!) So my advice when piecing this block together is to have the pattern sheet close by so that you can keep referring to it as a guide if you get a bit confused with HST placements etc.
So this variation of the Mill Wheel Block is pieced together completely out of HST – 16 to be exact – and are laid out in a way that it should, if you squint your eyes, have a pinwheel type design flowing through it. I think you’ll only really see this if you use two contrasting fabrics/colours in your HSTs. (This theory has been untested.) If you don’t want to use contrasting colours then that’s cool, you’ll just end up with a really pretty block that has a lovely X type design to it! 🙂
For all of the measurement and cutting details, along with the fabrics* I’ve used to piece this block together and a diagram of the block layout, click on the pattern sheet linked at the top of this post. If you would like to use the same 12.5″ set square as me, you can find it here:June Tailor Get-Squared 12.5″ Ruler.
+++
As I mention in the video, my fingers are crossed that I’ll be able to get next weeks blocks out to you on time. A big dentist appointment waits for me on Monday to remove the one wisdom tooth in my mouth that chose not to sprout out in the proper way. (Think horizontal and causing havoc with the molar in front of it! Ouch!) So I’m trying to do as much prep over the weekend as I can, but we’ll see what happens over the next few days!
Keep on sharing your blocks with me! Big apologies if I don’t see them straight away. Time zones and missing notifications can sometimes be to blame! You’re all doing such a fantastic job with your blocks and your talents and skills just blow me away!!
I hope you all are having a fabulous weekend!!
Happy Sewing, Friends!!
xx
*A big thanks to Australian wholesale supplier and fabric distributer Dayview Textiles for supplying me with such beautiful fabrics! If you want to see all of the fabrics I’ll be using in this Quilt Along, check out this post where I share them all with you!
So another Wednesday has rolled around and we’re now up to block five in our HST Sampler Quilt Along! I really can’t quite get over how quickly the past few weeks have flown by as block five marks our (almost) halfway point! But I don’t want to think about it all ending just yet, I’m having way too much fun making these blocks and sharing them all with you!!
The fifth block in the series is the fun and uber-simple Shoo-fly block! Packed full of traditional charm and elements, this block will be pieced and finished before you can say, ‘wow, I love it!’ 😀
As always, if you click on the pattern sheet linked at the top of this post, you’ll be able to find a full list of all of the measurements and cutting info, along with the fabrics* I’ve used to piece this block together! If you would like to use the same 12.5″ set square as me, you can find it here: June Tailor Get-Squared 12.5″ Ruler.
+++
Keep on sharing those blocks with me, it truly makes my day seeing them and knowing you’re having fun and growing in your skills!!
Coming up on Friday is block six: the Mill Wheel. It is a bit of a tricky one to layout and piece, but totally worth all of the brain-power once finished! I hope you’re ready for it!
Until then,
Happy Sewing, Friends!!
xx
*A big thanks to Australian wholesale supplier and fabric distributer Dayview Textiles for supplying me with such beautiful fabrics! If you want to see all of the fabrics I’ll be using in this Quilt Along, check out this post where I share them all with you!
Let’s end the week on a high with Block Four in my Quilt Along series – the Friendship Star!
I absolutely love this block! I have done since I made this quilt top using this fun little block! I’ve had a few issues with the quilting on this one and it’s currently in the process of having all of the quilted stitches unpicked by hand because I hated the FMQ job I did on it! I’m sure one day I’ll get around to re-quilting it and placing it on a bed or on the back of lounge so that it be used for cuddling under!
If you click on the pattern sheet linked at the top of this post, you’ll be able to find a full list of all of the measurements and cutting info, along with the fabrics* I’ve used to piece this block together! If you would like to use the same 12.5″ set square as me, you can find it here: June Tailor Get-Squared 12.5″ Ruler.
+++
I wish you all the most loveliest of weekends, wherever you are in the world! I hope you all enjoy making the blocks from this week and are ready to discover two more HST delights next week!
Keep sharing your blocks! I love seeing them!
Share here:
Instagram: @3and3quarters(PS. If your account is private, I won’t be able to see your block/s!)
*A big thanks to Australian wholesale supplier and fabric distributer Dayview Textiles for supplying me with such beautiful fabrics! If you want to see all of the fabrics I’ll be using in this Quilt Along, check out this post where I share them all with you!
Continuing on with my HST Sampler Quilt Along, here is the third block in the series for you to make! This one is called the Contrary Wife Block!
To be honest with you, I struggled to find some decent historical information on this one to include in the pattern sheet. Bummer! I’m sure there is a fascinating story behind it! If you know any fun little facts about this block, please comment below – I would love to know more!!
All of the measurements and cutting info, along with the fabrics* I’ve used to piece this block together are in the pattern sheet linked at the top of this post! If you would like to use the same 12.5″ set square as me, you can find it here: June Tailor Get-Squared 12.5″ Ruler.
+++
Block four in the series will be ready for you on Friday (hopefully on time – I have a long awaited appointment to see the Dentist on Friday afternoon! Wisdom teeth suck!) The block that we will be making is a fun little favourite and is very appropriate for our little community that we have going on here! And that block is the Friendship Star!
Don’t forget to share all of your blocks with me and if you have any questions, please feel free to ask at any time! 🙂
See ya on Friday, Friends!
xx
*A big thanks to Australian wholesale supplier and fabric distributer Dayview Textiles for supplying me with such beautiful fabrics! If you want to see all of the fabrics I’ll be using in this Quilt Along, check out this post where I share them all with you!
The Morning Star, I think, has to be one of my favourites! I love how bright and vibrant the layout is and how by just using two fabrics in the block it makes it look really effective, humble and simple.
Just like before, everything you’ll need to know in regards to the measurement and cutting information as well as the fabrics* I’ve use to piece this block together are in the pattern sheet linked at the top of this post! If you would like to use the same 12.5″ set square as me, you can find it here: June Tailor Get-Squared 12.5″ Ruler.
+++
Blocks three and four will be coming out on Wednesday and Friday of next week! One of the blocks I’ve made before, while the other is a bit of a traditional one that I thought I’d never make!
I hope you all have a lovely weekend sewing up your blocks! Don’t forget to share them with me and if you have any questions, please feel free to ask at any time! 🙂
Happy Sewing, Friends!!
xx
*A big thanks to Australian wholesale supplier and fabric distributer Dayview Textiles for supplying me with such beautiful fabrics! If you want to see all of the fabrics I’ll be using in this Quilt Along, check out this post where I share them all with you!
**Argghh! Right at the last minute I’ve just realised I’ve been quoting the size of the block wrong throughout the whole video!! The size of the blocks will be 12.5″ square NOT 12&1/4″! The set square ruler I use is 12.5″ NOT 12″! Oh my, where was my brain today!
Hello and happy Wednesday to you all!
Today brings to you the first block in my HST Sampler Quilt Along series, the Formal Garden Block!
Everything you’ll need to know in regards to the measurement and cutting information as well as the fabrics* I’ve use to piece this block together are in the pattern sheet linked at the beginning of this post! If you would like to use the same 12.5″ set square as me, you can find it here: June Tailor Get-Squared 12.5″ Ruler.
I know I’ve said this a thousand times now but don’t forget to share your finished blocks with me! I love, love, love seeing them!
Happy Sewing, Friends and I’ll see you on Friday with block #2!
xx
*A big thanks to Australian wholesale supplier and fabric distributer Dayview Textiles for supplying me with such beautiful fabrics! If you want to see all of the fabrics I’ll be using in this Quilt Along, check out this post where I share them all with you!
Happy Day! The time has finally come to introduce to you my next Quilt-Along-With-Me series on my YouTube channel! Yay!
This time around we’ll be doing a HST* Sampler Quilt!
The quilt will be made up of nine 12″ blocks that all feature HSTs in their design. Most of the blocks are quite simple to piece together with only a small handful that may challenge you! So if you’re a lover of HSTs, a hater of HSTs who wants to learn to love them or simply have issues piecing HSTs, then this is the perfect project for you to follow along with!
The blocks we’ll be making are (in order of release): Formal Garden, Morning Star, Contrary Wife, Friendship Star, Shoo-Fly, Mill Wheel, Churn Dash, Open Window (a new variation) and the Windblown Square.
In each block tutorial I’ll let you know all of the measurements and cutting info like I usually do, along with what fabrics I’m using for that block. An information sheet will also be available for you to print off and follow along with at home! (These will be available to download from my blog.)
For this series, I’ll be using a range of fabrics from RJR Fabrics and Cotton+Steel. The main collection is one called The Sultan’s Garden designed by Mary McGuire and soon as I saw it, I knew it was perfect for this series!
The fabrics I’ve chosen are from the Apricot/Turquoise edition of the collection (there’s also a Berry edition featuring beautiful shades of purples and pinks!).
Here’s a list of each of the fabrics I’ll be using, along with it’s name and where it’ll feature in this Sampler Quilt.
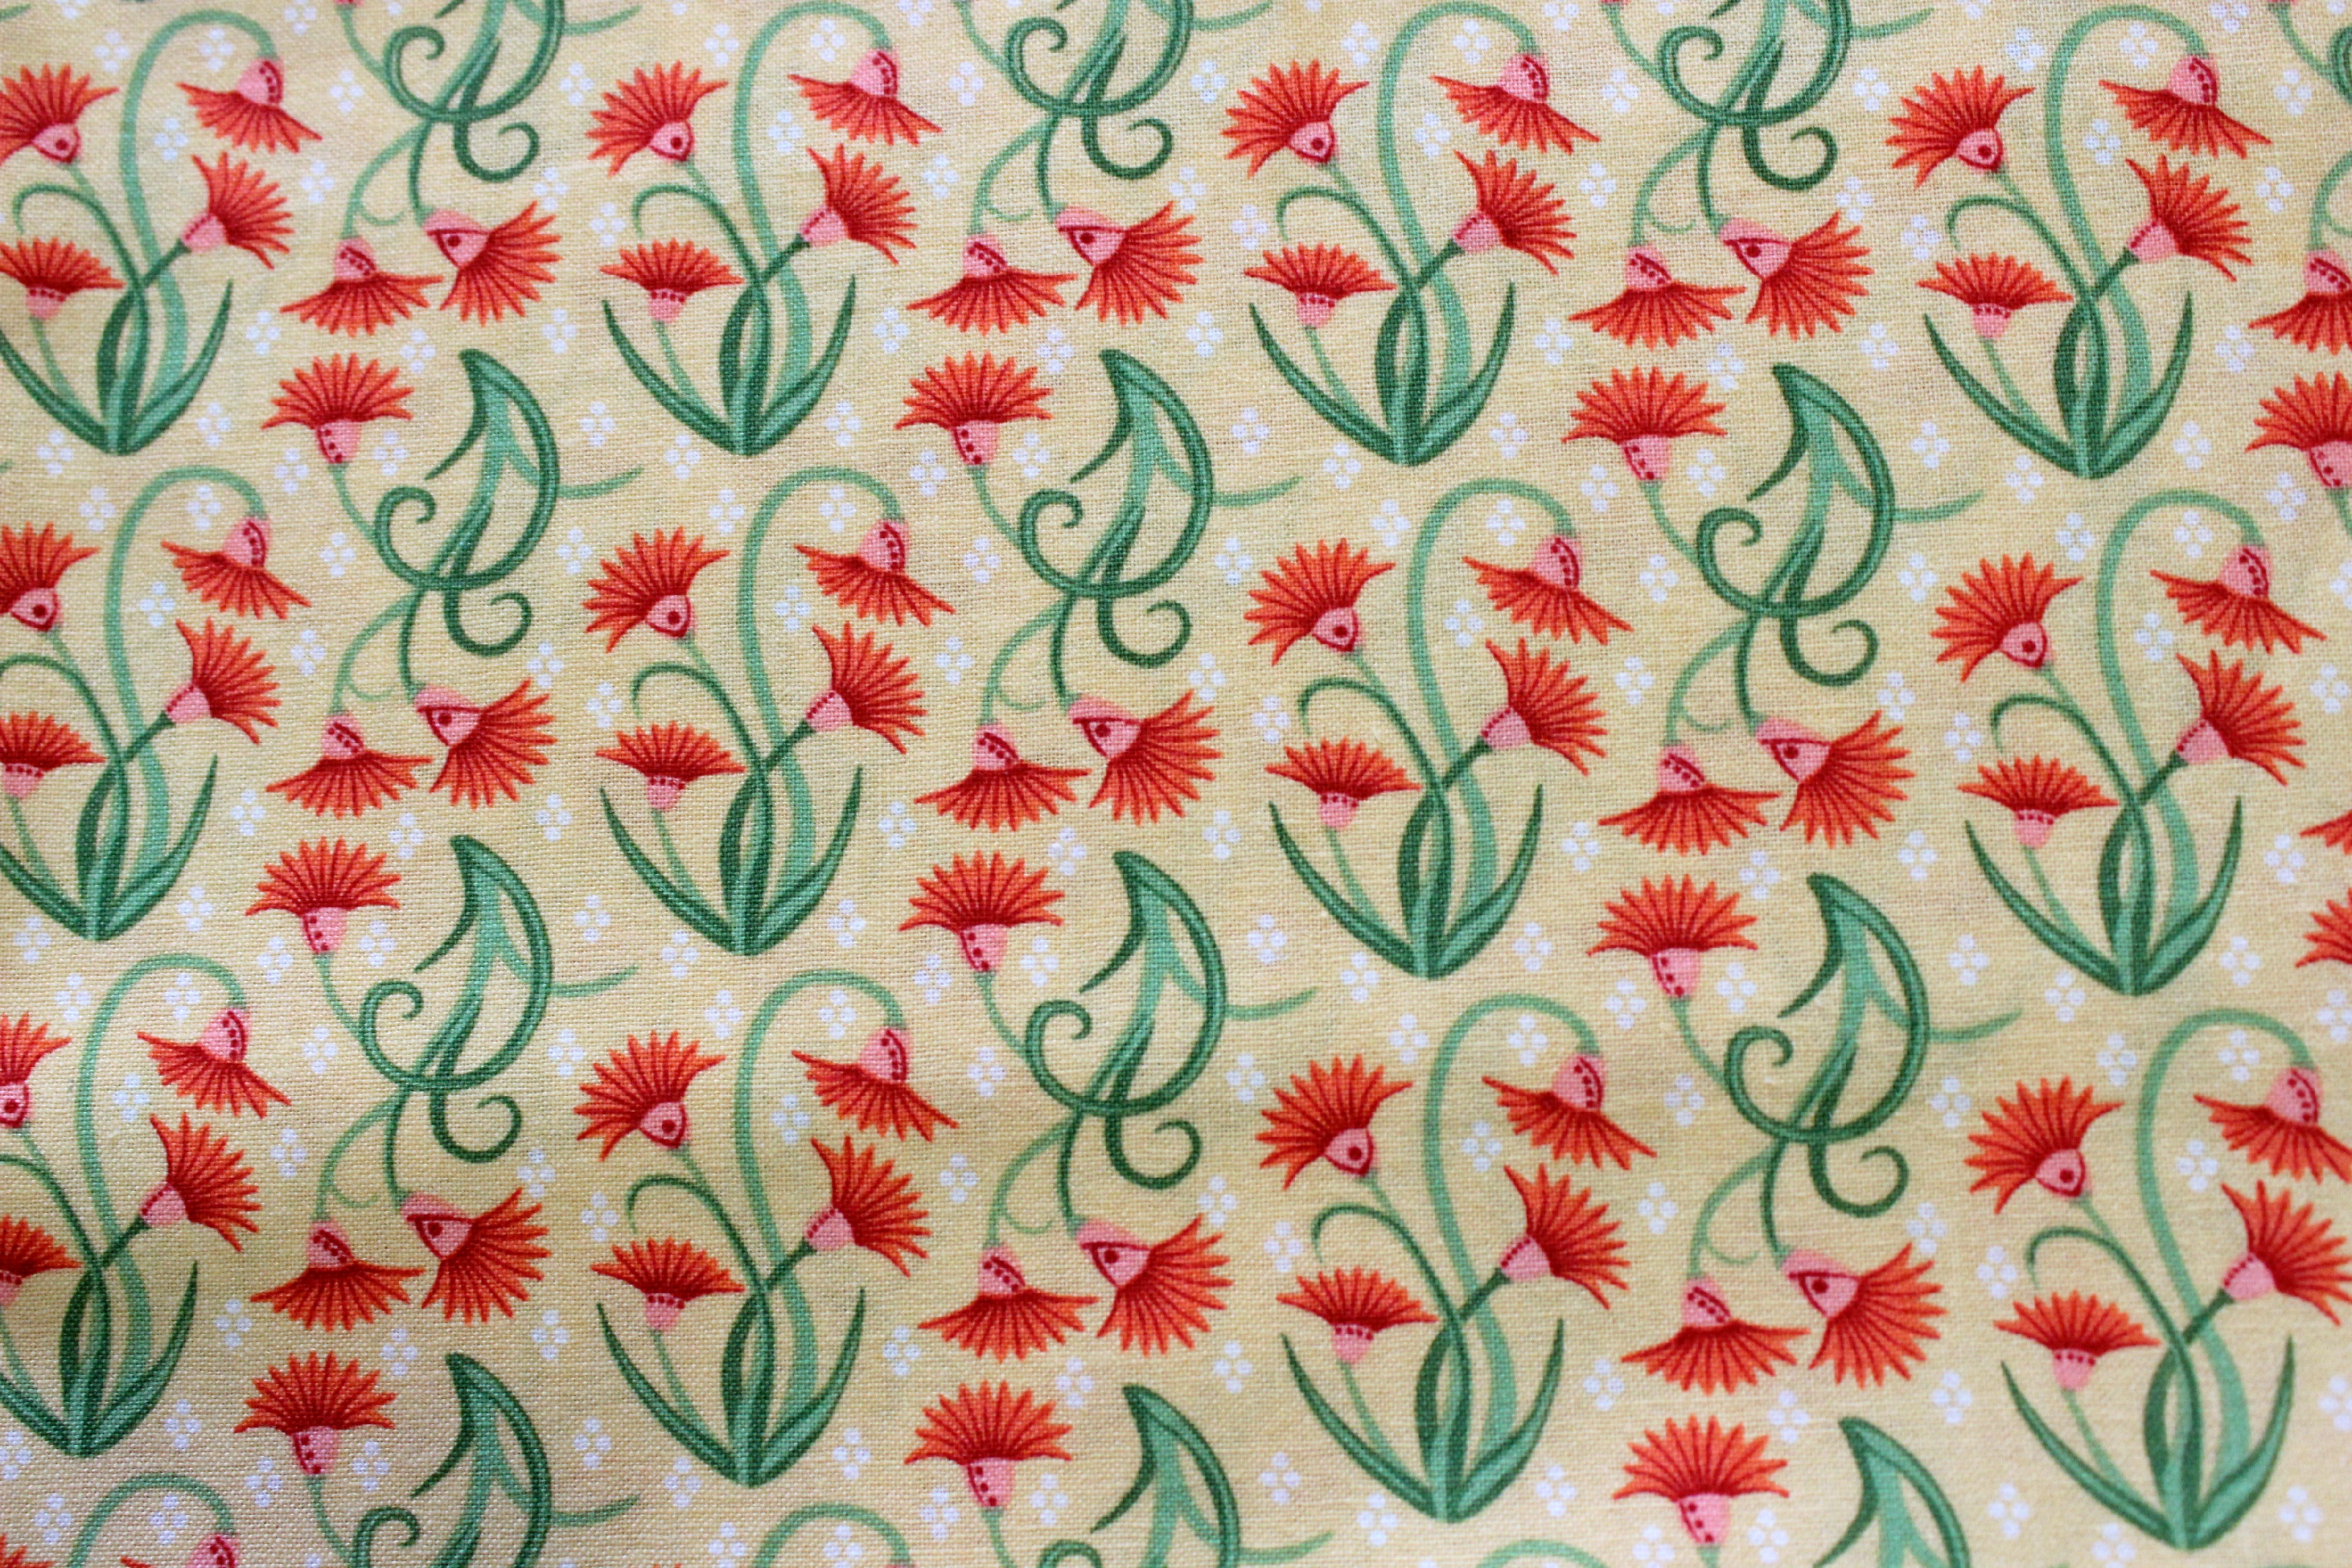
FABRIC NAME:Tulips. This fabric will used in two of the blocks.
FABRIC NAME:Melisa. This fabric will be used in one of the blocks.
FABRIC NAME:Minaret. This fabric will be used in one of the blocks.
FABRIC NAME:Mosaic. This fabric will be used in one of the blocks.
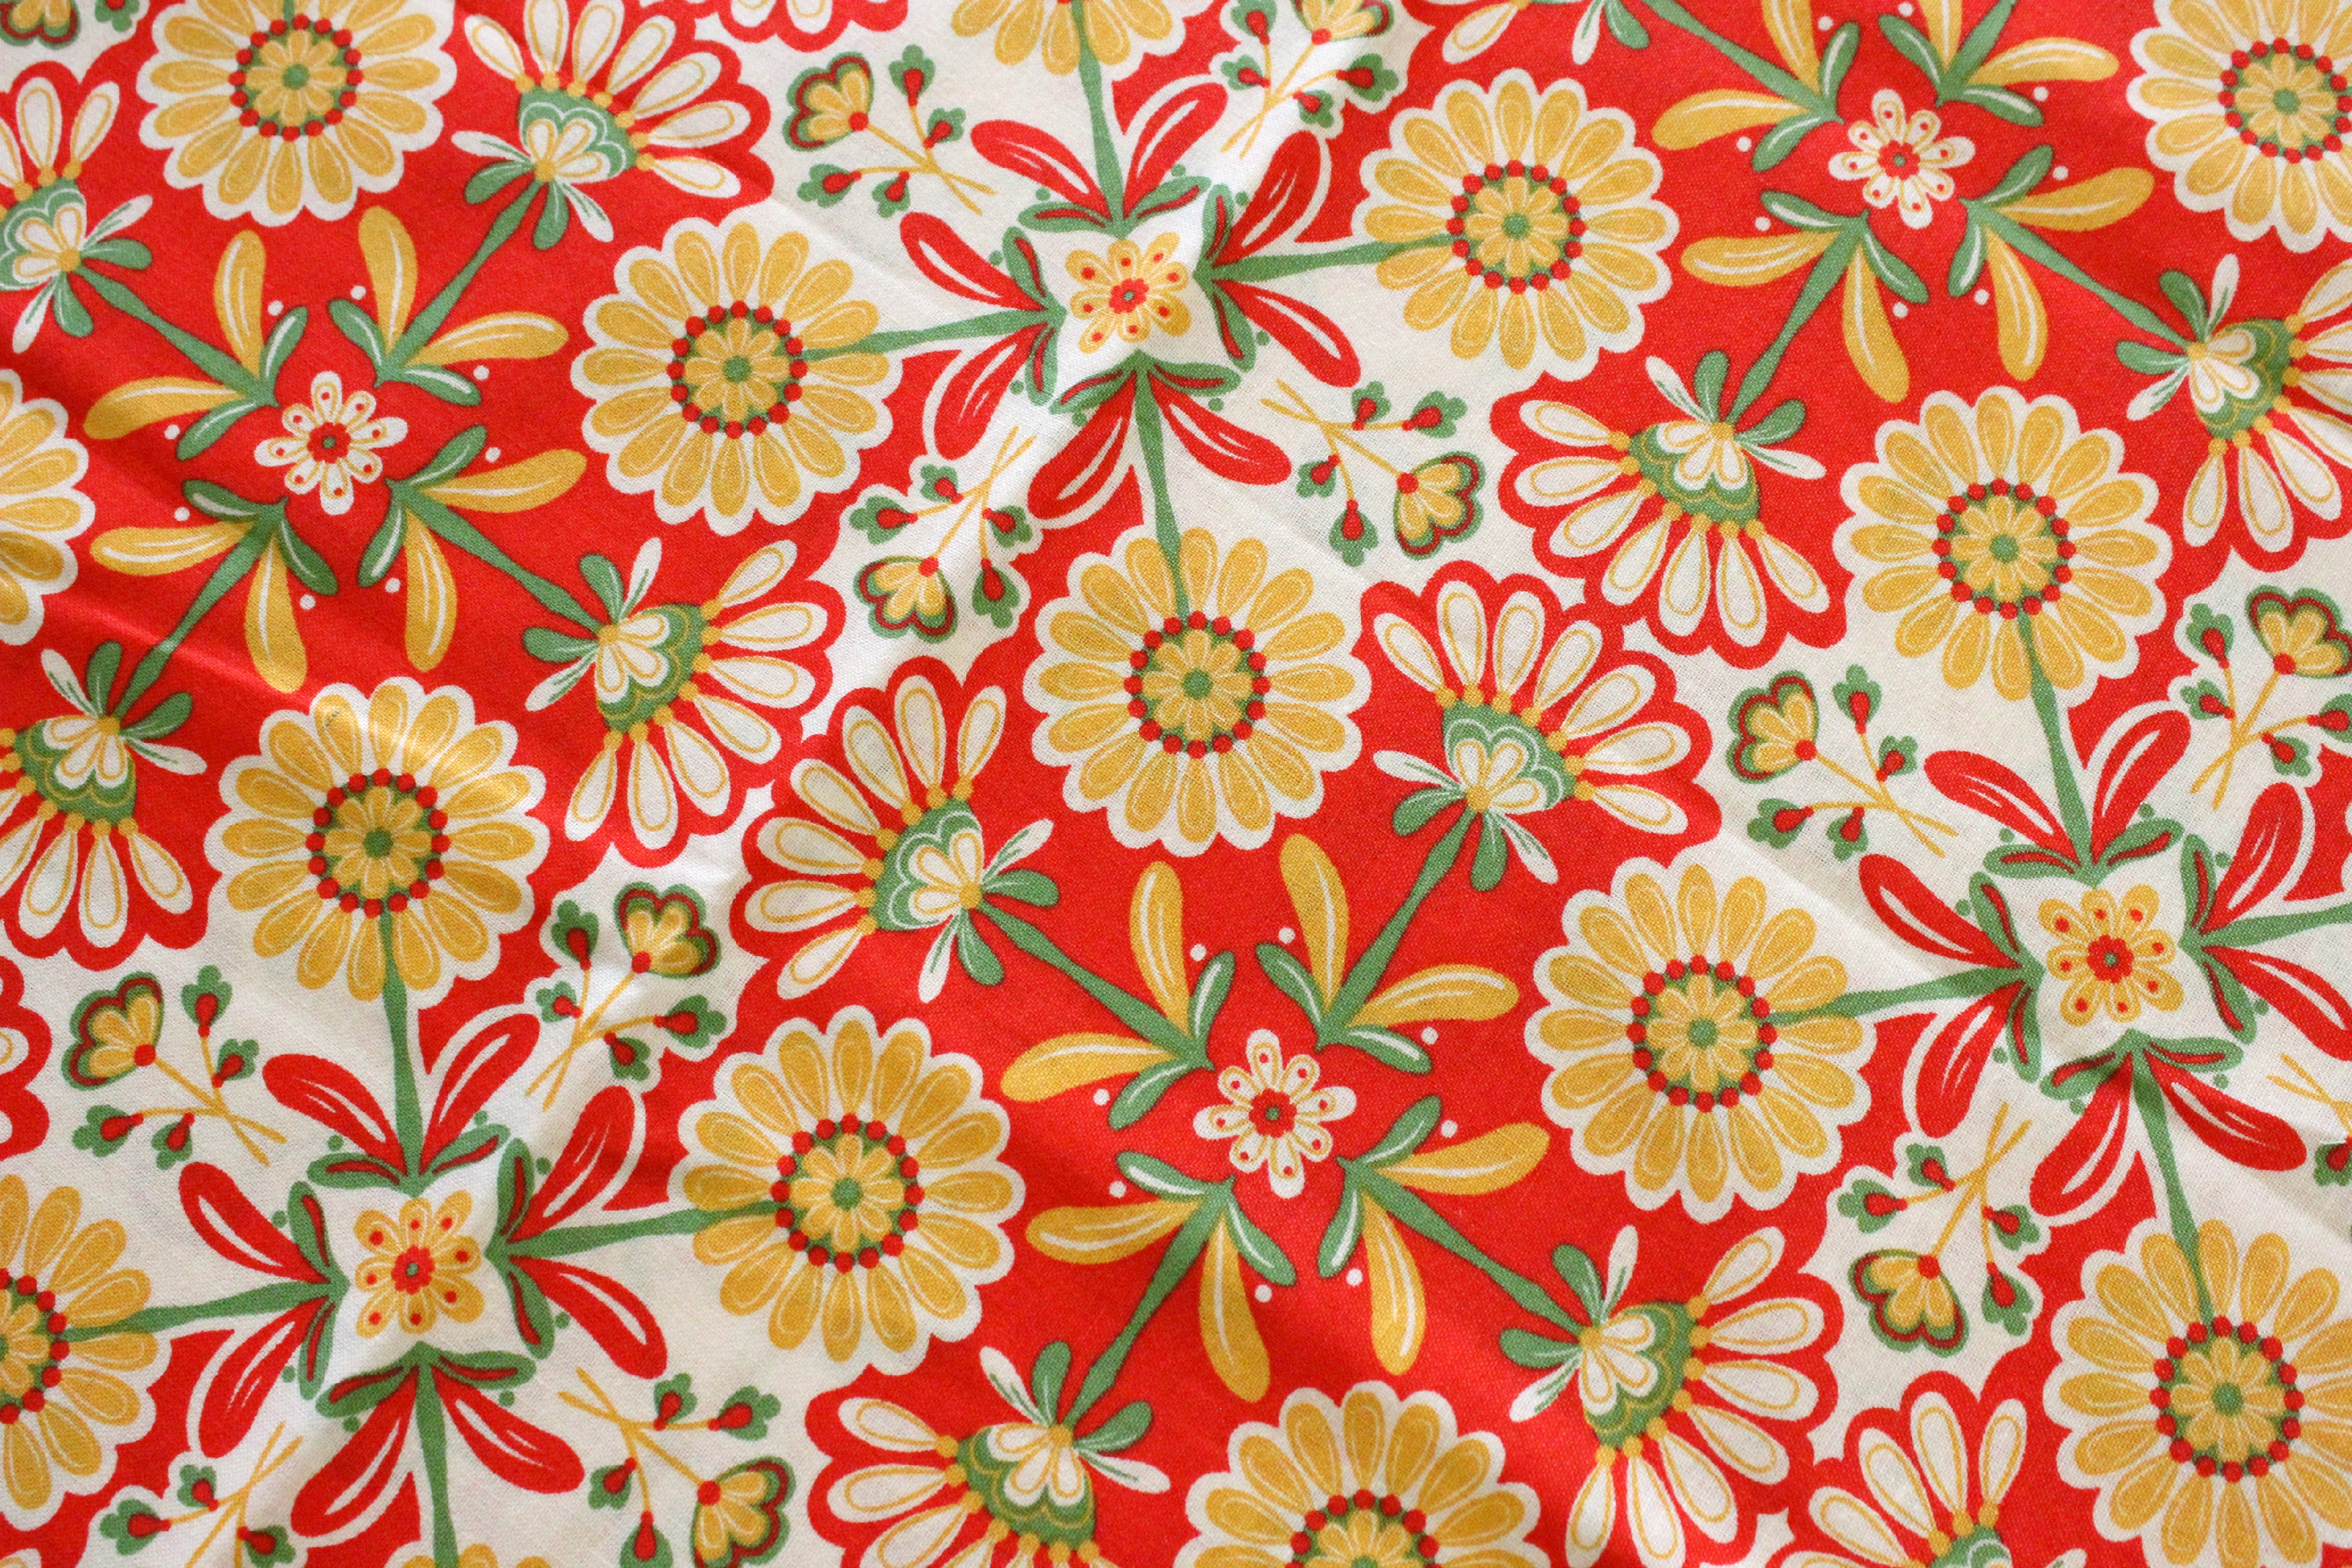
FABRIC NAME:Leila. This fabric will used in two of the blocks.
FABRIC NAME:Blossom. This fabric will be used in three of the blocks.
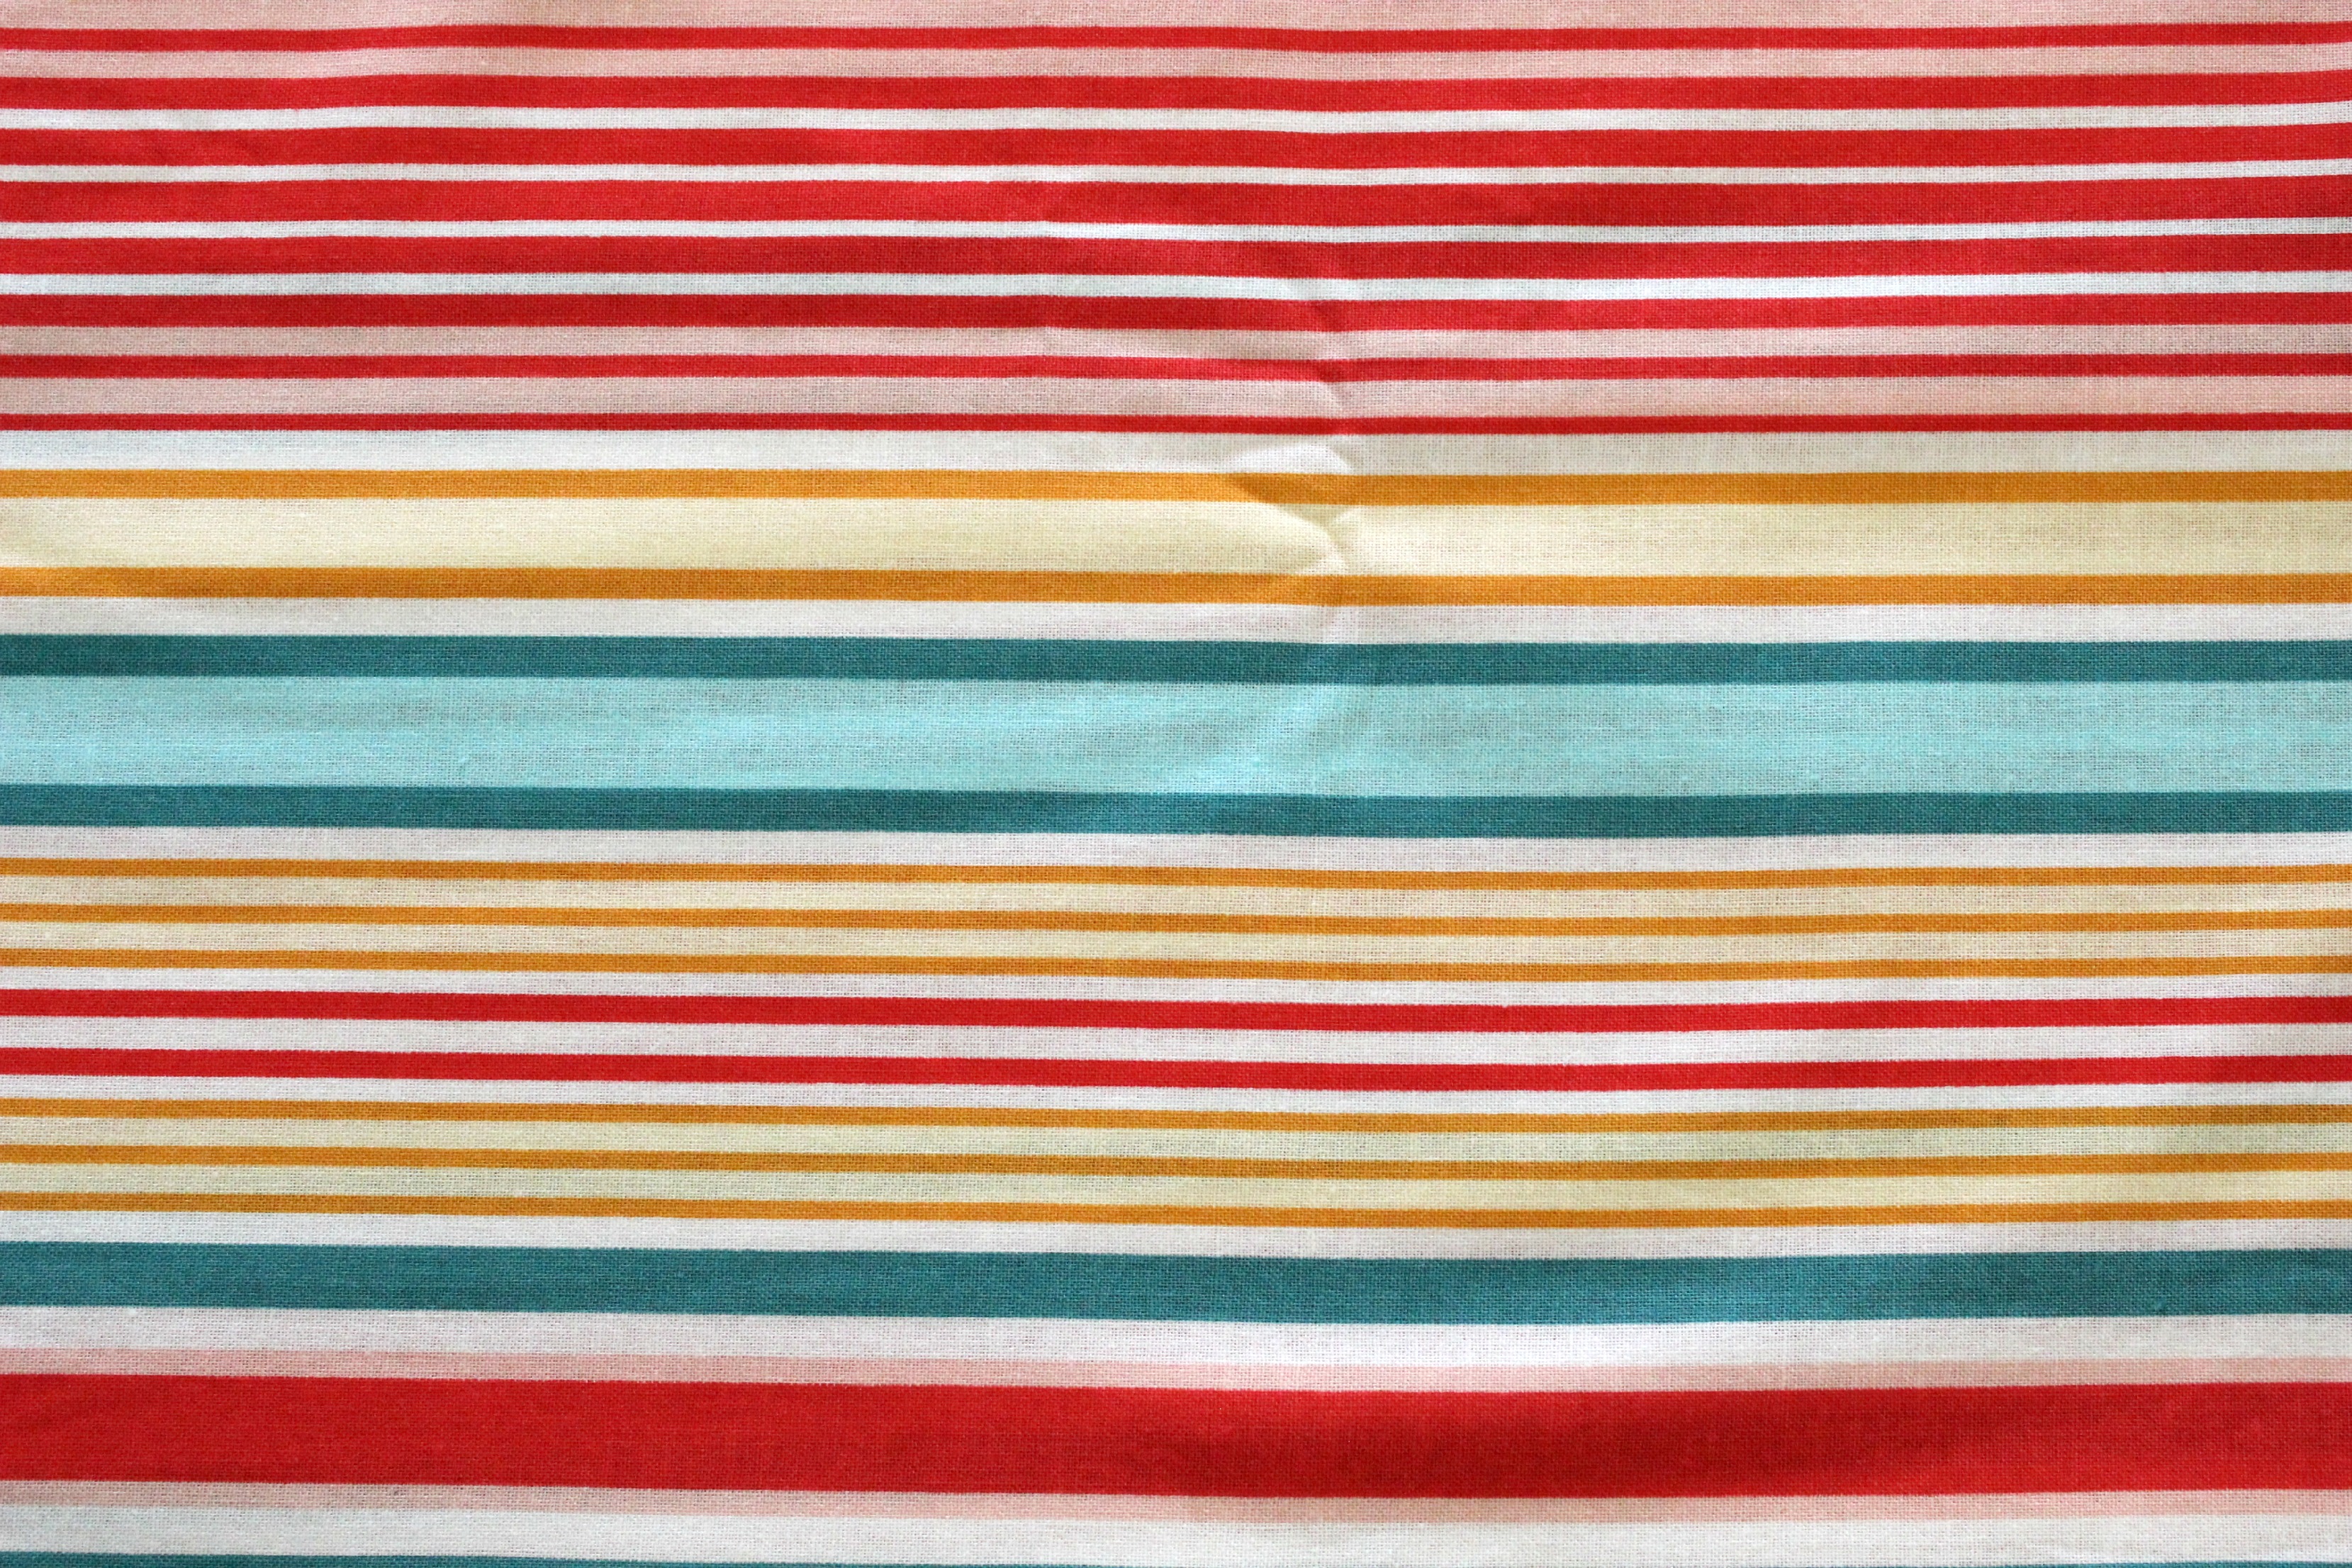
FABRIC NAME:Stripe. This fabric will be used as the binding for the quilt.
+++
To accompany these prints, I’ve also mixed in two matching XOXO Basics fabrics from Cotton+Steel.
FABRIC NAME:Pink Cheeks. This fabric will be used in three of the blocks.
FABRIC NAME:Dandelion. This fabric will be used in one of the blocks.
+++
To balance out the prints, I’m also using two Cotton Supreme Solids from RJR Fabrics.
FABRIC NAME:Elephantastic Pink (on the left). This fabric will used in two of the blocks.
FABRIC NAME:Blue Skies (on the right). This fabric will be used as the background fabric in all nine blocks as well as for the sashing and borders. (NB: This fabric doesn’t photograph well: in real life it doesn’t look this grey and boring!)
+++
Now in regards to how much fabric you’ll need will all depend on if you’re going to use as many fabrics as I am. If you are, I would recommend in getting no more than a half metre or half yard cut of fabric for each print you’ll be using in your blocks. You possibly could get away with using Fat Quarters, but if you make a mistake with a certain block, you may come up short and I don’t want that to happen to you! For the background fabric, you’ll need at least two metres (2 yards) and no more than 1 metre (1 yard) of fabric for the binding. Once the quilt top has been completed, I’ll share how much backing and batting you’ll need to finish it off!
+++
Now luckily for me, a wonderful Australian wholesale supplier and fabric distributer know as Dayview Textiles very kindly sourced and supplied these beautiful fabrics to me which I am very grateful for! If you’re in Australia and are keen on using the same fabrics as me, pop over to their website to find the nearest quilt store to you that they distribute fabrics to!
If you’re not in Aussie-Land, here are a few places you can purchase these fabrics online… (OH MY GOSH! Fabric.com has everything!)
I’m so excited about this little series finally starting and I can’t wait to see all of your lovely blocks and potentially beautiful quilts over the next coming weeks!
The video tutorial for block #1 will be out on Wednesday, with block #2 out on Friday!
See you then!
Happy Sewing, Friends!
xx
P.S If there’s any vital information you think I’ve missed, comment below and I’ll add it in!
P.P.S I also uploaded this video to my YouTube channel introducing the series if you’re interested in watching it!
The other day, while wasting time on Facebook, I came across a link that was shared to this awesome little FPP Jack-O-Lantern pattern by Sonja Callaghan from the blog Artisania. And with Halloween coming up very soon, I just knew that I had to print it off and give it a go!
Firstly, I printed off the pattern at a scale of 90% so that I was sure the pattern would fit comfortably on a A4 piece of paper. Then I sat down for a bit, trying to figure out the best way to make it as I’ve never attempted a FPP pattern this intricate before!
Once confident of how to start and what steps I had to do to be successful at the end, I picked out some fun autumnal RJR Supreme Cotton Solids and jumped straight into making!
Here are a few tips that I think might help you when making the block yourself…
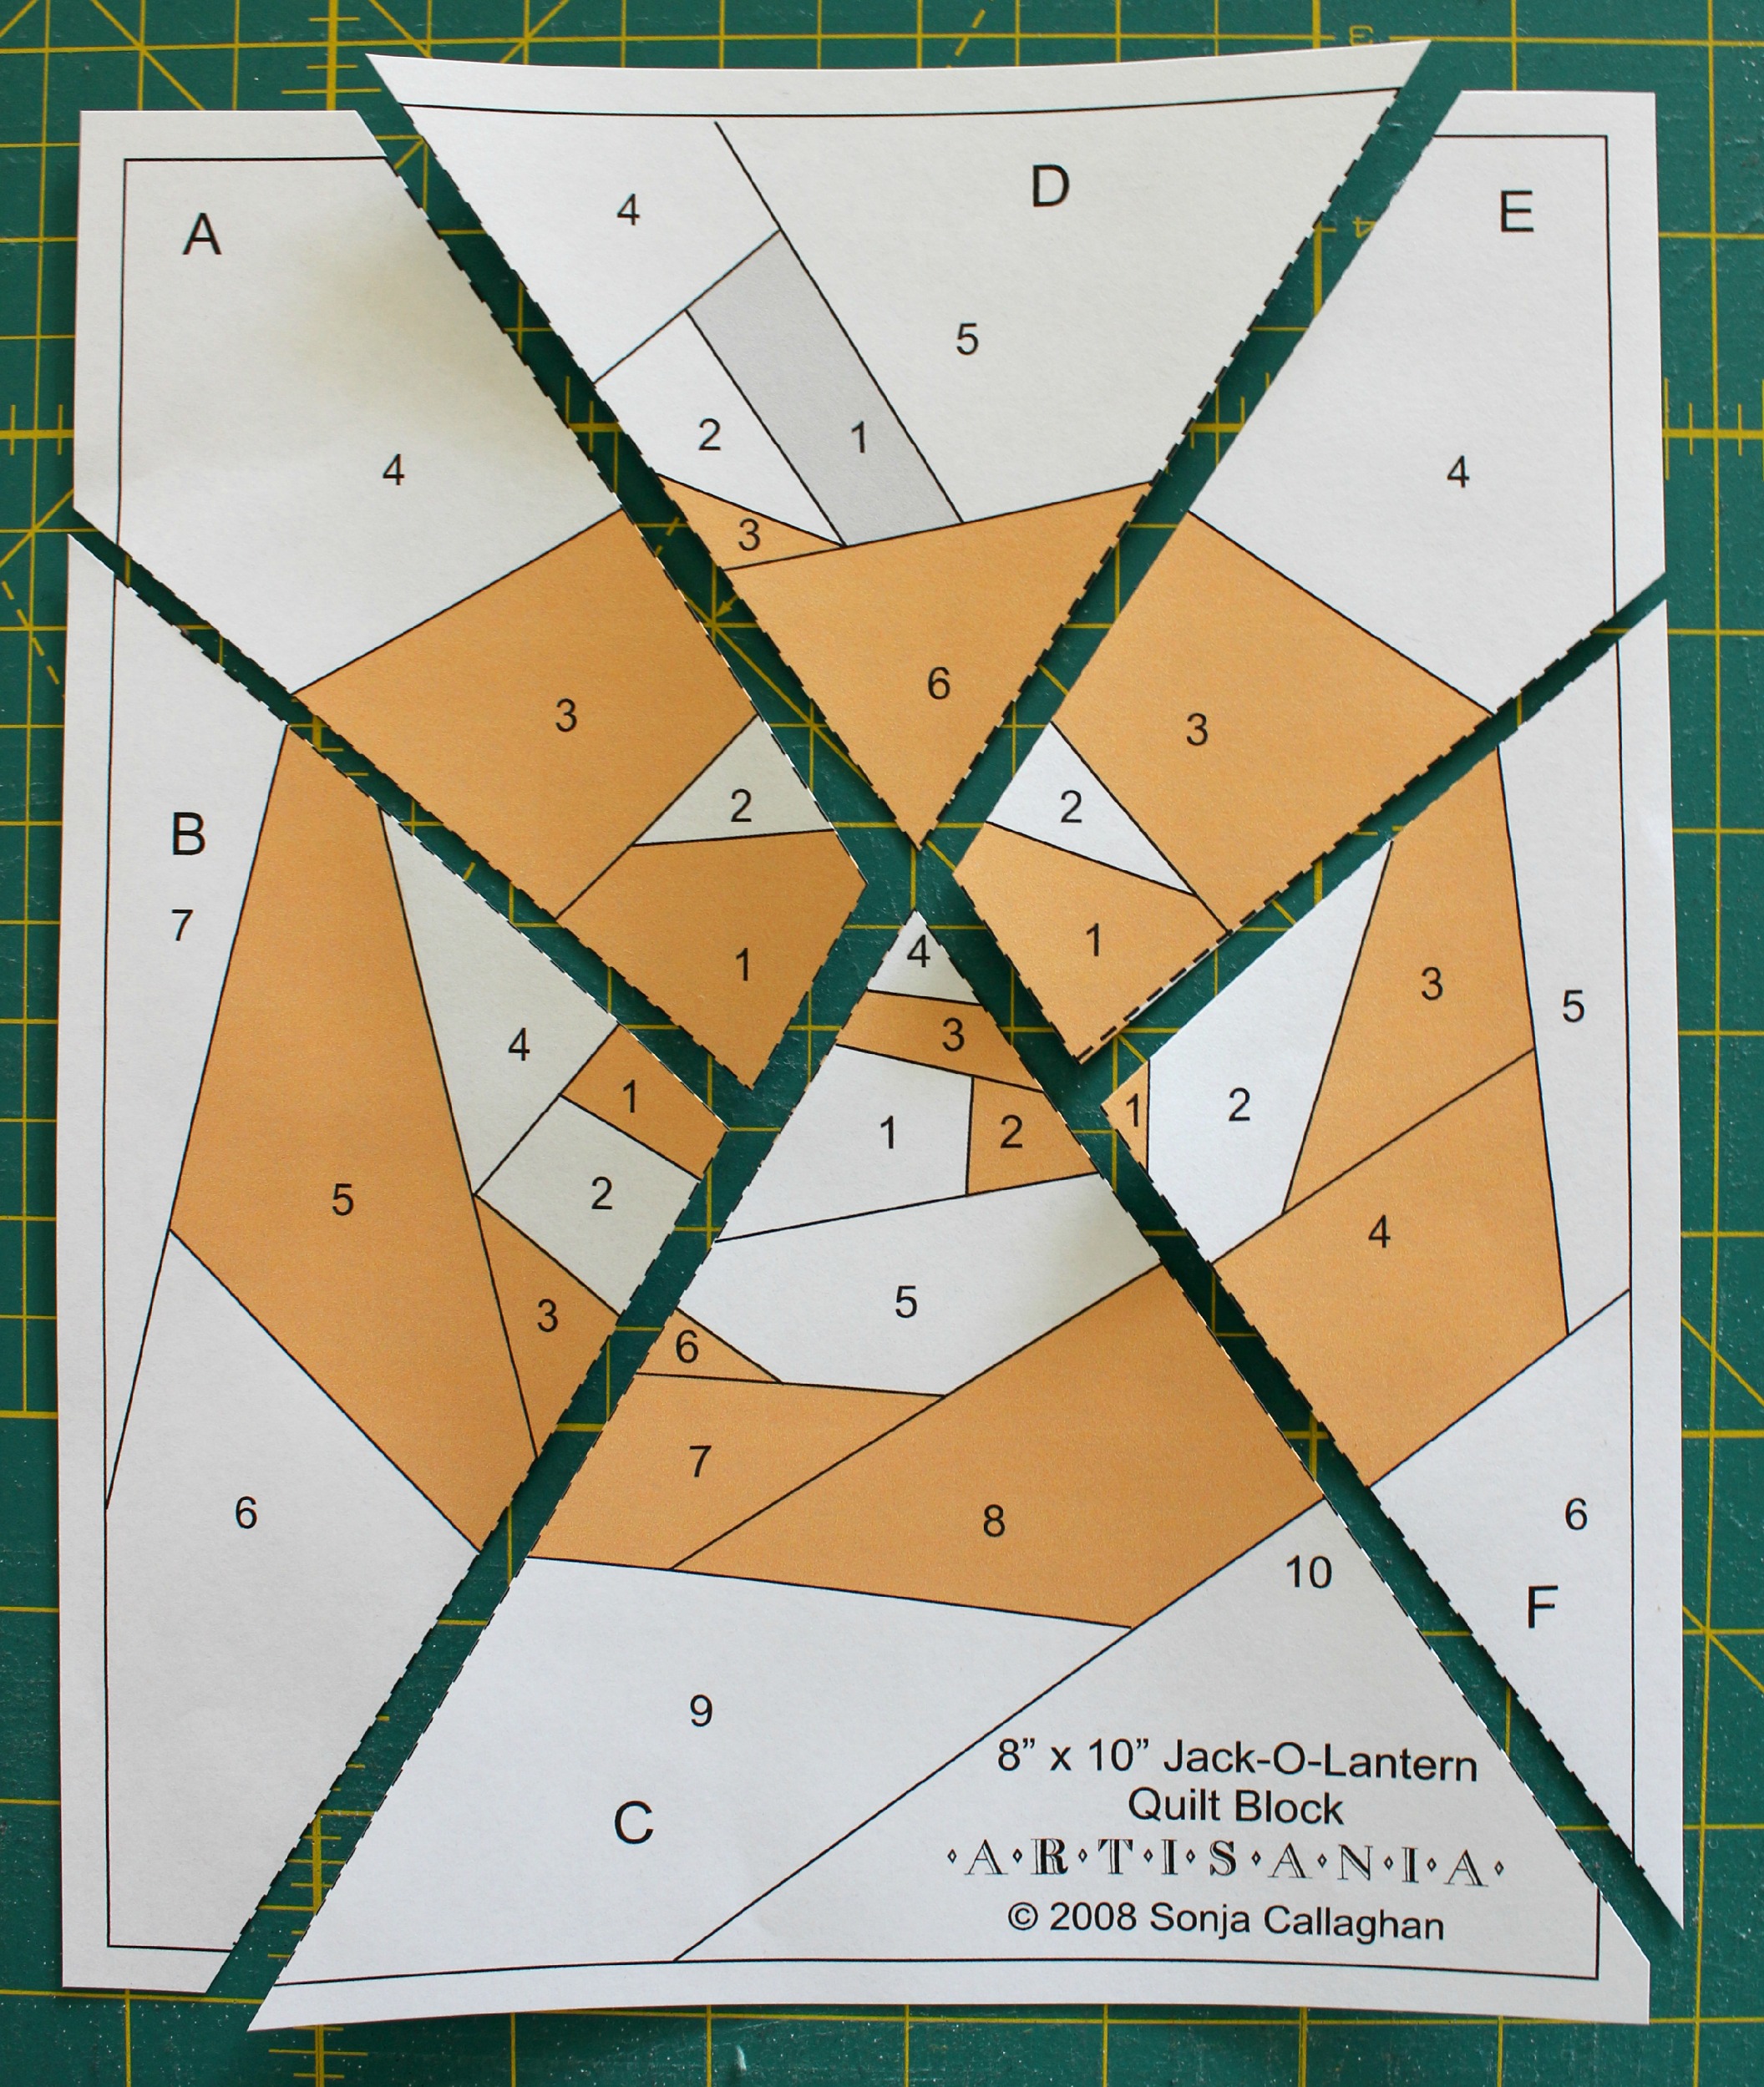
No. 1 – The block is divided into six sections labelled A to D. So you need to carefully cut the paper pattern into the sections before you can start any sort of piecing! (See Photo #2) I also cut an extra 1/4″ seam allowance around the outside line of the pattern so that I wouldn’t get caught out not having enough fabric to cover each section. (See Photo #1)
Photo #1Photo #2
No. 2 – Another prep step before starting: Using a Clover Serrated Tracing Wheel and a ruler I perforated all of the lines in each section that I’ll be sewing on top of. (See Photo #3) Doing this simply helps to ensure that the paper will rip away smoothly from the back once the block is finished.
Photo #3
No. 3 – I found it really helpful to initial each numbered section of the colour that was to be used so that I wouldn’t get confused!
W=White, O=Orange, B=Black and G=Green.
No. 4 – I was really relaxed with sizes of fabric I cut for each section. I found, that because a majority of the numbered sections were quite small, I was able to use quite a lot of fabric pieces from my little scrap pile I was creating from the other sections I had finished piecing. And due to that, the block came together really quite quickly!
No. 5 – As you piece each section together, make sure to leave enough fabric over the edges so that you can trim the block down with a 1/4″ seam allowance around each side. For this pattern to come together perfectly at the end, you need to cut a 1/4″ out from each edge on all six sections (excluding the edges you cut around before on the outside of the pattern)…Hopefully Photo #4 will help you understand a little better…
Photo #4
No. 6– Once you’ve come to the part where you’re ready to piece each section back together, I found doing it in this order the easiest…
Sew section A to section B, then section C to the other side of B. Remove the paper from the back and press the seams either to one side or flat open. Then sew section D to section E and then section F to the other side of E. Again, carefully remove the paper from the back and press the seams in the same way as before. From here, piece the two sections together to finish the block.
TIPS: When piecing each section together make sure to line up the seams around the outside of the pumpkin and around his mouth to achieve clean crisp lines. It may take a little bit to get these parts aligned and sitting perfect but trust me, it’ll be worth it in the end!
Finished block size: 7.5″x9.5″ (19cmx24cm)
So to sum it all up, despite a few mistakes on my part resulting in the seam ripper to make an appearance more than once, this was a really fun FPP pattern to piece together! Believe it not, I did learn a few new things and expanded my knowledge on the way I should tackle these types of tricky pattern designs! I also felt like a slight rebel making this little guy as Halloween isn’t widely celebrated in Australia as it’s seen as more of an ‘American’ tradition. But I like Halloween – it appeals to the crafty and creative side to me! Hence why I loved this making little guy!
If you like the look of this guy and would love to make him yourself but don’t know a thing about Foundation Paper Piecing (FPP), then check out this tutorialI made a little while ago taking you through the steps of how to do it!
Of course, if you have any questions about this block or are stuck on any step, please don’t hesitate to ask! I’m always here to help!
Best of luck to all of you who are going to print this little guy off and give him a go! Don’t forget to share your photos with me!