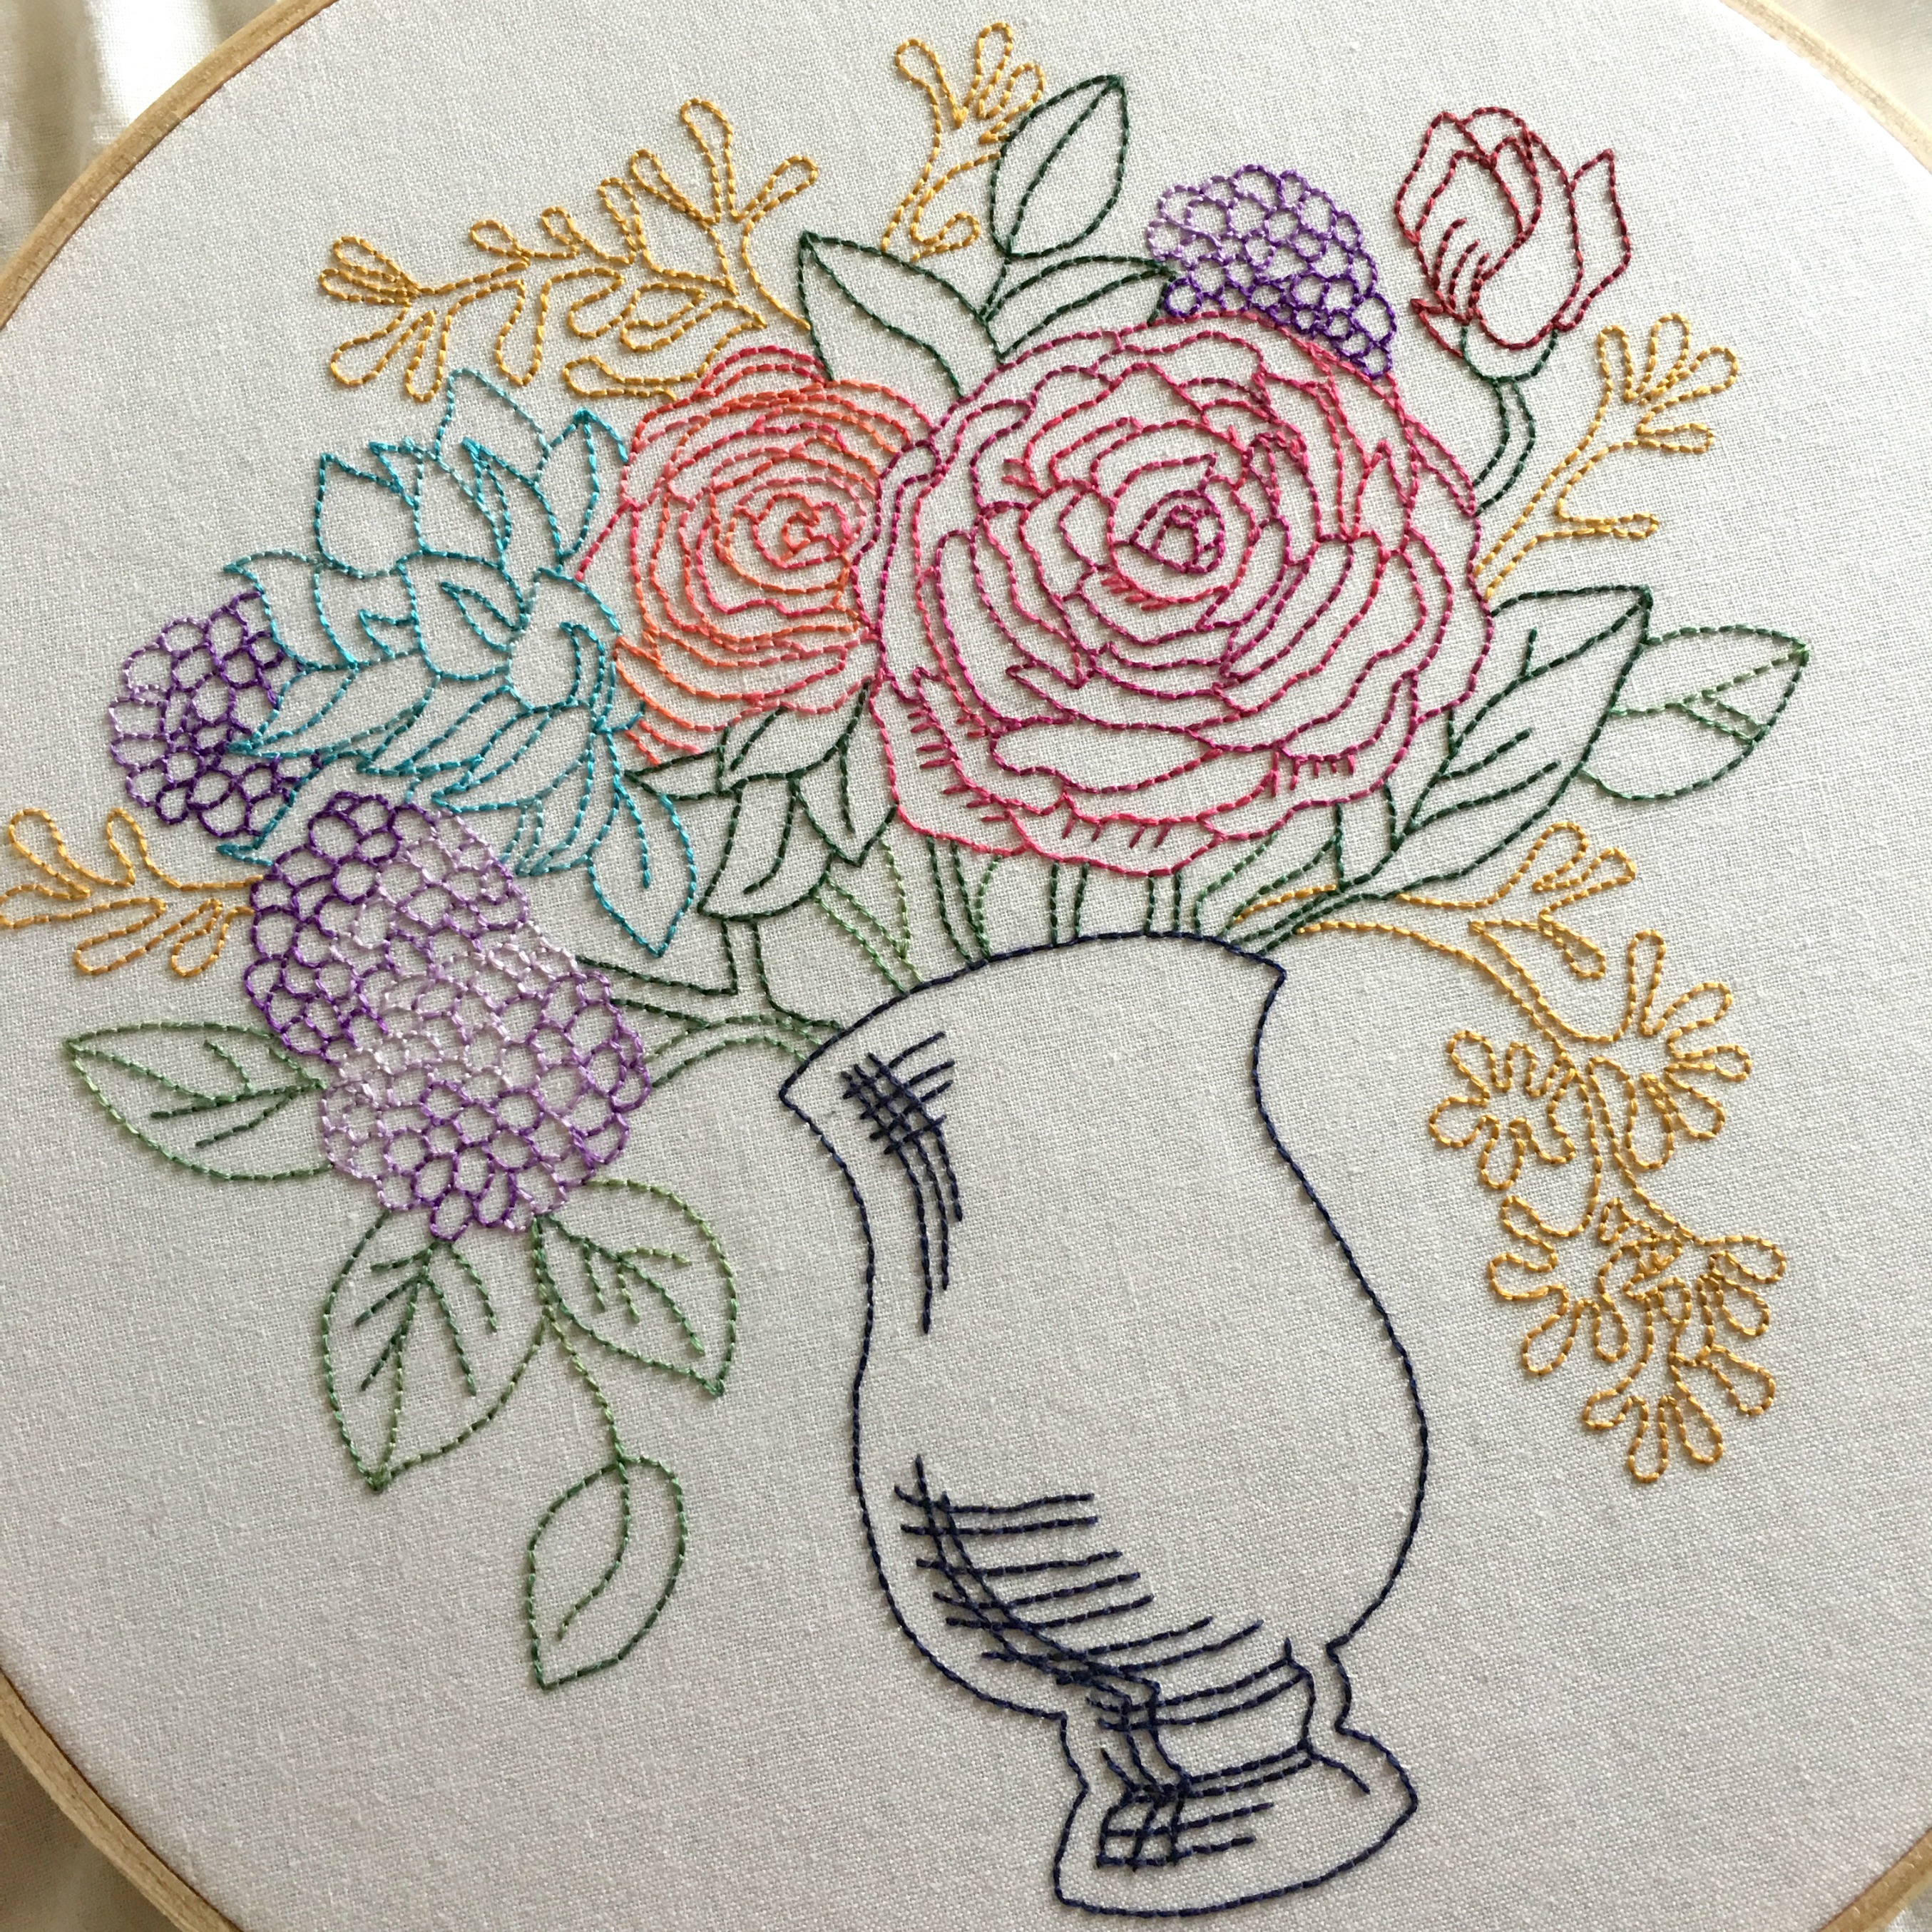
About a week ago I finished stitching a lovely floral embroidery that I had sitting on my desk waiting to be started for about six months or so. It was one of those designs that as soon as I saw it, I just had to make it!
Quite often I find myself go in and out of favourite styles or types of ways to be creative; whether it be simple patchwork piecing, quilting, crafting or a bit of delicate embroidery. So at a time where I was struggling to find the time and energy to do anything creative because of my work schedule and other life-y responsibilities, my itchy fingers and restless mind were in desperate need to do something fun, colourful, beautiful and creative! (Also the fact that I was in the mood for snuggling up on the lounge with a favourite quilt and re-watching one of my favourite movie franchises: The Lord of the Rings – Extended Editions played a huge role in getting this embroidery started!)
So this is where the nerdy part starts; A basic analysation of an embroidery…
When figuring out what colours to use for this design, I put my Florist hat on and thought sensibly about what kind of flowers where in it and what types of colours they would be in real life. I knew instantly that I wanted to use a variegated purple thread for the fluffy hydrangeas on the left hand side and at the back of the arrangement. Hydrangeas come in so many beautiful colours and shades and I wanted to really show the lighter and darker changes that the little flowers making up a hydrangea head have.
That big rose right of centre had to be red! It needed to be centre stage; fluffy, full and magnificent! Again, I used a variegated thread for this to add interest and to give a little bit more depth to the overall design. Its lovely little friend behind it is a couple of shades lighter, a little bit more fuller and finished again with a variegated thread full of luscious shades of oranges, pinks and reds.
The other elements of the arrangement (know as ‘filler’ flowers in the world of floristry) I also wanted to be true-ish to life and not take away initial interest of the main flowers. The deep greens and flowing golds compliment the overall colour scheme and design, while the heavy navy vase cements the design adding shape, roundness and a finality to the arrangement. In early plans I was actually going to embroider the vase a metallic gold but as the embroidery got along, I thought if I did that there would be too much gold/yellow tones in the design. By using a near opposite colour from the colour wheel, the navy vase compliments everything perfectly!
So there you have it. I little peak into how my brain worked out how to apply colour to this darling embroidery. Whether you found this post dead boring or super helpful, I hoped you enjoyed watching this embroidery come to life. And if you saw it all unfold on Instagram, thank you for enjoying the endless ‘spam’ of my work-in-progress!
Now I’m on the hunt for the perfect frame so that I can hang this beauty on a wall in my sewing room and swoon over it every time I notice it! I love finding old frames at charity shops so I think that’s what I’ll do when I next get the chance!
Also, if you would love to make this embroidery too, I found the pattern on one of my favourite websites that have a great range of embroidery designs, Urban Threads.
+++
And now I’m onto the ‘what’s next?’ phase.
Although I have a tonne of other projects to finish (*cough* Star Sampler Quilt Along! *cough*), I’m always on the hunt and yearning to start something new! Here though, is a quick list of immediate projects I’ve got going and/or want to start very soon!
Star Sampler Quilt Along to finish (the quilt-top construction tutorial will hopefully be ready this coming week!)
New crafty YouTube Tutorials to plan and film (includes a lunch tote bag, flower crown and floral wreath and of course more block tutorials!)
A winter coat to lay out, cut and sew together (yep, the inner dressmaker in me is dying to break out!!)
Swoon. I have yet another Swoon block waiting patiently for me to piece together (this one involves a beautiful colour palette of purple Tula Pink fabrics!)
There’s just so much I want and need to do! It can be awfully overwhelming at times… But little-by-little I’ll get there and do it all to the best of my ability!
I hope you’re all enjoying a splendid period of creativeness and are enjoying whatever it is that you’re currently making!
Now, I’m possibly not the best person to be chatting about sewing room organisation and storage! One glance into my currently messy sewing room and you’d get it! My organisation skills are chaotic, simplistically naive and (perhaps) a little non-existent! While my storage areas are overflowing, out of order and oddly colour-coded!
However, I think there are a few things here and there that I can share and inspire you with! And I’ve also been researching on how one or two other quilters have organised and stored things which I’ll share with you as well!
Firstly, let’s get into a few of the ways I organise and store things in my sewing room! I’m one of those people that like to re-use as much as possible and keep things quite simple. So I have lots of bits sticking out of glass jars and broken mugs (rotary blades, pencils, scissors, buttons and paint brushes!), items secured in pretty but battered tins, fabrics roughly folded and stuffed backed onto their shelves as well as a tonne of those handy plastic containers you can get at the $2 shop! 😀
Tins:
You may’ve caught me mentioning in my recent Sewing Room Tour video that I love to use tins to store and organise lots of stuff! From pins to threads to hexies to notions. Pretty decorative tins are everywhere and I love it! I’ve been lucky in the fact that my Dad is a keen collector of Arnott’s Biscuits tins as he worked for them for nearly 30 years! So very happily we have lots to spare so that I can store all of my sewing knick-knacks in them! I’ve also sourced a lot of my smaller tins online from little indie companies such as Belle & Boo, Emma Bridgewater and Lark.
Fat Quarter Drawer
A little while ago I purchased this hard-plastic type drawer from Spotlight made especially for storing fat quarters. It’s about 50cm (20″) long and can hold well up to 20-30 FQs. I’ve found it so handy to quickly place new FQs into it and then be able to pull the draw out and easily rummage through what’s in there.
Fabric
I’m quite boring when it comes to organising and storing my fabrics. I don’t really have any fancy folding or hanging system. I have a main bookshelf next to my sewing table that has all of my favourite or most used fabrics in a very relaxed colour-coded system: Whites, creams, yellows, browns and oranges on the top shelf, pinks and reds on the next two shelves, green and blue hues on the two after that and then right down the bottom I have my purples, greys and blacks. The majority of these fabrics are all half-metre (or half-yard) pieces or less. I tend to store all of my larger cuts of fabrics in the plastic containers I have under my sewing table. They’re quite easy to slide out and to have a quick little rummage through when I need to. These aren’t colour or range coordinated. Just folded up nicely and stacked one on top of the other.
Very conveniently, one of the crafty YouTubers I watch, Melanie Ham just recently uploaded this video showing how she organises her fabrics in her sewing room! I think if I had the time (and cupboard space!), this would be such a great idea to follow! I hope it inspires you just as much as it has me! 🙂
Another YouTube video I found that was all about sewing room organisation was this one by Stephanie De Pasquale Soebbing from Quilt Addicts Anonymous. I found that she had a fab idea for storing your ironing board, jelly rolls and pre-cuts as well as another neat and lovely way to store and organise fabrics.
Tools:
I tend to try and keep all of the tools I’ll need when cutting and sewing dotted around my cutting mat as this is like my central space in my sewing room. So here I have my rotary blades and quilting rulers close to hand along with my pins, thread snips, lead pencils, essential paper-piecing tools as well as threads and binding clips. These items are either stored in glass jars, pretty tins or placed in an easy to reach spot on my pink IKEA shelf.
+++
So as I sit here and look around at all of the different areas in my sewing room, there are still so many little things to do with the way I store and organise stuff that I could share with you… Like the way I’ve organised all of my craft stickers and die-cuts, to how and where I have my coat-hangers ready to hang a finished block or quilt, to the way I organise and store all of my patterns and paper-trail as well as the way I’ve organised my books based on how much I love them!
But unfortunately, I just don’t have the time to get into every nook and cranny that cleverly hides away a WIP or stray crafting notion! Today I just wanted to stick to the major areas that most people tend to struggle on finding a solution for… I hope I’ve helped in some little way!
Though in honesty, all of us quilters have our own unique way on how we like to organise our sewing spaces and store all of our wonderful fabrics and notions. I don’t think anyway is the wrong way. As long as whatever system you use works for you and the limits of your sewing room than that’s all that matters!
Have you got any fab ideas on how you organise or store things in your sewing room? Feel free to share it with us in the comments section below!
Hello and welcome to week two in my Everyday May series!
I thought for this week, I would dedicate it to writing more about my sewing room and addressing a few of the requests from you guys about organisation, how to set up or layout your work space as well as a few other fun things I think might be helpful!
So first off for today I wanted to share with you a simple tour of my sewing room.
A few of you might’ve already seen this, but I uploaded this video onto my YouTube channel a few weeks ago showing you some of my most favourite nooks and crannies and bits and bobs that make this room a happy and inspiring one for me and for my quilting!
To be honest, there really isn’t much more to add to what I say and show you in the above tour… In it, I just really wanted to try to capture the essence and those little things that matter the most. Such things include my ever-watchful Buzz who guards the room so diligently, some of my favourite pieces of stationary, the way I like to store my embroidery threads in colour order, the cherished photo of me with my parents along with the sewing machine that helps me bring my thoughts, designs, dreams and passion into something brilliantly tactile and real!
I’m so grateful that I have the opportunity to have this space at all! (You can read a little about the back story here!) And never a day goes by where I don’t spend a good couple of hours in here! It’s like my safe haven, my hub, my happy place. 🙂
No matter where you plan, design, cut, sew and work I hope that you enjoy the space you occupy when creating! Tell me about it in the comments section – I would love to know!!
So the title of the first one pretty much explains everything! It’s a gorgeous little book full of 25 quick and easy pillow patterns and ideas by some of the leading makers in the modern quilting movement. As I flick through it, my eye keeps catching on some super basic but very effective patterns and designs. Some of these include autumnal chevrons, fresh drunken path blocks, darling little Union Jacks (a must make!!) as well as rainbow flying geese and sunburst dresden plates! So if you’re crazy for making gorgeous pillows and cushions for the home, this book is a must for any quilter’s library!
So with this book, I did what we all shouldn’t do and judged the book by it’s cover and said, YES! I mean, how adorable are some of the darling crafty things on this cover?!! Ohh! So homey and fun! Once I had a quick flick through it at home, I knew I had made a good choice! There are some super fun and aesthetically pleasing projects in this book ranging from patchwork pincushions featuring beautifully free-motioned embroidered words: Sew me! The lovely house and clothesline framed design is a pattern in the book along with the sweet little stuffed houses (or garden sheds!). If you have kids in your life, I think this is a great book to use as inspiration when the next birthday rolls around!
I absolutely love Liberty print fabrics!! They feature so many beautifully delicate floral patterns, colours, forms and proportions. I swoon every time I see them! When I get the chance to visit London, Liberty will be one of the first places I’ll go where I’ll make a beeline straight for the fabrics and haberdashery department! Ooo, I can’t wait!! Anyway, back to reality and this lovely book at hand! This one features a great handful of different type of sewing and quilting projects like a Classic Thread Spools Quilt, a modern Medallion Quilt, a fun little dog collar and fabric rosettes, a few easy to construct bags and totes as well as some dressmaking designs like a t-shirt and tunic dress. The photos and over-all layout of the book is just simply darling and sooo Liberty! It’s definitely my kind of sewing book!
Another title that pretty much sums up the theme of the book – lots of simple projects that can be made for the home! Patterns include a sweet but very modern frilly apron, pot holders, a few fun little quilts, office based projects such as journal covers and lamp shades and then a few things for the kids such big round floor cushions, a checkers board mat and a birthday board made from fabric! There are so many great ideas in here it’s so hard not to just list them all down!
I have to be honest with you again… The only reason why I bought this book (a part from the fact I love the Scandinavian aesthetic!) was for that jolly little Santa softie sitting proudly and oh-so sweetly! What a little legend! But apart from him, there are some really great ideas in this one! Not only is it full of homey sewing projects but it has some delicious Scandinavian recipes, beverages and traditions! There are some fab things to make the kids like the Santa softie, a fabric fish mobile and lovely appliquéd strip quilt! Then there are some great makes for the kitchen as well as a few simple bags and totes. Four words to describe this book – Simple. Fresh. Modern. Humble.
And last but not least, I was able to pick up another copy of one of my all-time favourite quilting books! I will always recommend this one as a great first quilting book to have in your stash. All of the designs are modern and fresh, easy to follow and photographed beautifully. Like all quilting books, right at the beginning there is a dedicated chapter to showing and explaining all of the basic (and more advanced) techniques, tools and materials you will need to know and have to begin patchwork and quilting. In this book, this info is explained in plain english, no fancy-pants words or misleading instructions. It’s straight to the point and super helpful! Some of the projects include blocks such as the square-in-a-square, four-patch and nine-patch as well as plenty of other modern and traditional block forms. Perfect!
+++
Whew! Book haul over!
Now I just have to find a place to put them all! 😀
What’s your favourite quilting/sewing/craft book? I would love to know!
So if you didn’t know, at the beginning of this year I started a Floristry course after always wanting to do so ever since my last year in high school.
Safe to say I’m really enjoying it and am learning a lot about flowers and plants than I ever thought I would!
So in today’s post I thought I would give you an honest account of what a typical day/week for me is and what it’s really like to be studying as a floristry student!
Let’s start with the basics…
I have classes three days a week; Monday 9am-3.30pm, Wednesday 8am-4.30pm and Thursday 8am-4.30pm. On Mondays and Wednesdays we have prac lessons in the morning and then in the afternoon we concentrate on the theory side of the course: basic retail knowledge (so how to work competently in all areas of a retail florist shop) and then a plant class where we learn all about the anatomy of plants, plant care, plant names as well as health and safety info. And because I’m in an ‘accelerated’ course (meaning we just finish the course sooner than our other classmates), Thursday is an all-day prac day where we’re currently learning how to construct formal and informal Trail Bouquets!
Here is a layout of some of the most basic tools I have in and around my tool box…
one: 22 gauge wires. Used for wire-based designs and arrangements such as Corsages and Wedding Bouquets. Comes in thicker and finer gauge sizes.
two: Parafilm. A stretchy, self-sealing tape that is wrapped around exposed wires. It prevents rusting and allows wires to grip onto each other better.
three: Some darling deep burgundy Chrysanthemums that I’m currently using in my arrangements.
four: Floristry scissors. Perfect for cutting flower stems and all wires!
five: Flower Foam. Used in posy boxes and bowls, bats and wreaths as a water source for the flowers. The foam allows the flowers to last longer and gives the florist better control with placement when making an arrangement. Designs featuring floral foam will usually cost more as opposed to those without. The one I use is by Oasis which is considered the best kind in the industry which I whole heartedly agree with!
Now, of course there are so many more other things in my tool box but as I write this, my actual tool box is on campus and what’s above is all I had on hand at home to show you!
🙂
Here are some of my favourite designs I’ve learnt so far… In class we usually practice each design twice and on the third go we’re assessed and marked! Eep!!
(FYI: you may’ve already seen some of these in my Instagram feed!)
This was my very first attempt at a Formal Wired Posy! It features pink Roses, pink Carnations, Sedum (the green spiky bits), white Spray Roses, pink Hyacinth florets and a foliage leaf called Ruskus.
And this was the one I made for assessment, which included a ribboned handle!
Another design we’ve recently learnt was the ANZAC Chaplet.
Made traditionally with laurel leaves (symbolising victory and honour), three sprigs of rosemary (each representing the Army, the Navy and the Air Force) and red poppies(symbolising remembrance), I made this one using Camellia leaves and red Gerberas as these are what were in season at the time! The base of the chaplet is styrofoam wrapped in a green wreath wrap that resembles the texture of garbage bin bags! Each leaf is tacked on using bent 2″ pieces of 18 gauge wire in a particular pattern where each leaf overlaps the one before it hiding the ‘mechanics’. Although after a while my thumb begun aching from pushing thick wire pins into the styrofoam, I really enjoyed making it. The technique was soothingly repetitive and created a very tactile surface that makes my quilter’s heart flutter just that tiny little bit!
Now this little guy I loved putting together! The design is called an Asymmetric Arrangement Gift Hamper. This arrangement features the use of floral foam that is placed in a special plastic bowl with a cage that keeps the foam in place. I choose materials that would compliment the colour of the bear, the ribbons and the basket itself. (FUN FACTS: That basket belonged to my maternal Grandmother and is used in my sewing room to hold all of my unfinished projects while the bear was a Christmas gift from my BFF a few years ago!) The flowers in this arrangement include yellow Gerberas, white Roses, green Mollca Balm with Viburnum leaves, maroon Cordyline leaves, green Monstera leaves and a few dried out Tortured Willow branches at the back.
And then lastly we have the wired Cake Decoration (top) with a Spray (bottom). These pieces are essentially made as a mini version of the wired Formal Posy and a simple Corsage! Admittedly, I did struggle with making this one at first as you needed to get the top part sitting flat as possible while getting the bottom spray to curve nicely and be in proportion to the top. Sooo tricky!!
Currently in class we’ve just begun getting into some of the funeral designs such as Sheafs, Wreaths, Open Sprays and Casket Sprays (both constructed using floral foam), along with more wedding designs such as the Trail Bouquet, Hand-Tied Wedding Posies and Table Arrangements.
Okay, now I think it’s only fair to be absolutely honest about the pluses and minuses to Floristry… Let’s do the bad things first and then finish it off with the good!
Minuses:
The early mornings! (Boo!): Having been a night owl for last few years, the crazily early mornings have been definitely a shock to the system! Since when was there a 5.30am?? But with time and a solid routine, I’m getting used to the early wake up calls – I’m actually involuntarily waking up 6.30am! What!? Funnily enough I’ve actually always loved getting up early as it makes the day seem longer and I’m always able to get more stuff done! Plus there’s always something so nice about waking up before or with the sun and breathing in the fresh, crisp morning air and consciously planning your day out.
Dirty fingernails (and most often than not, chipped as well!): That was the one thing that steered me away from Floristry. I had someone tell me not to do it as it would ruin my hands. Even my Floristry teacher said it would ruin your fingernails the day we had sign-ups. But I thought, I’m not going to let that one thing stand in the way of my interest! Yes my fingernails maybe dirty and stained a light green at the end of the day but there’s nothing a good scrub with a brush and some soap can’t fix!
Fluctuations in wholesale flower prices: It’s Mother’s Day this weekend and because of the demand on flowers, the prices at the market have skyrocketed! Only this morning on a quick trip in, I spent over $40 on five bunches which really should’ve been half that price in a normal week. My poor bank balance has really copped a blow over the past week or so!
The day I made a Flower Crown!!
Pluses:
A new venture in creativity!: I would class myself as a very creative person. I crave making with my hands, whether that be with fabric, thread, food, flowers, craft supplies – anything! – I must always have my hands and my mind kept busy! Plus I love learning a new skill! Especially a skill that I can apply to real-life and potentially do as a job. So what better way to harness all of that and get creative with flowers! Like quilting, the design possibilities are endless!
Witnessing beautiful sunrises!: I touched a little bit on this above… I love a good sunrise (and sunset to be honest). There’s something about the promise it brings of a new day where you are given another chance to learn more, to laugh, to breathe, to sing, to dance, to create, to cook, to communicate, to relate and to live! Sunrises are beautifully inspiring in that way! 🙂
Discovery and playing with beautiful flowers and foliages!: Flowers are beautiful! Full stop! I’ve always loved flowers but I think after being around them almost everyday of the week along with learning all of their names and how to care for them properly, I’ve gained a deeper love and appreciation for them. Flowers aren’t around for all that long and we must cherish their one-of-a-kind beauty for as long as we can before they sadly die! 😦
Learning the tricks of the trade: Ohh, so many tricks, so many techniques, so many ah-ha! moments in class! They’re much more simple than what you’d expect. And don’t worry, I’ll show you them all one day!
It just feels right: You know when you start something new and there’s that feeling inside you where you know that what you’re doing is the right thing? I’ve experience plenty of new starts where the feeling has been the complete opposite – where the whole thing just does not feel like the right choice or right thing for my life. Well, Floristry feels right. After 11 years since leaving school I finally feel like I’m doing the right thing! (A part from doing all of my quilting ventures, blog and YouTube! Where would I be without all of you!!)
+++
So I think that’s it. That’s everything so far about my course that I think is good to share with you.
There will be more posts during the month that will centre around flowers and making/arranging a few things so I hope you’re excited for that! (I know I am!!)
We’re smack-bang in the middle of March today! (Heck!) And the weather this afternoon is reminding me of why I love the beautiful cool changes in between the seasons! Autumn is slowly beginning to creep into life and I love it! The slow breeze ruffling the ageing leaves of the trees in our garden, the sun setting earlier casting long shadows through the house and the promise of warm afternoon cuppas with a cheeky chocolate biscuit or Hot Cross Bun! (‘Tis the season, you know!)
And with thanks to this perfectly inspirational Autumnal afternoon, I felt it was the perfect time to write a much needed and long awaited blog post!
Oh, my poor little blog has been so neglected this year and it makes me feel so guilty everyday! The year is seriously moving so fast that I can’t scarce believe it that April is just around the corner! Even scarier, it’s Easter next week! It literally felt like yesterday that I was writing all about my Christmas Tree!
So with that, let’s catch up on what’s happening!
How are you?! Have you been making anything fun, new, challenging, inspirational?
Me, I’m good! I’ve been having so much fun learning and playing with some beautiful flowers in my Floristry course. We’ve moved on from making simple button-holes and tricky corsages to learning how to put together wired bouquets (the beginning of our wedding work!) to small posy boxes and baskets as well as big alter-type designs such as this one…
We’ve also begun to venture into circlet/halos (flower crowns) and cake decorations! How fun! But in saying that, there’s also lots of tricky elements to the art of floristry. Colour theory, design choices and placements, spacial awareness as well as all of the ins-and-outs to all of the techniques we’re learning to master…Hand-tied bouquets, wire-work, working with base-medium forms (ie floral foam) and just getting everything looking perfect, precise and professional! And then there’s all of the behind the scenes stuff such as retail education, flower care as well as learning all about how plants work and the science behind it all! It can be tough somedays. Totally exhausting. Stressful. Full-on. Tiring. But fun. Really, really fun. 🙂
+++
Let’s also catch up on what’s been happening on my YouTube channel! Although I’ve been slightly absent from my blog, I’ve been trying my darn-hardest to keep up with uploading a video every week – whether it be a tutorial or a chit-chat one such as a Monthly Favourites, a Haul or some other video request that I’ve received.
The first thing is a quick and sweet block tutorial I did around Valentine’s Day. It was just a really simple four-patch block tipped onto one of it’s corners, making it look like a lovely love heart!
MEASUREMENT & CUTTING INFO:
Cut –
x1: 3″ white square (Cotton Supreme Solid in Optical White)
x1: 3″ light pink square (Cotton Supreme Solid in Elephantastic Pink)
x1: 3″ medium pink square (Prima Cotton Homespun in Lipstick)
x1: 3″ red square (Cotton Supreme Solid in Chilli Pepper)
– x2: 4.5″ white square
A few weeks before I made the tutorial, I had been seeing this block everywhere in my Instagram feed and it totally inspired me to make it my own and then share the process of making it with you in tutorial form! I can not stress at just how simple, easy and quick the block is to make. The final size of the block (7&5/8″ square) is perfect to make into little mug or pot rugs or to piece into a darling mini quilt or even a lovely lap quilt! The choice is completely yours!
Another tutorial that I was able to recently make and upload was the Boxy Zipper Pouch! I had so many requests for a tutorial on this when I shared the one I made for my mum at Christmas that I knew I had to do it as soon as possible! Already, I’ve received lots of emails, instagrams and messages from you showing me your finished little pouches and they all look so great!!
Here’s the how to –
MEASUREMENTS & CUTTING:
From the batting and two matching or contrasting fabrics cut –
x1: 11″x14″ rectangles from each
You will also need –
x1: 10″ (25cm) matching or contrasting zipper
Don’t forget to share you finished pouches with me! You know I always love to see what you make! 🙂
And lastly, due to another request from you guys, I did a two part special showing you my Quilt Collection and then my Mini Quilt Collection!
I had lots of fun making each one, re-discovering some of my favourite quilts and renewing my love and passion for all things patchwork and quilting!
Oh, I love it so!!
+++
So that’s my little world to date! I really cannot describe just how lovely and much needed this little blog-post catchup has been! It’s always so nice to have the opportunity to sit and write all of the happenings that have been not only in my sewing room but also out of it as well!
It’s been such a peaceful and pleasant Autumn afternoon!
It’s always so lovely to find the time to sit and write and share and catchup with you!
I must admit, my blog has very sadly been neglected over the past few months… Life has seem to find the accelerator pedal and made the past few weeks just fly by! (I mean, can you believe it’s the middle of February already!! Geez!)
So as always, there are lots and lots of new exciting things to catchup you up on – so let’s dive in!
first update – floristry!
I’m a student once more and no ordinary student at that! I’m learning how to become a Florist!
I’ve always wanted to study floristry ever since I was in my last year at high school. (I’ve also always been into gardening and growing my own plants, veggies, herbs and fruits. A trait inherited from my dad and paternal grandfather.) But things and experiences prevented me from pursuing it until late last year when I was very randomly reminded of my early interest in wanting to do it. So I did some research and found out that one of the local TAFE colleges in my area offered the very course I was interested in! Yay! So I applied and begun the course on the 1st February!
If you follow me on Instagram, you may have seen some new photos of flowers and arrangements and be thinking, ‘why?’…. And now you know! Of course I’ll keep posting pictures of my sewing adventures and life adventures and other sorts of things, but now pretty florals and bouquets will be added to the mix as well!
+++
second update – youtube
Now, you may be thinking if I’m studying floristry does that mean no more tutorials, videos, blogging, sewing, crafting…??!!
No. I will never stop sewing! Patchwork and quilting is my life! I’ve found that if I’m ever having a personal crisis or have had a bad day or am feeling blue or even 100% happy, I know that I can always rely on sewing to cheer me up, to put me back in the right mind set and to remind me that life is good. 🙂
And I love sharing that with you! I love teaching and helping you out. I love inspiring you and watching you grow in your skills and confidence. I have so many great things planned to share with you on my YouTube channel and blog this year and I’m so excited to get stuck into them!
However, now that my time is being shared with my studies there will be times when videos may be late or go up on the wrong date or not go up at all from week-to-week. (I may even change my upload day soon – I’ll let you know when and if I do!) It really will depend on how busy the week gets with study, family life, prior commitments etc. But just know I will always do my best to get something up and out to you each week!
And just as a sneak-peek to those of you who read my blog, here are a few of the tutorials/videos coming up on my channel over the next month or so… (in no particular order, btw!)
– My Mini Quilt Collection
– Ocean Waves Block Tutorial
– Boxy Zipper Pouch Tutorial
– February Favourites
– Behind the Scenes: The Tutorial Edition*
(*This will be a video showing you how I film, edit and produce my block tutorials. It’ll be the behind the scenes of the Ocean Waves block!)
– And there’s the potential of a mini Spotlight Fabric Haul if you would like to see it… Let me know if you do!
+++
third update – sugar block club
This year I decided to jump on the band wagon and join in on one of Amy’s from Stitchery Dickory Dock Sugar Block Clubs. (Click here if you want to learn more about it!)
These are the two blocks I’ve made so far for January and February – Churn Dash and Log Cabin variations!
I’ve decided to use solids for each of my blocks as I absolutely love using them at the moment! (Plus, I have lots of solid fabric to get through!) I’m sticking with a neutral creamy colour for the background which will help each of the colours I choose to sing and show off the designs in each block. I’m so excited to see where this quilt will end up!
+++
fourth update – happy mail!
Although I’ve already thanked her, I just want to acknowledge and share this lovely gift that a wonderful friend, reader and viewer sent me last week!
Carissa made me this super cute little ‘thank you’ wall hanging/mini in the design of an envelope, featuring hand embroidered details, beautiful little sample fabrics from her HST Sampler Quilt along with a gorgeous little frenchie bulldog fussy cut for the fabric postage stamp!! Ahh, soooo cute!!
Along with this, she so generously sent lots of fun things like Pop Tarts and a selection of American candies, binding clips, a Buzz Lightyear Mug (!!) and so many other awesome little things!
And so again Carissa, thank you so much for sending me such a lovely, generous and thoughtful package! You’re truly the best! (Can you tell I’m still on a bit of a high from all of it?! Te-he!)
+++
And that’s the update done! (There’ll be a fifth update but I’m going to make that into a separate post – it’ll be all about my Four-Patch Love Heart Block tutorial!)
I’m so looking forward to completing my floristry course and perhaps sharing some flower care and construction tips with you some time!
And, I’m quite eager to get those tutorials underway and share them with you asap!
In today’s post I’m combining both part one and part two in my most recent project uploaded onto my YouTube channel featuring the new RJR Fabrics collection, ‘In the Kitchen’ by Patrick Lose. And that of course is my Foundation Paper Pieced (FPP) Coffee Cups Wallhanging!
So I thought, instead of doing two separate posts, why not join them together in a lovely huge blog post for you to come back to and have all of the info you need in one neat little package!
So let’s get into the nitty-gritty stuff and start making!
First of all you’ll need the pattern to make those cute-as-a-button coffee mugs! And here it is!
Download it and print it off as many times as you wish! (Although for this project you’ll only need three copies!)
Next is the video tutorial where I show you how to piece them together… You’ll find that right under this video, there’s a full list of all of the fabrics you’ll need, how much to cut for each section (all of the guess work has been taken care of!) as well as a few of the tools and notions I use when I’m FPP.
MEASUREMENTS & CUTTING INFO:
Cut these amounts for each section in the template. (These amounts are to make one Coffee Cup block.)
PLUS for the opposite side of the cups and diagonal sashings, cut –
x3: 2¼”x5.5″ rectangles and
x4: 2¼”x8¾” rectangles from your background fabric.
FABRICS I USED FOR EACH CUP:
Top Coffee Cup block
– Main print: Coffee Cups Calico in Paprika
– Line detail: Silhouettes in Butter
– Background: Quilted Grid in Salt
Middle Coffee Cup block
– Main print: Kitchenware in Fresca
– Line detail: Tile in Multi
– Background: Quilted Grid in Salt
Bottom Coffee Cup block
– Main print: Utensils in Chocolate
– Line detail: Silhouettes in Fresca
– Background: Quilted Grid in Salt
Moving onto part two in the project, I show you how you can finish your wallhanging with two lovely borders that frame the coffee cup trio and then how to simply sew it all up and quickly quilt it to completion!
Again, there’s a full list of all the measuring and cutting info for this part directly underneath for you to take a squizz at!
FABRICS, MEASUREMENTS & CUTTING INFO:
First Border –
FABRIC: ‘Silhouettes’ in the colour Butter
CUT: x2: 1½”x23″ strips and x2: 1½”x10¾” rectangles
Second Border –
FABRIC: ‘Kitchenware’ in the colour Eggshell
CUT: x2: 2¼”x25″ strips and x2: 2¼”x14″ rectangles
Backing –
FABRIC: ‘In the Kitchen’ in the colour Multi
CUT: x1: 15″x29″ rectangle
+++
And now it’s time for a GIVEAWAY**!! Whoo!!!
I have one delightful little Fat Quarter Bundle with 16 prints from the range that I would love to give away to somebody! If you want that to be you, then simply comment below answering this question:
What do you love most making in the kitchen and why?
The winner will be announced/contacted next Friday, 5th February 2016.
Best of luck!!
(PS. World-wide entries are welcomed!)
**NB: THIS GIVEAWAY IS NOW CLOSED! THANK YOU TO EVERYONE WHO ENTERED!!
+++
Now if you’re just as smitten with this range as I am, here are a few places online where you can get the ‘In The Kitchen’ collection!
As soon as I saw this range, I knew I had to get my hands on some and get creating! I think the range has some of the fun-est kitchen-y prints that I’ve seen in a long time and some of the colour names are simply spot-on perfect! They include – Butter, Paprika, Chocolate, Cocoa, Salt and Saffron! Ooo, so delicious!!
But back to the tutorial at hand… I called this project a ‘Pieced Apron’ as it’s made in three sections or stages that are then all sewn together to create our apron! Easy!
**Behind the scenes trivia**
If you look closely, the design of this pattern was inspired and loosely designed off the apron featured in a few of the prints in the range! What do you think??
So everything you’ll need to know on how to make this apron is in the video as well as listed below it. There I’ve written out all of the measurement and cutting instructions along with the name and colour of the fabrics I’ve used for each piece. TIP: Take your time as you watch and follow along in the video, pausing and catching up at any stage that you feel necessary. 🙂
FABRICS, MEASUREMENTS & CUTTING INFO:
Top half of the apron:
– For the front cut: x1: 10”x12” rectangle from the fabric: ‘Kitchenware’ in the colour Butter.
– For the top trim cut: x1: 1¾”x12” rectangle from the fabric: ‘Silhouettes’ in the colour Fresca.
– For the neck loop cut: x1: 3”x26” rectangle from the fabric: ‘Utensils’
in the colour Eggshell.
– For the lining cut: x1: 11¼”x12” rectangle from the fabric: ‘Tile’ in the colour Multi.
Apron pocket:
– For the front cut: x1: 6”x12” rectangle from the fabric: ‘Hot Pads’ in the colour Fresca.
– For the top trim cut: x1: 1¾”x12” rectangle from the fabric: ‘Silhouettes’ in the colour Fresca.
– For the lining cut: x1: 7¼”x12” rectangle from the fabric: ‘Tile’ in the colour Multi.
Bottom half of the apron:
– For the front cut: x1: 20”x30” rectangle from the fabric: ‘Silhouettes’ in the colour Paprika.
– For the top trim cut: x1: 1¾”x30” rectangle from the fabric: ‘Silhouettes’ in the colour Fresca.
– For the apron ties cut: x2: 3”xWOF strips from the fabric: ‘Utensils’
in the colour Eggshell.
– For the lining cut: x1: 21¼”x30” rectangle from the fabric: ‘Tile’ in the colour Multi.
Also, here’s a list of all of the NOTIONS & TOOLS I used in this tutorial:
So next week I’ll be doing one more project featuring this collection… It’ll be a two parter (videos will be up on Wednesday and Friday) and will feature a fun Foundation Paper Piecing pattern designed by me that will then be sewn into a sweet wallhanging!
I had a ‘moment’ the other day… A wash of dreaded panic swept over me as I realised that next week is Christmas! Eek!! Here I was, living in some weird dream land thinking that Christmas was still a few weeks away and that I still had loads of time to get things done, to make some fun Christmasy things to share with you and to go shopping for gifts! Well no. That wave of panic sure did slap me in the face and made me wake up to that fact that there are still so many things I want to do and share before the Festive Season is over for another year!
Over the past week or so, I’ve been wanting to get my camera out and snap some fun little photos of our Christmas Tree to share with you! Having a real Pine Tree for a Christmas Tree isn’t that big of a tradition here in Australia. My brothers and I always grew up with a fake plastic tree, sitting proudly in a corner of our living room, decorated heavily with multi-coloured twinkling lights, thin and scratchy tinsel and ornaments that were about a gazillion years old! It was one of those trees that if you were to get too close, touch it slightly or even breathe the wrong way near it, it would topple over spewing baubles and fake pine needles all over the floor!
These days, our tree is a little bit more stable but just as fake and plastic. We’ve upgraded the ornaments over the years and added some new white-light twinkling lights and fluffier tinsel! It still stands in a corner in our front living room and is the Mecca for all the of the presents and related Christmas items to sit under and around!
We usually set aside the first day of December to set up the tree and hang the decorations around the house. This year we did it a few days earlier than usual and had a fabulous little helper in my five year old nephew, Ayden. With Christmas tunes playing in the background, he helped me put all of the baubles onto the tree, placed ornaments and other Christmasy decorations around the house all while wearing a darling Santa hat on his head! What a little legend!!
Here are a few of my favourite things that we have hanging on our tree…
The little glass Deer is a relative newcomer to our tree. I bought it last year from one of the big department stores we have here called Myer. I thought it was super cute and I loved how glittery and vintage-festive it was! The glass angel was a gift for my mum from one of her students when she was still teaching. It’s one of those legit glass ornaments that if your were to accidentally drop it, it would for sure break! Eek!
The red felt Christmas tree is another little treat I bought from Myer last year. I loved the ‘handmade’ look it had about it and gave me inspiration to make a few myself. (Which never happened!) Plus, I can never resist buying something like this when it’s covered in buttons and fun little pom-poms! And then there’s the classic golden bauble… Perfect to take those fun reflective type photos with! (Spot the blogger!)
The gorgeous Tonga Angel belongs to my parents. They visited the beautiful Pacific Island late last year and bought back this handmade treasure! I love it! Next to her on the tree, centre stage is an ornament I made a few years ago in a Christmas tutorial on my YouTube channel that features my beautiful Lucy. This darling pup died in April and it’ll be one my first ever Christmas’ without a pet by my side. I miss her dearly…
The pattern stag came in a packet of four from IKEA many years ago! I also have a packet of red ones too floating around the house somewhere… I liked the blue ones more at the time so I added them to our permanent collection! The Christmas tree is another Myer purchase from last year. I loved how solid and 3D it looked. And because the felt is so thick and the bell on the bottom so heavy and clunky, it weighs a small tonne making the bow it’s hung on literally bend in half! But no matter how impractical it is, I still love it!
What’s a Christmas Tree without a tacky ornament of Santa Claus?! I have no clue where this Santa has come from… I think it may’ve belonged to my dad’s parents who relished in plastic-y vintage-y decorations like this! I must admit, I really quite like it. I love it for it’s kitsch, old-school vibe and for the plethora of holly stuck on the back of his sleigh! He’s an oldie but a goodie!
+++
So that in a nutshell is our tree. It’s not fancy. It’s not real. It’s not colour coordinated or perfect. It’s simple, homey and lovely. And I wouldn’t want it any other way!
What’s your Christmas Tree like? I would love to know!
I hope you’re all having a wonderfully festive month wherever you are in the world!