TUTORIAL: FPP Union Jack Block!

Over the past few months, I’ve had a numerous amount of interest and requests to make a video tutorial showing how I make the Union Jack block…

The Union Jack Block

The first time I made this block I had just learnt how to Foundation Paper-Piece and was absolutely daunted by all of the different pieces and angles I had to sew! Oh. My. Gosh. So, I took a deep breath, studied the pattern and instructions and then took one step at a time. So then of course I proceeded to make countless mistakes, under and over judged fabric lengths and widths AND importantly learnt that keeping to a quarter-inch seam was critical for the pattern to come together, crisp and evenly at the end! What’s that saying? Through our mistakes, we become stronger… Well, maybe…

Since then I’ve gone on to make a lot of versions of this block, almost to the point where I could do it with my eyes closed! (Well, no. Not really. That would be a terrible idea!!) I had high hopes (and still do, actually) of piecing my many blocks together to make one of those big Britannia type quilts.

A sample of the Union Jacks I've made...
A small sample of the Union Jacks I’ve made…

I’ve written about it before in other blog posts and it was on my New Year Quilting Resolutions of 2014 list to make during that year. (An idea that failed miserably! None of those quilts got made! My bad.) But hope is not lost! It will get made… one day… soonish…next year, maybe…

But, alas! I have had the chance to incorporate this block into quilt! I was commissioned by a work colleague to make a quilt for our department manger who was leaving to pursue another job. The biggest love in her life was bunnies as well as sharing the same admiration for all things British, like me. So I made her this quilt as a farewell gift!

English Bunny Quilt (2012)

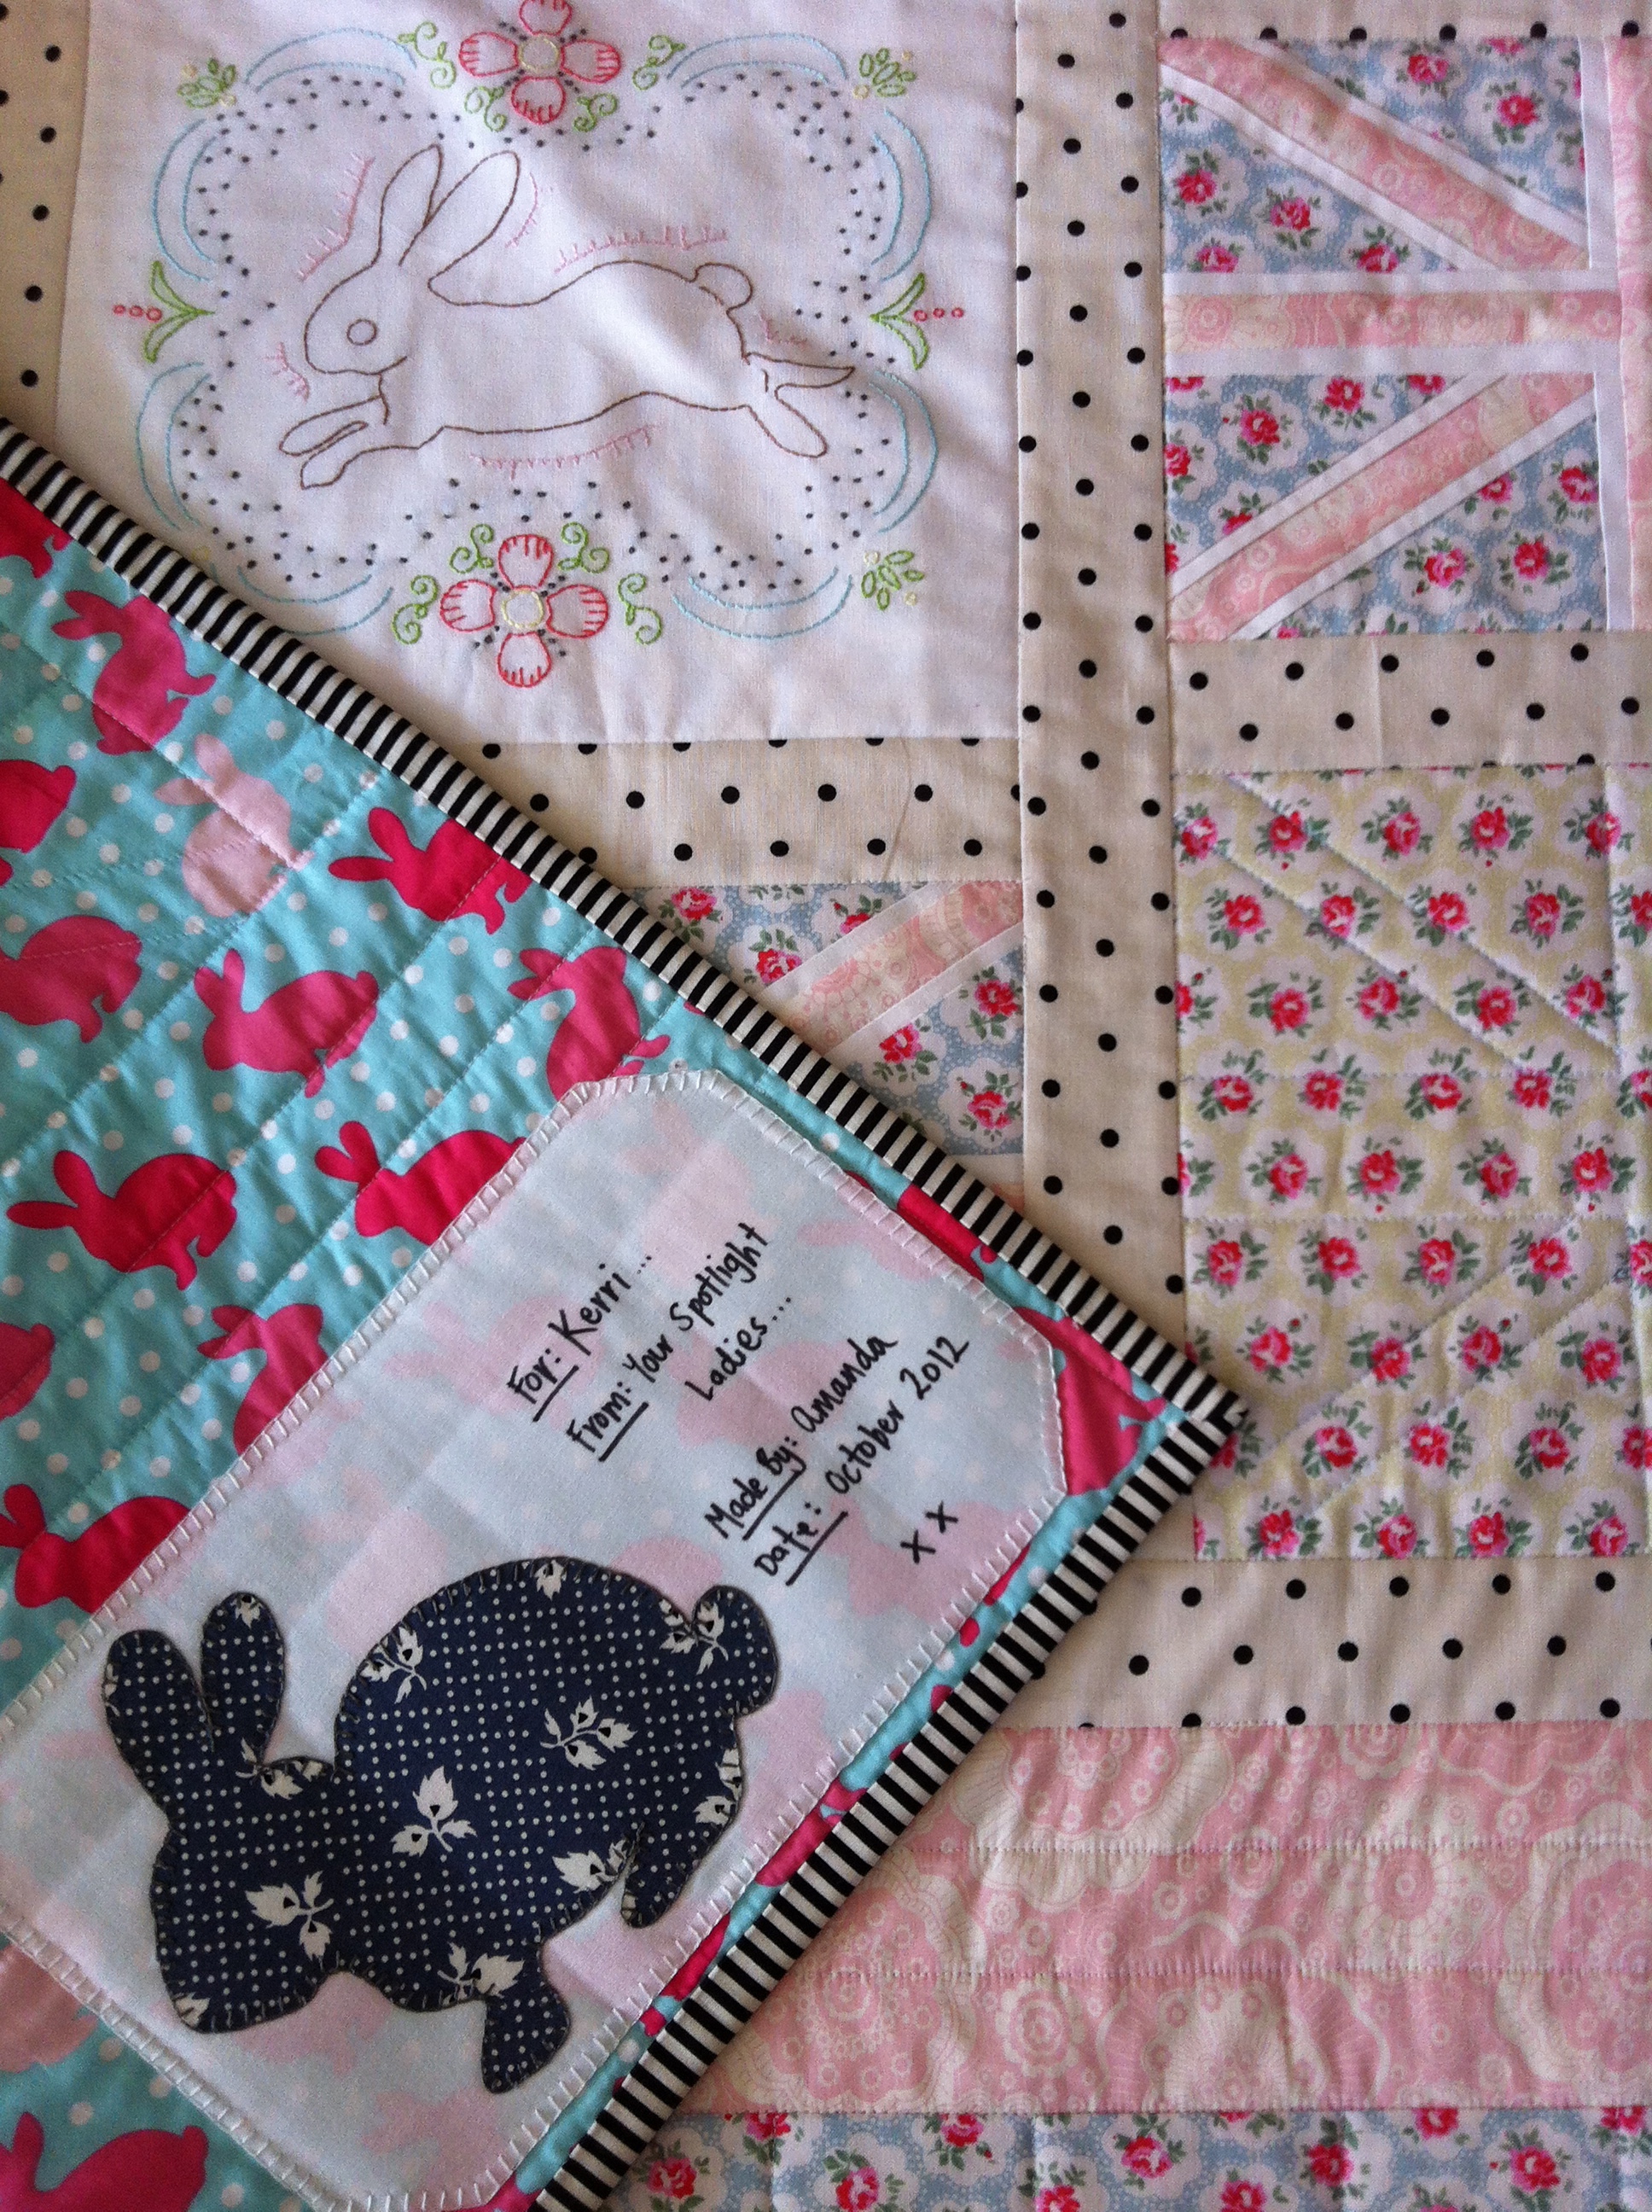
It still is one of the most favourite quilts I’ve ever made.

I originally found this block in the book Modern Blocks, compiled by Susanne Woods as I was casually flicking through it when visiting my favourite bookstore in Sydney, Kinokuniya. As soon as I saw this block pattern in the book, I immediately made the decision to buy it without even looking at what other blocks were in the book! That’s how keen I was to make it! However, it wasn’t until I got home that I realised the block was made entirely using the foundation paper-piecing method… A technique, at the time, I didn’t know anything about! With my excitement and high hopes of being able to make an inspiring Union Jack Quilt squashed, I placed the book on my shelf and forgot about it.

My little library!
My Quilting Book Library

A few months later, I signed up to do the online Craftsy Block of the Month with Amy Gibson[And just on a side note: If you’re new to quilting and want to learn lots of new techniques and be wholly inspired by everything patchwork, I recommend highly to watch these video tutorials! It’s 100% free to watch and join. Honestly, without watching these tutorials, I wouldn’t be the quilter I am today! So go! Do it now! Watch. Learn. And grow!] …and in one of the months she taught me how to foundation paper-piece. Here I was, thinking it would be this weird, strange, ancient technique that I thought I would never enjoy. How very wrong I was. In a matter of minutes, I was in awe of just how easy and simple the technique was. I just couldn’t believe how straight, clean and crisp I could get my seams and how many new and awesome modern block designs that were now open for me to make! And then…Lightbulb! I now had the power to make that Union Jack block!! Huzzah!!

The block in question, called Just Jack, was designed by Lynne Goldsworthy. (A quilt-block designer I seem to keep running across over the past few months…spooky!) The block that I make is a little bit different to the one in the book. I’ve made it smaller (165% as opposed to the suggested 200%) and have eliminated the two pieced strips from the top and bottom so that it’s just a Union Jack.

JustJack

Now I must admit, this block is pretty tricky (and a little bit daunting!) if you’re new to foundation paper-piecing but I still want to encourage you to give it a go! Don’t worry if you make mistakes – I did and I learnt from them! Be brave, dive in and see what happens! (Oh man, I should take on some of my own advice inother parts of my life! Jeez!) 

If you are new to foundation paper- piecing, you’re more than welcome to check out this tutorial I made last year that goes through all of the basic tools and steps to understand the technique.

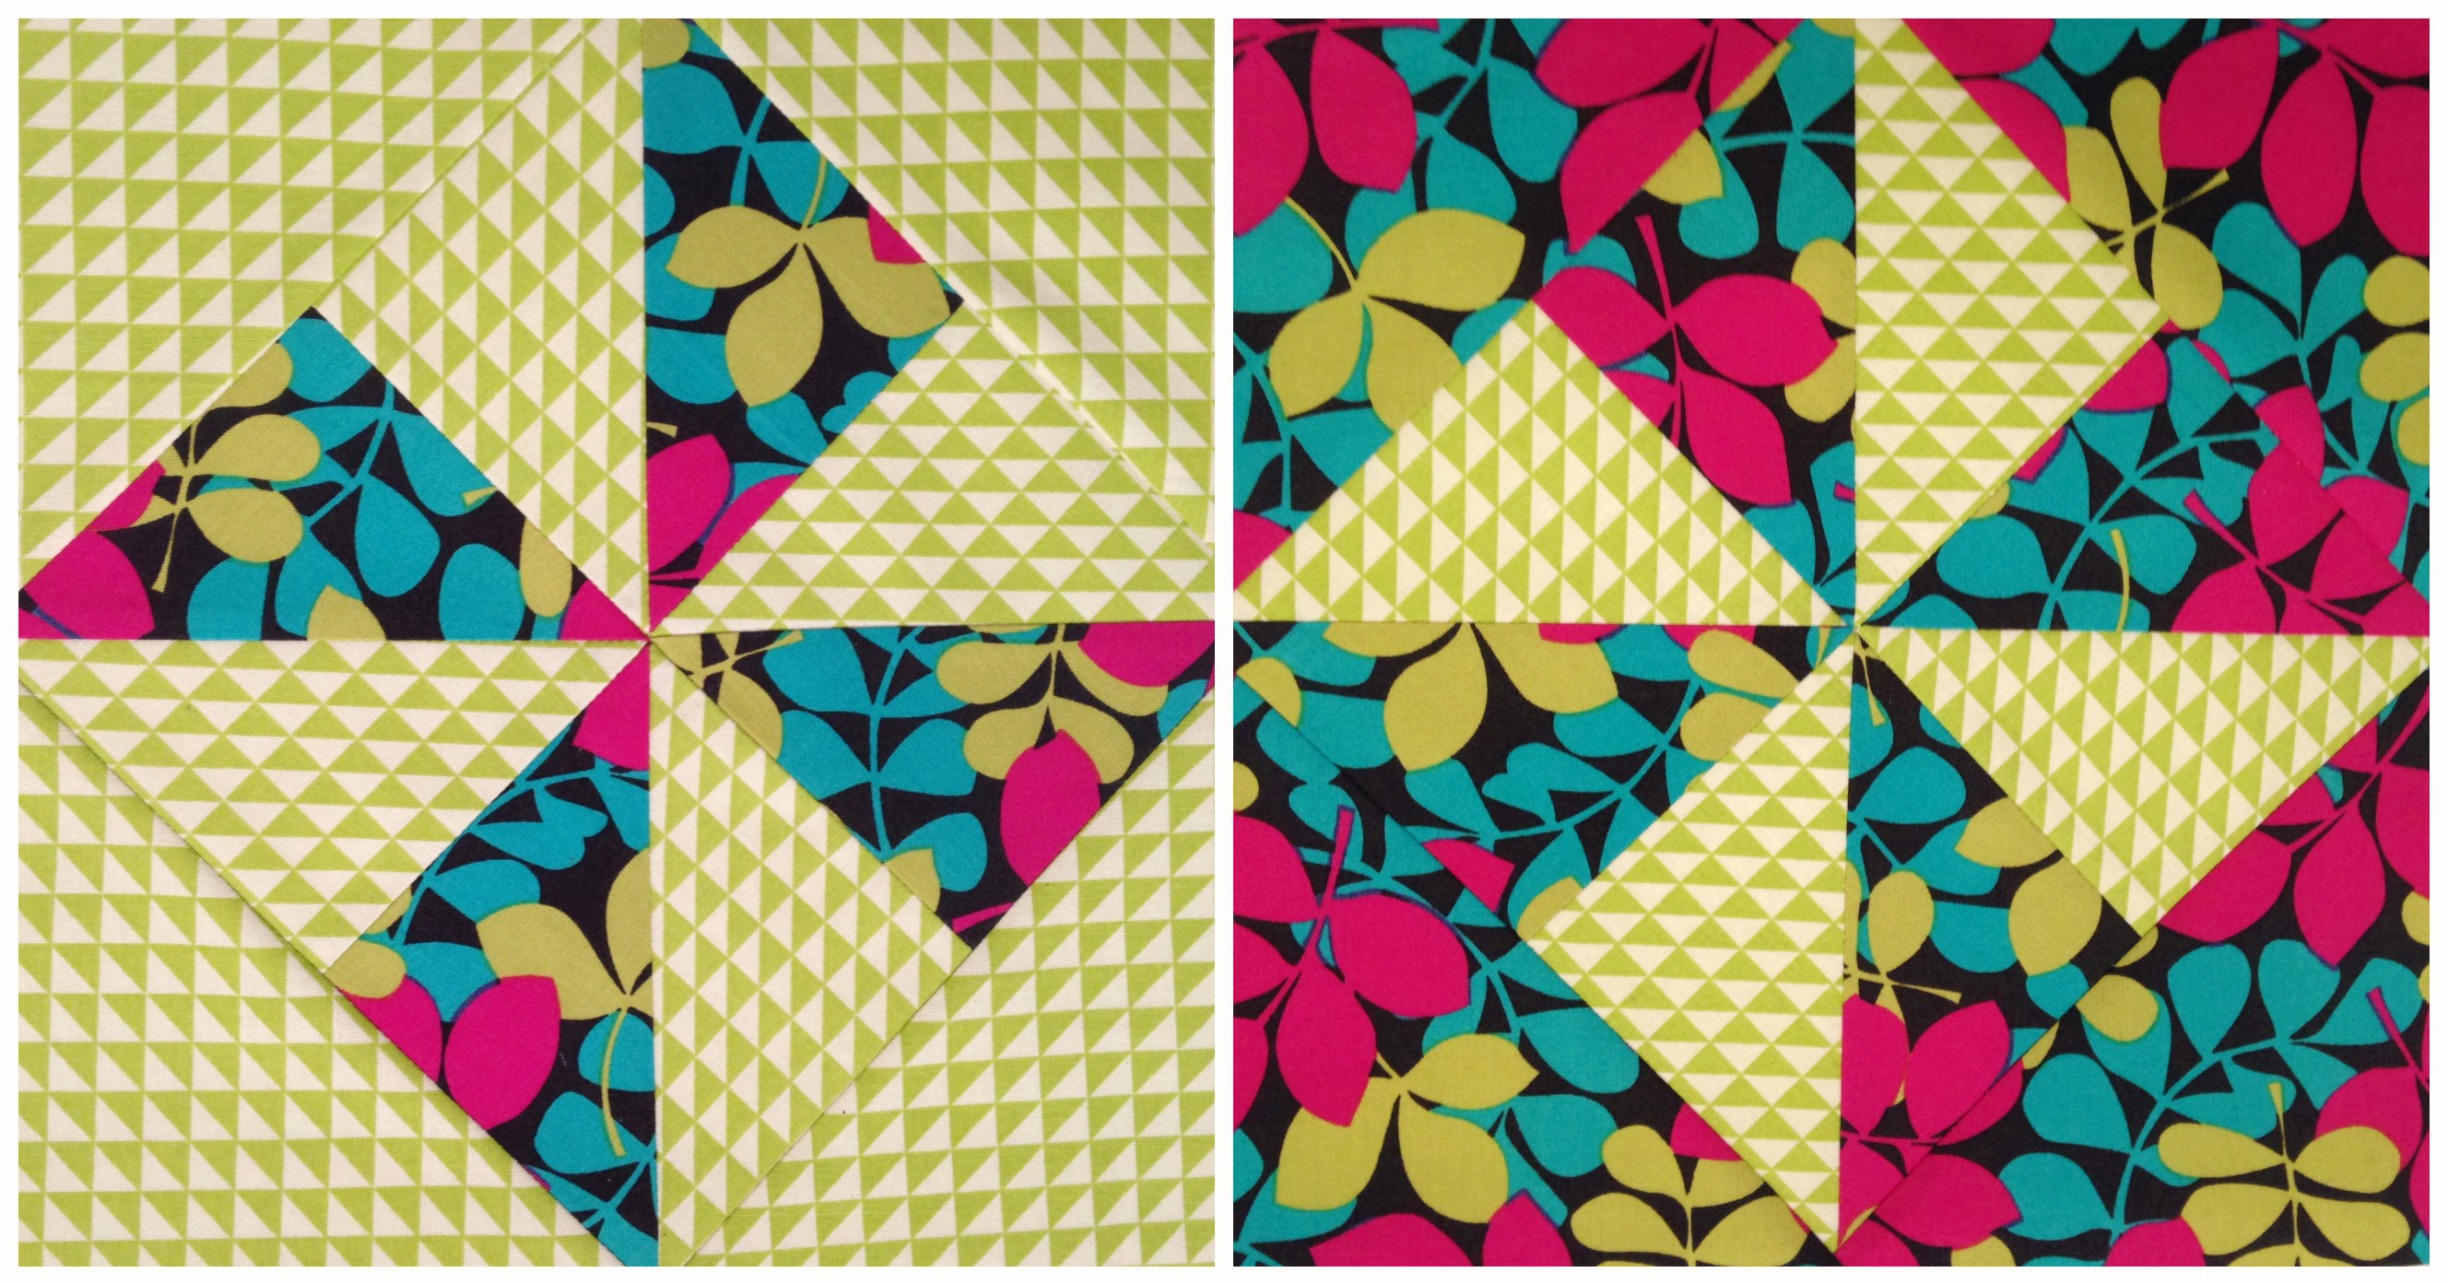
One of the things I absolutely love about this block is that it allows you to be as free and creative as you wish! You can use fabrics that are rich in print and colour, ones that clash horribly but still look good or just stick to the classic side of things using solid colours to bring the block to life!

Now, the final size of this block will all depend on how big you choose to enlarge this pattern. At 165%, my finished block measured 26.5cmx17.5cm (10&3/8″x7″).

If you don’t have this book or unable to purchase it, here are a few other Union Jack patterns I’ve found on the net that are similar to the one I’ve made.

‘Union Jack Block & Bag Pattern’ by Amy Smart (Diary of a Quilter)
‘Union Jack Quilt Block’ by traceyjay on Craftsy (FREE PATTERN!)

And lastly, here’s a list of the tools and notions I like to use when I’m doing any foundation paper-piecing…

– Brother Innovis 200QE sewing machine
– Brother 1/4″ sewing foot
– Gutermann polyester thread
– Fiskars Rotary Blade and Cutting Mat
– Sew Easy Rulers
– UHU Glue Stick
– Triumph Craft Scissors
– Birch Non-Melt Flower Head Quilting Pins
Clover Thread Snips
Clover Serrated Tracing Wheel 
Clover Finger Presser 

Of course, let me know if you’re going to make this block (or already have!). Send me a photo of your finished block, or a project with the UJ in it or your fabric selections for your planned block! I absolutely love it when you share your creations and ideas with me!

The ways in which you can share with me…

Instagram & Twitter: @3and3quarters

Email: 3and3quarters@gmail.com

Facebook

If you’ve made it to the end of this post, I send you a big virtual HIGH-FIVE for getting through all of my rambling back story!

You’re a true super star!

Happy Sewing Friends!!

xx

TUTORIAL: The Chevron Block!

The Chevron Block
The Chevron Block

Oh, man! There’s just something real cool about the Chevron Block (Am I right!?)! I don’t know what it is, but geez, I just love this block! It’s simple, fast to piece together and is so effective when pieced into a quilt!

This is one I made in 2011 using the Chevron Block…

I called it A Summer Zig-Zag Quilt!

Summer Zig Zag Quilt (2011)

So here’s what you need to do to make this block…

Simply cut x2 5″ squares from two different fabrics (they can be contrasting, matching, clashing, be print vs. solid etc.) and then watch and learn how to piece it together in this video!

FINAL BLOCK SIZE: 22cmx22cm (8&5/8″x8&5/8″)

Here are just a few tips I’ve picked up along the way to help achieve perfect Chevron points…
When piecing together the HST units together, lay the diagonal seams directly on top of each other. (As shown in the video) Pin the two units together and carefully sew them into one row.
By ensuring that these seams are directly aligned with another on either end, you should have perfect points when you open the row out.

Always make sure you sew with a 1/4″ seam. I know I sound like a broken record saying to do this all the time but it really is essential to sew all of your seams exactly the same. If one seams is slightly bigger or smaller than the other, then you’ll begin having problems with matching your seams and points.

This is the most important one: Take your time! Don’t worry about making mistakes! Learn from what you’ve done wrong and simply try again until you master it! I know you can do it! 🙂

Two Chevron Blocks pieced together

Have you made this block into a quilt? If you have, I would love to see a photo of your finished quilt! There are also some great Chevron Quilts to be found on Pinterest if you’re wanting to give this block a go and are looking for some inspiration!

Happy Sewing Friends!

xx

TUTORIAL: The Hashtag Block!

The Hashtag block seems to be absolutely everywhere at the moment! And when I say ‘everywhere’, I really just mean Pinterest and Instagram! 😀

So I thought I’d jump on the bandwagon and make a tutorial showing you how to make this block yourself! Yay!

This is a great little block for all levels of quilters! It’s very simple and quick to piece together and is a wonderful pattern to be able to mix and match prints, colours and values with!

To make this block you will need to…

Cut from one fabric:
x3: 3″x9″ rectangles

and then…

Cut from a contrasting fabric:
x2: 3″x9″ rectangles
and
x2: 3″x13&1/8″ rectangles

And then simply follow the step-by-step instructions in the video to learn how to piece this block together!

The final block size should come to about 32.5cmx32.5cm (12&3/4″x12&3/4″)

The Hashtag Block
The Hashtag Block

And just incase you’re curious, the print fabric I used for this block is called ‘Memoir’, from the Alchemy Quilting Collection by Amy Butler.

Don’t forget to let me know if you’re going to make this block! I would love to know how you get along!

Happy Sewing Friends!!

xx

Stop-Motion Embroidery #3

Every few minutes or so I would ‘down tools’ and take a photo of how far I had progressed in completing this little embroidery.

This was the result…

In all honesty, I have no idea how long this actually took me, as it was one of those projects that I kept coming back to over a period of three months.

But know this… While I was making this embroidery I watched all four season of Downton Abbey (love that show!!) as well as childhood movies like Hook! (one of my favourite Robin Williams movies) and Peter Pan (oh, to never grow up!).

Create Embroidery 2

Here’s a bit more info about this embroidery…

– Music: ‘Mermaids’ by Jinja Safari
– Pattern: Urban Threads http://goo.gl/WB4XfF
– Embroidered onto 100% Cotton Linen
– Backed with light-weight fusible interfacing
– Traced using a HB lead pencil
– Hoop: Semco, size 260mm (10″)
– I use DMC threads/floss with a no. 7 sized embroidery needle
– Captured using a Canon Power Shot SX280 HS camera
– Embroidered using back-stitch

I’ve also made two other Stop-Motion Embroidery videos. Here are the links if you wish to see them as well!

Stop-Motion Embroidery #1 – Flowers

Stop-Motion Embroidery #2 – Heart

Happy Stitching Friends!!

xx

I made a Quilt!!

As is expected at this time of the year, the last few weeks have been filled with festive get-togethers, exciting gift making and an endless array of baking, giving me very little time to tend to my lovely little blog.

But in the last few days before Christmas, I’ve hoarded away a little bit of time to spend writing to you! And boy, is there a lot to write!

So with Tony Bennett’s Christmas album crooning in the background, let’s get down to business!

First, allow me to introduce to you my beautiful niece Amelia who was born on the 5th December.

Amelia!

She came into the world in a very hurried fashioned that earned her and her parents a National News worthy story! Let’s just say, they didn’t quite make it to the hospital in time! Here’s the story if you want to know more!

Next, let’s address the title of this post…

Yes indeed, I did make a quilt. And I did it in quite a sneaky type way too (you may have seen a few glimpses on Instagram!). Usually at Christmas, my close group of friends and I do a Kriss Kringle type of gift giving. So to sooth my need to make a quilt as a gift this Christmas season, I chose to make one for one of my closest girlfriends who I’ve known since high school.

Sam's Tribute Quilt

Thankfully she loved it! And even luckier, the colours went perfectly with a lot of the décor she has in her new inner-city apartment! Whoo!

The pattern I used is called the Tribute Star Quilt that I found (as a FREE download!!) on the Denyse Schmidt website! It’s quite an easy pattern to follow, choc-full of HSTs and simple squares that would look great using any print or solid fabrics.

Sometime in the New Year, I’m planning on giving the Tribute Star block another go using a few different type prints (maybe) and turning the block onto it’s point and adding corner triangles to the edges. From what I can see in my mind’s eye, I think it’ll be a little good ‘un!

What’s also kept me busy over the past few weeks are the Christmas tutorials I’ve been filming, editing and publishing onto YouTube!

Videos I’ve made include:

Paper-Pieced Christmas Trees

Handmade Christmas Felt Ornaments

Handmade Christmas Paper Crafts

Reindeer Cupcakes

The BEST Gingerbread Men in the World

Rocky-Road Christmas Tree

I’ve been putting so much time and effort into these little videos to the point where I’m quite ready to take a much-needed break once Christmas and Boxing Day arrive!

However, once Christmas is over, I’ll be getting straight back into it!

Before the month’s out, I’ll be publishing another Stop-Motion Embroidery video featuring this beautiful design from Urban Threads.

Create Embroidery

And then in the New Year, I have a ton of new quilt block tutorials planned as well as some other fun crafty ideas for you to be inspired by!

If you want to be in the loop of what, where and when I upload these video tutorials, check out my YouTube channel and subscribe to be the first notified! I would love to have you join me!

So my friends, I wish you all a very happy festive season, celebrating and making beautiful memories with your nearest and dearest!

xx

Handmade Christmas Felt Ornaments!

Get the Pattern: Handmade Christmas Felt Ornamants Template

***

Although it’s currently summer here in Australia, today has greeted us with a cold and drizzly rainy day that I really don’t mind too much at all! (See ya later humidity!)

So, with only 13 more sleeps until Christmas (What!? Surely, that can’t be right?!), here’s a little video I made showing you how to make some very inspiring and very festive felt ornaments!

Now these little beauties are entirely handmade, so of course they will look a little rough and imperfect, but I think that adds to their charm!

If you’re keen to make this craft this season, feel free to be as creative as you like, go crazy and mix up the colour combinations or stay traditional in your designs like I have. The choice is completely yours!

XmasOrnaments

For more information about these handmade goodies, check out the description box that’s accompanied with this video on YouTube.

Have fun making!!

Happy Sewing Friends!

xx

XmasOrnamentsAlternate
Alternate Video Thumbnail


TUTORIAL: Paper-Pieced Christmas Trees!

ChristmasTrees

GET THE PATTERN: FPP Christmas Tree PDF

Hello & a Happy Wednesday to you all!
Today brings my first of many Christmas videos for 2014! And we’re starting off with a bit of a tricky one. But take comfort, once you know the basic steps to Foundation Paper-Piecing, you’ll be whipping up these blocks in no time!

Like I mention at the beginning of the video, if you’re new to Foundation Paper-Piecing, perhaps watch the tutorial I made a little while ago explaining everything there is to know to this technique to then help you out with this video.

Tools

And if you’re interested, here’s just a quick little list of the sewing tools I used in this video*…

– Brother Innovis 200QE sewing machine
– Brother 1/4″ sewing foot
– Gutermann polyester thread
– Fiskars Rotary Blade and Cutting Mat
– Sew Easy Rulers
– UHU Paper Glue
– Triumph Craft Scissors
– Clover Serrated Tracing Wheel
– Clover Finger Presser 
– Fabric from Spotlight

And as always, share with me any pictures of your finished blocks if you’re keen on giving this a go! You can contact me here: 3and3quarters@gmail.com

Happy Sewing Friends!

*This is not a sponsored video or post. All products have been bought by me and all opinions are my own.

MINI TUTORIAL: Flying Geese Block

Here’s just a quick little tutorial I uploaded last week simplifying the process of making the utterly-tradtional Flying Geese unit.

The process of how to make this block should be a staple in your patchwork library and when it is, you can adapt and shape it into any size or formation you wish!

Here are the measurement & cutting instructions for this block..

– Cut x1: 5&1/2″ x 3″ rectangle from one fabric

– Cut x2: 3″ squares from a contrasting fabric

– Piece together as demonstrated in the video.

– Feel free to make as many Flying Geese units as you wish to piece together a long strip, or square or rectangle. The choice is all yours!

The final measurements of this unit are: 5&3/8″ x 3″ or 13.5cm x 7.5cm.

And, here are some great examples of the Flying Geese unit pieced together in a few beautiful and creative ways!

(Links to the sources of these quilts are at the end of this post!)

FlyingGeeseQuiltsHappy Sewing Friends!

xx

{LINKS}

The Quilt by City Stitches

The Quilt by A Stitch In Time

Tutorial: The Pinwheel Block

Pinwheel Duo

Good Afternoon to you!

With a comforting mug of tea settling next to the keyboard and my written notes laid out before me, let’s explore the latest instalment in my quilt block tutorials – the Pinwheel Block!

Inspired by a block in the book ‘500 Quilt Blocks’ by Lynne Goldsworthy & Kerry Green, the Pinwheel Block is deceptively easy!

Here’s what you need to do to make this block!

Measurement & cutting instructions

(This block only requires two contrasting fabrics.)

Cut x2: 6″ squares from one fabric for the corners

Cut x2: 4.5″ squares from each fabric for the HSTs*

Final block size: 25.4cm or 10″ square.

And as always, let me know if you’re going to give this block go! You can email your lovely pictures to this address: 3and3quarters@gmail.com

Happy Sewing Friends!

xx

PS. Regarding my Christmas videos: These will begin in December, with the first one due to come out on Wednesday the 3rd! Then every Sunday & Wednesday upload, until the end of the month will be Christmassy related! Whoo! (This is just incase I didn’t really explain it well enough in the video!) I hope you will all enjoy the ideas and projects I have in store!

*HSTs = Half Square Triangles

Three Years Down!

On a warm Friday night three years ago, I plucked up the courage to begin writing this here humble quilting blog.

Now here we are, 1,093 days later and I’m still just as dedicated and proud of my little slice of the internet as I was the day I created it.

As I’ve done in other past ‘birthday’ type posts, let’s recap the year that was!

Firstly: YouTube!

This year, I’ve dedicated a lot of hard work into developing my YouTube channel (and with some very pleasing results thus far!).

YouTubeChannelScreenShot

I’ll also be the first one to admit that I’ve spent so much time planning and creating content for it, that my blog has had to fall-by-the-way-side so speak and become the second child. But! In saying this, my blog has never been too far out of my mind! Along with my YT channel, the welfare of my blog is always on my mind and I’m constantly developing ways in which I can improve its quality! Hence my little foray into making video tutorials!

Thanks to YouTube, my confidence in my patchwork/quilting skills has improved, I’ve felt confident in delivering and teaching skills to others and I’m continually being challenged in both my sewing skills and editing/technical skills.

Hooray!!

Here’s a list of some of the most challenging videos I’ve created this year…

Finn the Human Pillow

The Bear Paw Block

The Jacob’s Ladder Block

7 Basic Embroidery Stitches

Foundation Paper Piecing

Sewing Room Tour

Secondly: Quilting Shows!

Although I had been quilting for over 7 years, 2012 was the first year I was confident enough in my work to enter them into shows.

This year, I struck a goal off my list and entered a few items into the prestigious Sydney Royal Easter Show in April/May. And would you believe it, one of my quilts received a highly commended ribbon!!

IMG_2656

No way did I think I would receive anything in my first year of entering! Not in the least! But I’m so greatly humbled that my sweet little ‘Happy Quilt’ was noticed and received the love it’s owed.

Now this quilt hangs in my room and I use it as a backdrop for quite a lot of my videos! (Just like this one!)

And like last year, I entered a mini quilt into the Sydney Quilt Show during July. Although it didn’t receive any ribbons, I’m still chuffed to bits that my little quilt was invited to hang in an enormous room filled with many, many, many beautiful quilts!

Thirdly: Projects!

As I began brainstorming and planning the things I would write for this section, a pang of guilt was slowly rising inside of me. I felt that I really hadn’t ‘made’ or ‘done’ very much sewing/patchwork/quilting/crafting wise to really reflect and chat about.

However, after having a quick squizz through all of the post I’ve published over the last year, so many little projects kept popping up with me exclaiming out loud, ‘Oh yeah! I totally forgot about that one!’ Hence highlighting the reason why I chose to begin writing a blog! My mind really is like a sieve sometimes!

So here are some highlights of the creative things I’ve began and/or finished over the past 12 months.

Halloween Crafts: This is the first time I’ve ever got into Halloween crafting. Halloween isn’t widely celebrated in Australia but it’s very slowly (some may say very quickly!) catching on!

Dressmaking: I’ve made a few little things in the past (a coat, aprons, dresses) but over the last month or so I’ve really enjoyed the process of making simple t-shirts through preparing the pattern, pinning it down, cutting it out and then constructing a 2D material into a 3D wearable garment.

Me1.B

Plus, there’s an element of pride in wearing something that you’ve made and then having others compliment you on how well it looks! (Modest much!?)

Struggling with WIPs: At the start of the year, I made a pledge to try and finish all of my WIPs. It’s safe to say that promise went out the window two weeks in! To add to the pile is a Plus Block Quilt and my ‘Diamonds in the Sky’ Quilt that I totally ruined with some ridiculous experimental quilting!!!

Oh! It's so horrible!!
Oh! It’s so horrible!!

(I haven’t the heart or patience to unpick this yet! I’m still in mourning!)

Other Quilts: Inspired by this tutorial, I made a baby quilt to sell in my madeit store.

PinkHeart7

It’s still listed, waiting for the perfect buyer. Do you know anyone having a little baby girl soon? Perhaps this is what you’ve been looking for! (A little bit of promotion on my blog never hurt anyone, right?)

Another quilt that is currently under way is one I’m making for my niece who is due to enter our family in early December!

IMG_3157

And here’s a little bit of trivia for you: one of the blocks in this quilt is the very one I made in my Bear Paw Block tutorial! Yep!

Embroideries: I’ve stitched a few more embroideries including this one which I made into video!

Little Purses: These little guys are always my best seller when I list them up onto my madeit store. They’re super easy to make and the design possibilities are endless!

LinenFloral1

I have quite a few listed at the moment if you’re interested… Unfortunately, they’re only available for Australian residents. Postage is insanely pricey for any international sales. You’ll find the postage will be more expensive than the purse itself!

Fourthly: Goals for the coming year.

I think one of the main things I want to achieve over the next 12 months is a steady growth in my sewing skills, gain confidence when it comes to teaching and filming for my YT channel as well as to take on opportunities that are given to me to develop my creativity and voice in the world.

There are also some big quilts I want to attempt too!

One being a hand-applique based quilt that will feature this design…

Sampling the planned design!

(I’m thinking of entering this into the 2015 Sydney Royal Easter Show if I finish it on time!)

And the other, a Lone Star Quilt!

Quilt By Emma Jean Jansen | Source

I’ve always, always, always admired these quilts. The technical skills and patience to make this is incredible to think of! But, I feel that I could tackle a quilt of this magnitude and do a good job of it too! (Famous last words??)

So there are two quilts with some pretty intense types of skills that I’ll need to teach myself and hone but I’m ready for the challenge and ready for downfall! (If that happens, of course!)

So there is the year that’s past. Looking back over previous posts from this year, I’ve open up a lot about myself to you all (check this post out), have shared where I get my inspiration from, have studied a heck of a lot, re-joined the retail working-class and shared the lovely things I have in my life.

But lastly, to all of you who follow my blog in one way or another, I would like to thank you for your most wonderful support, for your always kind words of encouragement and for simply ‘liking’ my posts!

Every little bit of interaction from you (whether you’re just browsing or seriously analysing my every word) brings me immense pleasure and happiness! I truly am lucky to have like-minded people interested in the things I write, make and photograph.

Thank you!

 xx