‘Quilt-Along-With-Me!’ Part Three: Backing, Batting & Basting!

GET THE INFO SHEET: QuiltAlongWithMe – Part Three

IMG_3980

Whew! Part Three in my QAWM series is finally here! It almost seems that the universe was throwing everything at me last week preventing me from getting this stage filmed, edited and published!

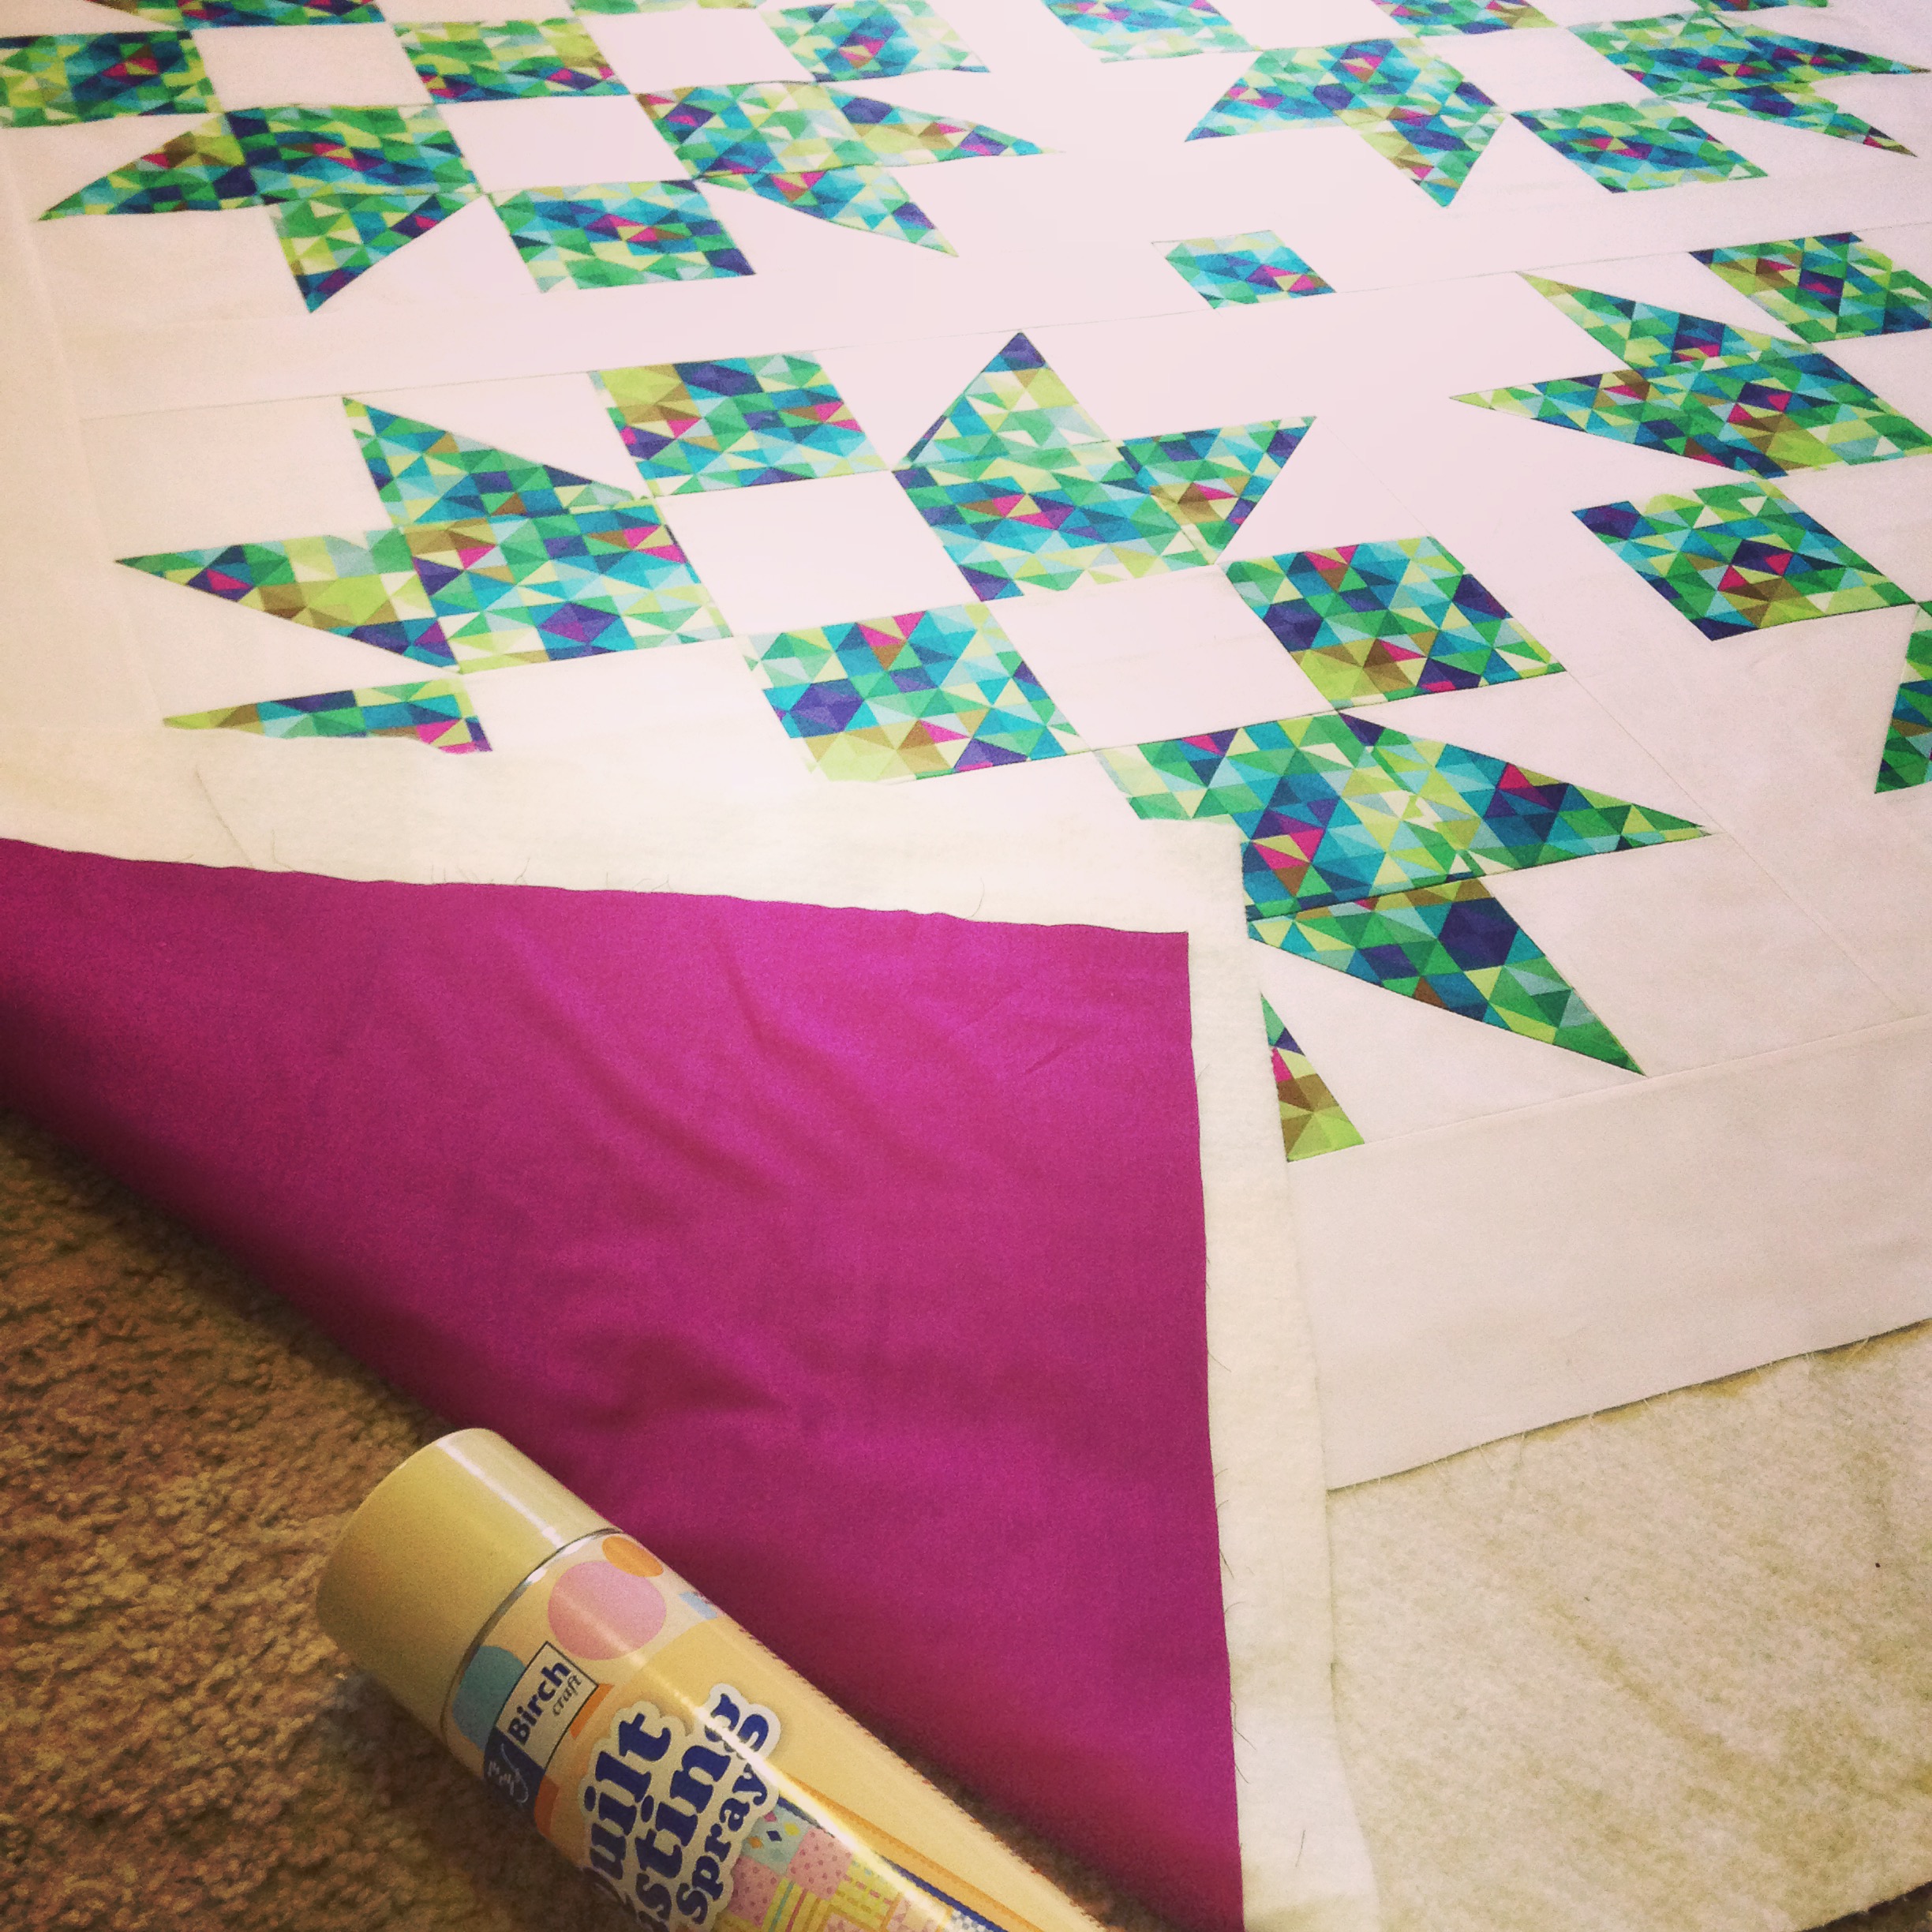
For starters, the weather in Sydney at the the start of last week went absolutely crazy! I had never seen so much rain fall in my life! It literally never stopped! Thus resulting in me being confined to the house to simply wait it out. (It was advised by authorities not to leave your home if you really didn’t need to! That’s how dangerous the rain had become!) So after three to four days stuck inside, cabin fever kicked in and I couldn’t help singing to myself this song from one of my favourite childhood movies, Muppet Treasure Island! Finally on Thursday the rain stopped and I was able to visit my local fabric store to buy the fabric for the backing, the exact batting I wanted, a new can of basting spray and thread that matched the colour of my backing fabric.

On Friday, we were forced out of the house as scheduled electrical work was happening in our area, thus resulting in losing our power for four hours between the time of 8am and 4pm. So to the city we went! We caught a train to Circular Quay, had some lunch and then hopped onto a ferry that took us around to Darling Harbour where we went to have a look at the Madame Tussauds Museum.

Sydney was looking beautiful this day!
I met an Avenger!
I met an Avenger! Squee!!

Saturday was the centenary of ANZAC Day, a special national day that all Australians and New Zealanders hold close. It was the day that our troops landed on the shores of Gallipoli during World War One. The history is a tragic one of poor leadership decisions, of being led to the wrong place and of heavy losses that weren’t at all necessary. ANZAC Day is a public holiday for us where we are given the chance to honour, remember and celebrate what the ANZACs did for our nation as well as recognise the others who have and who still do serve our country.

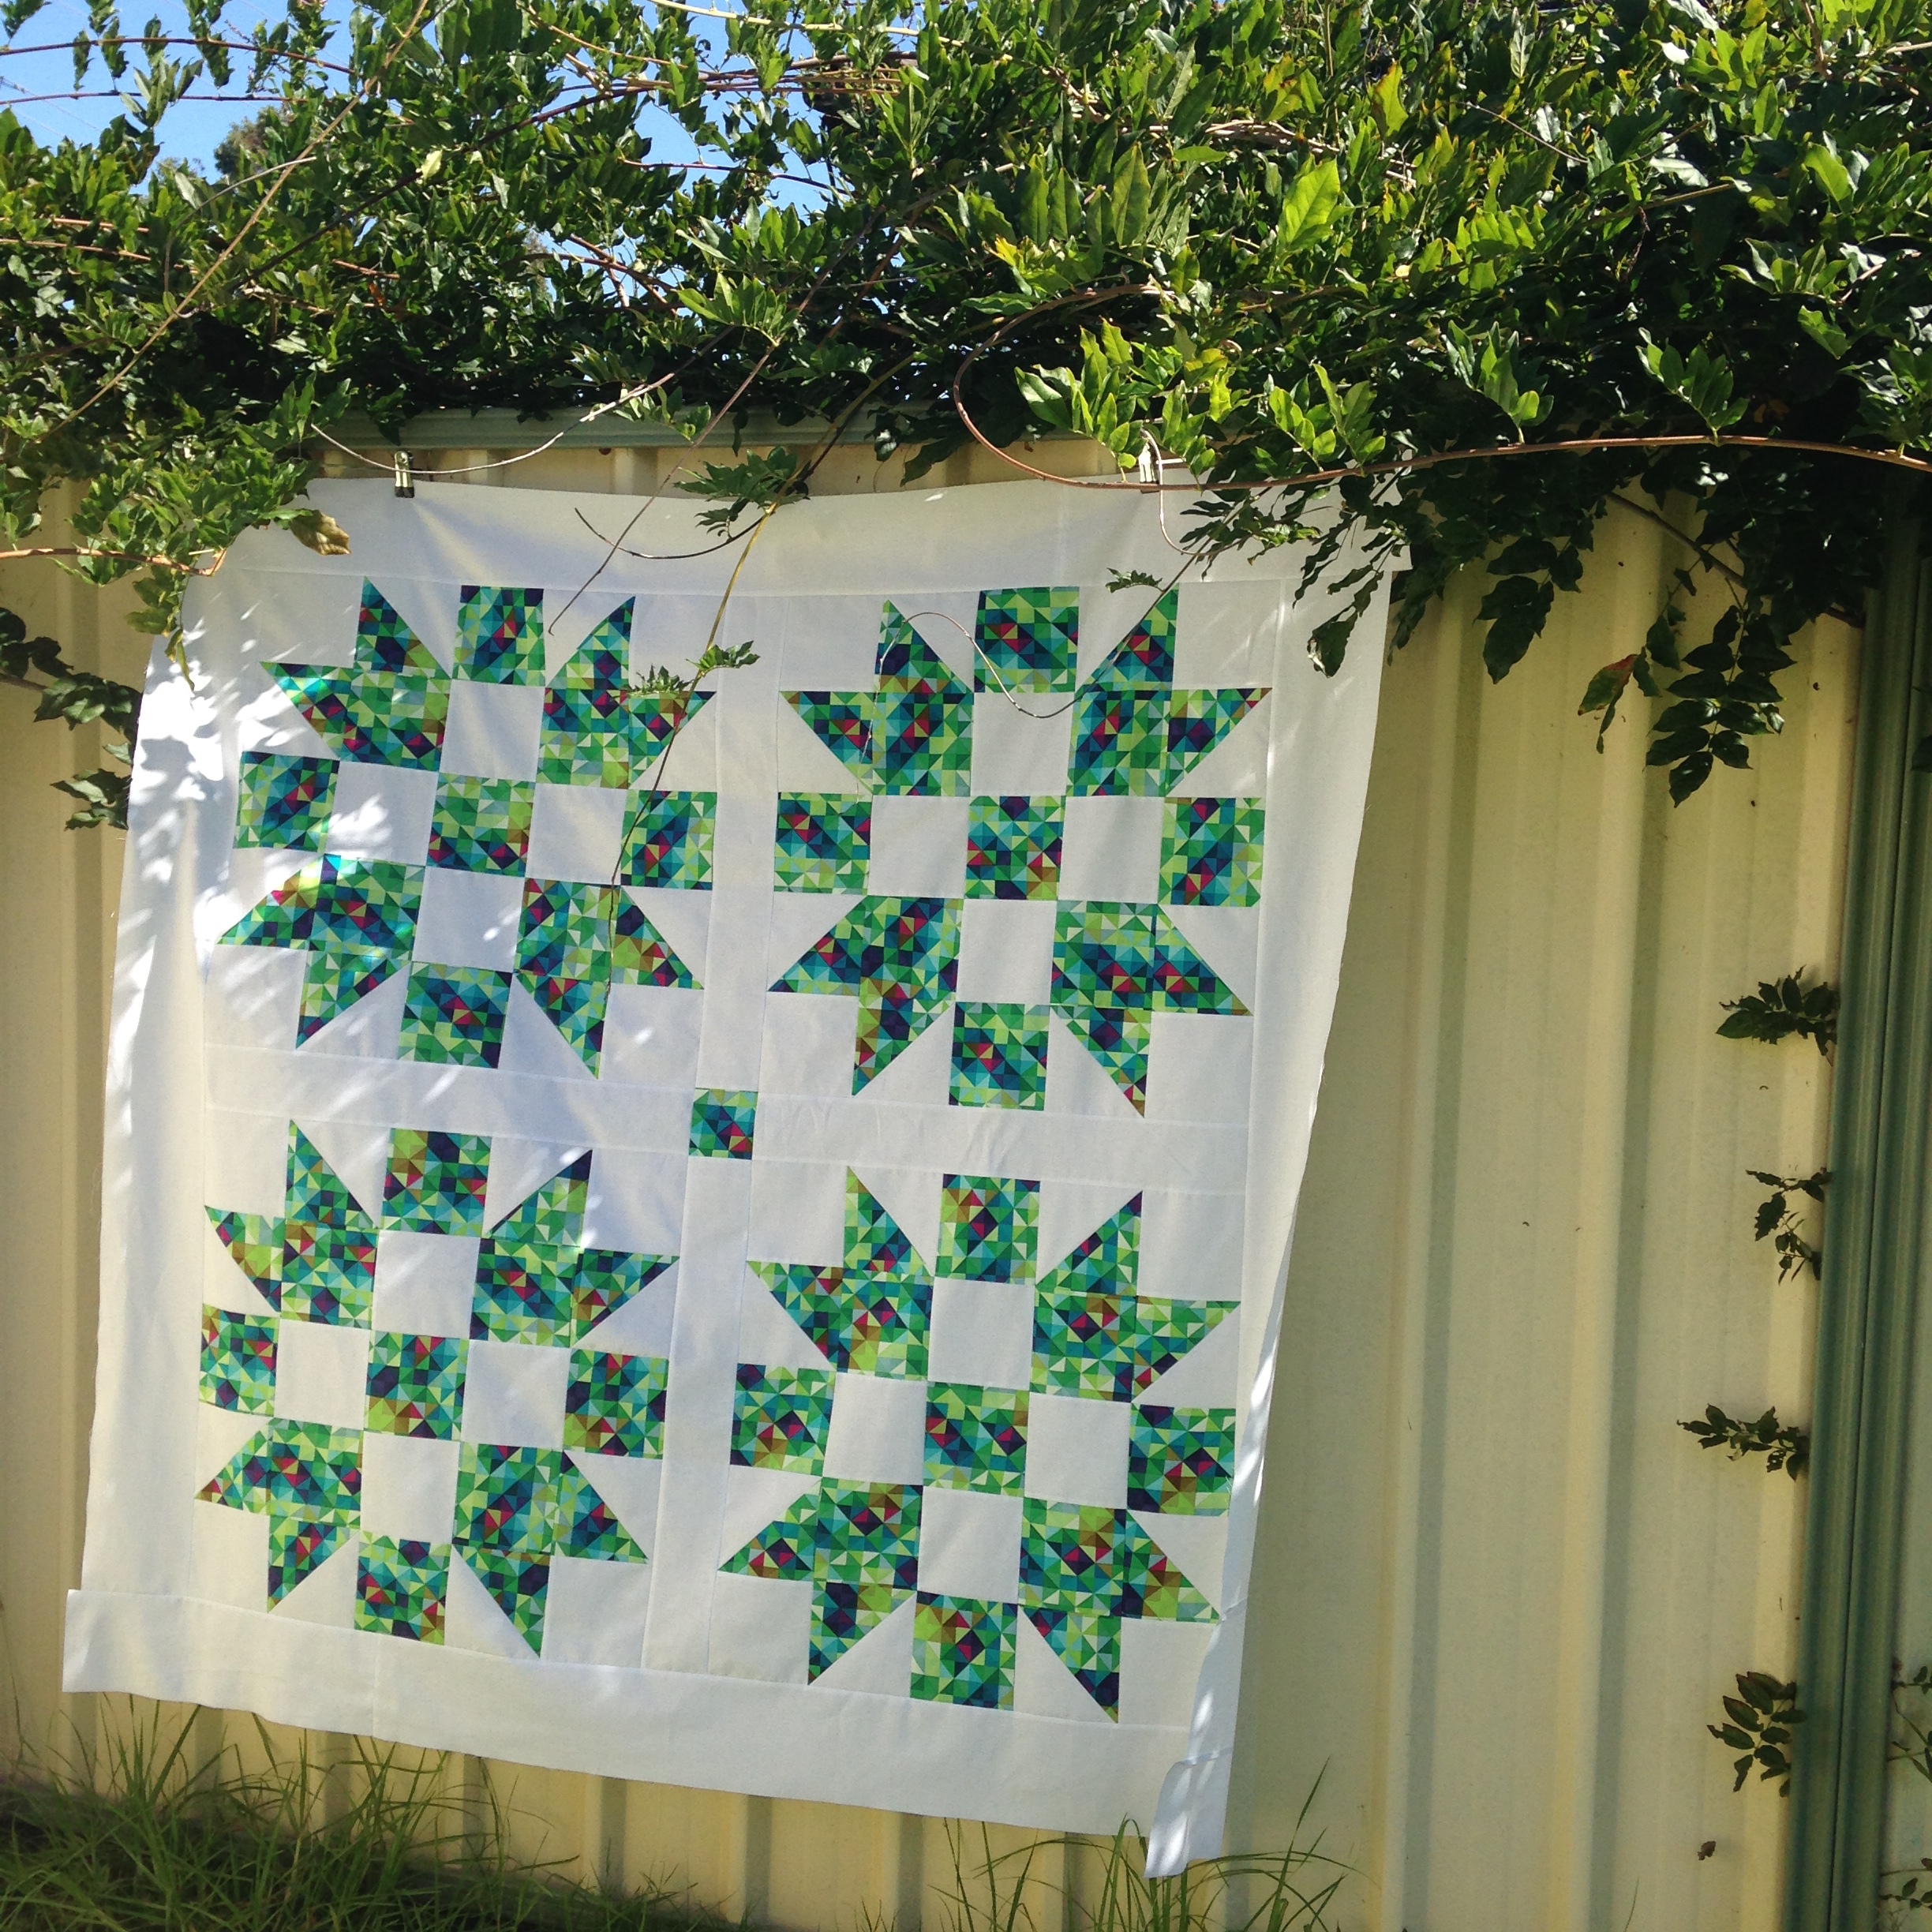
On Saturday afternoon, I thought I’d take the time to get started on filming part three. However, after discovering unfixable holes in my backing fabric after cutting it in half and sewing them together, I threw it in and spent the rest of my time making and sewing hexies!

Pretty Hexies!
Pretty Hexies!

Venturing out again to the fabric store was a no go as most stores closed early due to ANZAC Day and to add insult to injury, a huge storm was currently battling its way across Sydney that brought very heavy rain and hail stones! Eek!

Roll on Sunday… I bought some new backing fabric, ensuring that it was perfect! My camera was charged and ready to go. The sun was shining which meant my lighting would be perfect! And most importantly, I was in a good mood! So I jumped on the moment and got it filmed and done!

FathersChoiceQuiltBasted

So that was my week… Although I did forget to mention the numerous people we had around for lunches and dinners (we were the most sociable house on the block last week!) as well as the horrid bout of stomach flu I suffered on Monday and Tuesday, adding to my rainy day blues!

On the positive side, on the down days I was able to write and publish a very over due blog post (my March Favourites) as well as make a quick and very spontaneous tutorial on how to make an ANZAC Poppy Felt Brooch! Win!

+++

So in Part Three of the series we’ll be looking at how to make a pieced quilt backing, how to chose the right batting as well as how to baste a quilt together so that it’s ready to be quilted.

As always, everything you’ll need to know regarding measurements and cutting instructions is in the information sheet linked above!

Part Four will be all about quilting our quilt! I’ll go through the different ways you can do this while also discussing the way I’ve chosen to quilt my quilt. I’ll show you how to set up your sewing machine for quilting as well as the way I like to organise my space so I’m comfortable and happy!

Also, don’t forget to show me your finished blocks and quilts! Tag me on Instagram or Twitter at @3and3quarters, send me an email or share them on Facebook!

If you have any questions or thoughts about the block, the finished quilt or the series as a whole, please comment below and I’ll try my very best to help you out!!

Happy Sewing, Friends!

xx

Catchup on the series here:

+ Part One

+ Part Two

March Favourites!

A bit late, huh!? Well, there’s no time better than present, so here were the things I most loved during the month of March!

HOME by Peter Morrissey Vanilla Candle

HOME Candle

I love a good homey vanilla scent candle! They fill the house with a lazy comforting aroma that makes you feel happy all day! I usually like to burn candles later on in the day and into night as it makes the house cozy and delightful!

This particular candle is the first I’ve bought with double wicks. At the time of purchasing I wasn’t sure how quick it would burn through. But now that I’ve had it a while, it seems to burn in the same similar time as a single wick.

I’m not too sure what I’ll do with the glass dish once the candle has died. I was thinking of cleaning it out and using as a place to store random knick-knacks. Do you have any other suggestions? Let me know in the comments!

Bourjois Limited Edition Vintage Blusher in 16 Rose Coup de Foudre (Love-Struck Rose)

Bourjois Blush

I say, ‘what’s a favourites list without a few beauty products?!’ And this one doesn’t disappoint!

Now to be completely honest and melodramatic, this blush has changed my life! It is so beautiful, petite and lush that I’ve been swooning over it all month! It’s this gorgeous shade of pink/coral that has a delicate shimmer mixed throughout. It’s quite a heavy type covering blush, so only a little on the brush goes a long way!

I bought it online through ASOS who, I happily discovered, have a pretty good beauty/makeup range to explore with some very competitive prices that makes this little Aussie smile! (Cosmetics are super expensive in Australia, so any place where I can buy at a cheaper price is fantastic!!)

Rimmel Lasting Finish Lipstick in 006 Pink Blush

RimmelLippy006

Along with my sweet little blush, I also purchased another Rimmel lipstick. My excuse for buying it was that I didn’t have this shade of pink lippy in my collection. (As one does!) I find that I really like soft pinks like this when I want a makeup day to be really light, casual and minimal.

Pieces Akamo Bar Stud Earrings

BarEarringsCloseup

I’ve been looking for a pair of stud earrings like this for a good little while now, so when I was browsing on ASOS, I checked out their jewellery section and found these little beauties! They were super cheap and the exact colour I was wanting! Win! So naturally, I’ve been wearing them all month!

Fluffy Socks

FluffySocks

Autumn has finally set in in Australia and the nights are getting particularly chilly! So to keep my little piggies (my toes, that is!) warm, I’ve been snuggling up in these cozy fluffy socks! I find because it’s not quite Ugg Boot weather yet, these socks seem to do the best job at keeping me warm. Their soft, feathery nature makes it feel like I’m walking on clouds! It devine!

A Circle of Geese foundation paper piecing pattern by Piece By Number

A Circle of Geese Block

I’ve had a great month getting lost in some random and fun sewing projects, especially this block pattern by Piece By Number. It was a bit strange actually; I had this odd craving to get stuck into some foundation paper-piecing for some reason and remembered this great block I had made when I was doing the Craftsy Block of the Month with Amy Gibson a few years ago. So I printed out the pattern pieces, dug out a few of my favourite DS Quilts fabrics and simply got lost in the sewing process! It was wonderful!

Hot Cross Buns!

So March was Easter. And with Easter comes chocolate and Hot Cross Buns! And man, was I craving them! I’m pretty sure I bought over three packets of buns in as many weeks! And don’t worry, I did share them with my family but even that was pretty hard to do!!

The way that I love to eat them is heated to warm, with a good spread of butter and a hot cup of tea! Ooo, heaven!

BONUS FAVOURITE!

AVPM One other thing I absolutely loved throughout March was re-watching A Very Potter Musical, A Very Potter Sequel and A Very Potter Senior Year by StarKid on their YouTube channel. If you’re a fan of the Harry Potter books I would very much encourage you to watch them! They’re ‘totally awesome!’

+++

So one month over and another has replaced it! Let me know of any things you’ve loved over the past few weeks! I would love to know!

I also uploaded this video chatting all about these favourites! Check it out if you wish!

Happy Favouriting, Friends!

xx

Other Favourites posts from this year…

+ January

+ February

‘Quilt-Along-With-Me!’ Part Two: Sashing & Quilt Top Finish

GET THE PATTERN: QuiltAlongWithMe – Part Two

Finished Quilt Top
Finished Quilt Top

Good Afternoon!

Welcome to Part Two in my ‘Quilt-Along-With-Me’ series!

Now that all of our giant Father’s Choice blocks have been pieced, it’s time to sash them together and finish the quilt top with a basic border edge! Hooray!!

In the following video, I walk you through the way that I like to sash, piece and press these elements so that I have my completed quilt top. By all means, I encourage you to do these steps in a way you most feel comfortable doing or in another way that you know best! My steps are simply a guide for you to follow if you need them!

Now, if you find it hard to follow along with the instructions in this video, you’ll find everything you need to know in the pattern sheet above. All of the measurements, cutting instructions and steps to piece the sashing and borders are there for you!

In the next video of the series I’ll be showing you how to make a pieced backing, we’ll be having a chat all about batting and I’ll go through the different ways you can baste your quilt so that it’s ready to be quilted!

Sashed Father's Choice Block
Sashed Father’s Choice Block

 Also, don’t forget to show me your finished blocks and quilt tops! Tag me on Instagram or Twitter at @3and3quarters, send me an email or share them on Facebook!

If you have any questions or thoughts about the block, the finished quilt or the series as a whole, please comment below and I’ll try my very best to help you out!!

Happy Sewing, Friends!

xx

PS. If you missed out on Part One, click here and you’ll be taken straight to it!


In loving memory of my darling Lucy.

Lucy

I had planned to have part two in this series finished and uploaded on Wednesday. However the day before, Tuesday the 14th of April, my beautiful Lucy who was close to 15 years of age, passed away.

My darling brown eyed baby left my world while lying on the grass in our backyard. I was with her as she passed, stroking the top of her head and twirling her ears, just the way she liked it, willing her to wake up and be okay.

The past few days have been hard. Very hard. I cry as I write this, missing her sounds and her presence. The routine and the snuggles.

We buried her in the backyard, near the garden along our back fence, wrapped in her fleece ‘Hello Kitty’ blanket that I had bought by the panel at Spotlight. I used to call her ‘Kitty’ as she would meow for attention and purr when we would snuggle.

Lucy was a big delight in our family. She was only a small dog but had a huge presence in our home.

She will be achingly missed and will be loved forever.

x

‘Quilt-Along-With-Me!’ Part One: Block Prep & Piecing!

GET THE PATTERN SHEET : QuiltAlongWithMe – PartOne

Father's Choice Block
Father’s Choice Block

Hello!

Welcome to the first instalment of my ‘Quilt-Along-With-Me!’ series! I’m so excited to get started and I hope you are too!

In part one, I introduce the block we’ll be piecing together (which is the Father’s Choice block!) along with showing you the way I like to prep and cut my fabric as well as how I choose to make a bulk load of HSTs and how I piece and press my blocks.

Now, if you find it hard to follow along with the instructions in the video, you’ll find everything you need to know in the pattern sheet above. All of the measurements, cutting instructions and steps to piece the block are there for you!

A few facts about this quilt:
– The quilt that we’re making together will feature four Father’s Choice blocks, each one measuring 23″ (58.5cm)
– The blocks will be pieced together using a sashing technique
– The final quilt top will measure approx. 59″ (150cm) squared


I first came across this block when I was flipping through the book 500 Quilt Blocks by Lynne Goldsworthy & Kerry Green and looking for inspiration for this series. I had never heard of the block until it’s star-like nature caught my eye. The block featured in this book was a little bit too small for the type of quilt I wanted to design and make with you all, so I doubled the measurements, made a test block and fell in love!

Father's Choice Block
Father’s Choice Block

I was a little conscience to the fact that the piecing of this block could be a little tricky for beginners to manage. But once I made it and thought about it, I actually think this is a great block for beginners to try as it touches on some great basic technical skills that all patchworkers should learn and know. These include cutting basic squares, piecing and trimming down HSTs, basic forms of layout design (eg. learning how to make a four-patch unit), how to press units to achieve perfect nesting seams as well as how to manage piecing a large-ish block together.

{If you are new to patchwork and are going to give this block a go, let me know how you go! Tell me if you thought it was a bit hard or if you felt comfortable with the challenge…}

Also, don’t forget to show me your finished blocks! Tag me on Instagram or Twitter at @3and3quarters, send me an email or share them on Facebook!

In the next video I’ll be showing you how to sash all four blocks together as well as adding a boarder around the outside, completing your quilt top! You’ll find the pattern sheet with all of the information here once it’s uploaded!

Father's Choice Blocks
Four Father’s Choice Blocks

If you have any questions or thoughts about this block, the finished quilt or the series as whole, please comment below and I’ll try my very best to help you out!!

Happy Sewing, Friends!

xx

PS. If you missed out on the Introduction post I published, you can click here to get up to speed! 😊

‘Quilt-Along-With-Me!’ Series Introduction!

It all starts today!!

(Although a day late!!) 

The first instalment to this series will be live later on today (Monday)! I’ll be publishing another post once the video is up that will have a link to the Part One pattern sheet along with a nice little written piece informing you on more about the block construction and what’s coming up next!

All of the pattern sheets will be available to download from here, my blog, each time a new video in the series is uploaded. Once the series is finished, the completed pattern will be available to download for free!

I hope that you’ll join me in making this idea a success!

Happy Sewing, Friends!

xx

PS. You may be wondering why everything is running a day late… Yes?

Well yesterday (Sunday) I had a chance to catch up with some of my dearest friends that I hadn’t seen for the past few months. We chatted and laughed over afternoon treats and then had a lovely dinner together! It was a great day!

So this obviously resulted in a late edit and I unfortunately ran out of time to upload it on the day I said I would. But everything is full steam ahead today and I’m so excited to get the first video up for you to get stuck into!

x

TUTORIAL: Mini Snail Trail Block!

Now, I’m pretty sure I’ve shared with you just how much I love making mini sized versions of quilt blocks before… My Happy Quilt & Golden Trail Mini may jog your memory! And so today I want to take another opportunity to discuss and teach you how to make this one: the Snail Trail Block!

IMG_3774

If you’re regular reader of my blog, you may remember me making this little mini last year…

Start to Finish | Mini Snail Trail Block

July 2014
July 2014

It was my entry into the Sydney Quilt Show. I was so immensely proud of it. It was the first mini quilt I had ever made and loved everything about it. (And still do, actually!) At the moment, this little mini adorns the door to my bedroom. It represents my love for modern quilting, my love for pattern, texture and direction as well as the love I have for mini quilt blocks!

The inspiration for this quilt block has come from my favourite quilt book in my library, 130 Mini Quilt Blocks by Susan Briscoe. I pour through the pages almost daily, looking for sparks of inspiration or for a reason to simply start cutting up fabric and piecing together a little block!

So after a request and a genuine want to share how this darling little block is made, I created this tutorial for you!

Now at the beginning, I have a small little chit-chat explaining a few little tips that I think will help you when you’re piecing… Then I dive right in and guide you step-by-step in how the Snail Trail Block is pieced together!

If you would like to make this block here are the measurements and cutting instructions:

From the PINK fabric you will need to cut:
– x2: 1&1/8″ squares (for the centre four patch)
– x1: 1&3/4″ square (cut in half, resulting in two triangles)
– x1: 2&1/8″ square (cut in half, resulting in two triangles)
– x1: 2&5/8″ square (cut in half, resulting in two triangles)
– x1: 3&3/8″ square (cut in half, resulting in two triangles)
For the BLUE fabric, cut exactly the same as the pink.

The FINAL BLOCK SIZE measures: 5″x5″ or 12.7cmx12.7cm.

NOTE: I will just say that the more experienced you are at patchwork, the easier the block will be to piece together, obviously. But if you are a beginner, I still encourage you to give this block a go! Take your time, read the measurements carefully and never be afraid to make mistakes! It’s only through our mistakes we learn how to do things better!

So, I hope you enjoyed learning how to make this block and have been inspired to make it yourself!

Happy Sewing, Friends!!

xx

TUTORIAL: Jake The Dog Pillow!

GET THE PATTERN: JakeTheDogPillow PDF Pattern

It’s here! I’ve finally made the next instalment of my Adventure Time Pillow creations!

So, if you didn’t already know, I’m a bit of an Adventure Time nerd and I’ve had this tutorial on my to-do list ever since I did my Finn The Human Pillow last year in July! So I penciled it in and here it is for you today!

I had so much fun sketching, cutting, trimming, adjusting and making this project and I really hope you do too!

JakeTheDogPillow 2

JakeTheDogPillow1

JakeTheDogPillow 3

In all honesty, I think this pillow is easier to make than my Finn one as Jake doesn’t have as many features to attach as he does. So if you’re beginner in the sewing/crafting world and want to make one of these guys, try Jake first and make your way up to creating Finn!

And of course, let me know if you’re going to make this! I would love to know how you go! (And perhaps send me a photo?!) Also, please send through any feedback you have about the pattern if there is anything you think I need to change or tweak! (NOTE: I’m no professional when it comes to pattern making and writing, and I use no fancy software to create them either – just hand-drawn templates and Microsoft Word!)

Happy Sewing, Friends!

xx

How to make a Quilty Cross Pincushion!

Hello!

Well, it’s been a bit of a while since I last published post! Gosh! But I think I have a pretty rock-solid excuse for why… I’ve just returned home from a two week cruise to Fiji!!

Dravuni Island, Fiji

I had the best time and will be sharing more of my adventures and love for cruising with you in the next few days!

Now, a few weeks ago, before I went on holiday, I made a video tutorial showing how to make a Quilty Cross Pincushion and I’ve only just realised that I haven’t yet shared that with you here, on my blog!

After casually browsing on Pinterest looking for some inspiring ideas, I came across some sweet little pincushions that I thought would make a great little project to film and share.

So using my favourite Quilty-Cross method by Auntie Cookie, I paired white cotton linen with a few of my ultimate favourite DS Quilts fabrics and proceeded to make this tutorial…

Since uploading this video, I’ve had a wonderful amount of positive feedback from my lovely viewers saying they’ve been inspired to make one for themselves! Such words of encouragement are always wonderful to read!

Will you be making one too?

Happy Sewing Friends!

xx

TUTORIAL: FPP Union Jack Block!

Over the past few months, I’ve had a numerous amount of interest and requests to make a video tutorial showing how I make the Union Jack block…

The Union Jack Block

The first time I made this block I had just learnt how to Foundation Paper-Piece and was absolutely daunted by all of the different pieces and angles I had to sew! Oh. My. Gosh. So, I took a deep breath, studied the pattern and instructions and then took one step at a time. So then of course I proceeded to make countless mistakes, under and over judged fabric lengths and widths AND importantly learnt that keeping to a quarter-inch seam was critical for the pattern to come together, crisp and evenly at the end! What’s that saying? Through our mistakes, we become stronger… Well, maybe…

Since then I’ve gone on to make a lot of versions of this block, almost to the point where I could do it with my eyes closed! (Well, no. Not really. That would be a terrible idea!!) I had high hopes (and still do, actually) of piecing my many blocks together to make one of those big Britannia type quilts.

A sample of the Union Jacks I've made...
A small sample of the Union Jacks I’ve made…

I’ve written about it before in other blog posts and it was on my New Year Quilting Resolutions of 2014 list to make during that year. (An idea that failed miserably! None of those quilts got made! My bad.) But hope is not lost! It will get made… one day… soonish…next year, maybe…

But, alas! I have had the chance to incorporate this block into quilt! I was commissioned by a work colleague to make a quilt for our department manger who was leaving to pursue another job. The biggest love in her life was bunnies as well as sharing the same admiration for all things British, like me. So I made her this quilt as a farewell gift!

English Bunny Quilt (2012)

It still is one of the most favourite quilts I’ve ever made.

I originally found this block in the book Modern Blocks, compiled by Susanne Woods as I was casually flicking through it when visiting my favourite bookstore in Sydney, Kinokuniya. As soon as I saw this block pattern in the book, I immediately made the decision to buy it without even looking at what other blocks were in the book! That’s how keen I was to make it! However, it wasn’t until I got home that I realised the block was made entirely using the foundation paper-piecing method… A technique, at the time, I didn’t know anything about! With my excitement and high hopes of being able to make an inspiring Union Jack Quilt squashed, I placed the book on my shelf and forgot about it.

My little library!
My Quilting Book Library

A few months later, I signed up to do the online Craftsy Block of the Month with Amy Gibson[And just on a side note: If you’re new to quilting and want to learn lots of new techniques and be wholly inspired by everything patchwork, I recommend highly to watch these video tutorials! It’s 100% free to watch and join. Honestly, without watching these tutorials, I wouldn’t be the quilter I am today! So go! Do it now! Watch. Learn. And grow!] …and in one of the months she taught me how to foundation paper-piece. Here I was, thinking it would be this weird, strange, ancient technique that I thought I would never enjoy. How very wrong I was. In a matter of minutes, I was in awe of just how easy and simple the technique was. I just couldn’t believe how straight, clean and crisp I could get my seams and how many new and awesome modern block designs that were now open for me to make! And then…Lightbulb! I now had the power to make that Union Jack block!! Huzzah!!

The block in question, called Just Jack, was designed by Lynne Goldsworthy. (A quilt-block designer I seem to keep running across over the past few months…spooky!) The block that I make is a little bit different to the one in the book. I’ve made it smaller (165% as opposed to the suggested 200%) and have eliminated the two pieced strips from the top and bottom so that it’s just a Union Jack.

JustJack

Now I must admit, this block is pretty tricky (and a little bit daunting!) if you’re new to foundation paper-piecing but I still want to encourage you to give it a go! Don’t worry if you make mistakes – I did and I learnt from them! Be brave, dive in and see what happens! (Oh man, I should take on some of my own advice inother parts of my life! Jeez!) 

If you are new to foundation paper- piecing, you’re more than welcome to check out this tutorial I made last year that goes through all of the basic tools and steps to understand the technique.

One of the things I absolutely love about this block is that it allows you to be as free and creative as you wish! You can use fabrics that are rich in print and colour, ones that clash horribly but still look good or just stick to the classic side of things using solid colours to bring the block to life!

Now, the final size of this block will all depend on how big you choose to enlarge this pattern. At 165%, my finished block measured 26.5cmx17.5cm (10&3/8″x7″).

If you don’t have this book or unable to purchase it, here are a few other Union Jack patterns I’ve found on the net that are similar to the one I’ve made.

‘Union Jack Block & Bag Pattern’ by Amy Smart (Diary of a Quilter)
‘Union Jack Quilt Block’ by traceyjay on Craftsy (FREE PATTERN!)

And lastly, here’s a list of the tools and notions I like to use when I’m doing any foundation paper-piecing…

– Brother Innovis 200QE sewing machine
– Brother 1/4″ sewing foot
– Gutermann polyester thread
– Fiskars Rotary Blade and Cutting Mat
– Sew Easy Rulers
– UHU Glue Stick
– Triumph Craft Scissors
– Birch Non-Melt Flower Head Quilting Pins
Clover Thread Snips
Clover Serrated Tracing Wheel 
Clover Finger Presser 

Of course, let me know if you’re going to make this block (or already have!). Send me a photo of your finished block, or a project with the UJ in it or your fabric selections for your planned block! I absolutely love it when you share your creations and ideas with me!

The ways in which you can share with me…

Instagram & Twitter: @3and3quarters

Email: 3and3quarters@gmail.com

Facebook

If you’ve made it to the end of this post, I send you a big virtual HIGH-FIVE for getting through all of my rambling back story!

You’re a true super star!

Happy Sewing Friends!!

xx

TUTORIAL: The Chevron Block!

The Chevron Block
The Chevron Block

Oh, man! There’s just something real cool about the Chevron Block (Am I right!?)! I don’t know what it is, but geez, I just love this block! It’s simple, fast to piece together and is so effective when pieced into a quilt!

This is one I made in 2011 using the Chevron Block…

I called it A Summer Zig-Zag Quilt!

Summer Zig Zag Quilt (2011)

So here’s what you need to do to make this block…

Simply cut x2 5″ squares from two different fabrics (they can be contrasting, matching, clashing, be print vs. solid etc.) and then watch and learn how to piece it together in this video!

FINAL BLOCK SIZE: 22cmx22cm (8&5/8″x8&5/8″)

Here are just a few tips I’ve picked up along the way to help achieve perfect Chevron points…
When piecing together the HST units together, lay the diagonal seams directly on top of each other. (As shown in the video) Pin the two units together and carefully sew them into one row.
By ensuring that these seams are directly aligned with another on either end, you should have perfect points when you open the row out.

Always make sure you sew with a 1/4″ seam. I know I sound like a broken record saying to do this all the time but it really is essential to sew all of your seams exactly the same. If one seams is slightly bigger or smaller than the other, then you’ll begin having problems with matching your seams and points.

This is the most important one: Take your time! Don’t worry about making mistakes! Learn from what you’ve done wrong and simply try again until you master it! I know you can do it! 🙂

Two Chevron Blocks pieced together

Have you made this block into a quilt? If you have, I would love to see a photo of your finished quilt! There are also some great Chevron Quilts to be found on Pinterest if you’re wanting to give this block a go and are looking for some inspiration!

Happy Sewing Friends!

xx