With a comforting mug of tea settling next to the keyboard and my written notes laid out before me, let’s explore the latest instalment in my quilt block tutorials – the Pinwheel Block!
Inspired by a block in the book ‘500 Quilt Blocks’ by Lynne Goldsworthy & Kerry Green, the Pinwheel Block is deceptively easy!
Here’s what you need to do to make this block!
Measurement & cutting instructions
(This block only requires two contrasting fabrics.)
Cut x2: 6″ squares from one fabric for the corners
Cut x2: 4.5″ squares from each fabric for the HSTs*
Final block size: 25.4cm or 10″ square.
And as always, let me know if you’re going to give this block go! You can email your lovely pictures to this address: 3and3quarters@gmail.com
Happy Sewing Friends!
xx
PS. Regarding my Christmas videos: These will begin in December, with the first one due to come out on Wednesday the 3rd! Then every Sunday & Wednesday upload, until the end of the month will be Christmassy related! Whoo! (This is just incase I didn’t really explain it well enough in the video!) I hope you will all enjoy the ideas and projects I have in store!
Here’s a great little block for all of you beginners out there!
The Broken Dishes block is a classic traditional block made up entirely of HSTs*.
Its design aesthetics are endless and it is insanely quick to make!
So if you’re looking for an easy block design that is the next step up from a Four Patch Block then you’ve come to the right place!!
Measurements & Cutting Instructions…
From the GREY fabric cut:
– x2: 5″ squares
From the PRINTED fabrics cut:
– x1: 5″ square of each
The finished size of the block is around 22cm square or 8&5/8″ square.
Things I used in this video:
– Printed Fabrics: ‘Piccadilly’ fabric range by DS Quilts Collection
– Clover Finger Presser: http://goo.gl/IOXilY
– Brother Innovis 200QE sewing machine
– Fiskars rotary blades, cutting mats and scissors
– Sew Easy quilting rulers
And here’s a great example by Red Pepper Quilts using the traditional Broken Dishes block in a very modern way! (Personally, I love the use of all the solid colours working so harmoniously together!)
Do you have any quilt blocks you’d love for me to demonstrate? I’m currently in the midst of organising my tutorials schedule for next year and would love to add your suggestion to the list! Comment below with your marvellous idea! 😊
On a warm Friday night three years ago, I plucked up the courage to begin writing this here humble quilting blog.
Now here we are, 1,093 days later and I’m still just as dedicated and proud of my little slice of the internet as I was the day I created it.
As I’ve done in other past ‘birthday’ type posts, let’s recap the year that was!
Firstly: YouTube!
This year, I’ve dedicated a lot of hard work into developing my YouTube channel(and with some very pleasing results thus far!).
I’ll also be the first one to admit that I’ve spent so much time planning and creating content for it, that my blog has had to fall-by-the-way-side so speak and become the second child. But! In saying this, my blog has never been too far out of my mind! Along with my YT channel, the welfare of my blog is always on my mind and I’m constantly developing ways in which I can improve its quality! Hence my little foray into making video tutorials!
Thanks to YouTube, my confidence in my patchwork/quilting skills has improved, I’ve felt confident in delivering and teaching skills to others and I’m continually being challenged in both my sewing skills and editing/technical skills.
Hooray!!
Here’s a list of some of the most challenging videos I’ve created this year…
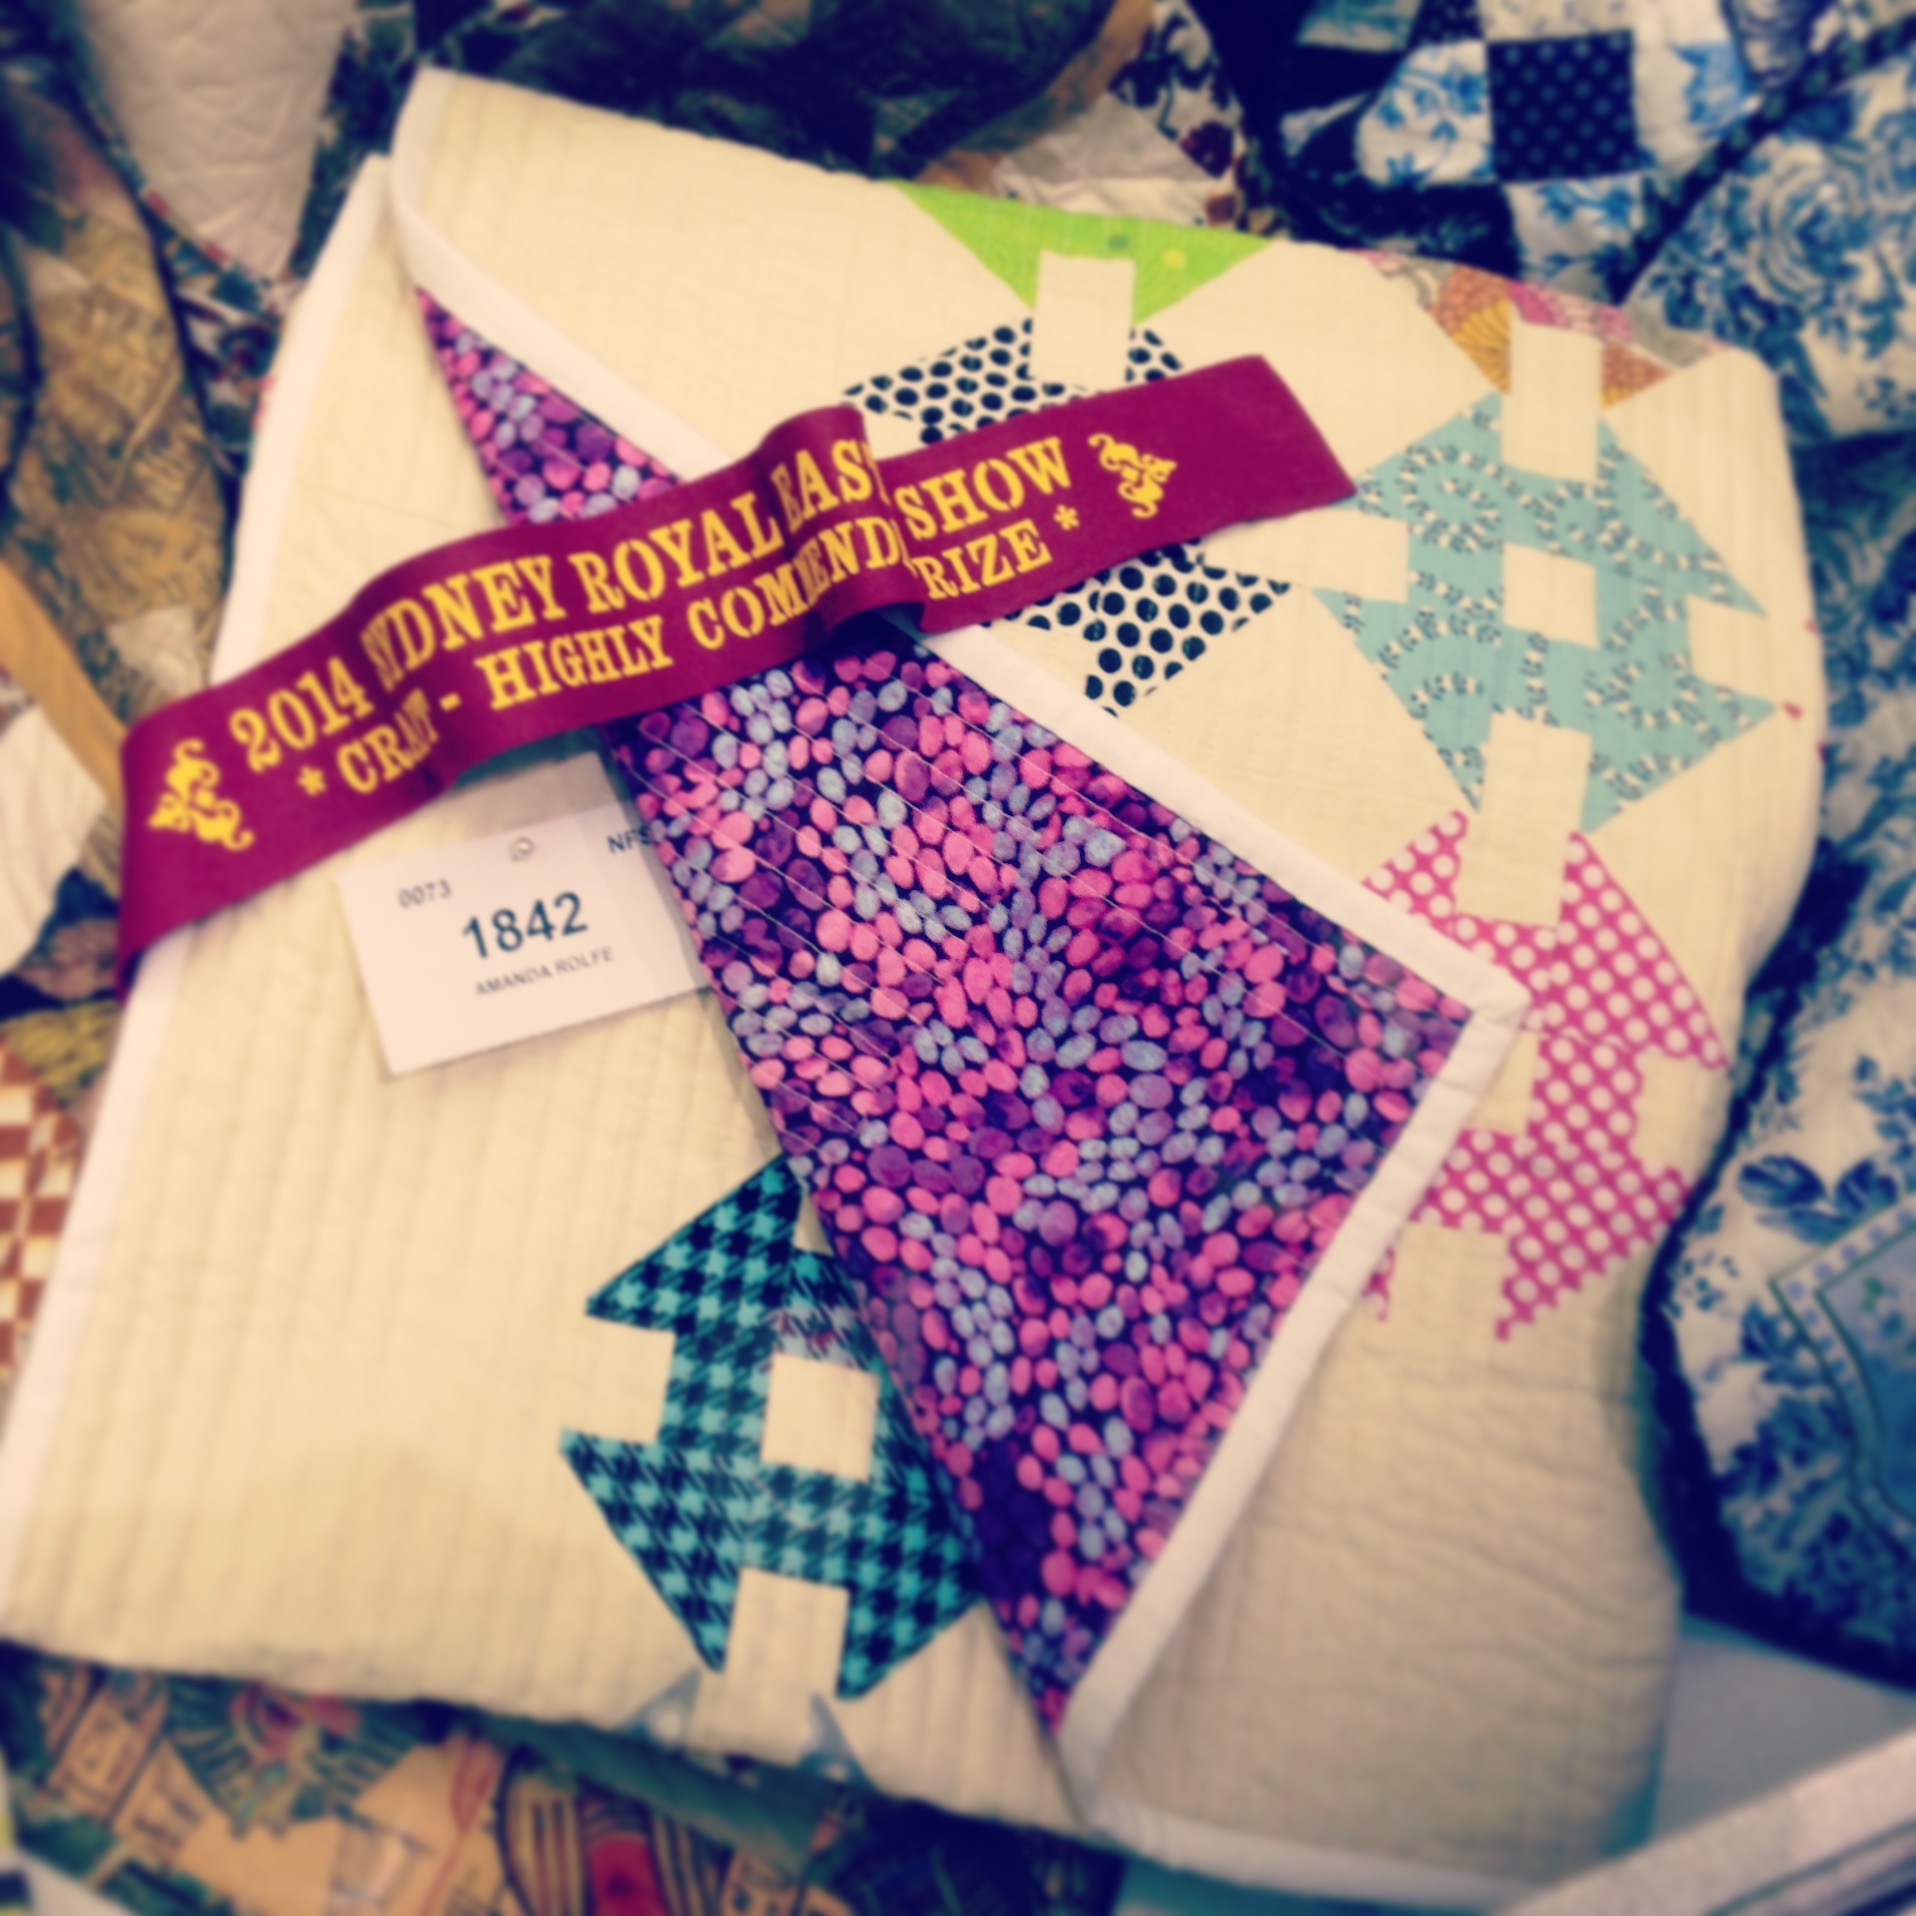
Although I had been quilting for over 7 years, 2012 was the first year I was confident enough in my work to enter them into shows.
This year, I struck a goal off my list and entered a few items into the prestigious Sydney Royal Easter Show in April/May. And would you believe it, one of my quilts received a highly commended ribbon!!
No way did I think I would receive anything in my first year of entering! Not in the least! But I’m so greatly humbled that my sweet little ‘Happy Quilt’ was noticed and received the love it’s owed.
Now this quilt hangs in my room and I use it as a backdrop for quite a lot of my videos! (Just like this one!)
And like last year, I entered a mini quilt into the Sydney Quilt Show during July. Although it didn’t receive any ribbons, I’m still chuffed to bits that my little quilt was invited to hang in an enormous room filled with many, many, many beautiful quilts!
Thirdly: Projects!
As I began brainstorming and planning the things I would write for this section, a pang of guilt was slowly rising inside of me. I felt that I really hadn’t ‘made’ or ‘done’ very much sewing/patchwork/quilting/crafting wise to really reflect and chat about.
However, after having a quick squizz through all of the post I’ve published over the last year, so many little projects kept popping up with me exclaiming out loud, ‘Oh yeah! I totally forgot about that one!’ Hence highlighting the reason why I chose to begin writing a blog! My mind really is like a sieve sometimes!
So here are some highlights of the creative things I’ve began and/or finished over the past 12 months.
Halloween Crafts: This is the first time I’ve ever got into Halloween crafting. Halloween isn’t widely celebrated in Australia but it’s very slowly (some may say very quickly!) catching on!
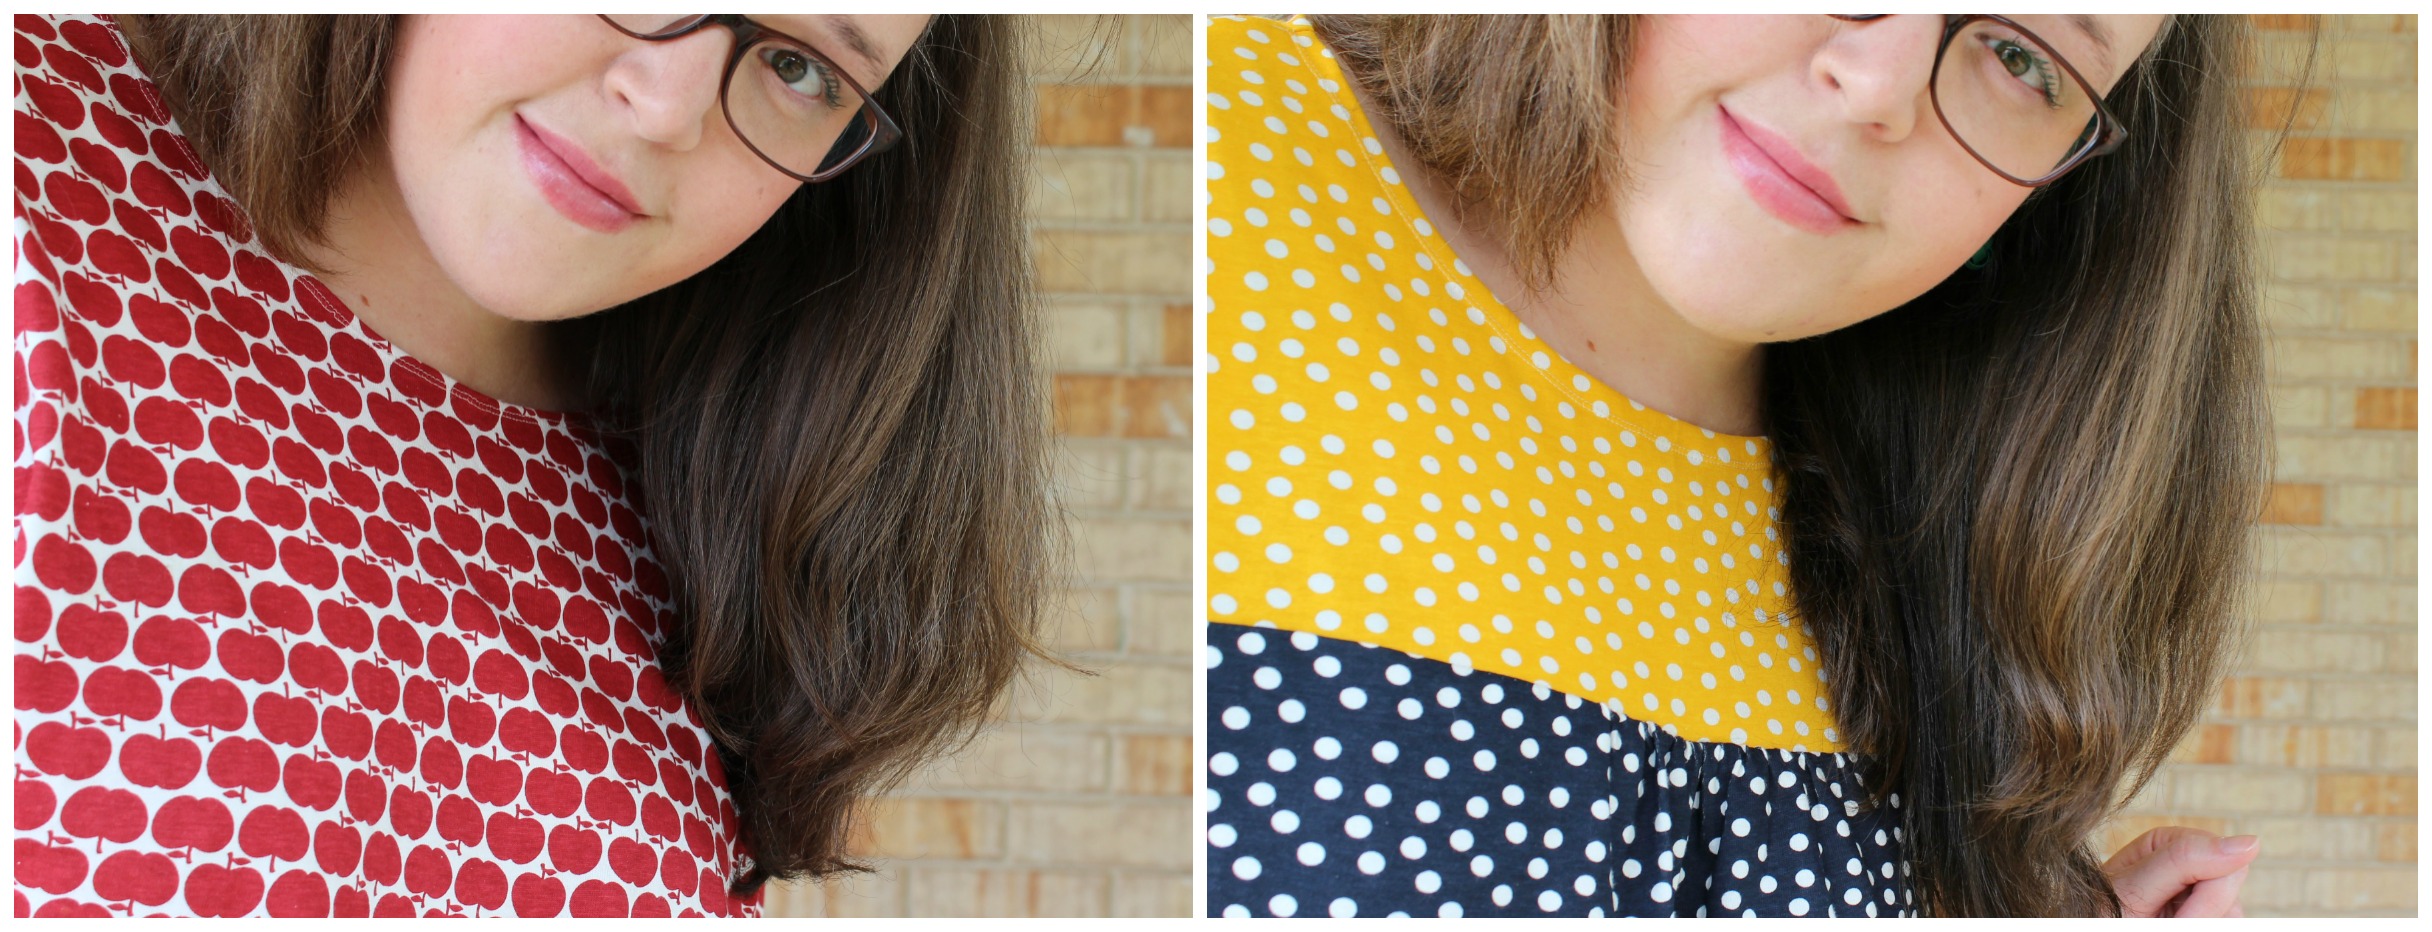
Dressmaking: I’ve made a few little things in the past (a coat, aprons, dresses) but over the last month or so I’ve really enjoyed the process of making simple t-shirts through preparing the pattern, pinning it down, cutting it out and then constructing a 2D material into a 3D wearable garment.
Plus, there’s an element of pride in wearing something that you’ve made and then having others compliment you on how well it looks! (Modest much!?)
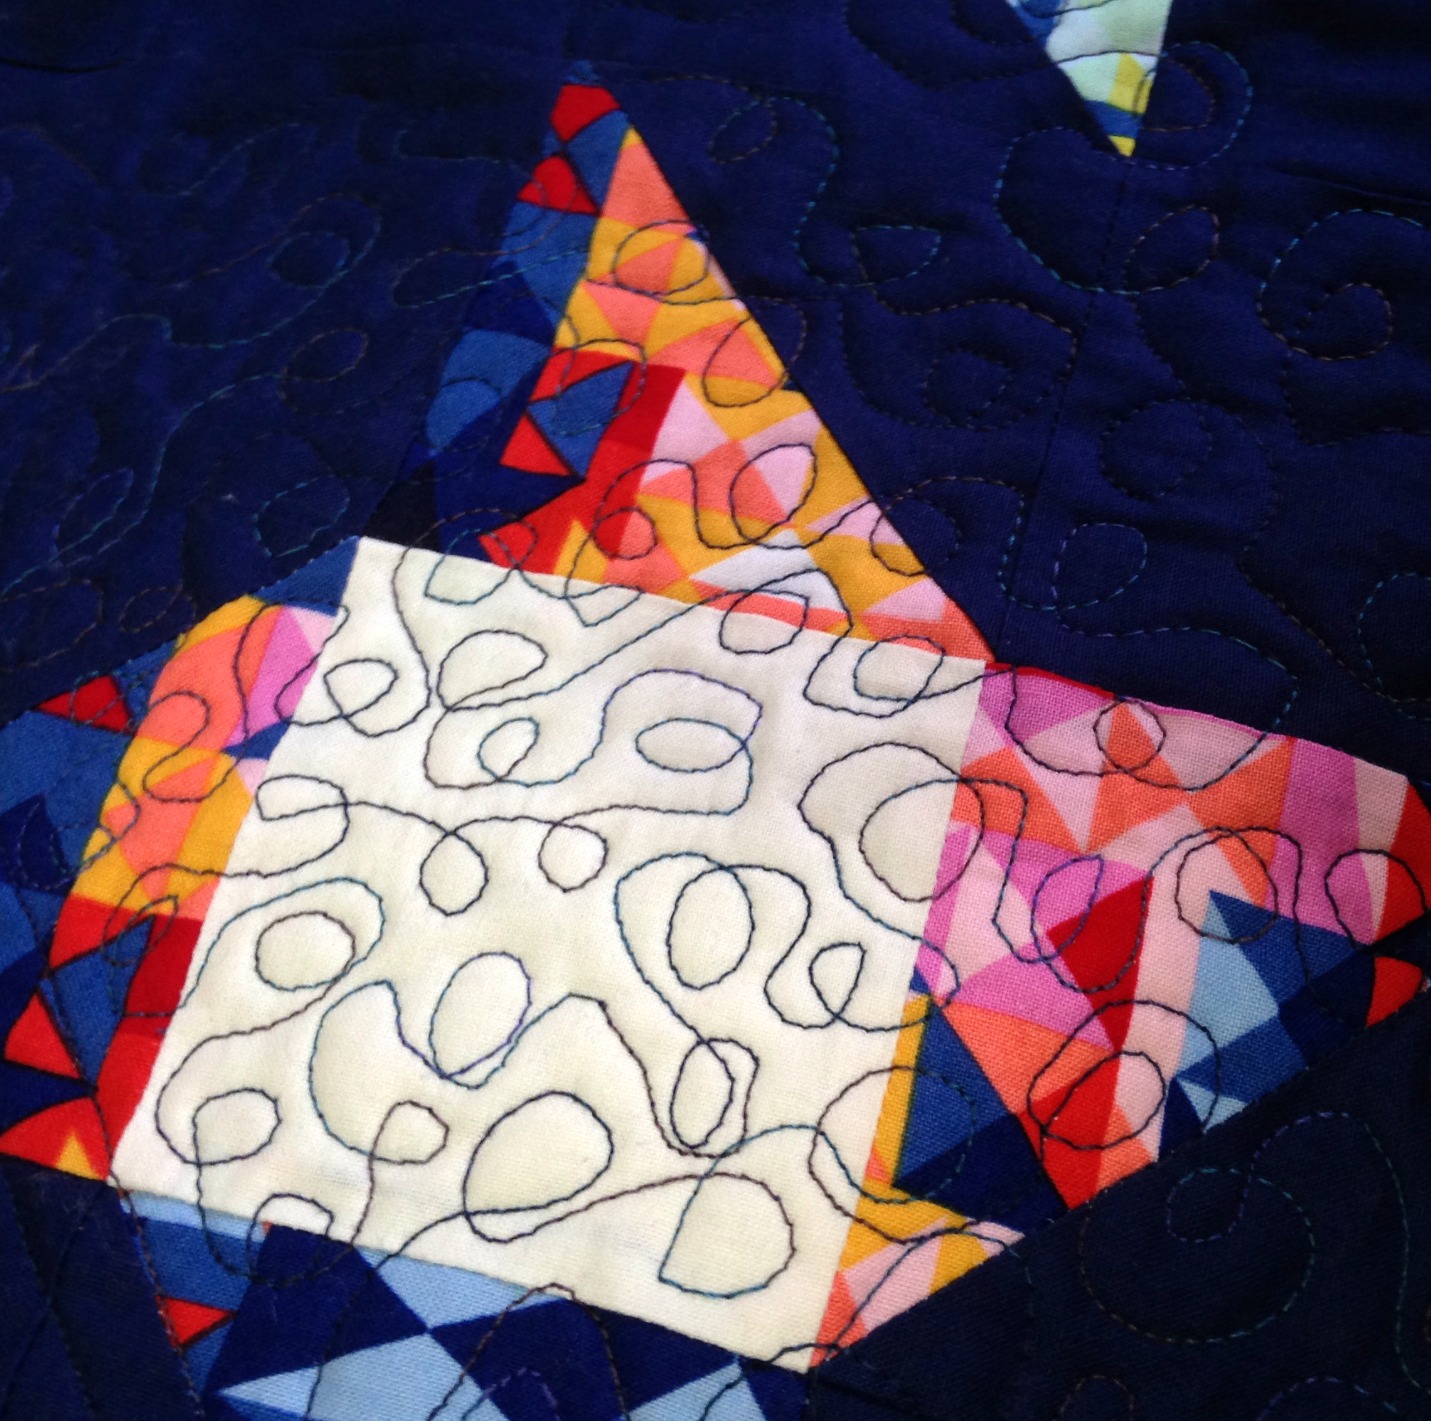
Struggling with WIPs: At the start of the year, I made a pledge to try and finish all of my WIPs. It’s safe to say that promise went out the window two weeks in! To add to the pile is a Plus Block Quilt and my ‘Diamonds in the Sky’ Quilt that I totally ruined with some ridiculous experimental quilting!!!
Oh! It’s so horrible!!
(I haven’t the heart or patience to unpick this yet! I’m still in mourning!)
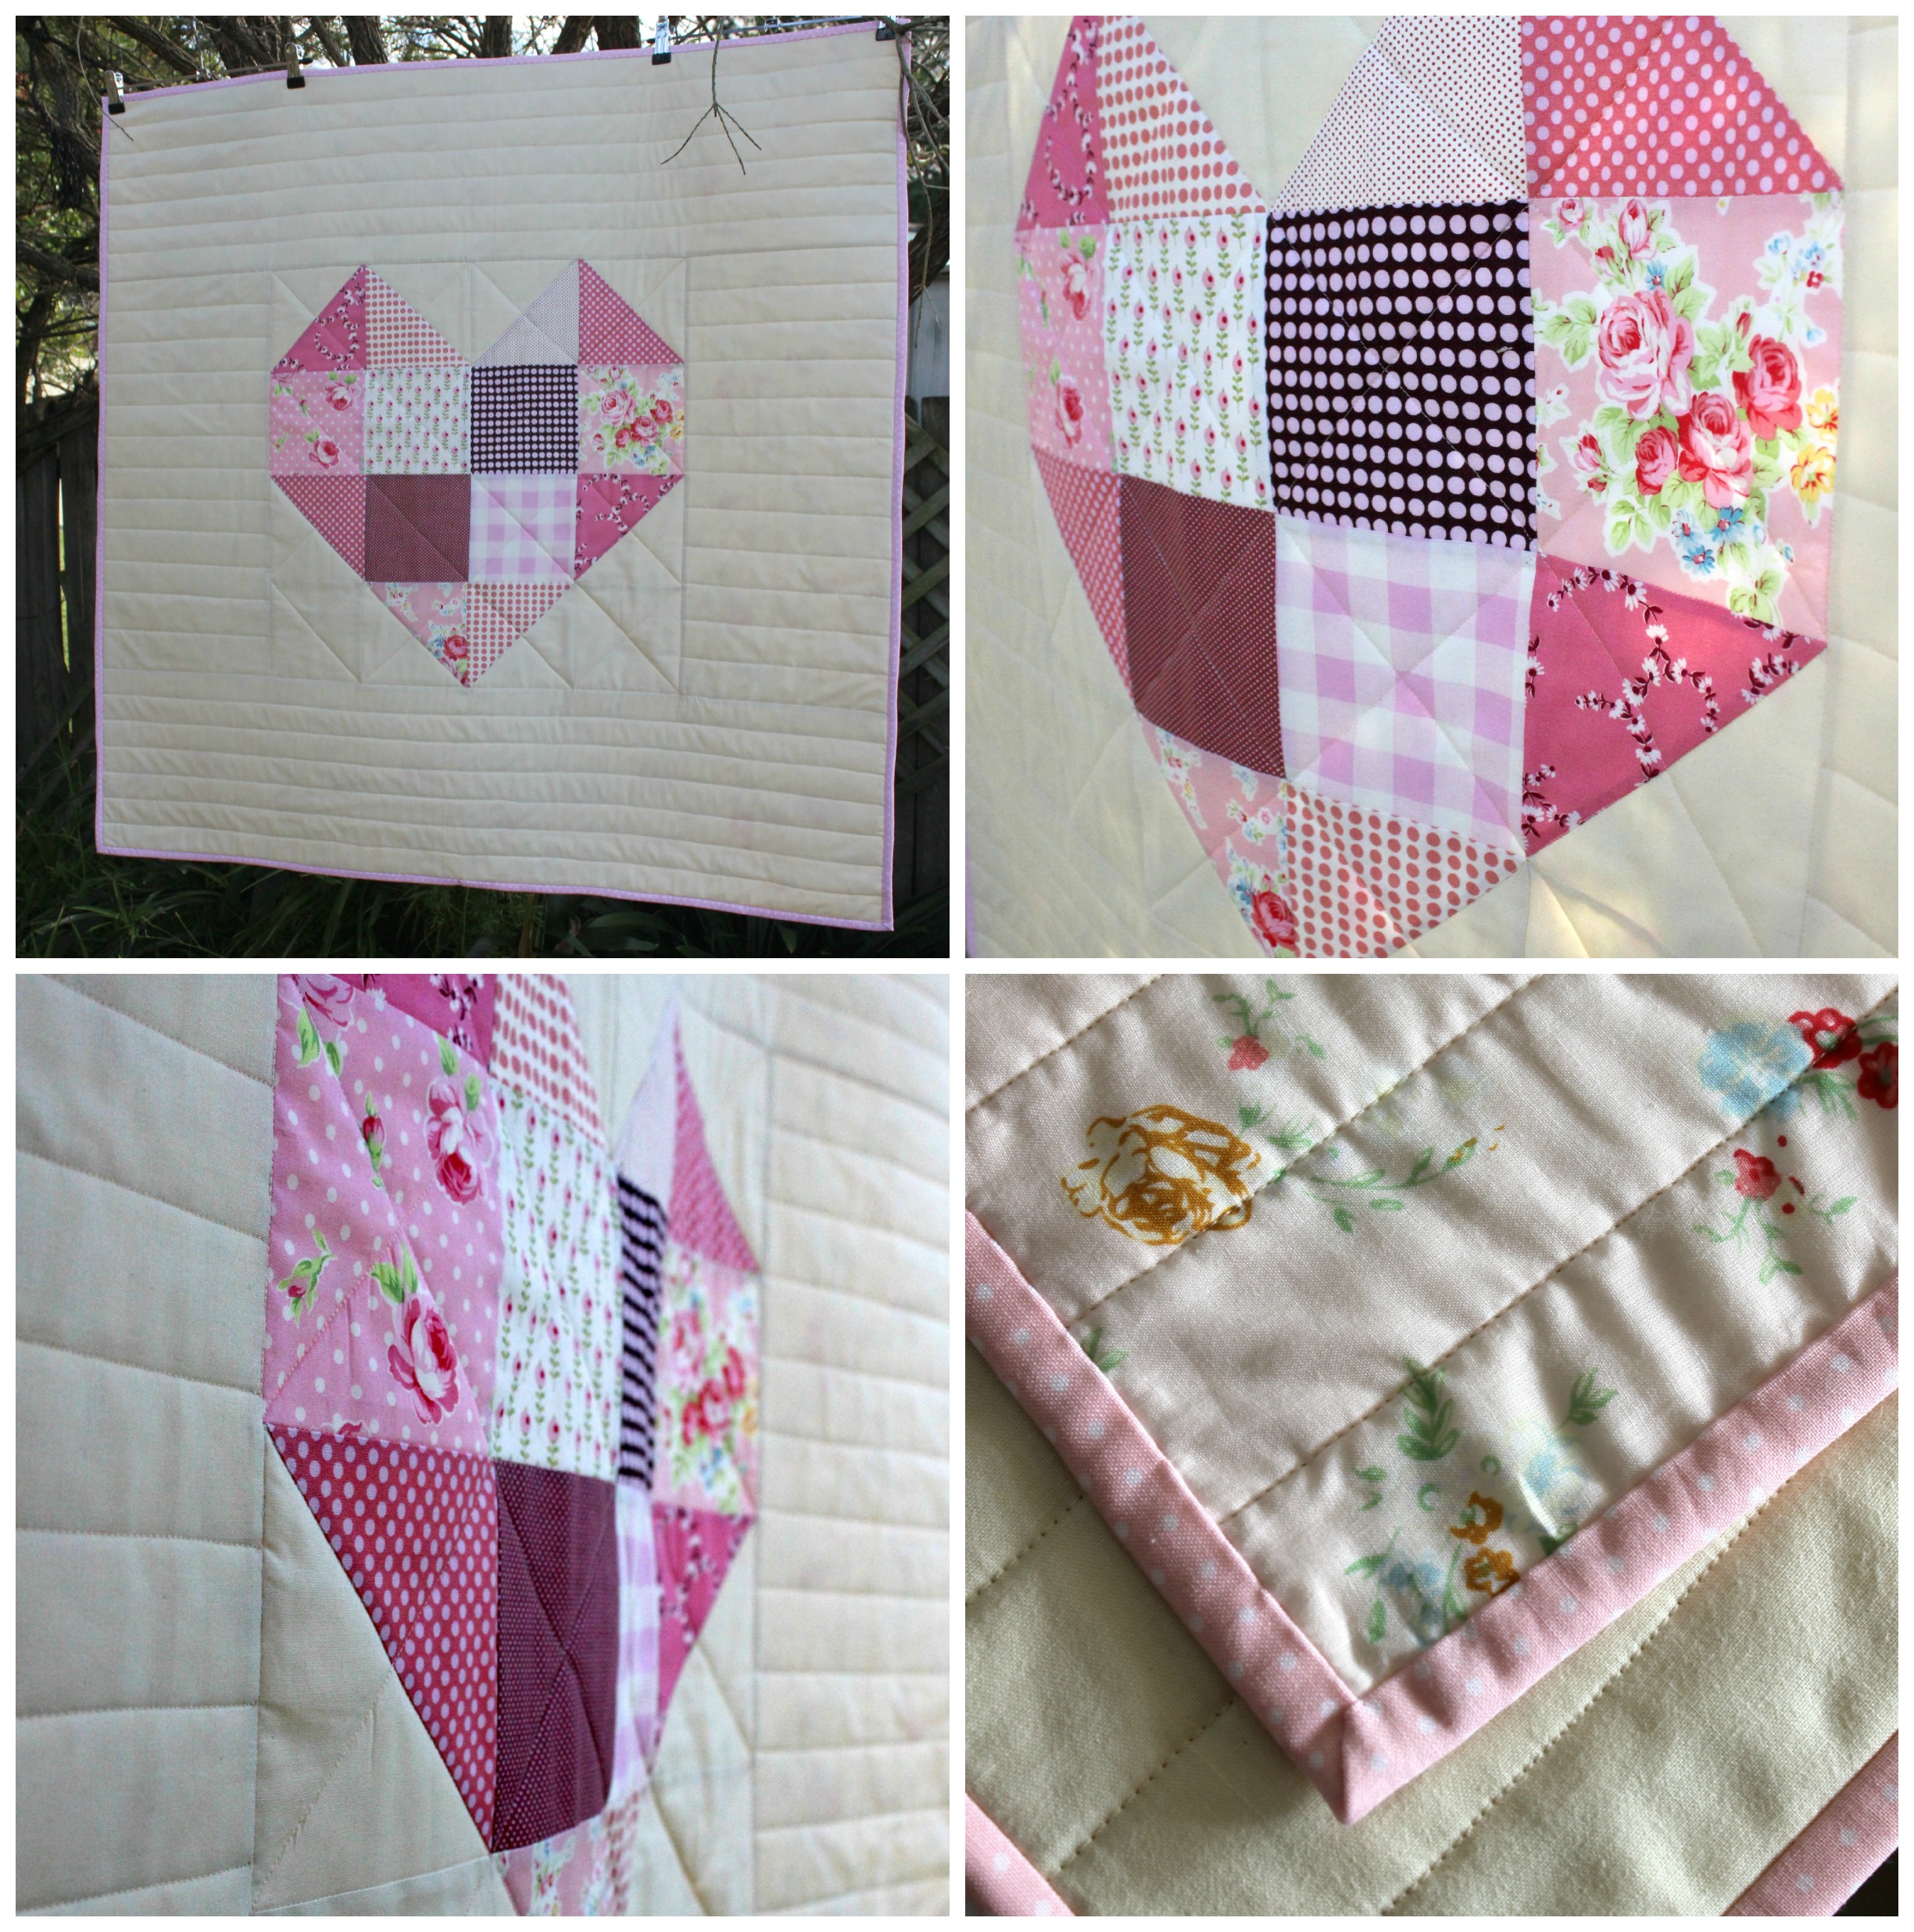
It’s still listed, waiting for the perfect buyer. Do you know anyone having a little baby girl soon? Perhaps this is what you’ve been looking for! (A little bit of promotion on my blog never hurt anyone, right?)
Another quilt that is currently under way is one I’m making for my niece who is due to enter our family in early December!
And here’s a little bit of trivia for you: one of the blocks in this quilt is the very one I made in my Bear Paw Block tutorial! Yep!
Embroideries: I’ve stitched a few more embroideries including this one which I made into video!
Little Purses: These little guys are always my best seller when I list them up onto my madeit store. They’re super easy to make and the design possibilities are endless!
I have quite a few listed at the moment if you’re interested… Unfortunately, they’re only available for Australian residents. Postage is insanely pricey for any international sales. You’ll find the postage will be more expensive than the purse itself!
Fourthly: Goals for the coming year.
I think one of the main things I want to achieve over the next 12 months is a steady growth in my sewing skills, gain confidence when it comes to teaching and filming for my YT channel as well as to take on opportunities that are given to me to develop my creativity and voice in the world.
There are also some big quilts I want to attempt too!
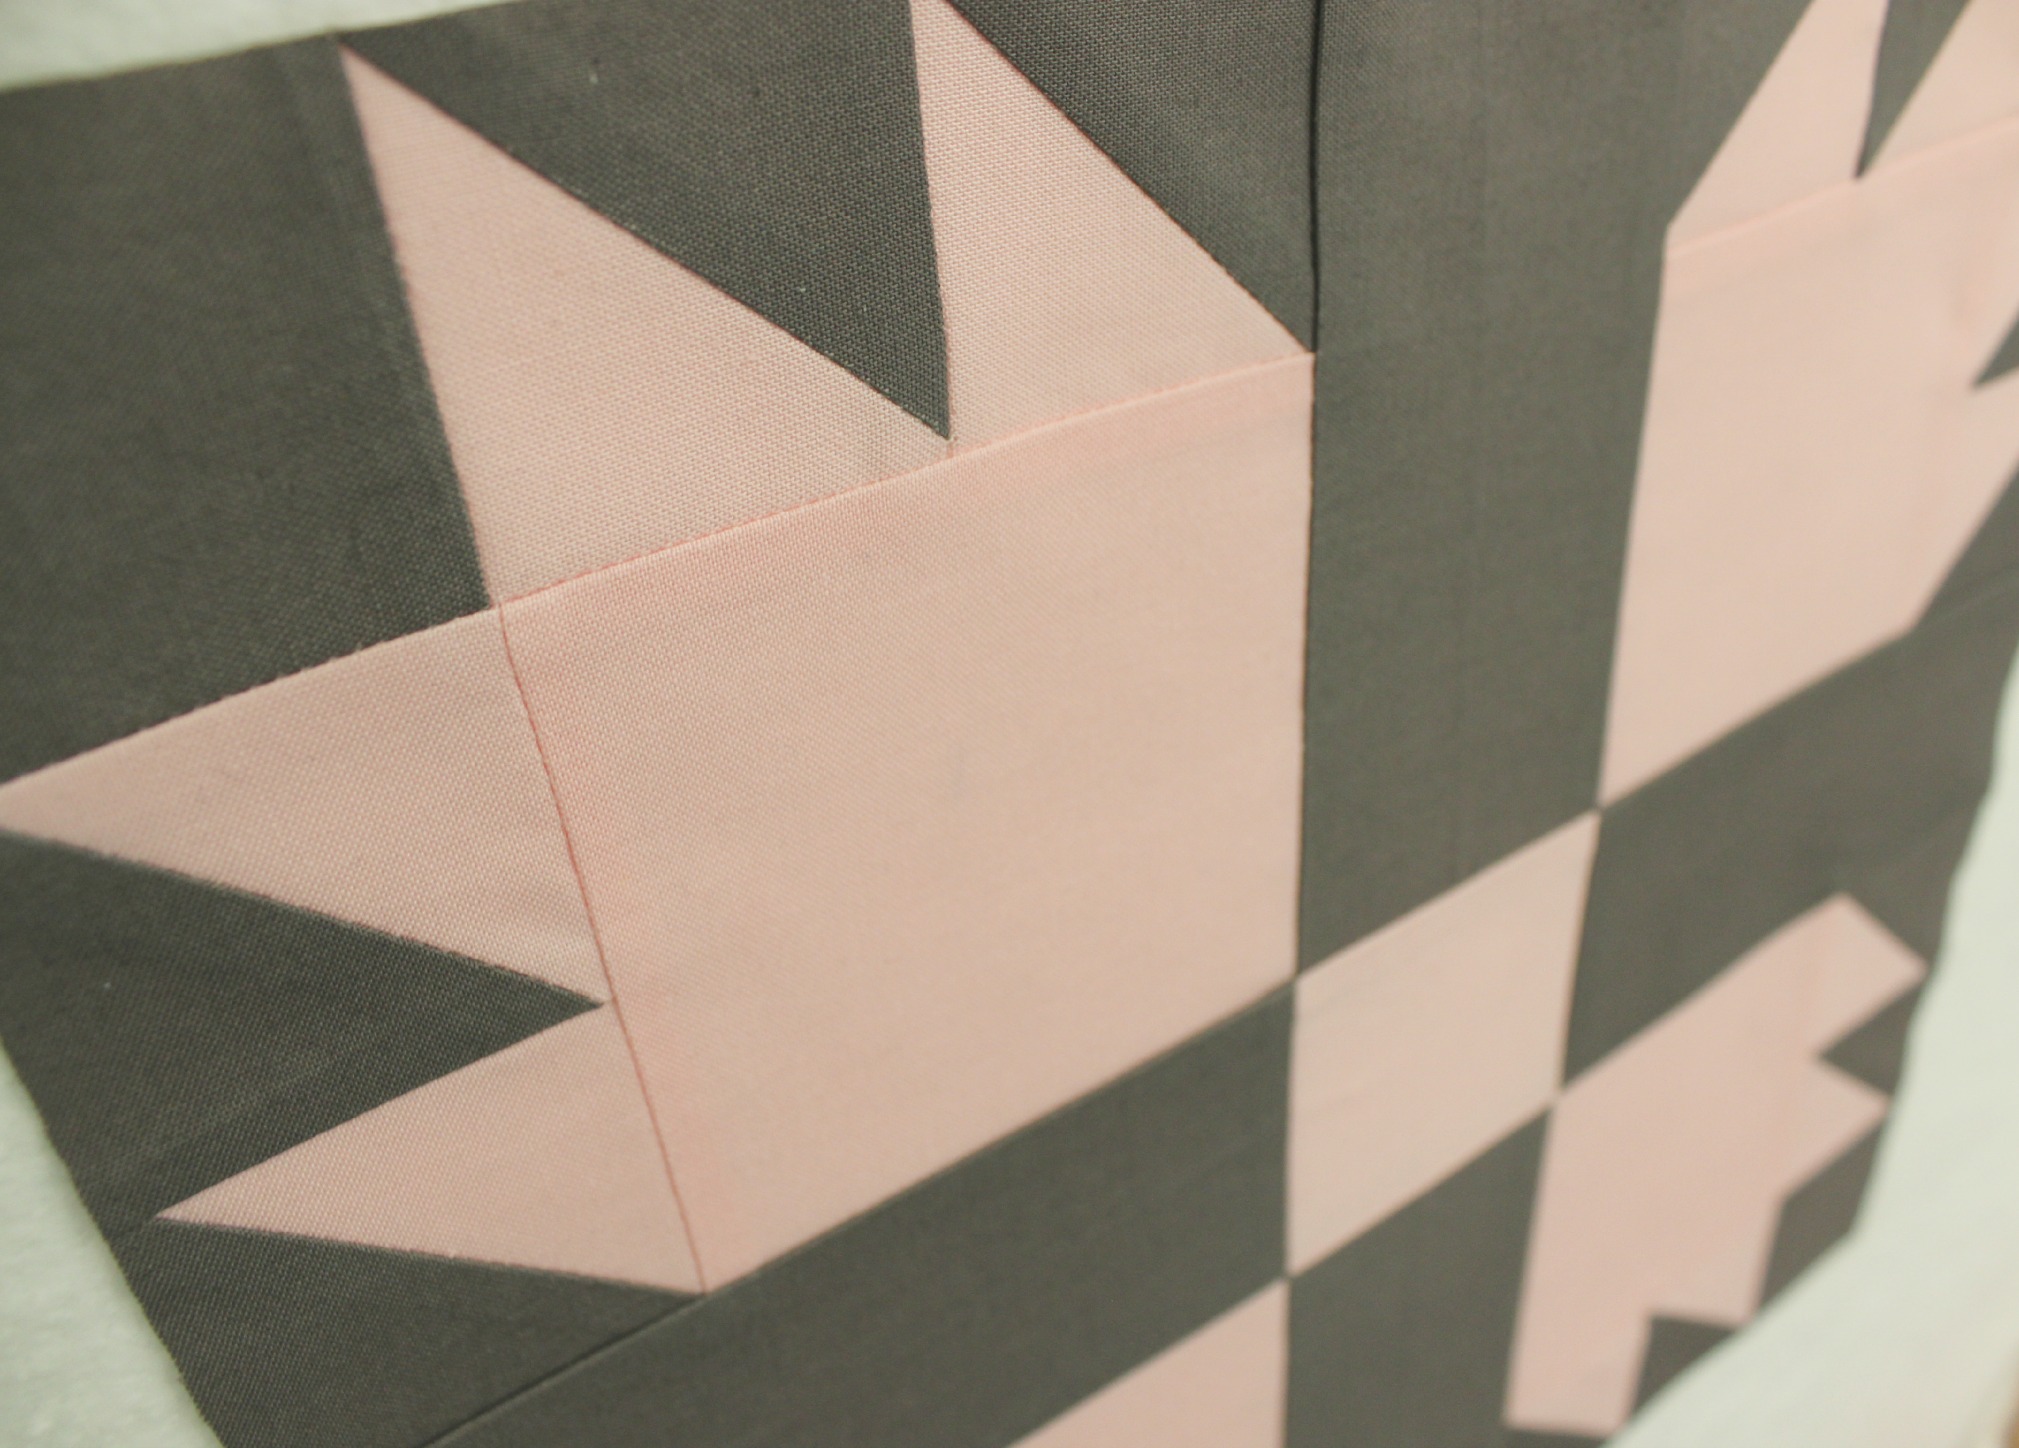
One being a hand-applique based quilt that will feature this design…
Sampling the planned design!
(I’m thinking of entering this into the 2015 Sydney Royal Easter Show if I finish it on time!)
I’ve always, always, always admired these quilts. The technical skills and patience to make this is incredible to think of! But, I feel that I could tackle a quilt of this magnitude and do a good job of it too! (Famous last words??)
So there are two quilts with some pretty intense types of skills that I’ll need to teach myself and hone but I’m ready for the challenge and ready for downfall! (If that happens, of course!)
So there is the year that’s past. Looking back over previous posts from this year, I’ve open up a lot about myself to you all (check this post out), have shared where I get my inspiration from, have studied a heck of a lot, re-joined the retail working-class and shared the lovely things I have in my life.
But lastly, to all of you who follow my blog in one way or another, I would like to thank you for your most wonderful support, for your always kind words of encouragement and for simply ‘liking’ my posts!
Every little bit of interaction from you (whether you’re just browsing or seriously analysing my every word) brings me immense pleasure and happiness! I truly am lucky to have like-minded people interested in the things I write, make and photograph.
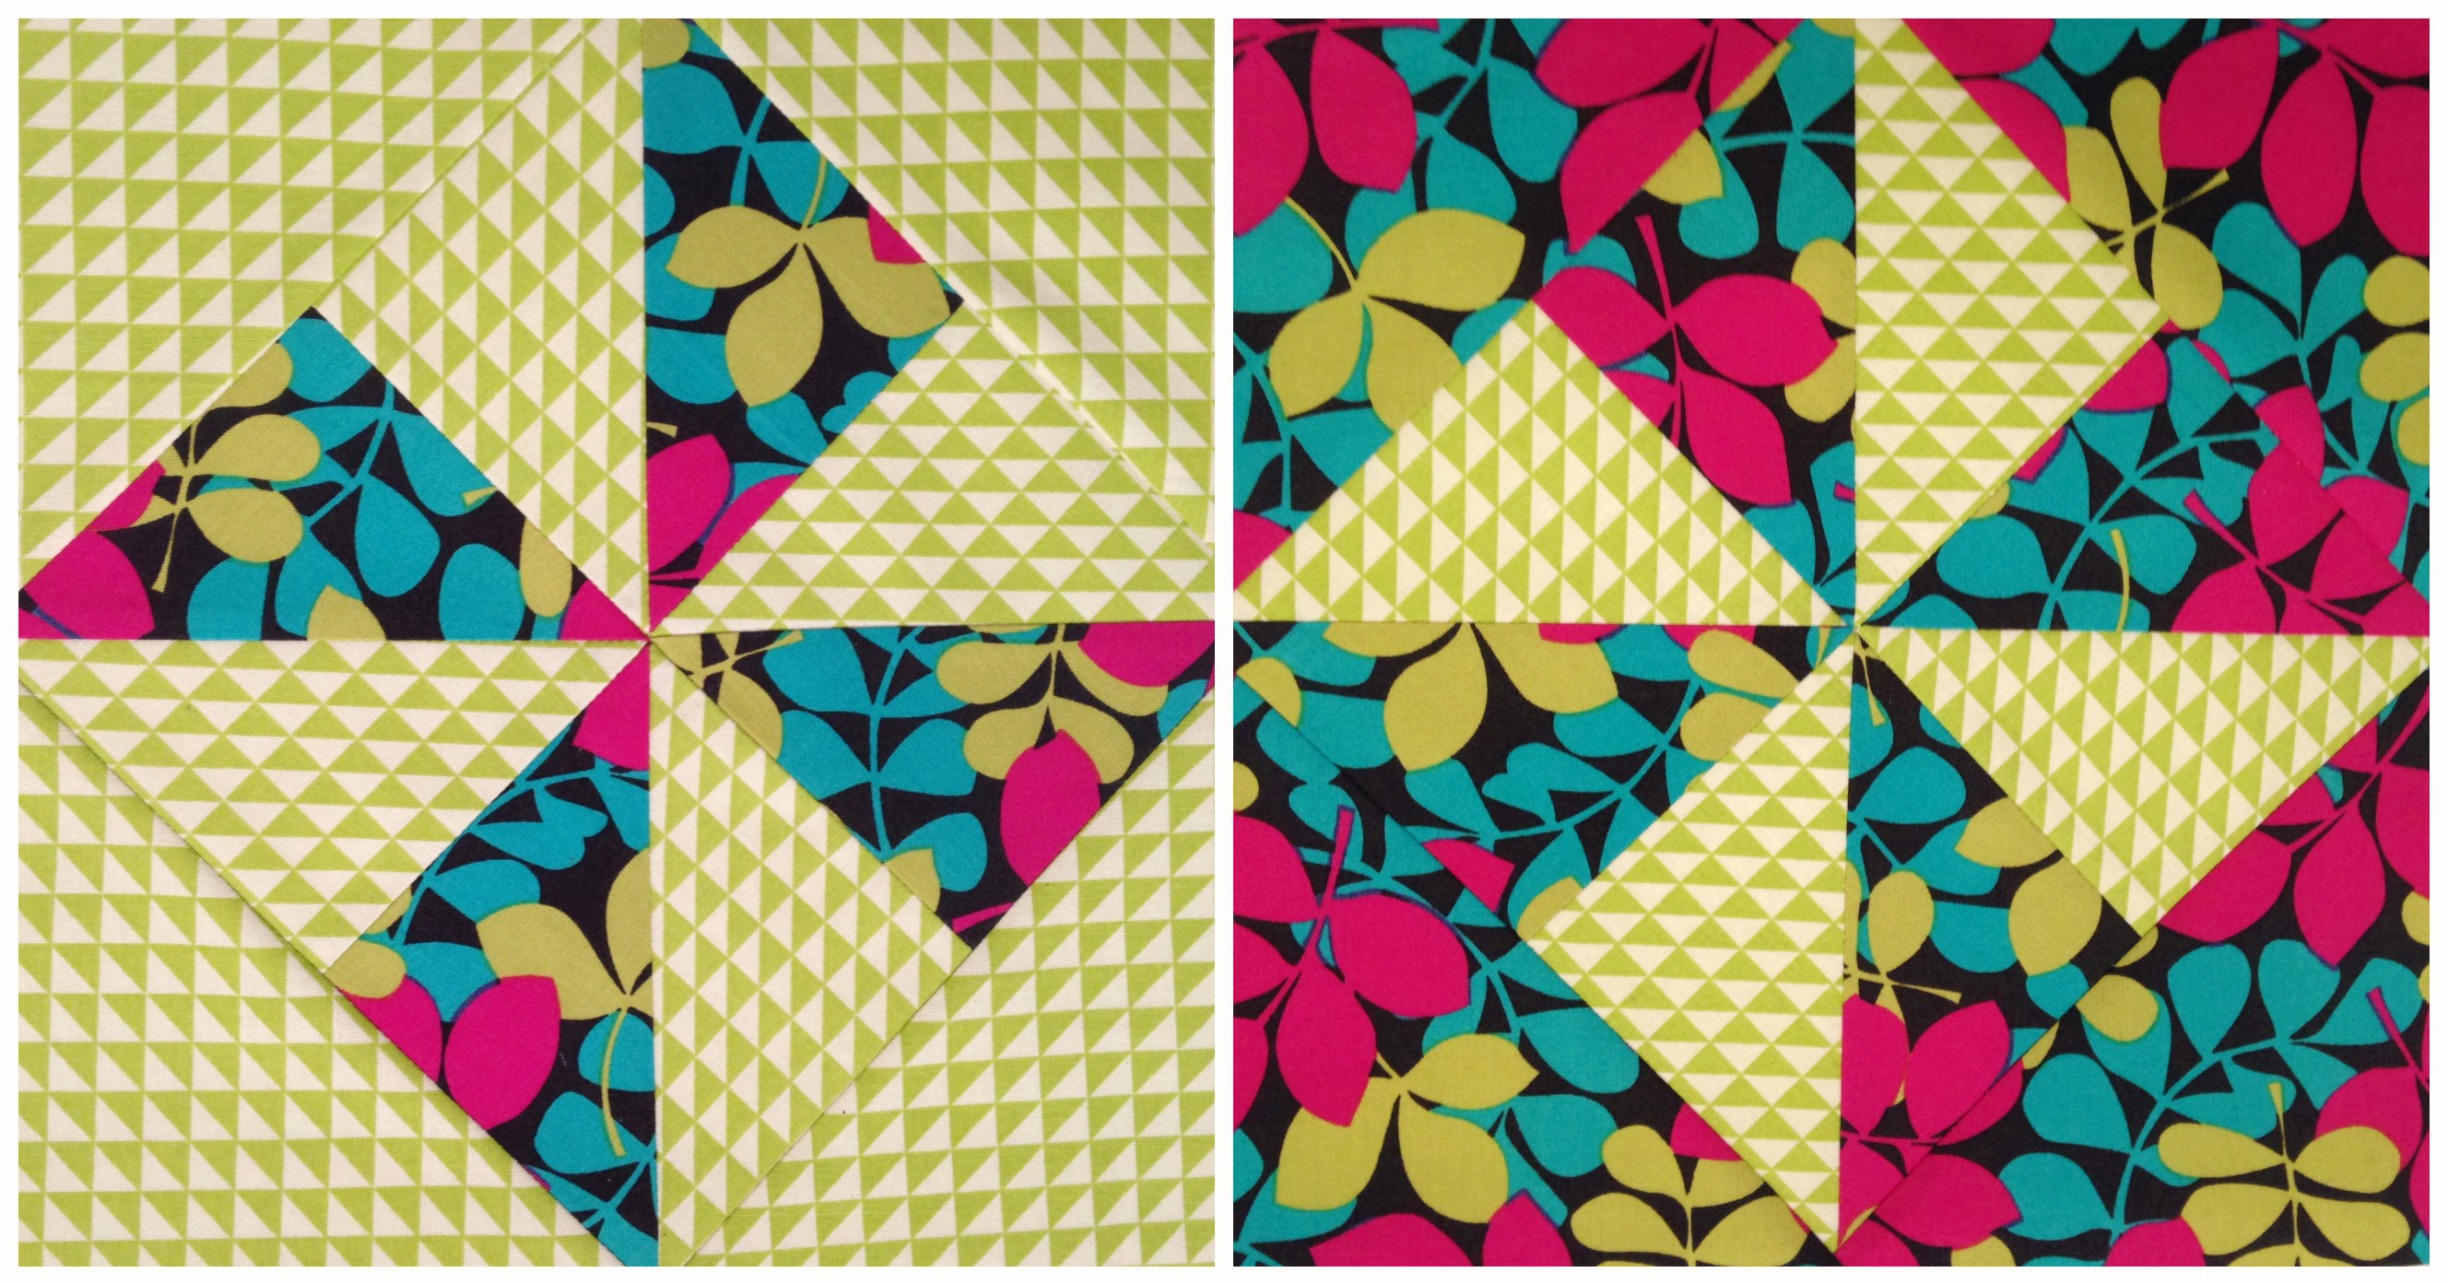
I thought it would be fit to dedicate this particular block to all of my friends (that’s you!) who live in the Northern Hemisphere who are welcoming the coming months of fall/autumn!
I hope you enjoy the cooler months!
#totesjealous
So this block, just like others I’ve demonstrated in the past, is super simple and is ideal for the beginner quilter who would like to stretch their legs a bit and give HSTs (that is, half square triangles) a go!
Learning how to make HSTs is an essential skill to learn if you’re serious about patchwork. It will become one of those knowing-how-to-write-without-thinking-about-it type skills that you’ll forever be falling back on again and again.
So if you feel unsure about making HSTs or just have no clue what a HST is, watch the tutorial and you’ll know!!
(PS. You can find all of the measurement and cutting instructions for this block at the end of this post!)
If I’ve inspired you to make this block, then here are just a few creative ways this block can be used to make a beautiful quilt!
Here are the links of where you can find the makers of these darling quilts!
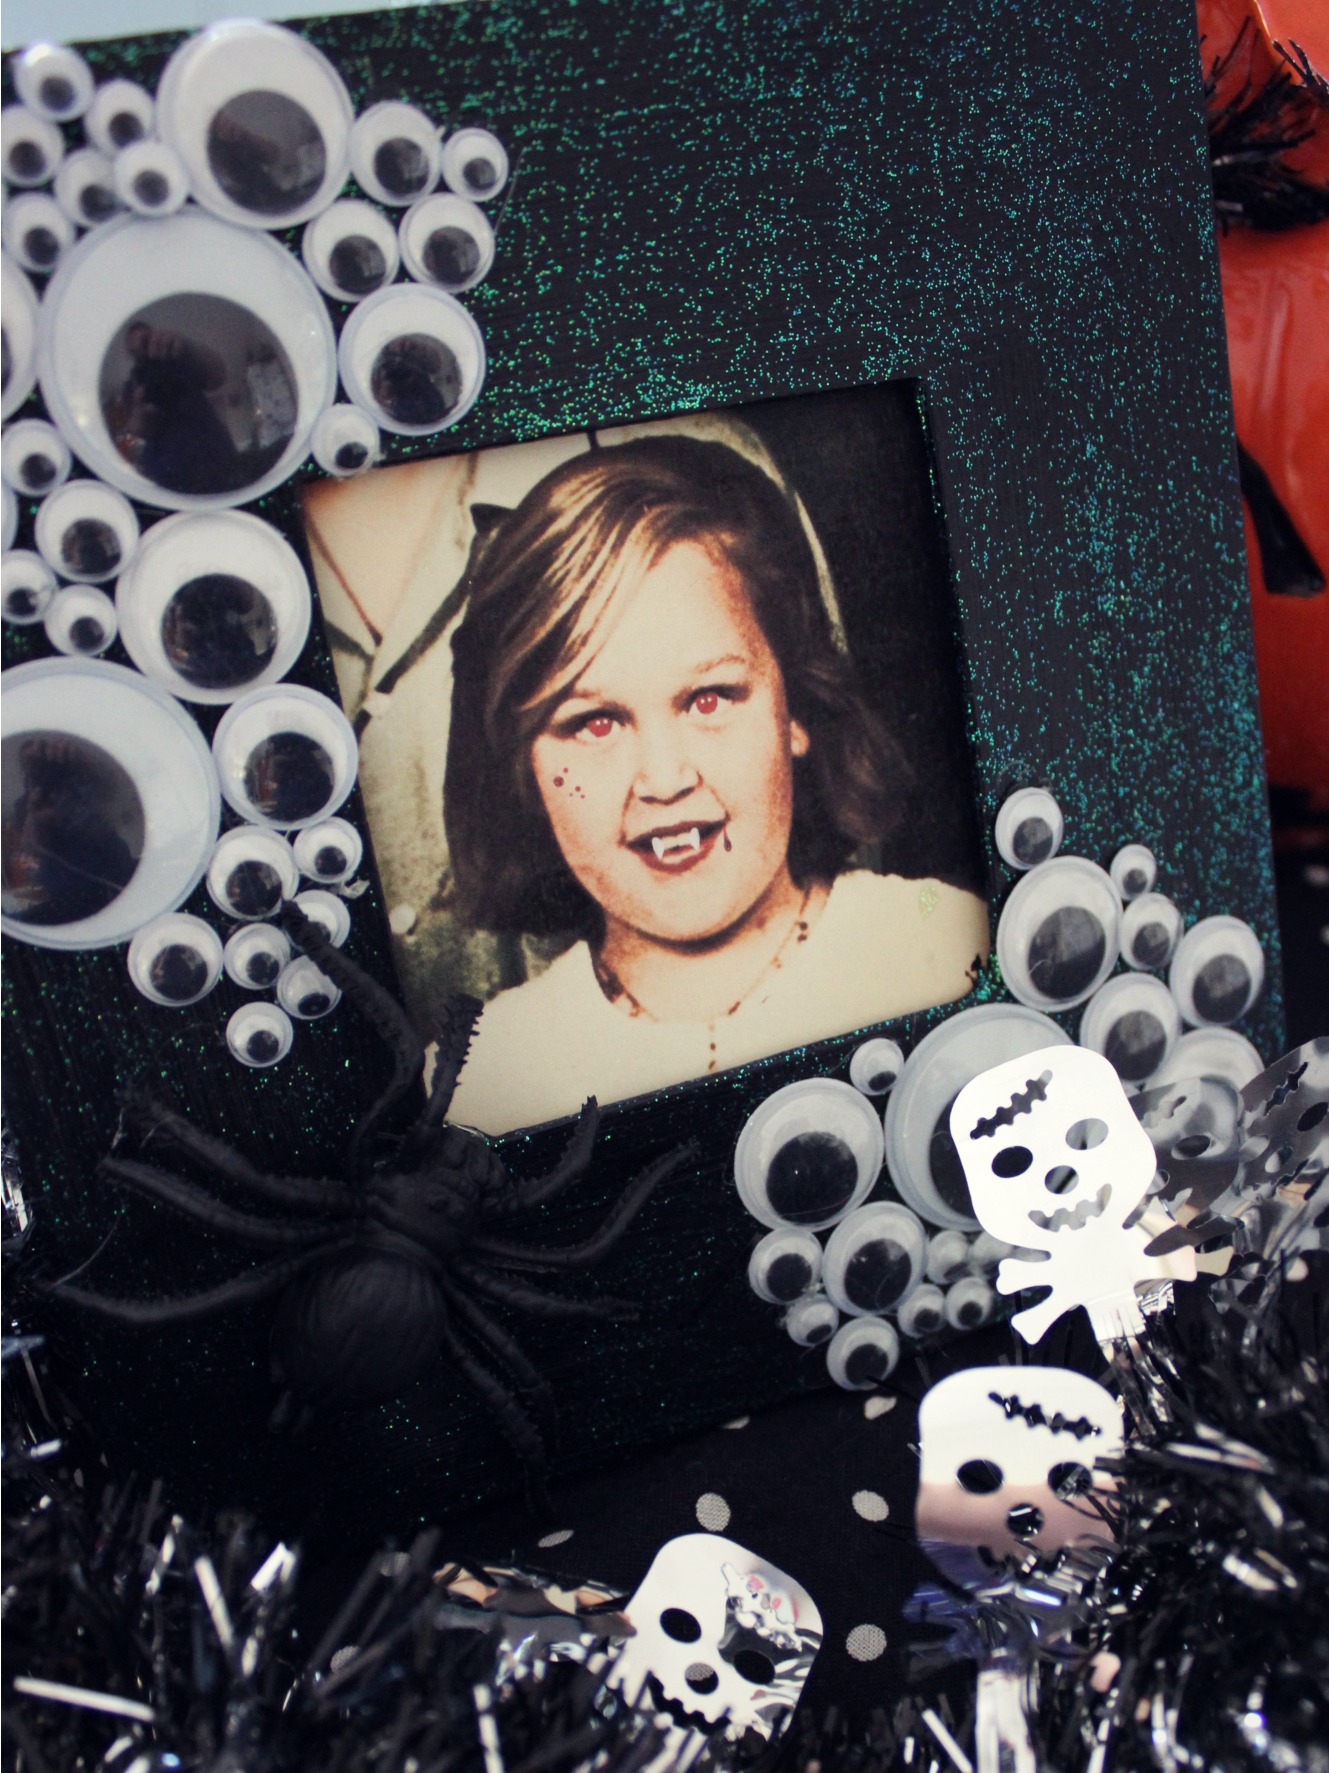
With Halloween just around the corner, I was inspired this week to make some fun little Halloween crafts to share with you!
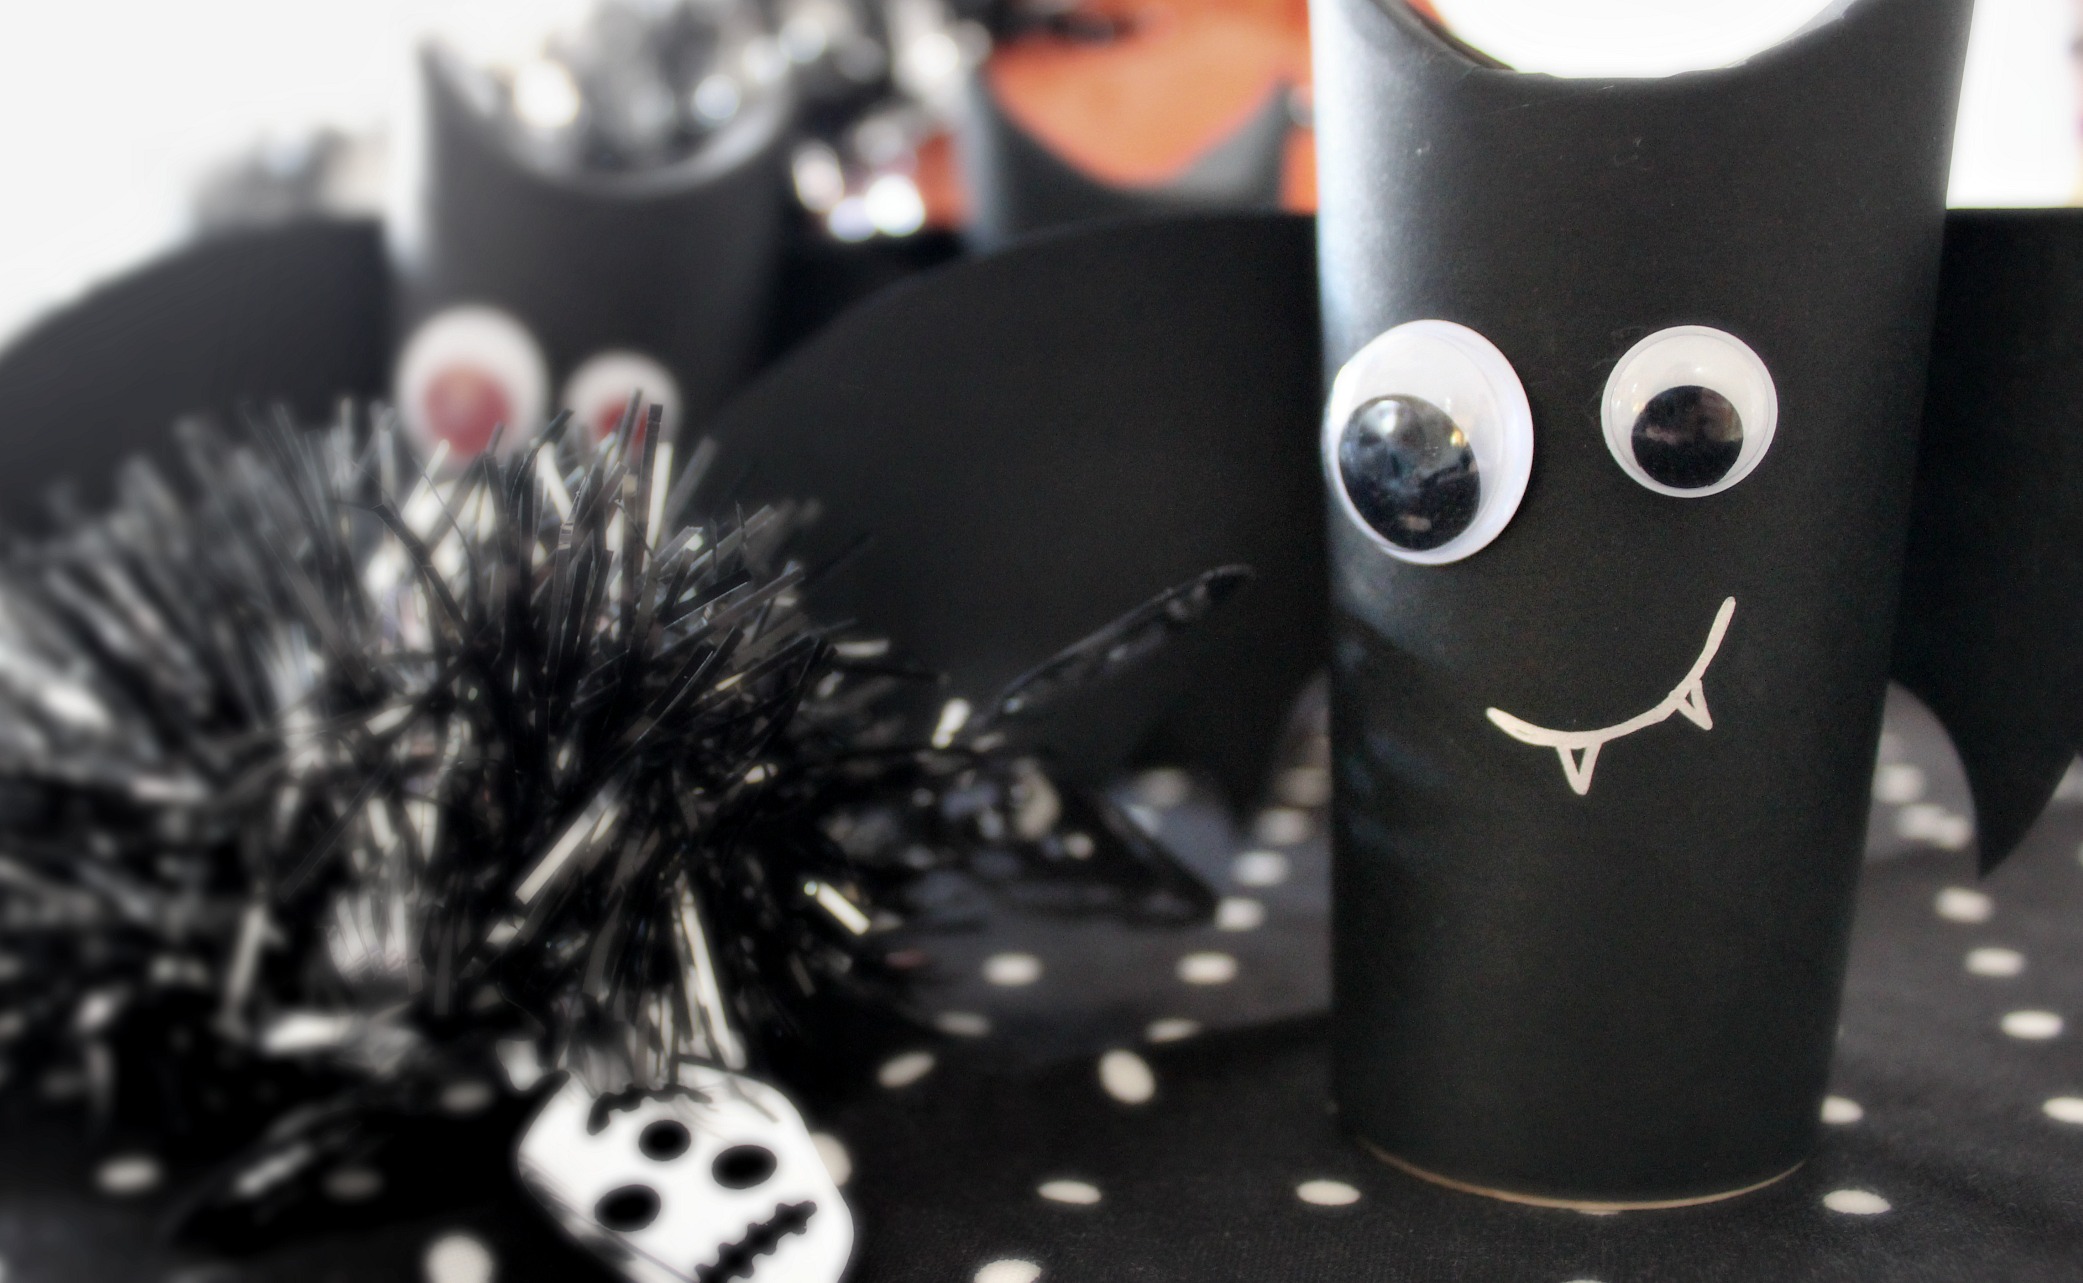
First are these adorable little bats made using toilet paper rolls.
These little guys are super quick to make and are perfect for little hands to get involved in!
To make you will need…
– Toilet Roll – A4 Black Paper – Craft Glue – Two Google Eyes – Silver Metallic Pen – Lead Pencil – Paper Scissors
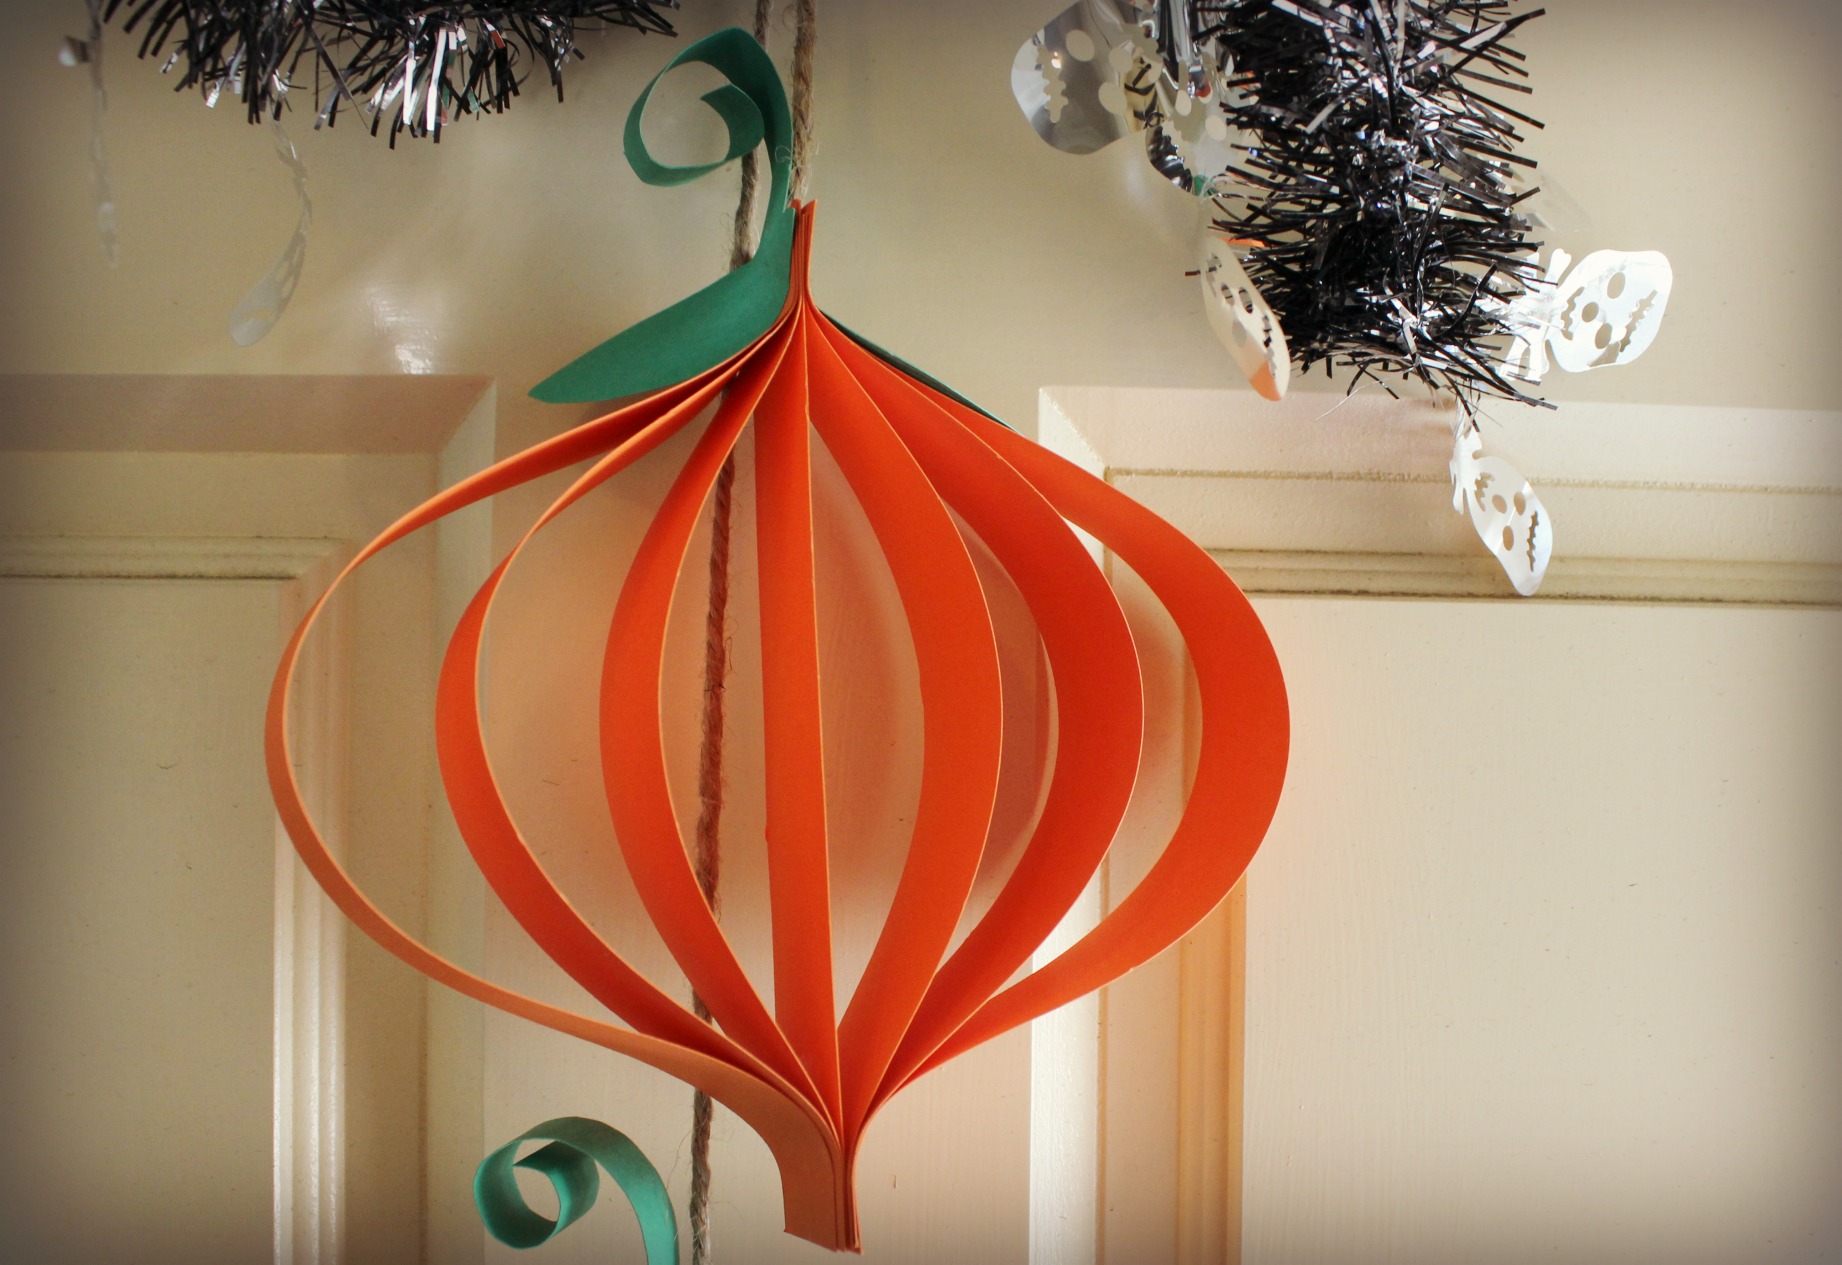
Next, is a really simple and very easy paper craft: Paper Pumpkins!
They remind me a lot of those paper lantern decorations you’d make in primary school for Christmas, but this time your using the more traditional colour of Halloween – orange!
To make you will need…
– One Large Sheet of Orange Card – A4 Green Paper – Craft Glue – Two Bulldog Clips – Twine/String – Paper Scissors – Stapler
This next one is my favourite. I think it’s a whole lot of fun and is simplistically effective!
The photo used in this Google Eye Photo Frame is of me as a little girl which I altered using PicMonkey, making me look like a scary Vampire girly thing.
To make you will need…
– Plain Photo Frame – Spooky Photo – Black Paint – Glitter Paint (Optional) – Paint Brush – Assorted Sizes of Google Eyes – Hot Glue Gun & Glue
And lastly, I made a Witch Hat Headband! Using simple materials such as felt, cardboard and a party hat, I’m really happy with how this turned out. The idea was in my head and the result is perfect! (Well, near enough!)
To make you will need…
– Party Hat (minus the elastic) – Two A4 Pieces of Black Felt – Pre-made Headband in Black – Black Cardboard – Ribbon and Decorations – Hot Glue Gun and Glue – Craft Glue – Craft and Fabric Scissors – Lead Pencil – A Plate (18cm or 7″ in circumference)
For instructions on how to make all of these crafts, check out the video at the beginning of this post!
Enjoy making…
&
Happy Halloween Friends!
PS: This is where I found my inspiration for these projects…
About this title:I had a plan today to sit down and dedicate some time to my blog (I know, it’s been a while…). But at the same time, my TV decided to air a Friends marathon… even though I’ve seen all of the episodes like a gazillion times!
So due to a not-to-be-missed marathon and the need to get some blog posts written, I’m currently sitting on my couch binge watching Friends and typing this post in the ‘notes’ app on my iPad. The title of my note reads ‘New Note’ and I liked it.
Hence the title: A New Note….
Yes.
Well, anyway…
As much as this blog has been neglected over the past couple weeks, my sewing and patchwork adventures haven’t!
There’s just so much to catch you up on it’s hard to know where to start…
Hmmm…. How about here…
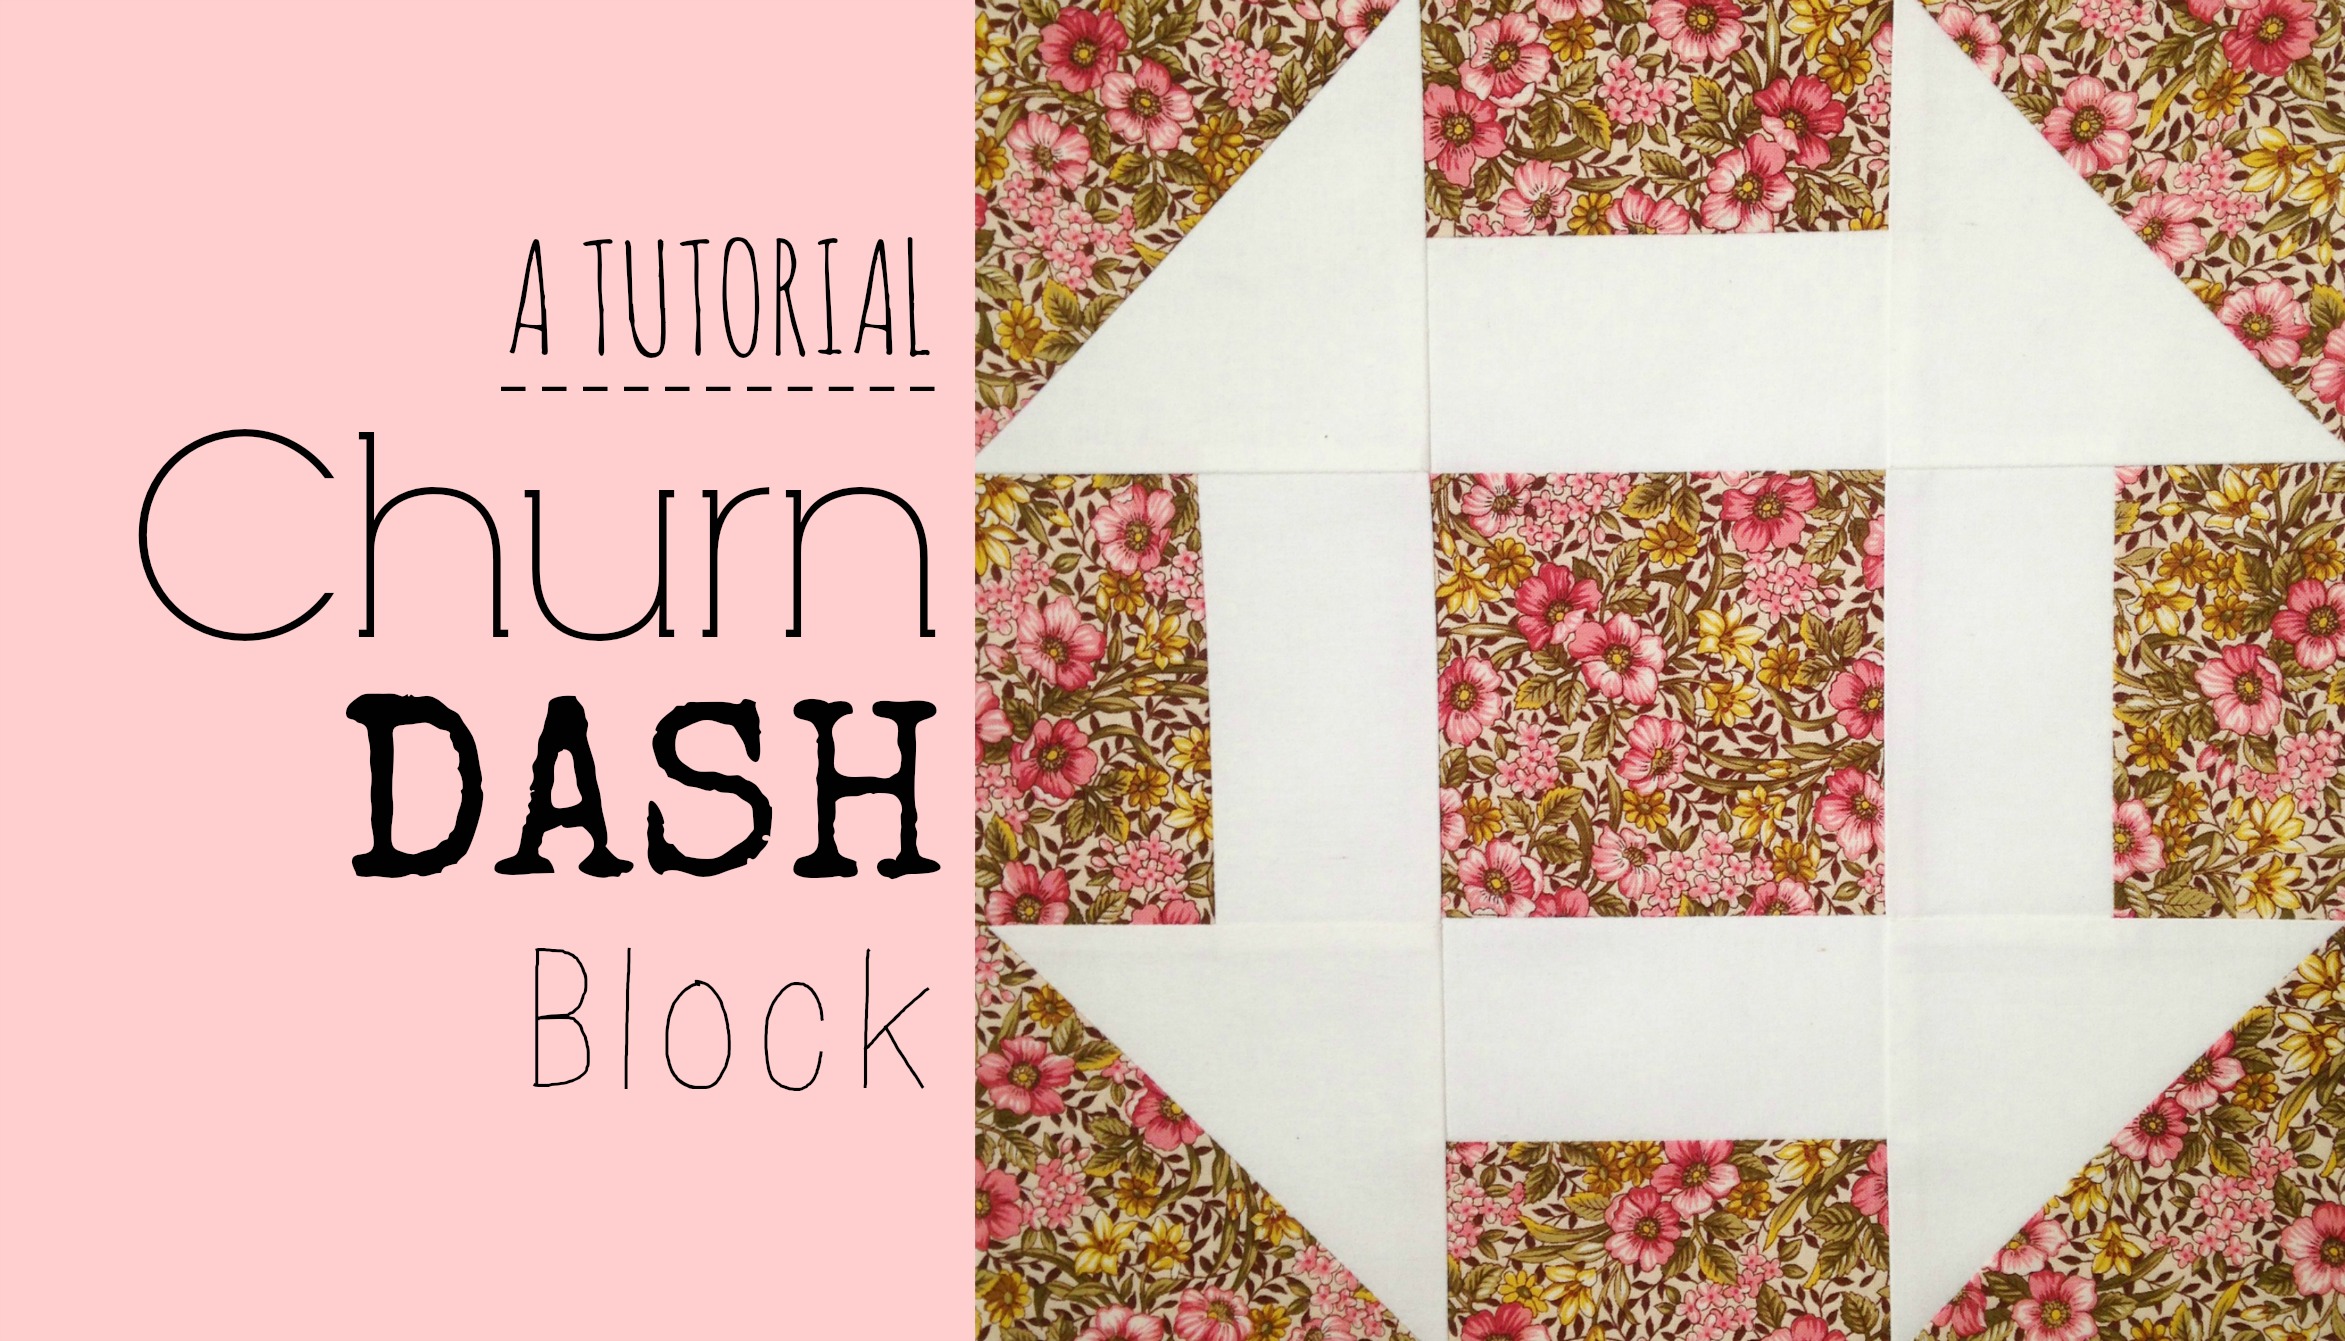
My last post was all about my latest Quilt Block Video Tutorial – the Churn Dash Block!
Simple, quick and effective! Perfect for beginners!
Video Thumbnail
I really think you should check it out! (But only if you want to, of course! No pressure!)
Next!
One afternoon, about a week ago, I was bitten by the ‘Cutting Bug’.
Da-Da-Daaaa!! *imagine sinister movie music*
You know the one I’m talking about; where you’re suddenly taken over with an urge to start cutting up some fabric and begin piecing together a quilt just for the heck of it.
I’ve always had a craving to do one of those simple Cross Quilts where they sort of all joined up together…
Find links to each of these quilts at the end of this post!
So in about an hour, I had cut 100 5inch squares from random fabrics that I thought looked good together and hey-presto, a new quilt top is currently (albeit slowly) being pieced together!
Once finished, I think it’ll become a really sweet lap quilt – suited for watching Friends marathons and writing blog posts on the couch! Te-He!
Another sewing adventure happened this past weekend when I helped host a Quilting Expo Day at my local Spotlight store. It was a fun day, as usual, where I got to teach, demonstrate, chat, sew, laugh, eat and be inspired by others.
I made simple blocks and projects that featured basic patchwork elements like cutting and piecing, making HSTs, pressing and chatting about all the different tools that can make the experience a whole lot easier (and fun!). I also had the opportunity to make and swoon over this Piccadilly DS Quilts Fabric range! Oh my!!
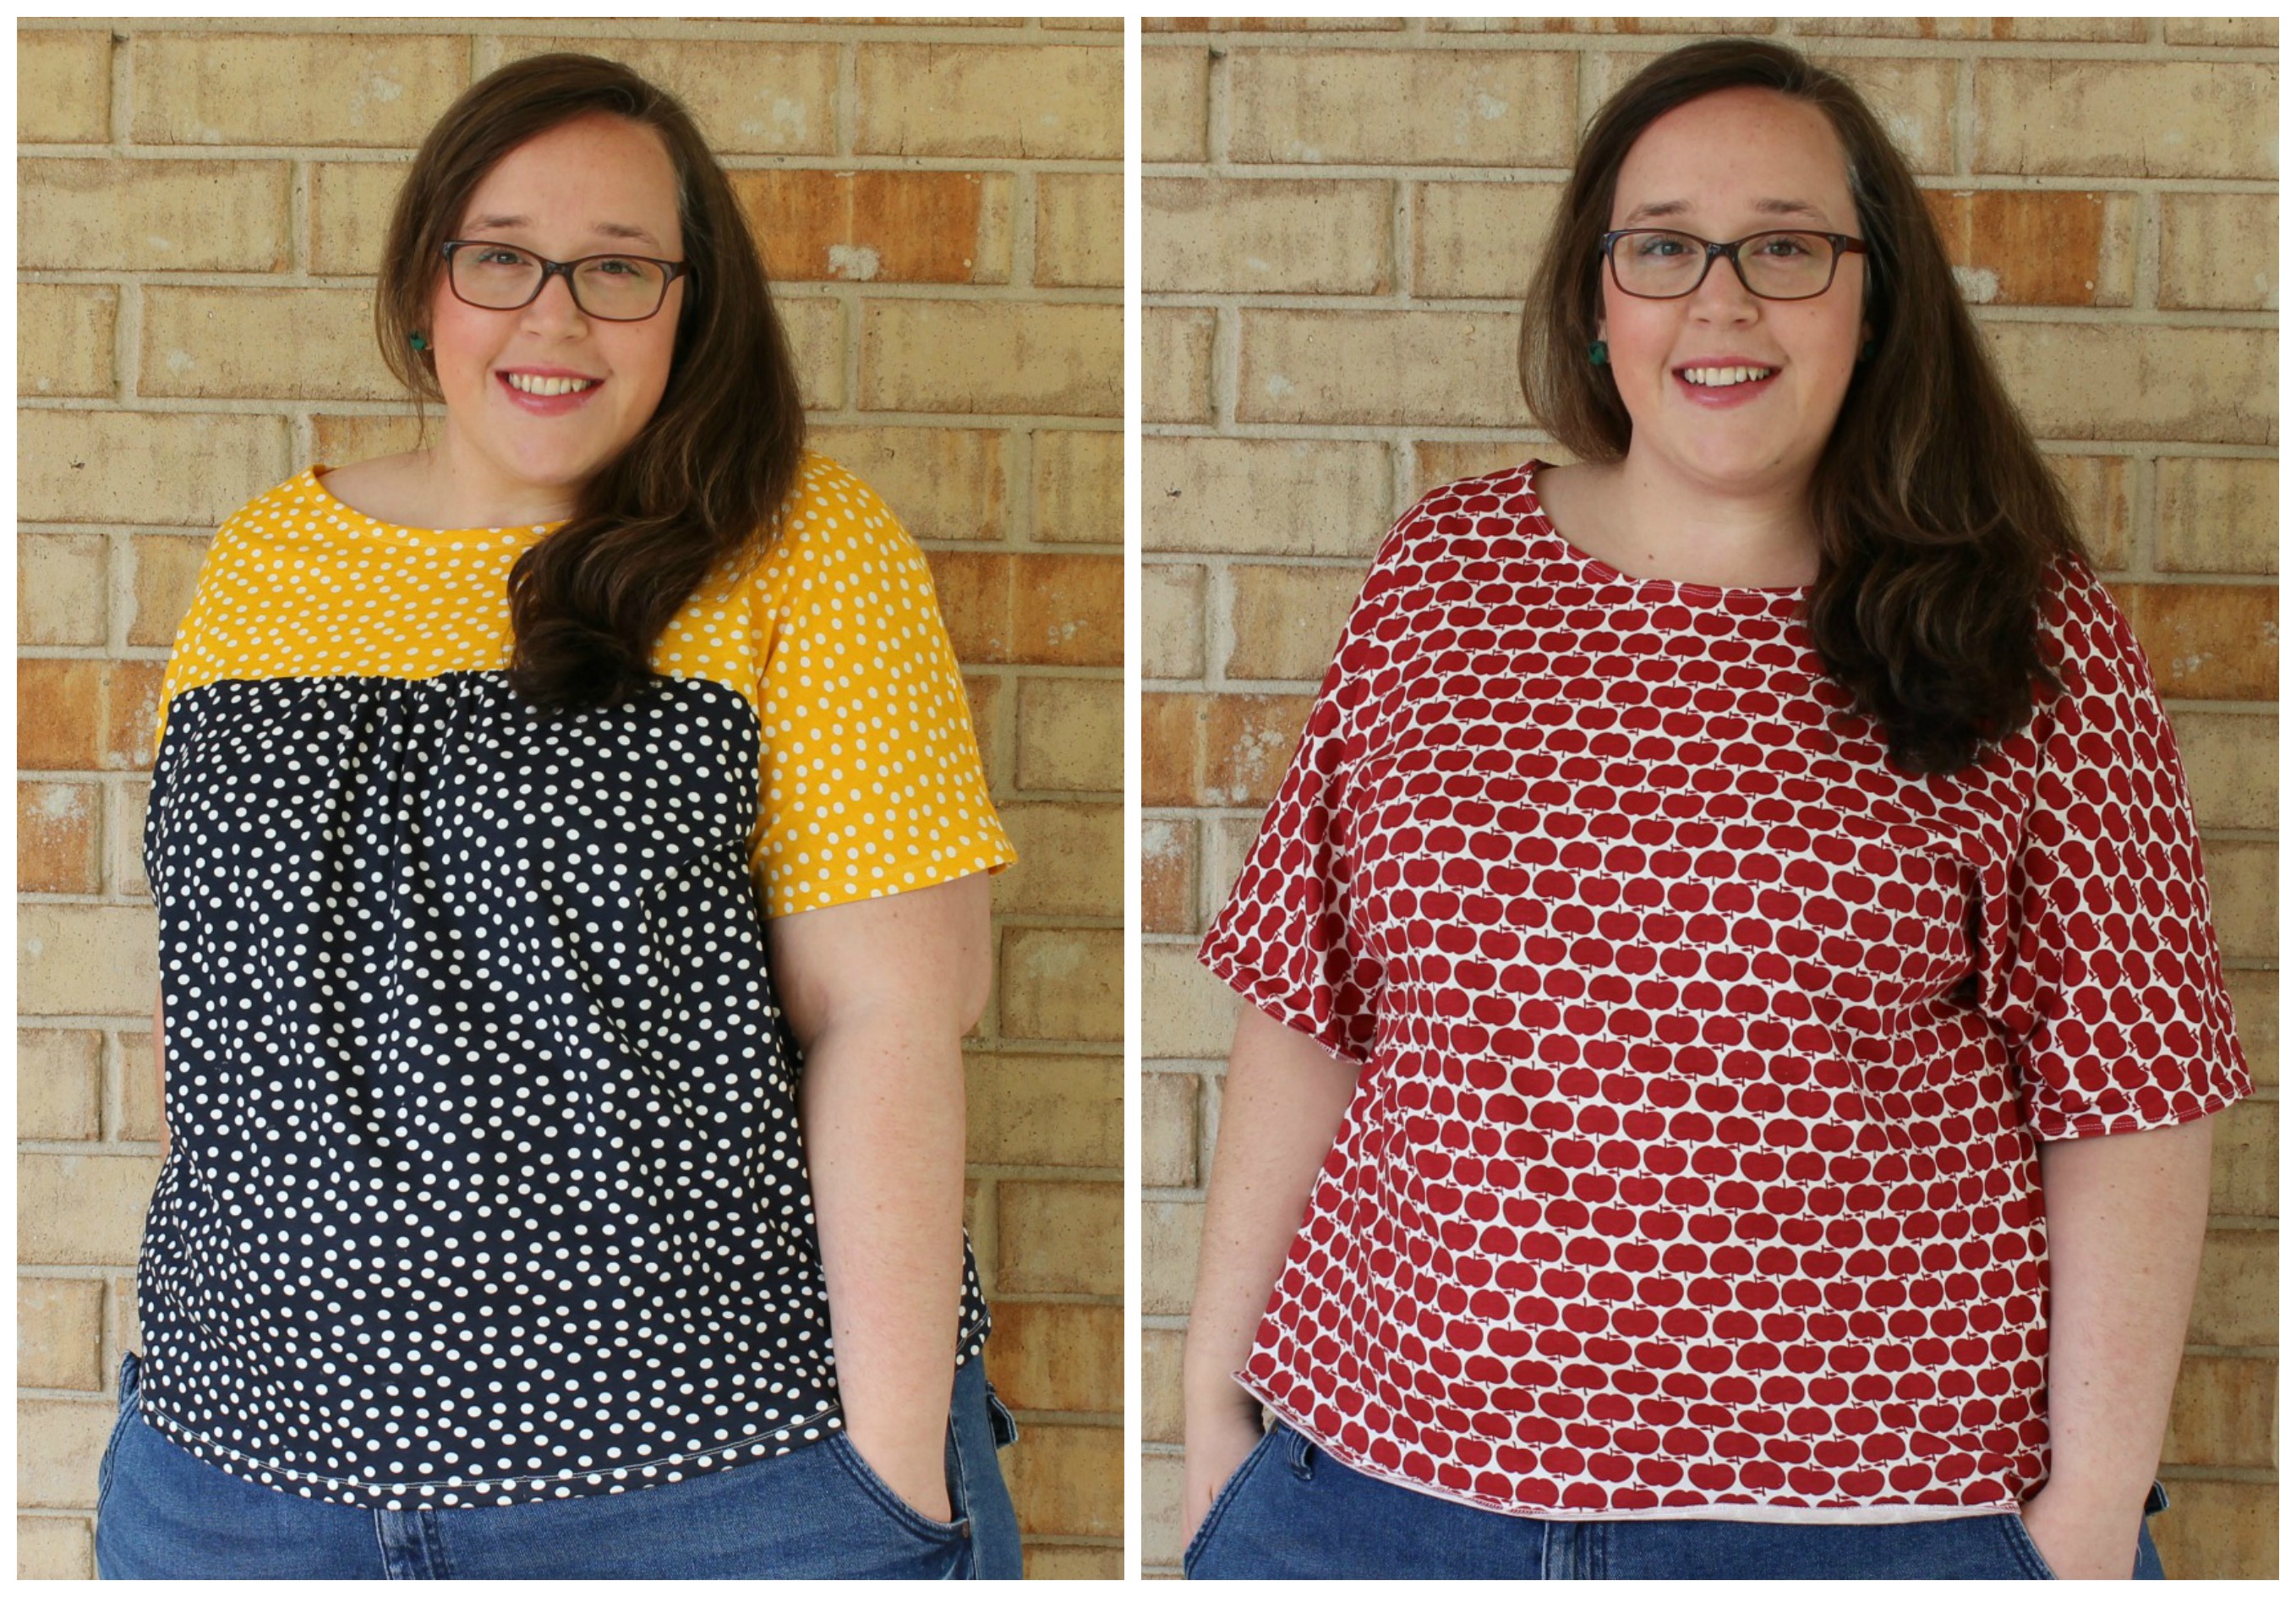
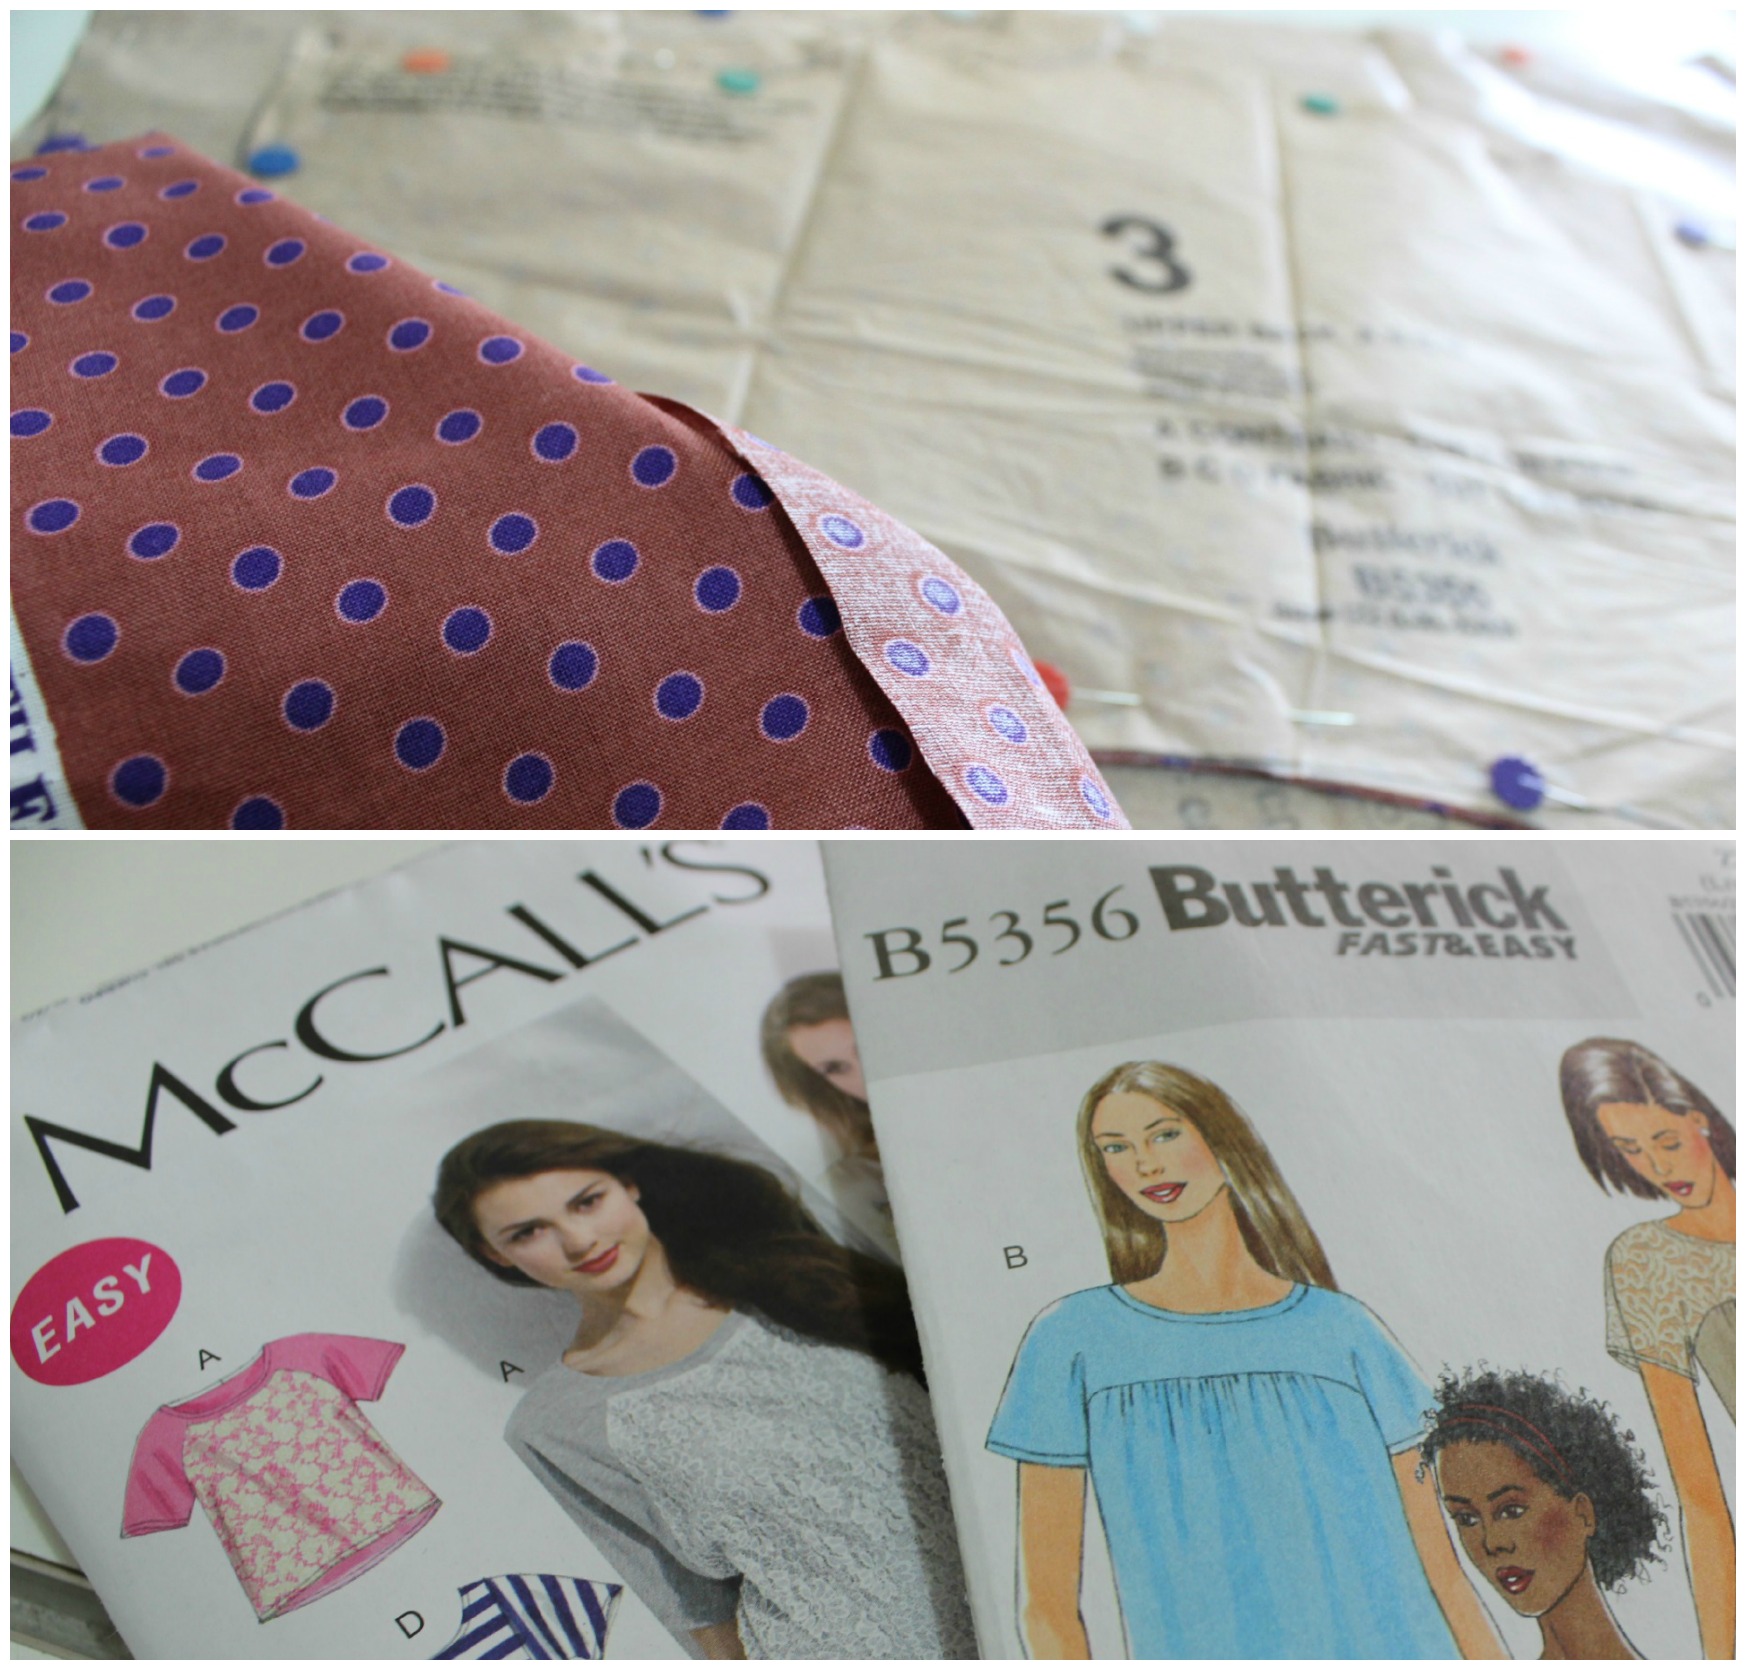
And lastly, over the past few days I’ve been dabbling in a spot of dressmaking!
#quilterturneddressmaker
I’ve been searching for a while for some basic t-shirt patterns and was able to find some perfect ones while I was at Spotlight on the weekend! Whoo!
So I bought some fun printed cotton knit fabrics and got going the next day!
I’m so happy with how they’ve turned out!
So happy that I’ve actually cut out my third pattern, but instead I’m using a lovely cotton weave spotty fabric that will make (I think) a really beautiful blouse.
In recent Pinterest binges, I’ve happily come across some beautifully designed and pieced quilts featuring the Churn Dash block.
Links to these quilts are at the end of this post.
Then by crazy chance I came across a simple pattern on how to make it within all of my lose-leaf patterns that I’ve collected over the years.
So duh! I just had to share it with you in tutorial form!
It really is ridiculous just how easy this block is construct! Before you know it, it’s done!
The other thing I love about this block is how easy it is change up….
Simply replace the centre square with the opposite fabric and then turn all of the blocks’ units 180degrees and you have a totally different looking block! Love it!!
I’m also kinda in love with the floral fabrics I’ve used. The patterns remind me a lot of the old tablecloths, dresses and skirts my mum inherited from her aunties! Again, love it! So adorably kitsch and retro!
Let me know if you’re planning on giving this block a go! I would absolutely love to see how you interpret this block and see the types of fabrics you use.
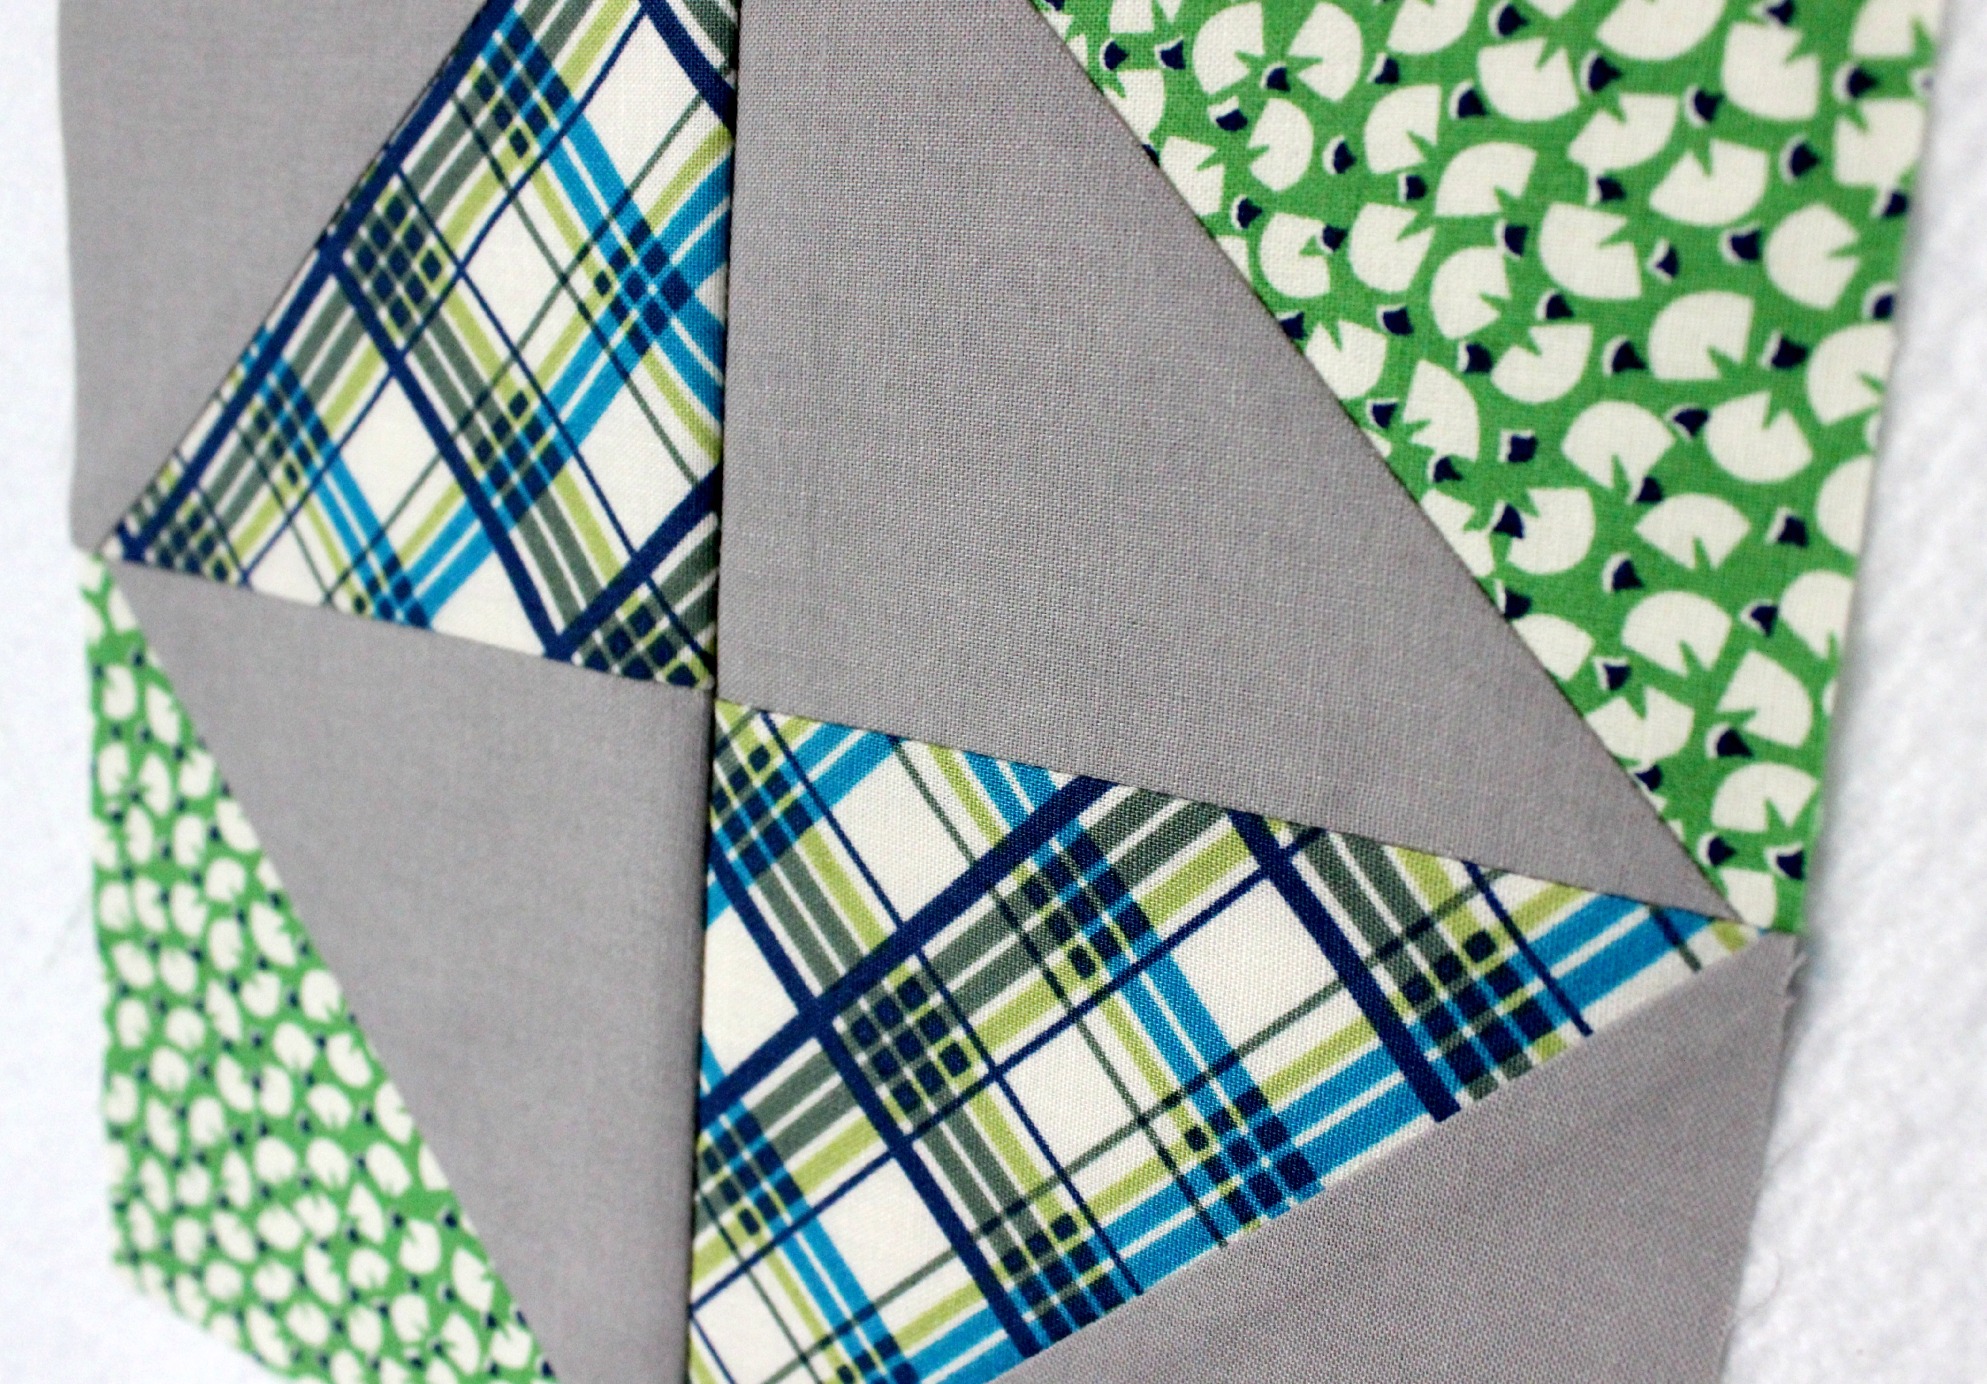
I’ve always had a bit of a soft spot for this block…
Perhaps it’s because it was one of the first ‘traditional’ blocks I ever constructed. (And come to think of it, I’m pretty sure it was one of the first times I ever made half square triangles!)
So, in a bid to mix the traditional with the modern (one of the things I love best to do in my quilting practice), I hovered over to my quilt book library and dug out this book. Full of simple and oh-so-delightful patchwork blocks, I found the one that I wanted and adapted it for this little tutorial.
Next came finding the right fabrics that would help make the unique design of the block stand out. In the end, I chose to construct the block using two solids – pink and grey – both so scrumptiously modern! LOVE IT!!
(Looking for the measurement & cutting instructions? Click of the PDF link at the start of the post and there they’ll be!)
Trailing off on a side note: some of you might not know that this December, a brand new little baby girl will be arriving in our family! No, it’s not me – I’m not pregnant… But my brother and sister in-law are expecting their fifth child after having four glorious boys! So this means, I can finally get into my pink cutesy fabrics and make something so girly that you’ll become so clucky you’ll want to have your own little baby girl!!
😀
But anyway, I’ve casually been on the lookout for a quilt design to make for my new niece and I’m quite sure I’ve found it in this little tutorial!
I am so simply in love with these two colours together that I almost feel a little uncomfortable by it… They don’t seem to over dominate each other; they quietly sit side-by-side, emitting a beautiful message of unity and history so much so that it almost makes me feel a bit teary! (Or it could just be my ever-loving monthly hormones wrecking havoc all over the place!)
So what I’m trying to say, after all of that weird emotion, I’ve decided to make a baby quilt for my pending niece using the Bear Paw block. YAY!
Have you made this block before? If so, let me know! And if you have a photo of the quilt, I would love to see it!
Also, if you have questions or feedback about this block/tutorial or have any other suggestions for tutorials or crafty things you would like me to demonstrate, comment down below or send me an email at 3and3quarters@gmail.com
In next weeks tutorial, I’ll be delving into the open possibilities of Quilt Labels! Should be a hoot!
Boy, these tutorials sure are coming on thick and fast! (Oh my, that was not intended to sound as rude as it does!)
Ahem! Moving on…
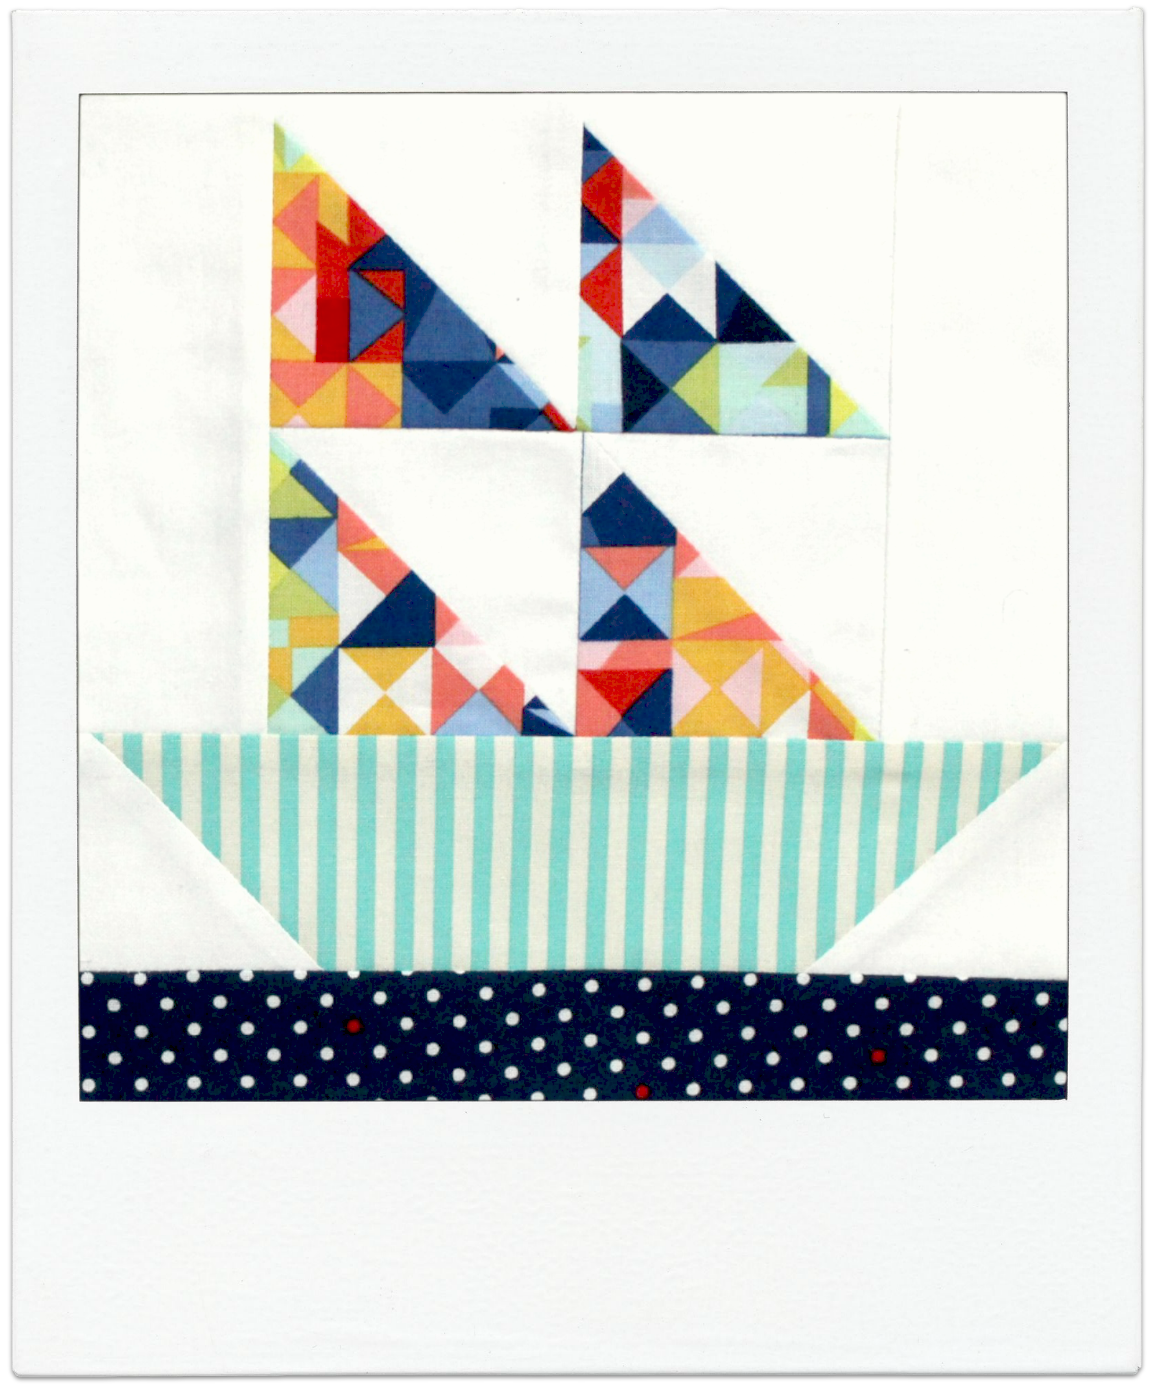
This week’s tutorial is The Sailboat Block!
It’s a wonderfully versatile and super-simple block to construct that has deep traditional roots but still possess an edge of modernity to it.
I love it!
Why only yesterday, on Facebook, one of the many quilting pages I follow posted a heritage quilt made up entirely of the Sailboat Block. I couldn’t believe it! Everything was in exactly the same place/design as the one I demonstrate in my tutorial! I was amazed, with my love, passion and appreciation for patchwork growing just that little bit more!
Here are the measurement & cutting instructions if you want to make this block yourself:
For the Sails cut:
– x2: 3&3/8″ white squares
– x2: 3&3/8″ print squares
For the side of the Sails cut:
– x2: 2″x5&1/2″ white rectangles
For the Boat cut:
– x2: 2&1/2″ white squares
– x1: 2&1/2″x8&1/2″ print rectangle
For the Sea cut:
– x1: 1&1/2″x8&1/2″ print rectangle
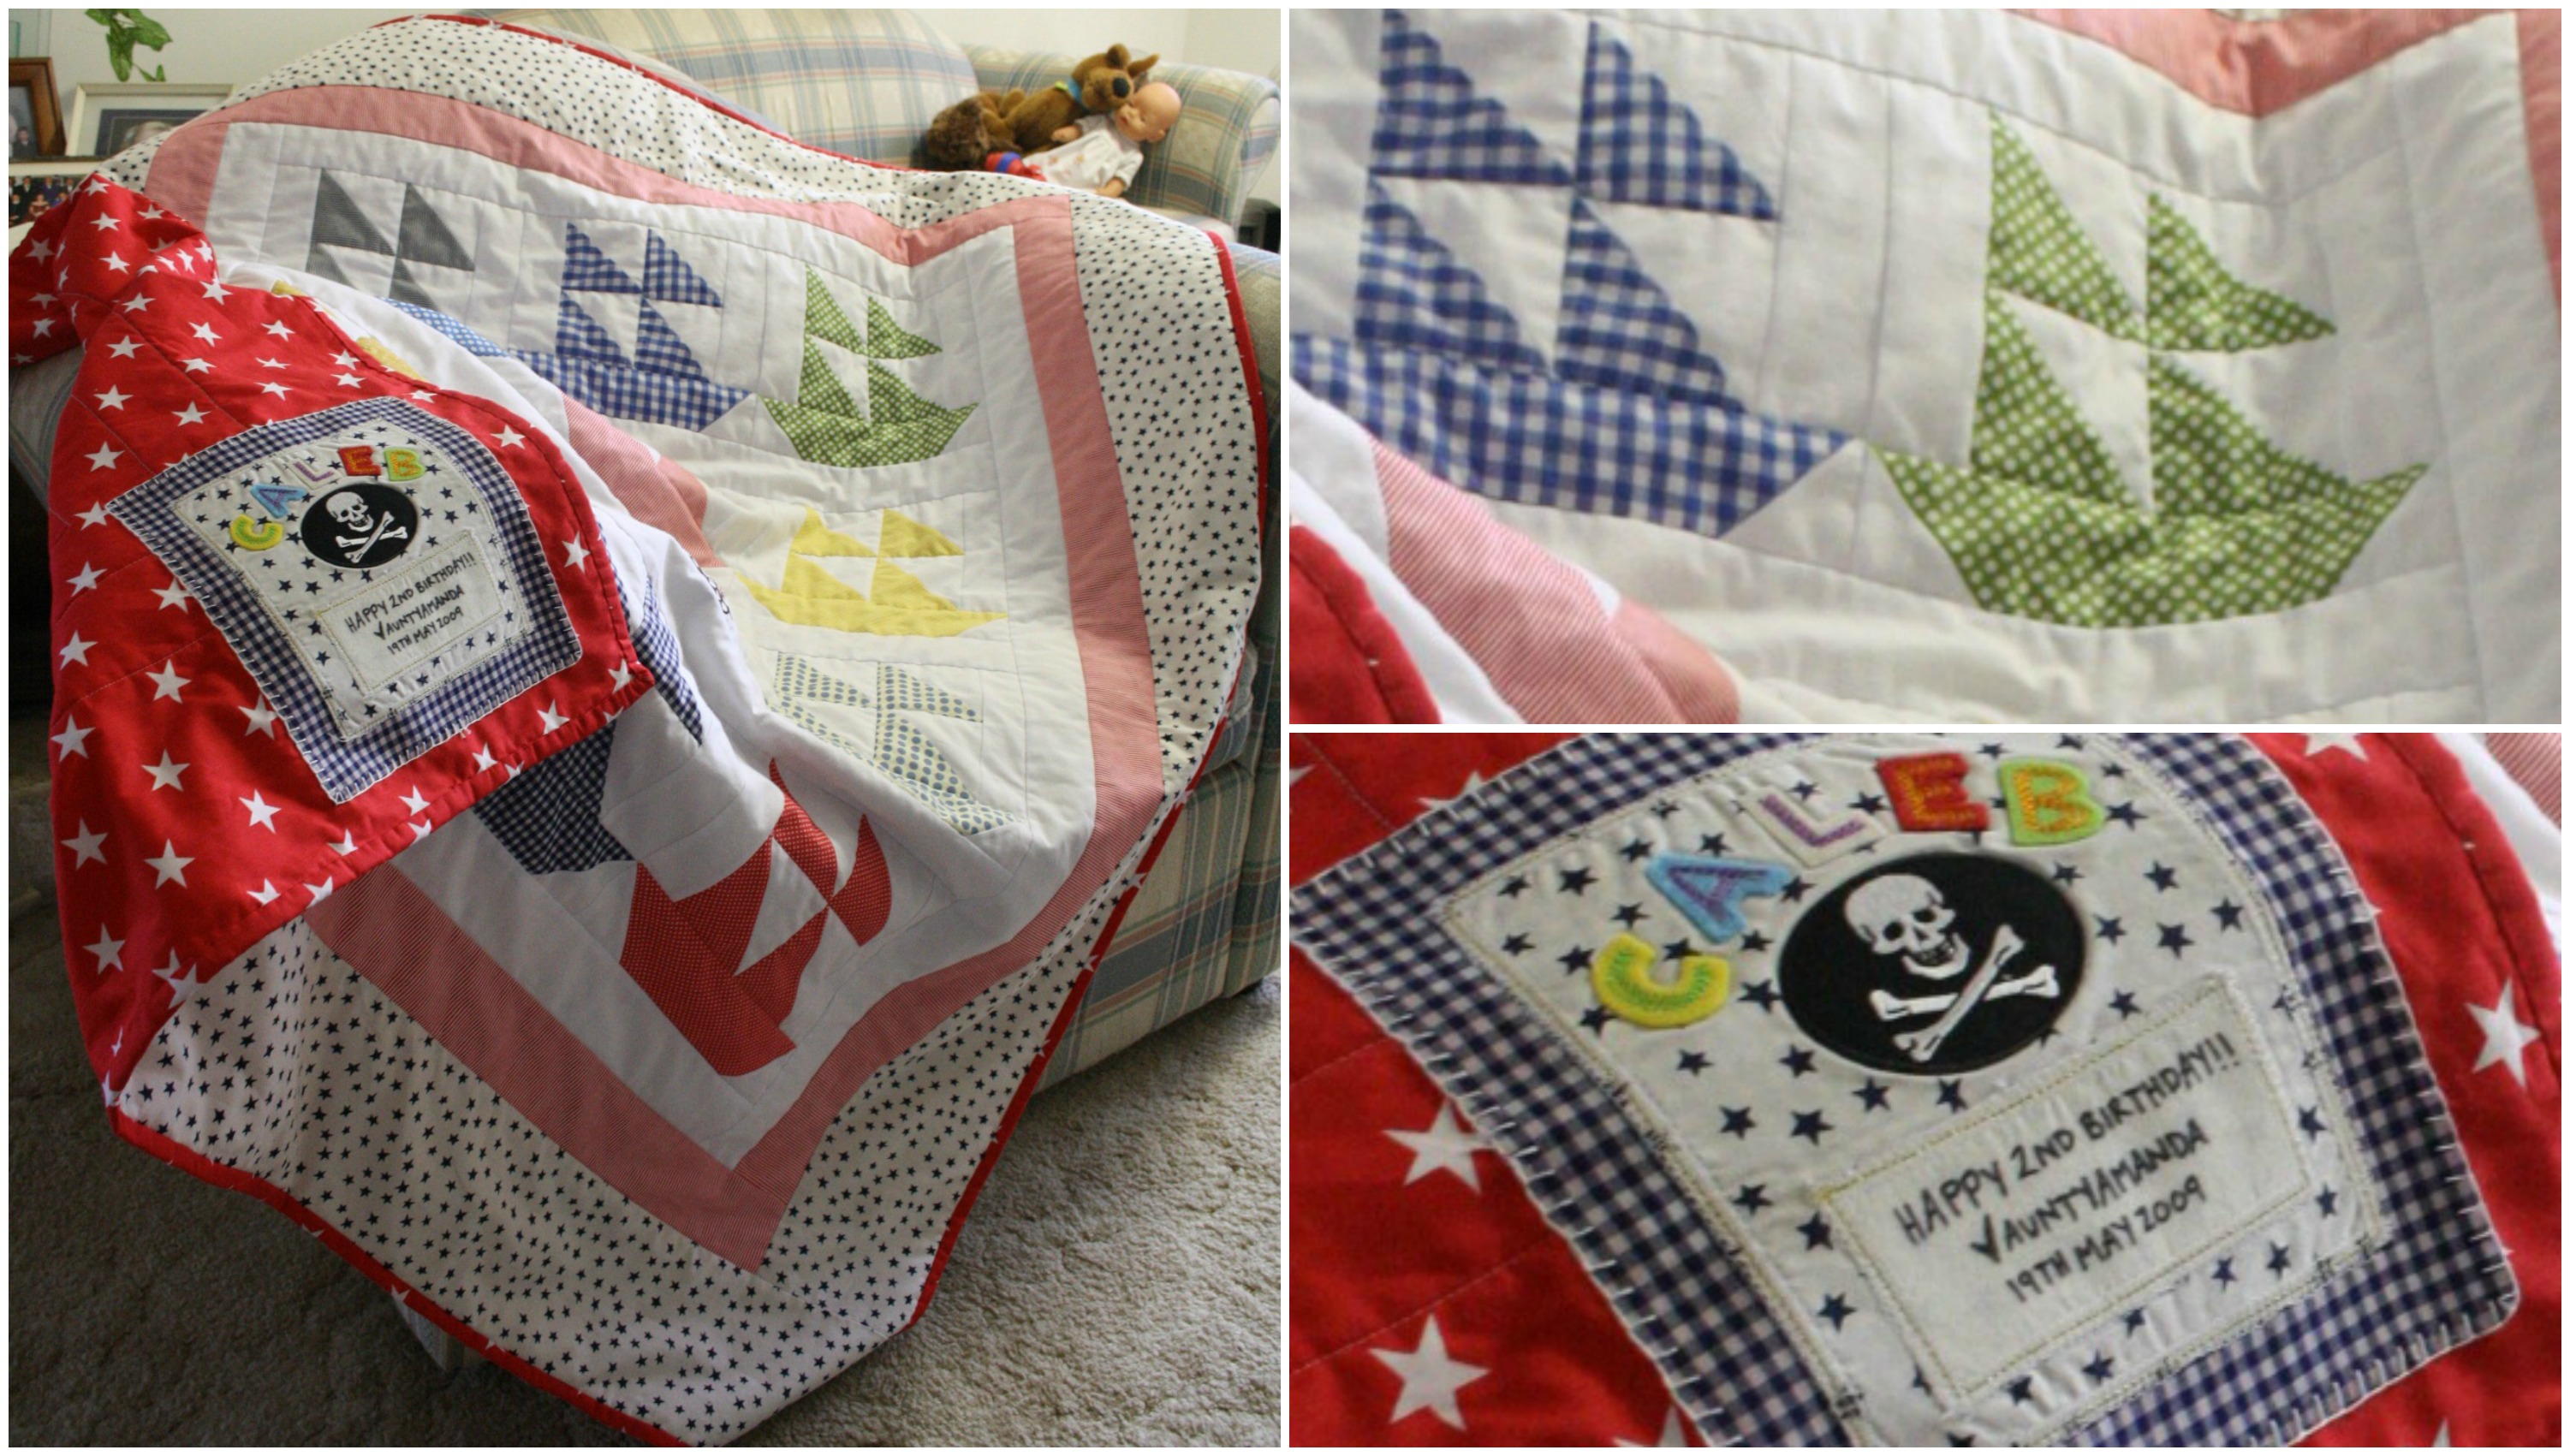
Making this block again brings back beautiful memories of the quilt I made for my oldest nephew (who is now 7!) in celebration of his 2nd birthday.
Caleb’s Sailboat Quilt | May 2009
This quilt was made way back when even before I started my blog! Almost seems like a lifetime ago!
Let me know if you’re going to give this block a go! It is so delightfully boyish that I think any little man will adore and treasure it! (Ha! Get it? Treasure…it!)
Hello & Good Morning to you on this chilly Australian winter morning!
The heater is pumping, Coldplay are repeating their mellow tunes through my computer speakers and a hot cup of Earl Grey is happily steaming next to me. But most importantly, my fingers are itching to present to you a new Quilt Block Tutorial!
One of the most viewed posts here on my blog is this one. It’s where I first begun sharing the creation of my Jacob’s Ladder Quilt.
Quilt Top Construction
And now, two years later, I’ve created a tutorial for those who would like to make this block themselves!
Here’s a quick low-down of the measurement and cutting instructions…
For the 4-Patch Units cut x20 assorted 2.5″ squares.
For the HSTs cut x2 white 4&7/8″ squares and x2 grey 4&7/8″ squares.
The finished size of the 4-Patch & HST units should measure 4.5″.
The finished size of the block should measure 12″.
Blooper Collage!
If you’re planning on making a fair size quilt with this block, I made 16 blocks to make this quilt…
My finished Jacob’s Ladder Quilt!
Like I said at the end of the video, if you’re going to give this block a go, take a photo of it and send it to me! You can email me (3and3quarters@gmail.com), Tweet me (@3and3quarters) or Instagram me (@3and3quarters)!