Let’s be honest, I’m not one for the attention that birthdays bring. I’m a typical wall-flower type of gal who likes to happily sit in the wings and watch the world float by.
However, the week leading up to along with the weekend that my 30th fell on, ended up being one of the busiest I’ve had in a long time…
So you know how I rave on about being a Florist and such? Well I actually put my skills into use and only did flowers for my first ever wedding!!!
The bride was the daughter of a family I’ve grown up with pretty much most of my life, so it was an honour to be asked and to contribute to her and her husband-to-be’s magical day.
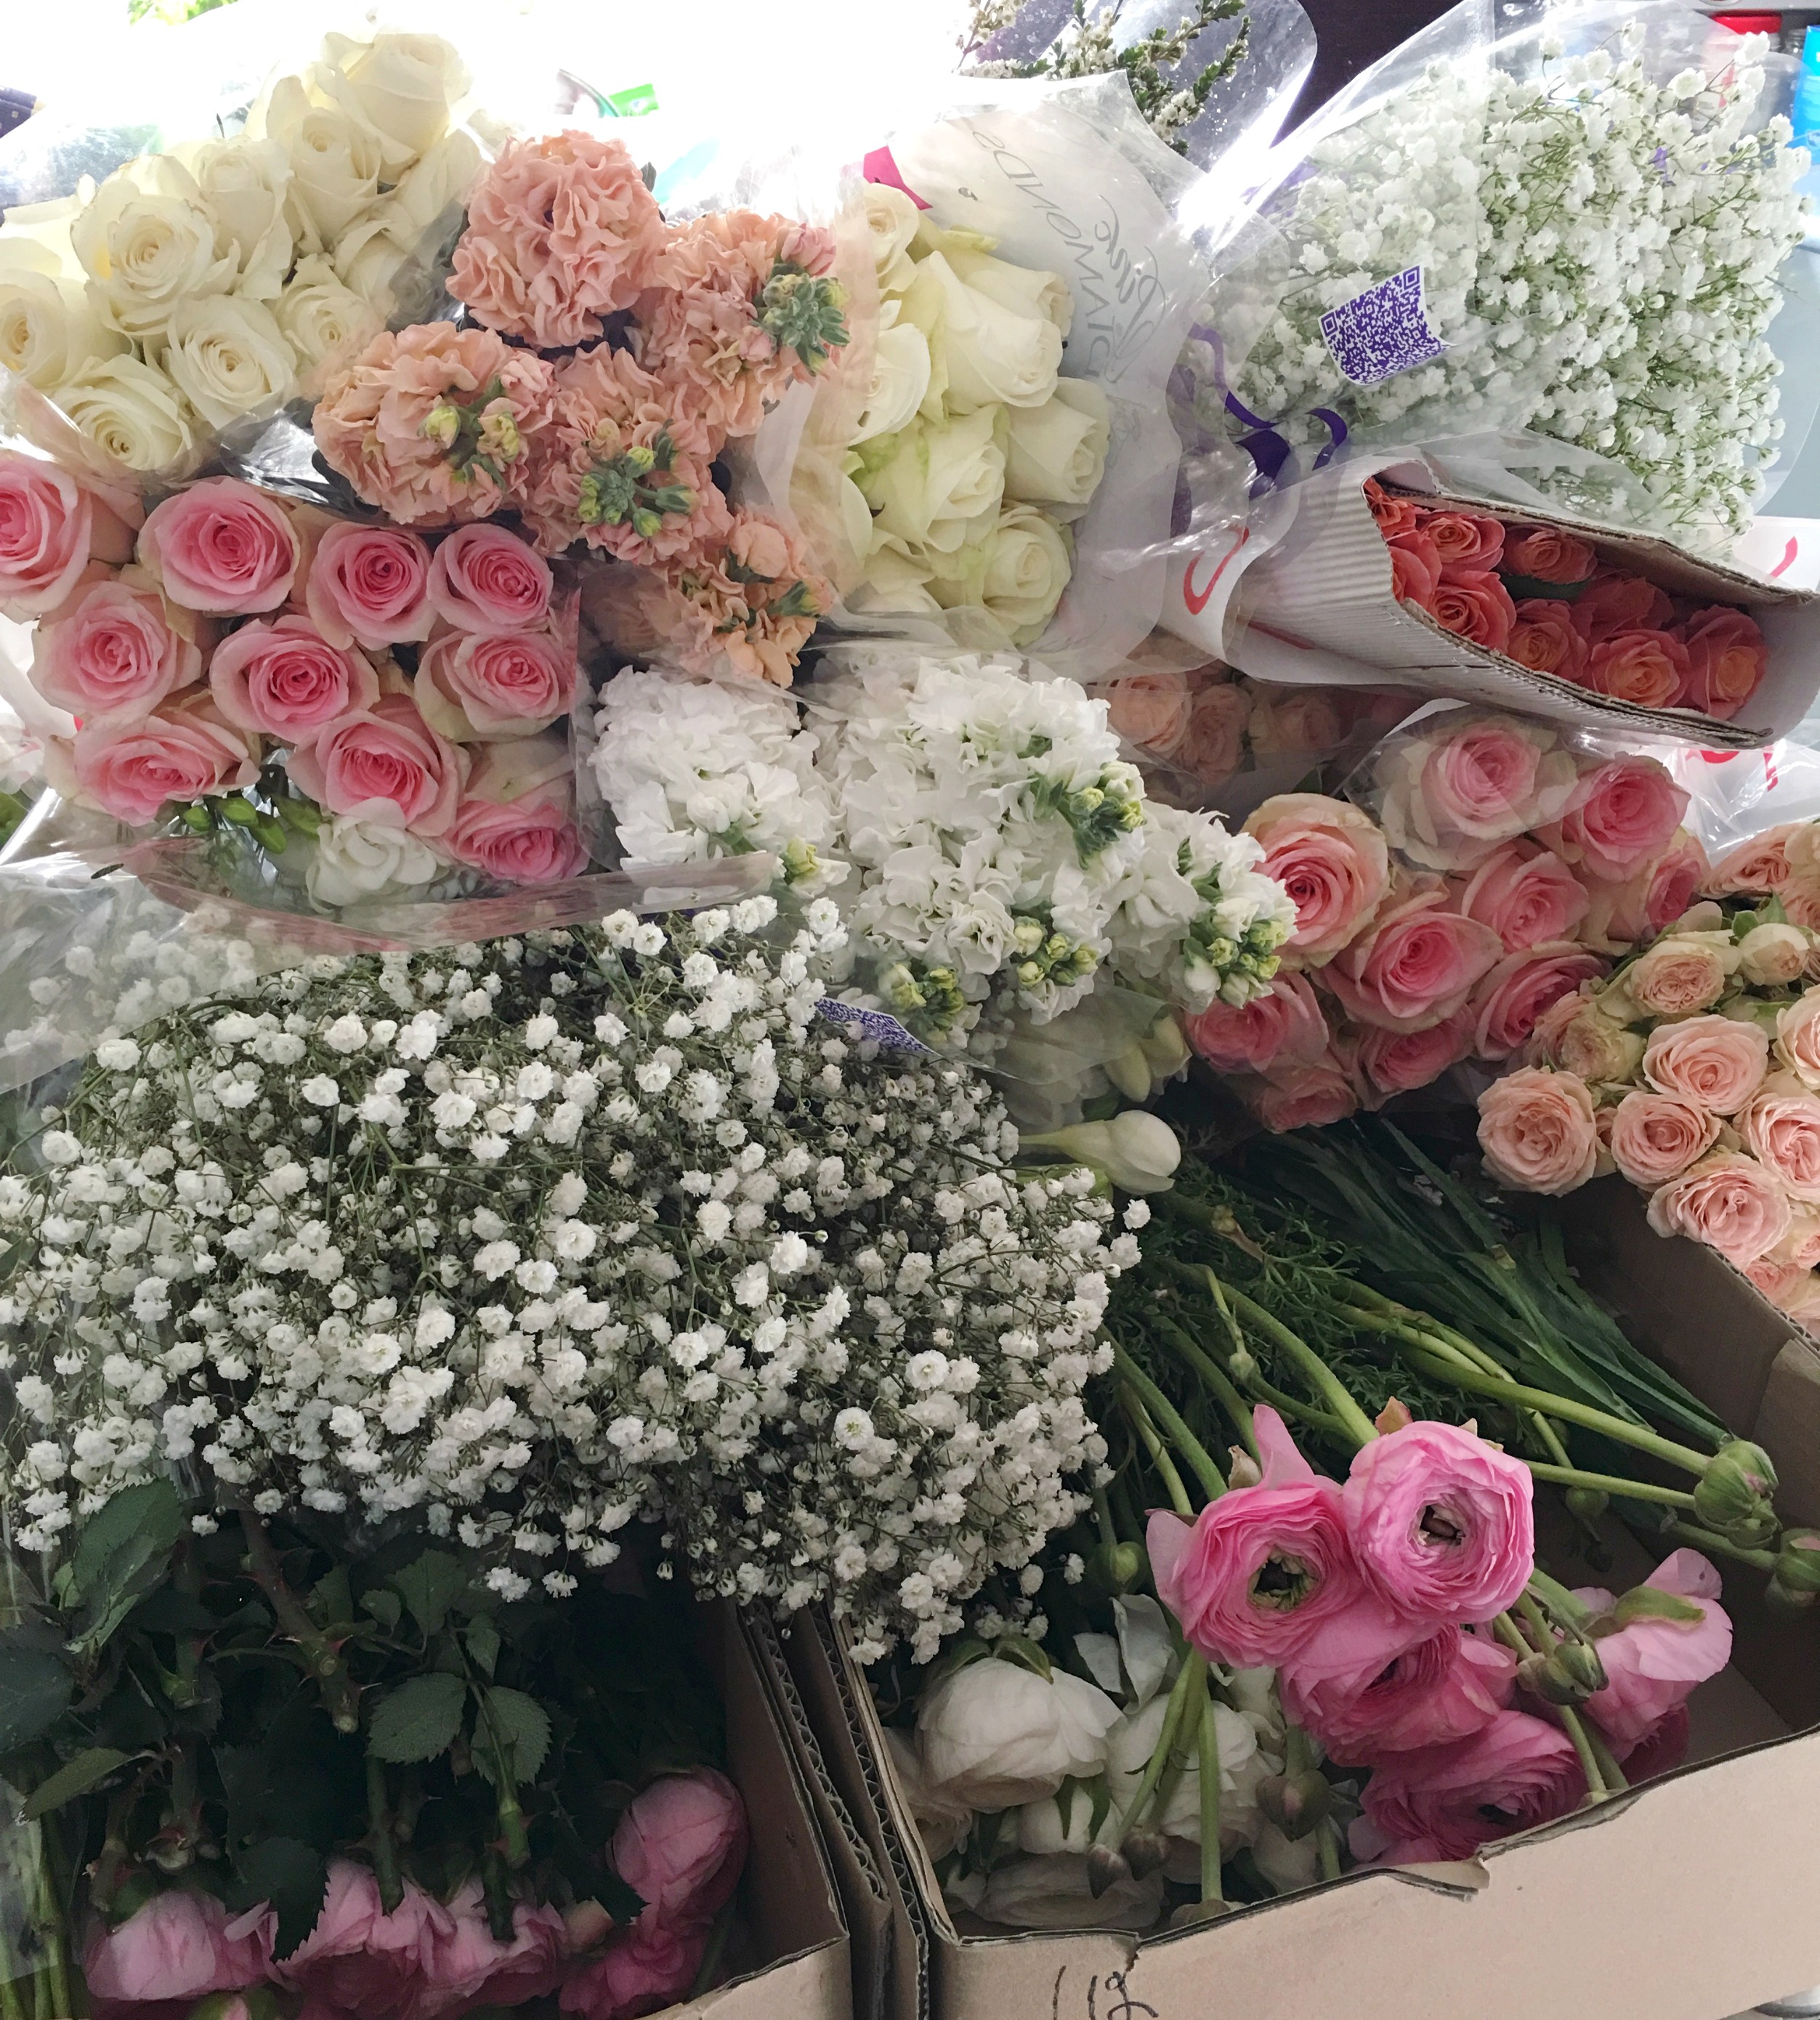
Prep for the big day began early Thursday morning with trip one of two to the Sydney Flower Markets. Day one concentrated on getting foliages – leaves and greenery. Friday, day two, was all about the flowers! And boy did we get lots of flowers! The colour palette was whites, blush pinks, peaches and soft and rustic pastel colours and highlights.
I managed to pick up an array of perfectly coloured Roses, in-season Ranunculus, darling peachy and white Spray Roses, beautifully perfumed Stock, fluffy stalks of Babies Breath and Carnations, feathery lime-green Aspidistra and a whole host of other fun blooms and greeny bits.
The rest of Friday was a bit of a blur of gum leaves, chatter and laughter (I had a good friend come over and help for the day! She’s a real legend!), unnecessary faffing over flower placements, over-the-top swooning over beautiful blooms and total contentment in the sheer joy of what I was doing. (Even though my stress level was at about a 9 out of 10! There was even a moment early in the day when I had a small panic attack that I hadn’t bought enough Roses! No need to worry, I had plenty in the end!)
The Bride’s Bouquet (not finished)
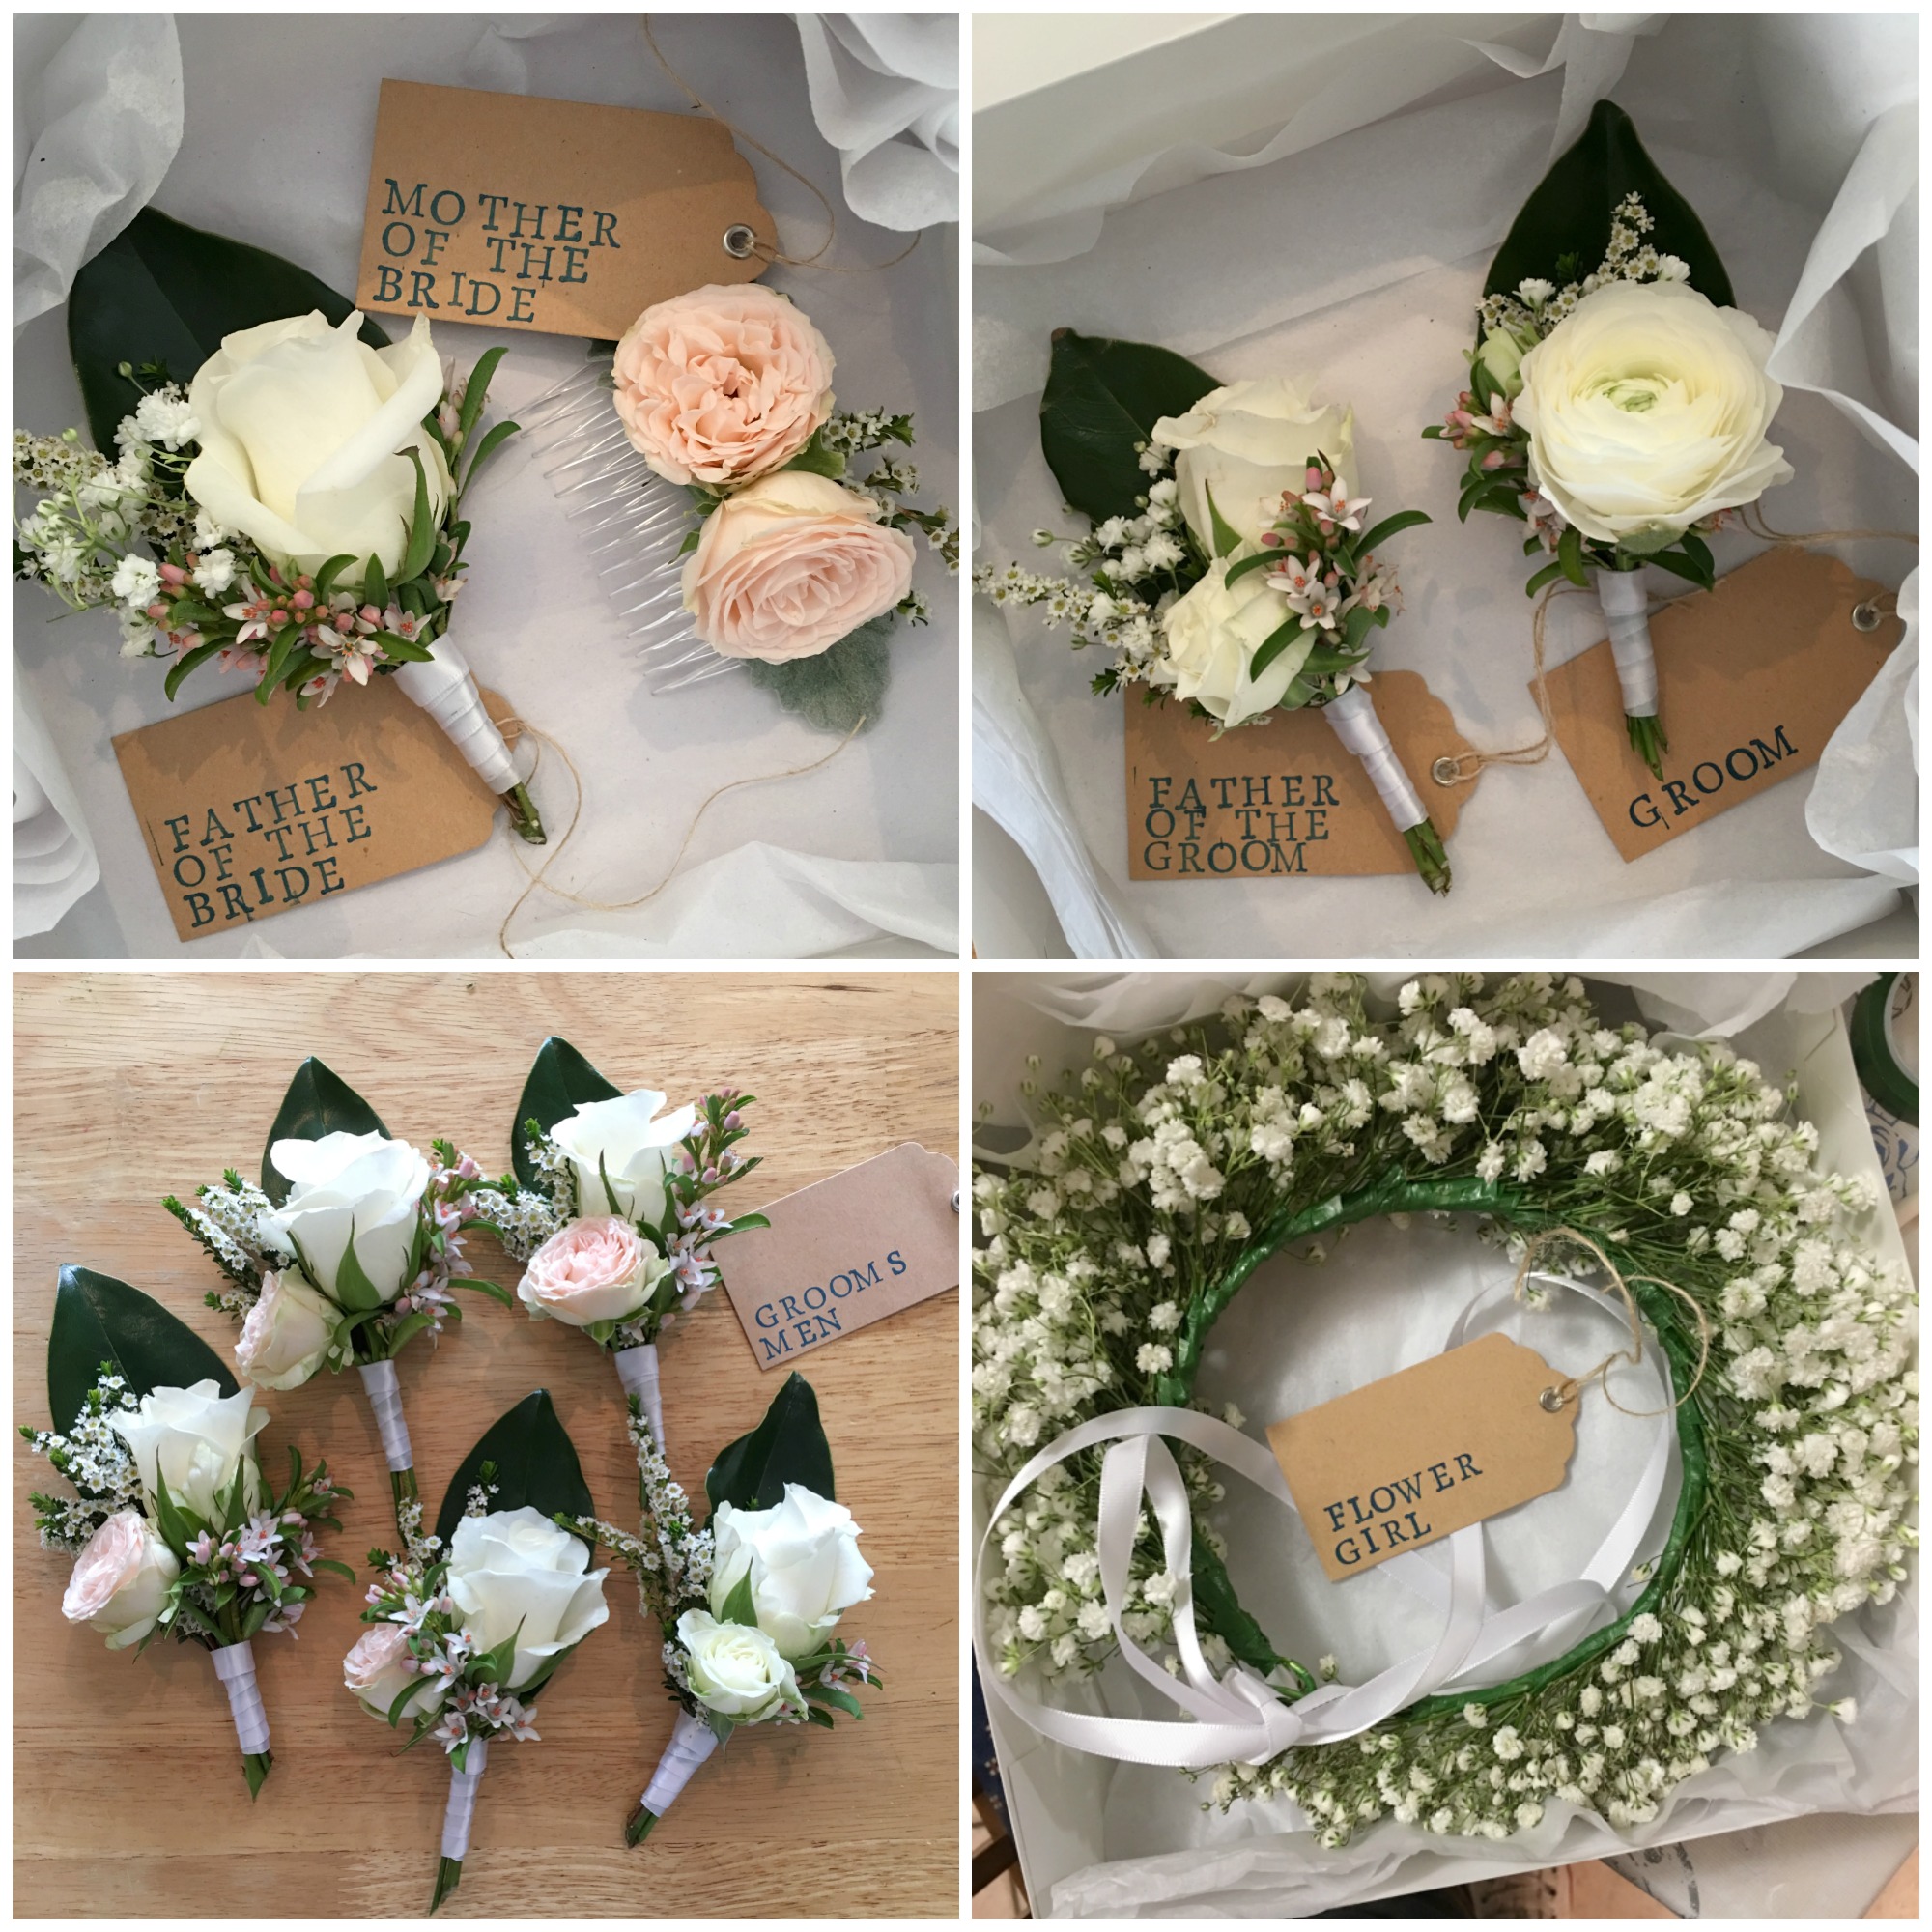
After another early start on the day of the wedding to get all of the last minute ribboning and packaging done, it was off to the venue to set up flowers for the ceremony, the three tier cake, the bridal party and reception tables.
Bridal Party Flowers in the back of my tiny car, ready for delivery!
The ceremony and wedding itself was beautiful. The bride and her maids looked gorgeous, the groom and his men were very handsome and everything went smoothly. Safe to say, I slept well that night!! 😀
+++
The next day it was my birthday!
I spent a quite morning at home, cleaning up my mess from the past three days. I even made myself a birthday bouquet out of the few left over flowers that didn’t quite make the cut for the wedding!
Then my family and friends all gathered at a local high-rise restaurant that served High Tea and chatted and laughed the afternoon away.
We had a birthday cake, lots of cute little bit-sized treats, scones with jam and cream, fancy hot teas and fresh yummy sandwiches.
It was such a lovely day spent with my close family and friends. Not too much fuss was made and I took the day and birthday wishes as they came. Which is always enough for this quiet little wall-flower!
+++
Before I go, a BIG thank you to all of you for your lovely birthday wishes you left me either on my YouTube channel, Instagram or Facebook. I appreciated every single one!
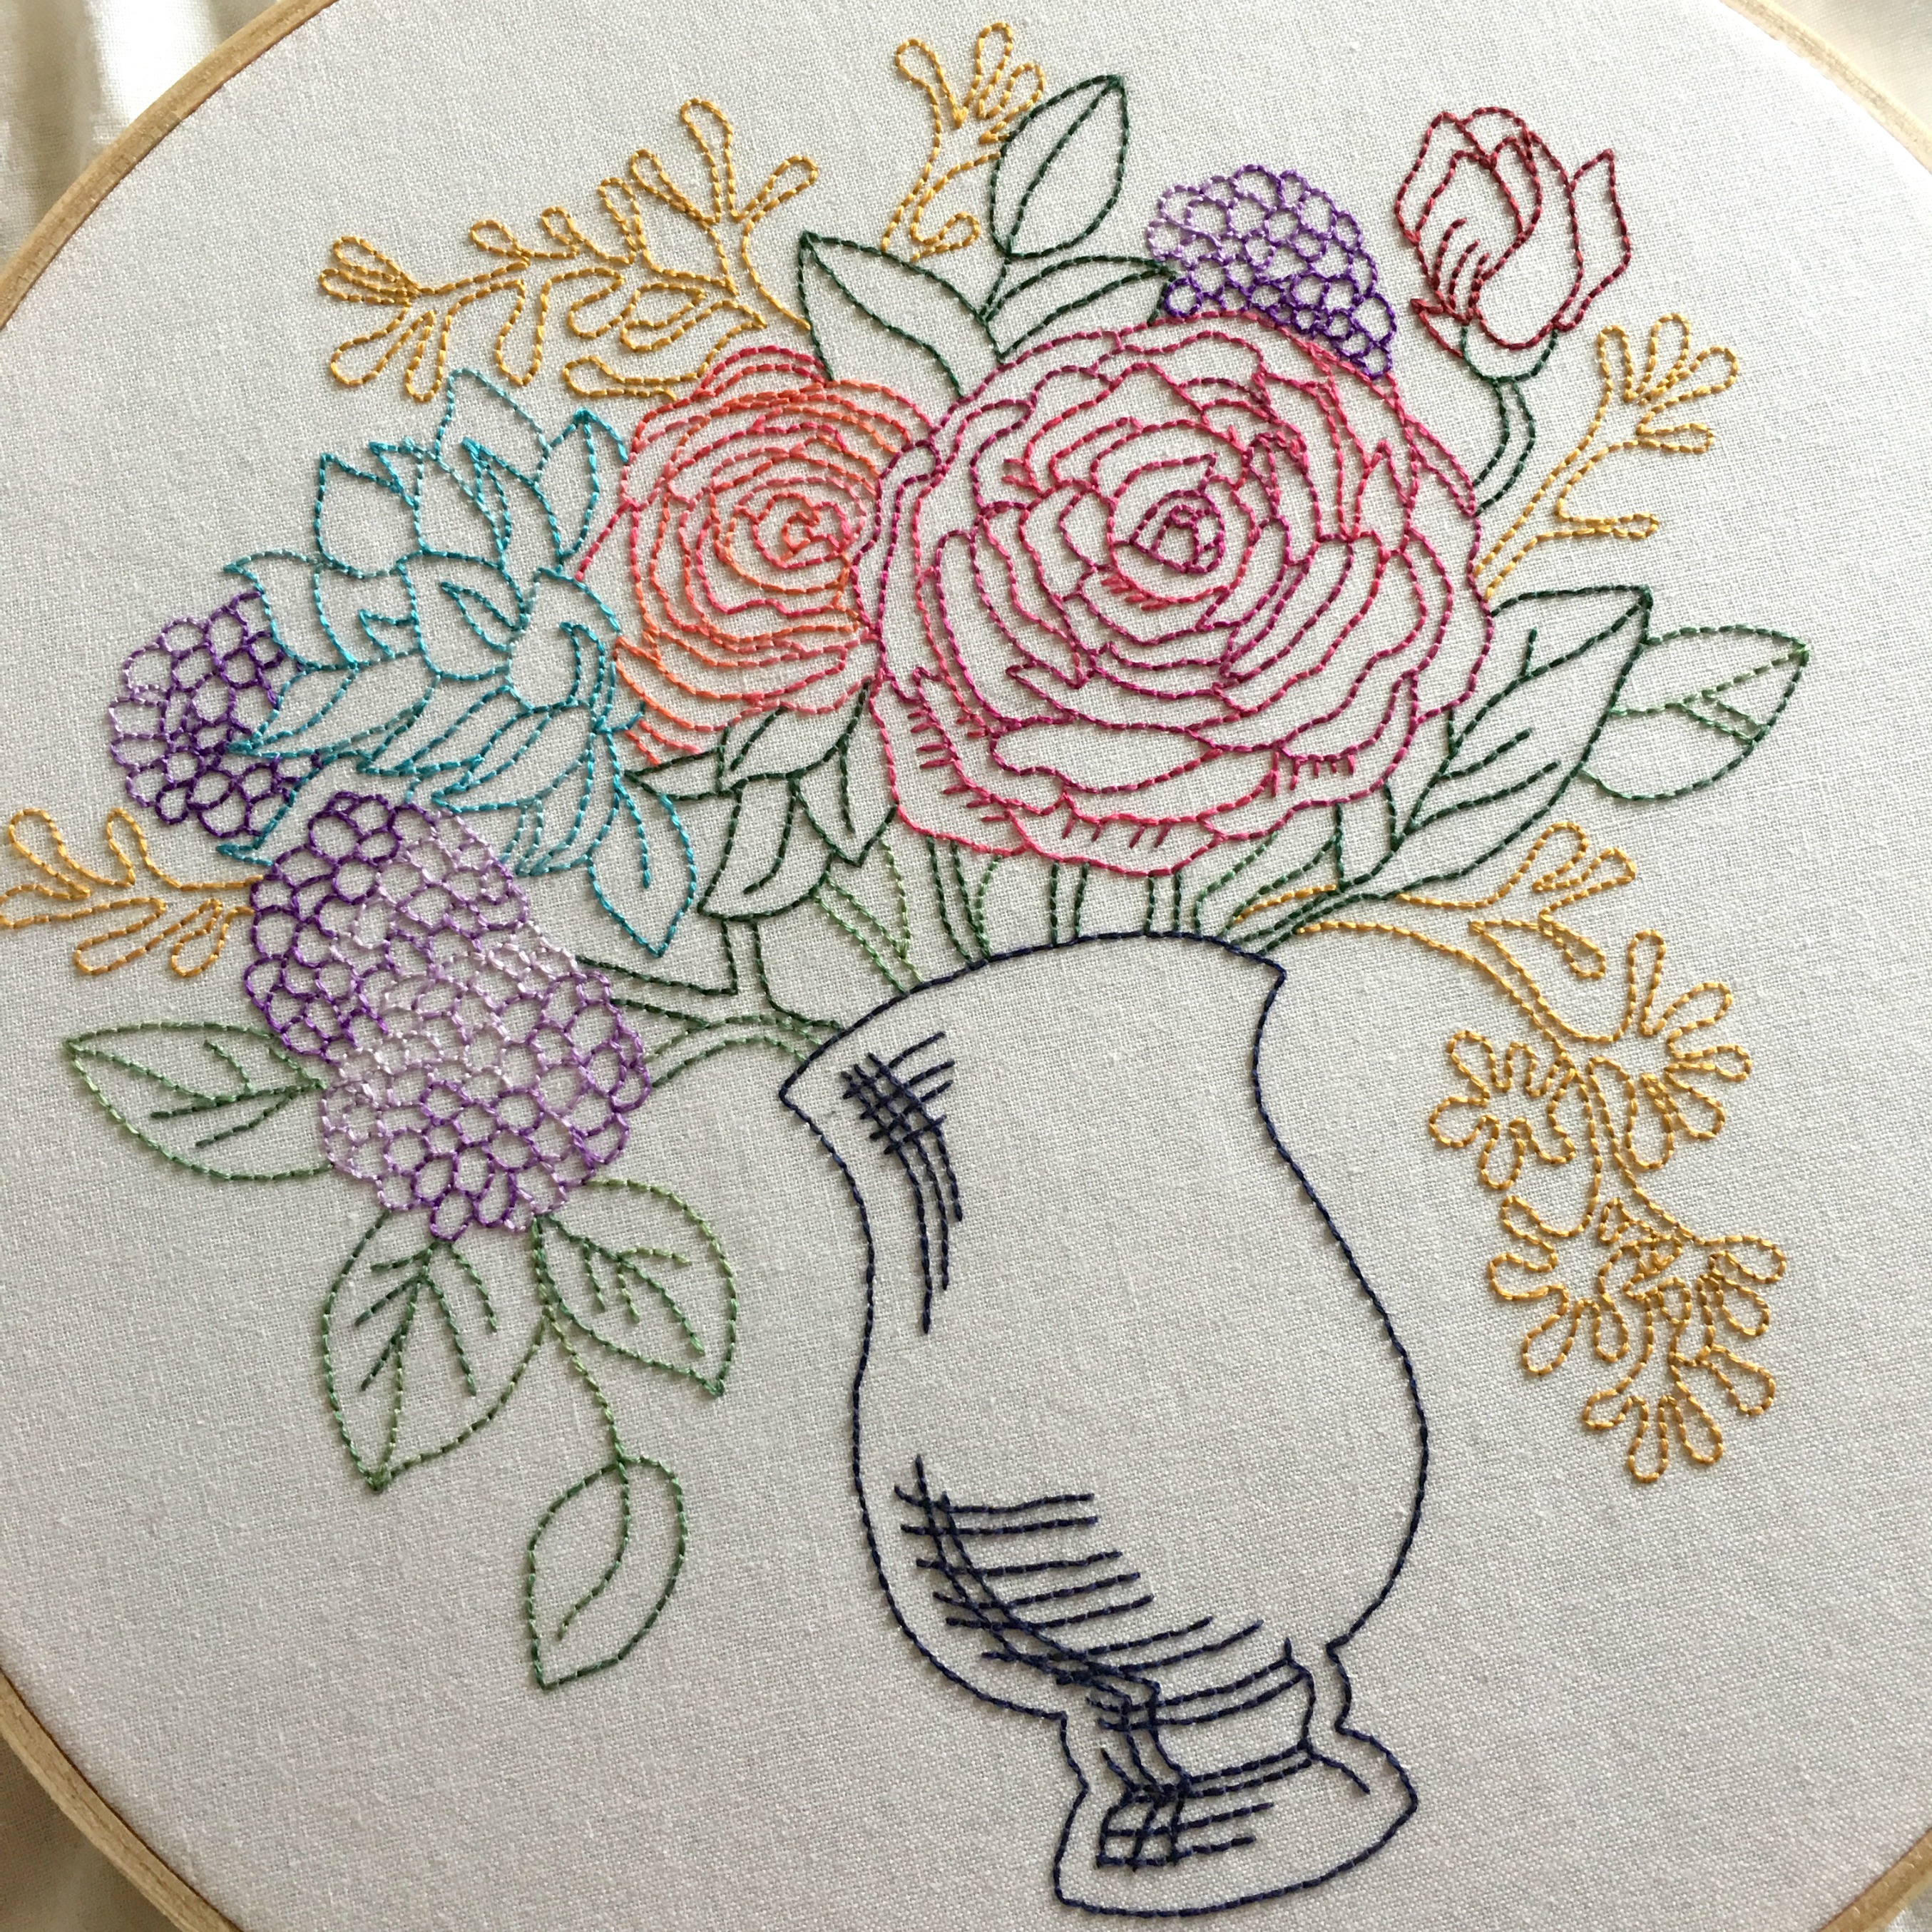
About a week ago I finished stitching a lovely floral embroidery that I had sitting on my desk waiting to be started for about six months or so. It was one of those designs that as soon as I saw it, I just had to make it!
Quite often I find myself go in and out of favourite styles or types of ways to be creative; whether it be simple patchwork piecing, quilting, crafting or a bit of delicate embroidery. So at a time where I was struggling to find the time and energy to do anything creative because of my work schedule and other life-y responsibilities, my itchy fingers and restless mind were in desperate need to do something fun, colourful, beautiful and creative! (Also the fact that I was in the mood for snuggling up on the lounge with a favourite quilt and re-watching one of my favourite movie franchises: The Lord of the Rings – Extended Editions played a huge role in getting this embroidery started!)
So this is where the nerdy part starts; A basic analysation of an embroidery…
When figuring out what colours to use for this design, I put my Florist hat on and thought sensibly about what kind of flowers where in it and what types of colours they would be in real life. I knew instantly that I wanted to use a variegated purple thread for the fluffy hydrangeas on the left hand side and at the back of the arrangement. Hydrangeas come in so many beautiful colours and shades and I wanted to really show the lighter and darker changes that the little flowers making up a hydrangea head have.
That big rose right of centre had to be red! It needed to be centre stage; fluffy, full and magnificent! Again, I used a variegated thread for this to add interest and to give a little bit more depth to the overall design. Its lovely little friend behind it is a couple of shades lighter, a little bit more fuller and finished again with a variegated thread full of luscious shades of oranges, pinks and reds.
The other elements of the arrangement (know as ‘filler’ flowers in the world of floristry) I also wanted to be true-ish to life and not take away initial interest of the main flowers. The deep greens and flowing golds compliment the overall colour scheme and design, while the heavy navy vase cements the design adding shape, roundness and a finality to the arrangement. In early plans I was actually going to embroider the vase a metallic gold but as the embroidery got along, I thought if I did that there would be too much gold/yellow tones in the design. By using a near opposite colour from the colour wheel, the navy vase compliments everything perfectly!
So there you have it. I little peak into how my brain worked out how to apply colour to this darling embroidery. Whether you found this post dead boring or super helpful, I hoped you enjoyed watching this embroidery come to life. And if you saw it all unfold on Instagram, thank you for enjoying the endless ‘spam’ of my work-in-progress!
Now I’m on the hunt for the perfect frame so that I can hang this beauty on a wall in my sewing room and swoon over it every time I notice it! I love finding old frames at charity shops so I think that’s what I’ll do when I next get the chance!
Also, if you would love to make this embroidery too, I found the pattern on one of my favourite websites that have a great range of embroidery designs, Urban Threads.
+++
And now I’m onto the ‘what’s next?’ phase.
Although I have a tonne of other projects to finish (*cough* Star Sampler Quilt Along! *cough*), I’m always on the hunt and yearning to start something new! Here though, is a quick list of immediate projects I’ve got going and/or want to start very soon!
Star Sampler Quilt Along to finish (the quilt-top construction tutorial will hopefully be ready this coming week!)
New crafty YouTube Tutorials to plan and film (includes a lunch tote bag, flower crown and floral wreath and of course more block tutorials!)
A winter coat to lay out, cut and sew together (yep, the inner dressmaker in me is dying to break out!!)
Swoon. I have yet another Swoon block waiting patiently for me to piece together (this one involves a beautiful colour palette of purple Tula Pink fabrics!)
There’s just so much I want and need to do! It can be awfully overwhelming at times… But little-by-little I’ll get there and do it all to the best of my ability!
I hope you’re all enjoying a splendid period of creativeness and are enjoying whatever it is that you’re currently making!
I wanted to share with you a few of the designs I made in class this week… I’ve had such a wonderful week at Floristry school! It’s one of the first times since I started when I didn’t want the week to end because I was enjoying what I was doing so much! I just wanted to keep playing!
Something seemed to click this week where I finally felt confident in my new found skills and noticed a rising passion for the art of floristry flourishing deep inside! (Corny, I know!)
This week we focused a lot on wedding bouquets and posies which are so fun and beautiful to make! Monday we had an assessment for a design called a Formal Hand-Tied Wedding Posy.
Packed full of even distributed flowers with a closed form (meaning no to very little negative space) and natural stems.
The second assessment was the informal version of the Hand-Tied Wedding Posy. The difference with this one is that there should be lots of negative space with materials placed high and low as well as placed in groups e.g. grouping of roses, carnations, foliage etc. This design should also take on a more vegetative effect which means the materials should look like they’re growing in a natural way.
The other assessment ticked off the list was the Informal Trail Wedding Bouquet. Although it did take about 2 hours to assemble, this one was slightly less stressful to make compared to the Formal version pictured below!
Formal Wired Posy
The Informal Trail Bouquet is a lot less structured, has lots of negative space and incorporates the use of line materials to carry colour and texture from one side to the other. The design is fully wired, which means all of the stems are cut off at the head of the flower, then wired and parafilmed. Materials then can be moved, bent, shaped and manipulated in any way you wish to achieve the design you want! This is sometimes easier said than done!
From the FrontFrom the Back
I really can’t stop looking at this design! I love all of the flowers and foliages I used and love the texture the pink/maroon Tea Tree sprays brings to the overall effect! So pretty!
Each of these designs are always finished off with a ‘ribboned’ handle which can either be ribbon, jute/hessian, lace, decorative ribbons, doilies or even natural materials like bark or big modern-type leaves. With the top two designs, I finished them off using a 20mm jute ribbon and bow and then used a lovely white satin ribbon on the last one.
It’s only three weeks until I finish my course and I’m trying my best to savour every minute – especially now that I’m really, really, really enjoying it!!
Since starting my Floristry course a few months ago, I’ve been visiting the Sydney Flower Markets early most Saturday mornings to buy my flowers for class the follow week.
To be honest, for a while there I was so intimidated by the place that I really struggled with the thought of going each week. It’s a pretty hectic place to visit when you’re not used to packed market conditions and very busy people rushing about! I’m not all that good with crowds and quite intense busy environments! However, with each visit I get under my belt I’m getting just that little bit more experienced and confident in what to buy and how to face the busy madness of the place!
On today’s flower run, I was happily accompanied by a good friend, Sam, who I’ve known since high school. Together we perused all of the different stalls, discussed colour choices and plant names, swooned over pretty flowers and then spent a fair good amount of money on them! (Well I definitely did anyway!)
Amid all of that, I even managed to get a few snaps to show you what was at the market this morning!
Pretty Natives!Matching & Choosing Colours!
I really can’t believe that I’ve only got a few more weeks of shopping as a student and then it’s on to the ‘real thing’! (What ever the ‘real thing’ will actually be!) Time has flown by so quickly and I’m not sure whether I’m ready to leave the comfort of my classes and ever-knowing, lovely teachers!
Also, I never thought I’d say it but I’m actually gonna miss making the trip into markets each weekend and getting what I need for class the follow week. It’s that concept of innocence you still have as a student… You’re still in that learning phase where you’re discovering new flowers and plants in class and then seeing them for sale at the market! (Always exciting!) And then there’s that moment when you bring your haul of flowers home and really connect and discover their beauty!
(Whoa! I’m talking like a real Florist now! OooOoo!)
So if you didn’t know, at the beginning of this year I started a Floristry course after always wanting to do so ever since my last year in high school.
Safe to say I’m really enjoying it and am learning a lot about flowers and plants than I ever thought I would!
So in today’s post I thought I would give you an honest account of what a typical day/week for me is and what it’s really like to be studying as a floristry student!
Let’s start with the basics…
I have classes three days a week; Monday 9am-3.30pm, Wednesday 8am-4.30pm and Thursday 8am-4.30pm. On Mondays and Wednesdays we have prac lessons in the morning and then in the afternoon we concentrate on the theory side of the course: basic retail knowledge (so how to work competently in all areas of a retail florist shop) and then a plant class where we learn all about the anatomy of plants, plant care, plant names as well as health and safety info. And because I’m in an ‘accelerated’ course (meaning we just finish the course sooner than our other classmates), Thursday is an all-day prac day where we’re currently learning how to construct formal and informal Trail Bouquets!
Here is a layout of some of the most basic tools I have in and around my tool box…
one: 22 gauge wires. Used for wire-based designs and arrangements such as Corsages and Wedding Bouquets. Comes in thicker and finer gauge sizes.
two: Parafilm. A stretchy, self-sealing tape that is wrapped around exposed wires. It prevents rusting and allows wires to grip onto each other better.
three: Some darling deep burgundy Chrysanthemums that I’m currently using in my arrangements.
four: Floristry scissors. Perfect for cutting flower stems and all wires!
five: Flower Foam. Used in posy boxes and bowls, bats and wreaths as a water source for the flowers. The foam allows the flowers to last longer and gives the florist better control with placement when making an arrangement. Designs featuring floral foam will usually cost more as opposed to those without. The one I use is by Oasis which is considered the best kind in the industry which I whole heartedly agree with!
Now, of course there are so many more other things in my tool box but as I write this, my actual tool box is on campus and what’s above is all I had on hand at home to show you!
🙂
Here are some of my favourite designs I’ve learnt so far… In class we usually practice each design twice and on the third go we’re assessed and marked! Eep!!
(FYI: you may’ve already seen some of these in my Instagram feed!)
This was my very first attempt at a Formal Wired Posy! It features pink Roses, pink Carnations, Sedum (the green spiky bits), white Spray Roses, pink Hyacinth florets and a foliage leaf called Ruskus.
And this was the one I made for assessment, which included a ribboned handle!
Another design we’ve recently learnt was the ANZAC Chaplet.
Made traditionally with laurel leaves (symbolising victory and honour), three sprigs of rosemary (each representing the Army, the Navy and the Air Force) and red poppies(symbolising remembrance), I made this one using Camellia leaves and red Gerberas as these are what were in season at the time! The base of the chaplet is styrofoam wrapped in a green wreath wrap that resembles the texture of garbage bin bags! Each leaf is tacked on using bent 2″ pieces of 18 gauge wire in a particular pattern where each leaf overlaps the one before it hiding the ‘mechanics’. Although after a while my thumb begun aching from pushing thick wire pins into the styrofoam, I really enjoyed making it. The technique was soothingly repetitive and created a very tactile surface that makes my quilter’s heart flutter just that tiny little bit!
Now this little guy I loved putting together! The design is called an Asymmetric Arrangement Gift Hamper. This arrangement features the use of floral foam that is placed in a special plastic bowl with a cage that keeps the foam in place. I choose materials that would compliment the colour of the bear, the ribbons and the basket itself. (FUN FACTS: That basket belonged to my maternal Grandmother and is used in my sewing room to hold all of my unfinished projects while the bear was a Christmas gift from my BFF a few years ago!) The flowers in this arrangement include yellow Gerberas, white Roses, green Mollca Balm with Viburnum leaves, maroon Cordyline leaves, green Monstera leaves and a few dried out Tortured Willow branches at the back.
And then lastly we have the wired Cake Decoration (top) with a Spray (bottom). These pieces are essentially made as a mini version of the wired Formal Posy and a simple Corsage! Admittedly, I did struggle with making this one at first as you needed to get the top part sitting flat as possible while getting the bottom spray to curve nicely and be in proportion to the top. Sooo tricky!!
Currently in class we’ve just begun getting into some of the funeral designs such as Sheafs, Wreaths, Open Sprays and Casket Sprays (both constructed using floral foam), along with more wedding designs such as the Trail Bouquet, Hand-Tied Wedding Posies and Table Arrangements.
Okay, now I think it’s only fair to be absolutely honest about the pluses and minuses to Floristry… Let’s do the bad things first and then finish it off with the good!
Minuses:
The early mornings! (Boo!): Having been a night owl for last few years, the crazily early mornings have been definitely a shock to the system! Since when was there a 5.30am?? But with time and a solid routine, I’m getting used to the early wake up calls – I’m actually involuntarily waking up 6.30am! What!? Funnily enough I’ve actually always loved getting up early as it makes the day seem longer and I’m always able to get more stuff done! Plus there’s always something so nice about waking up before or with the sun and breathing in the fresh, crisp morning air and consciously planning your day out.
Dirty fingernails (and most often than not, chipped as well!): That was the one thing that steered me away from Floristry. I had someone tell me not to do it as it would ruin my hands. Even my Floristry teacher said it would ruin your fingernails the day we had sign-ups. But I thought, I’m not going to let that one thing stand in the way of my interest! Yes my fingernails maybe dirty and stained a light green at the end of the day but there’s nothing a good scrub with a brush and some soap can’t fix!
Fluctuations in wholesale flower prices: It’s Mother’s Day this weekend and because of the demand on flowers, the prices at the market have skyrocketed! Only this morning on a quick trip in, I spent over $40 on five bunches which really should’ve been half that price in a normal week. My poor bank balance has really copped a blow over the past week or so!
The day I made a Flower Crown!!
Pluses:
A new venture in creativity!: I would class myself as a very creative person. I crave making with my hands, whether that be with fabric, thread, food, flowers, craft supplies – anything! – I must always have my hands and my mind kept busy! Plus I love learning a new skill! Especially a skill that I can apply to real-life and potentially do as a job. So what better way to harness all of that and get creative with flowers! Like quilting, the design possibilities are endless!
Witnessing beautiful sunrises!: I touched a little bit on this above… I love a good sunrise (and sunset to be honest). There’s something about the promise it brings of a new day where you are given another chance to learn more, to laugh, to breathe, to sing, to dance, to create, to cook, to communicate, to relate and to live! Sunrises are beautifully inspiring in that way! 🙂
Discovery and playing with beautiful flowers and foliages!: Flowers are beautiful! Full stop! I’ve always loved flowers but I think after being around them almost everyday of the week along with learning all of their names and how to care for them properly, I’ve gained a deeper love and appreciation for them. Flowers aren’t around for all that long and we must cherish their one-of-a-kind beauty for as long as we can before they sadly die! 😦
Learning the tricks of the trade: Ohh, so many tricks, so many techniques, so many ah-ha! moments in class! They’re much more simple than what you’d expect. And don’t worry, I’ll show you them all one day!
It just feels right: You know when you start something new and there’s that feeling inside you where you know that what you’re doing is the right thing? I’ve experience plenty of new starts where the feeling has been the complete opposite – where the whole thing just does not feel like the right choice or right thing for my life. Well, Floristry feels right. After 11 years since leaving school I finally feel like I’m doing the right thing! (A part from doing all of my quilting ventures, blog and YouTube! Where would I be without all of you!!)
+++
So I think that’s it. That’s everything so far about my course that I think is good to share with you.
There will be more posts during the month that will centre around flowers and making/arranging a few things so I hope you’re excited for that! (I know I am!!)