With Halloween just around the corner, I was inspired this week to make some fun little Halloween crafts to share with you!
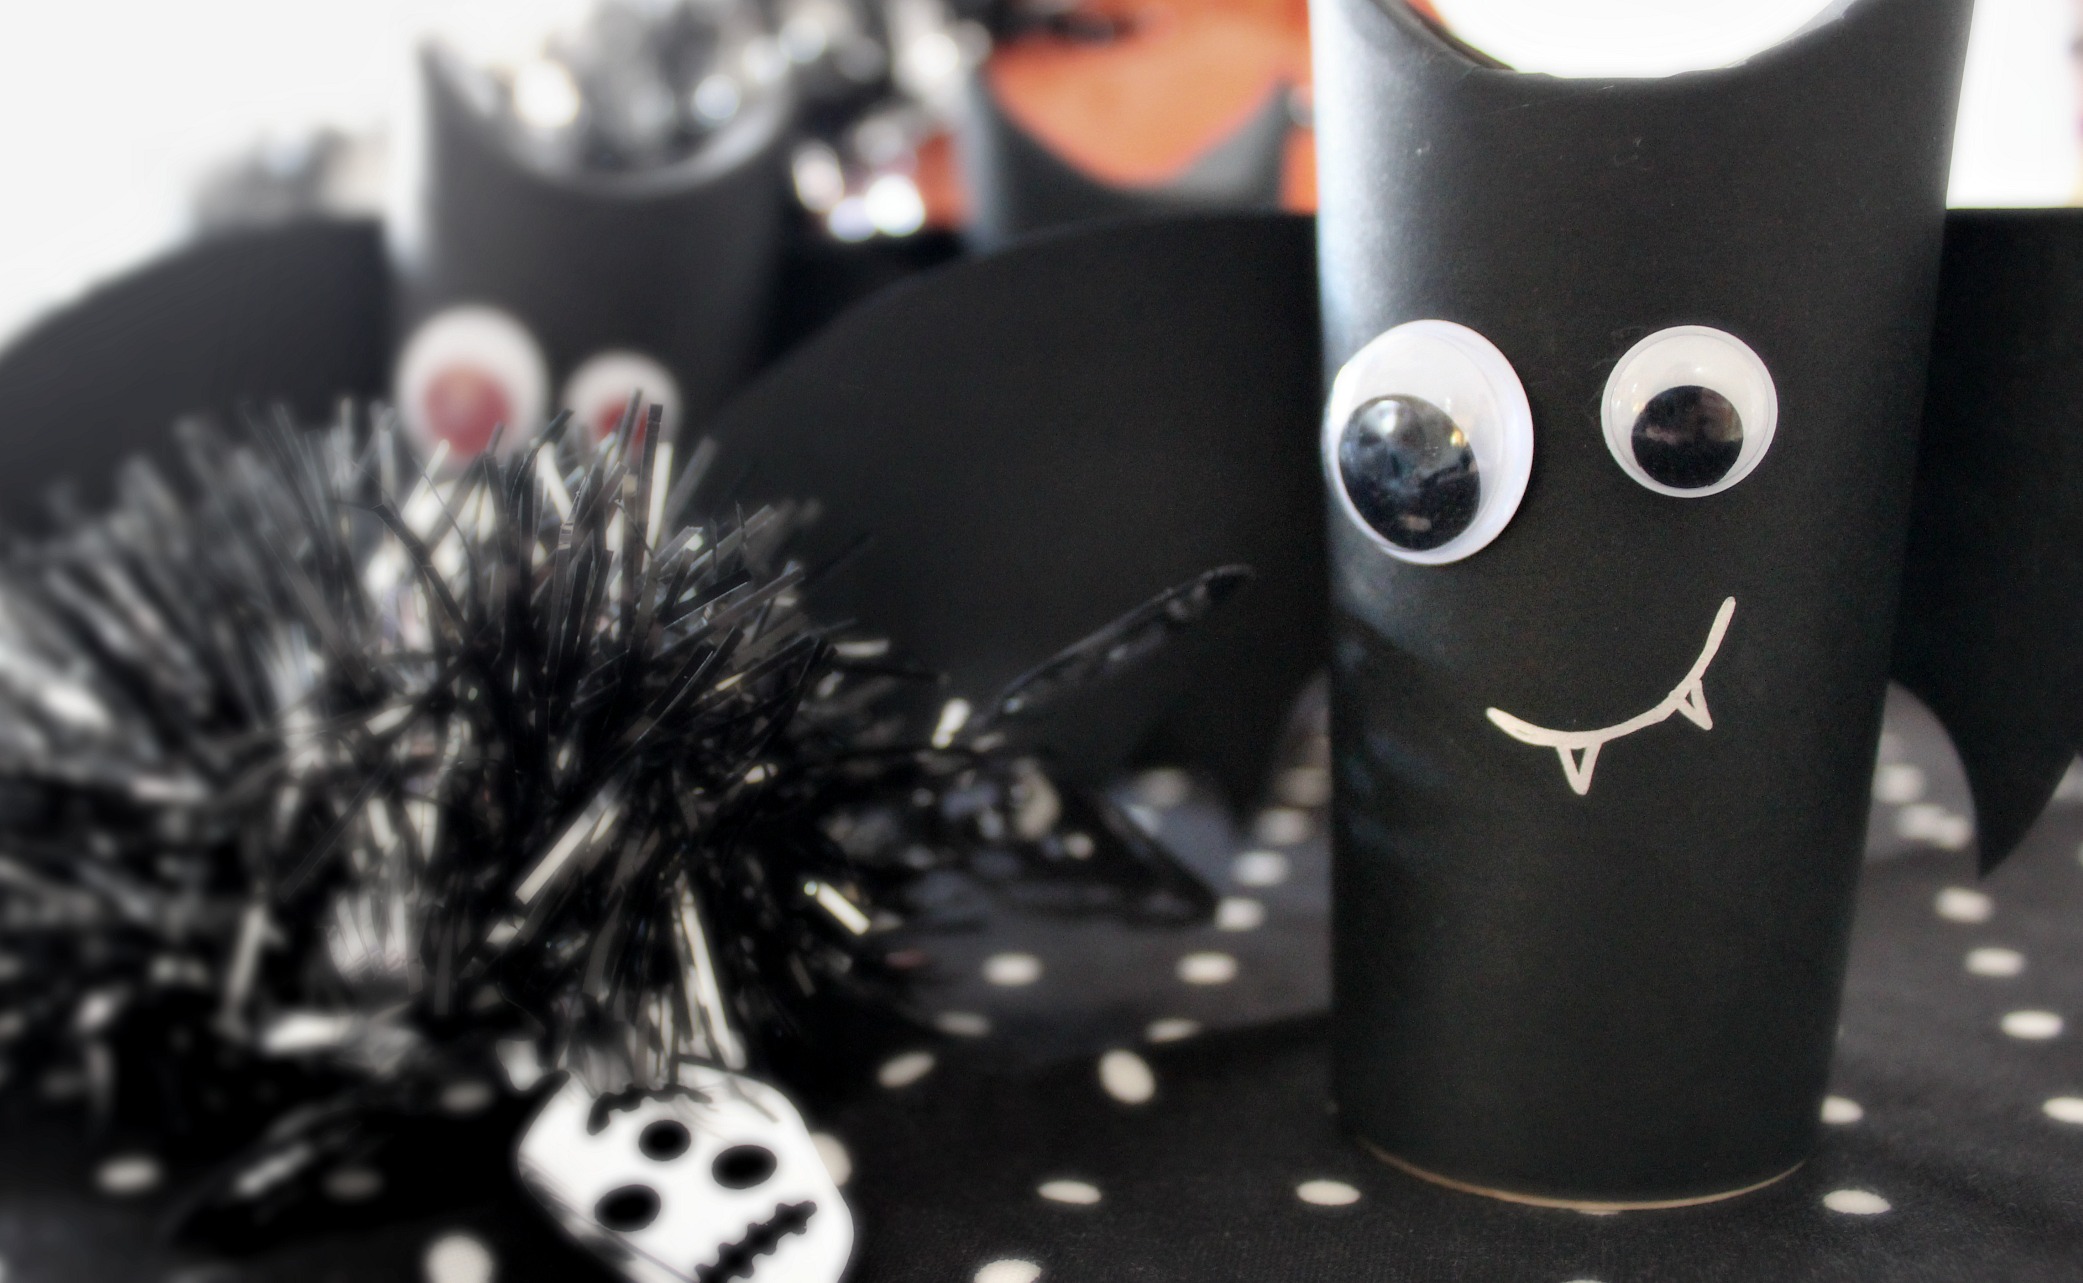
First are these adorable little bats made using toilet paper rolls.
These little guys are super quick to make and are perfect for little hands to get involved in!
To make you will need…
– Toilet Roll – A4 Black Paper – Craft Glue – Two Google Eyes – Silver Metallic Pen – Lead Pencil – Paper Scissors
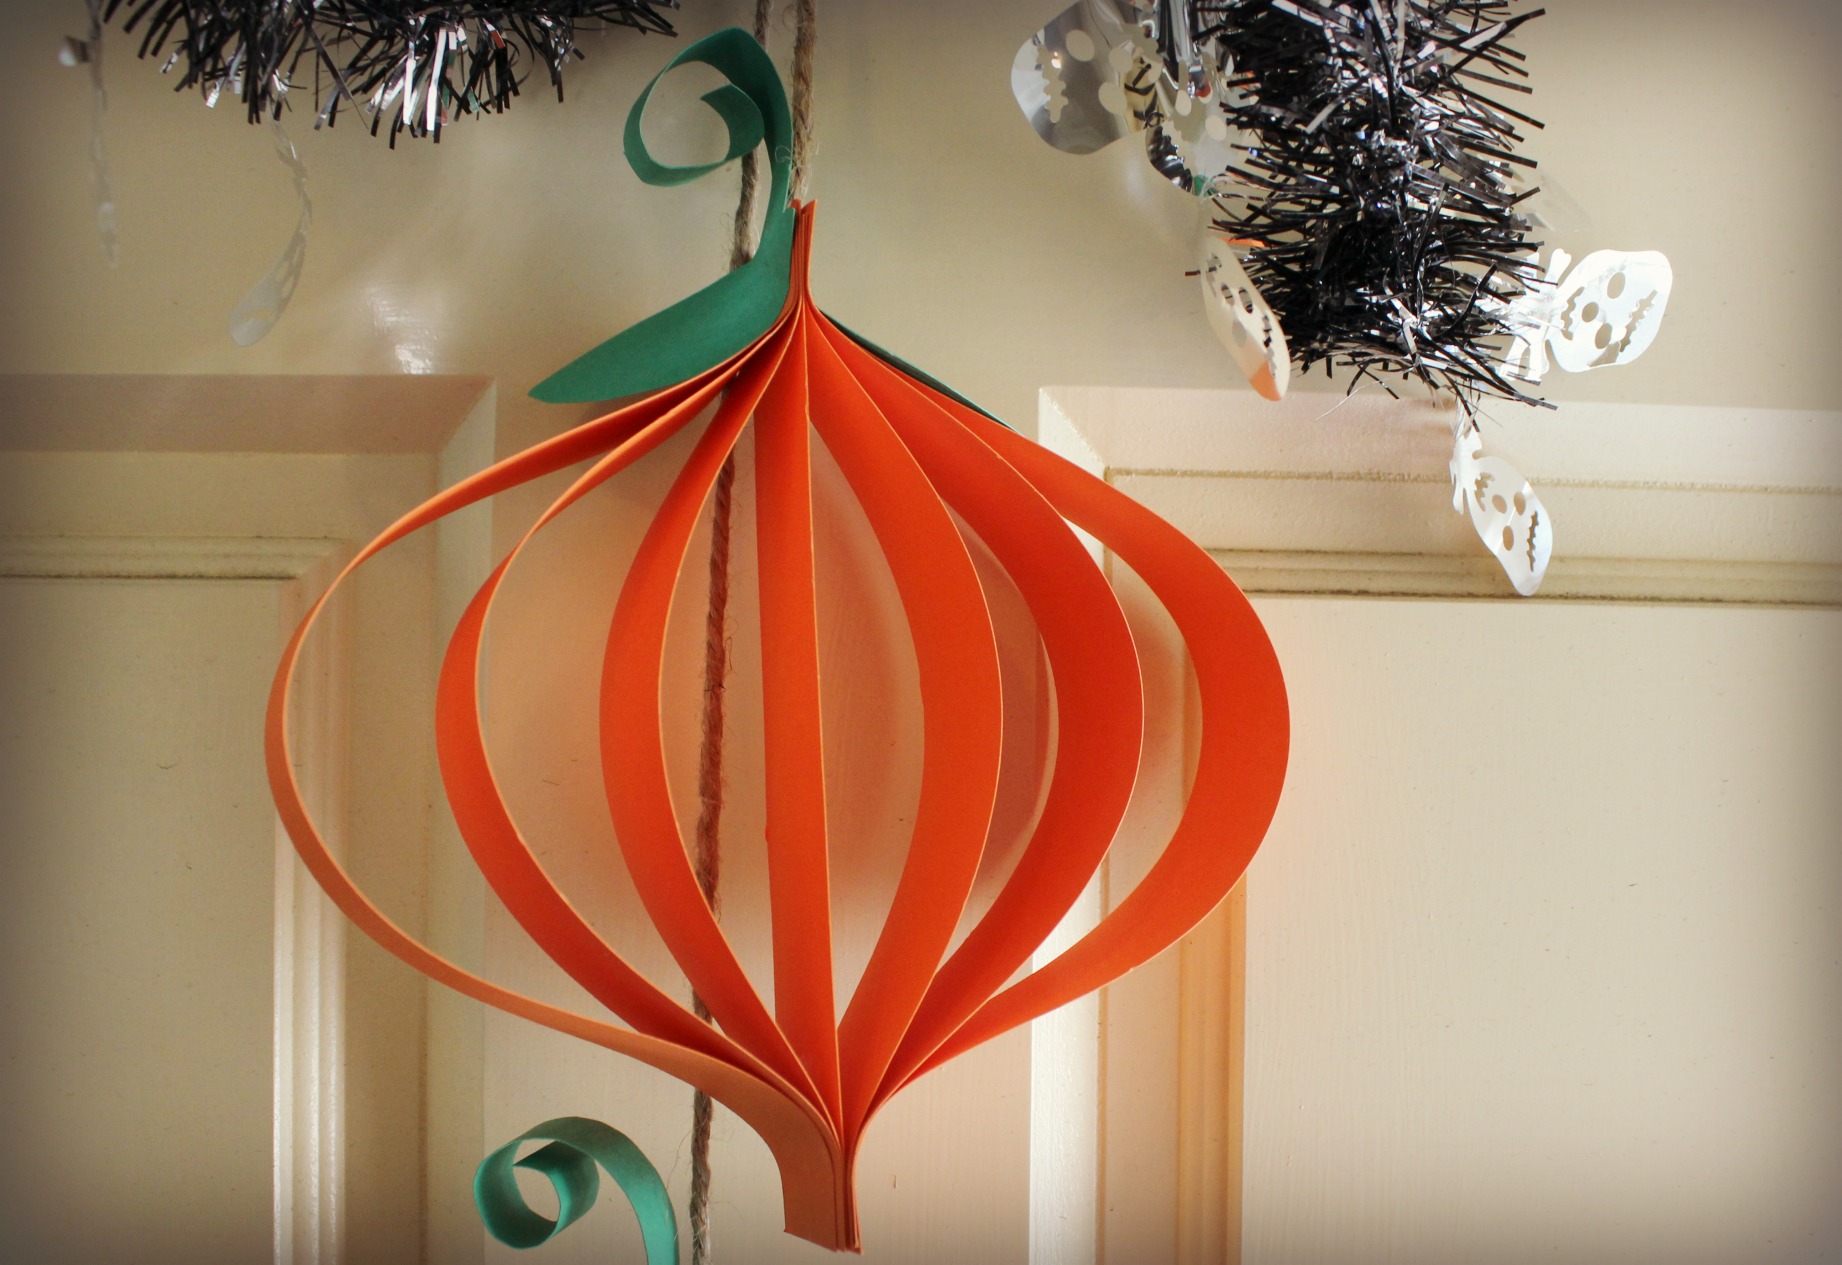
Next, is a really simple and very easy paper craft: Paper Pumpkins!
They remind me a lot of those paper lantern decorations you’d make in primary school for Christmas, but this time your using the more traditional colour of Halloween – orange!
To make you will need…
– One Large Sheet of Orange Card – A4 Green Paper – Craft Glue – Two Bulldog Clips – Twine/String – Paper Scissors – Stapler
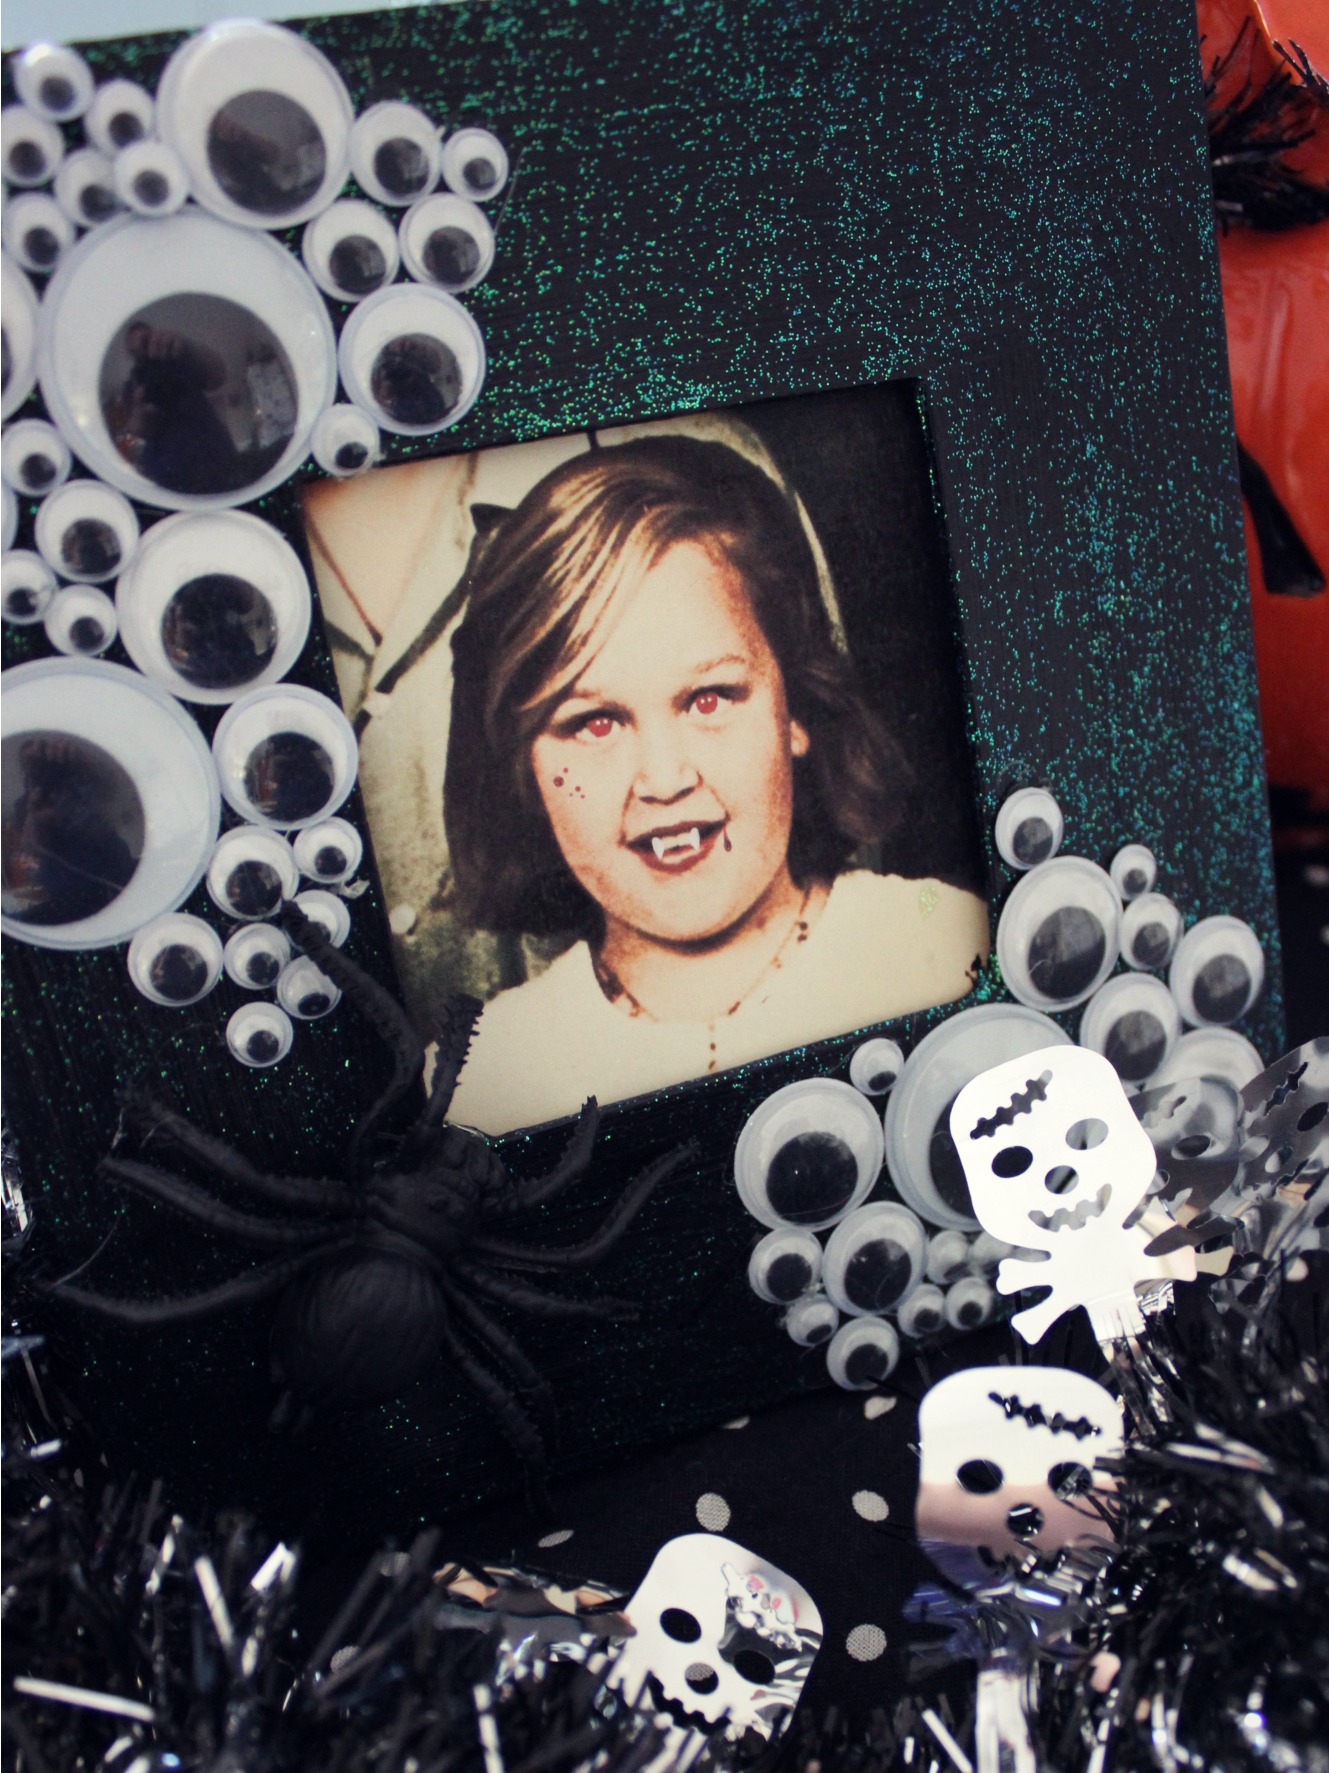
This next one is my favourite. I think it’s a whole lot of fun and is simplistically effective!
The photo used in this Google Eye Photo Frame is of me as a little girl which I altered using PicMonkey, making me look like a scary Vampire girly thing.
To make you will need…
– Plain Photo Frame – Spooky Photo – Black Paint – Glitter Paint (Optional) – Paint Brush – Assorted Sizes of Google Eyes – Hot Glue Gun & Glue
And lastly, I made a Witch Hat Headband! Using simple materials such as felt, cardboard and a party hat, I’m really happy with how this turned out. The idea was in my head and the result is perfect! (Well, near enough!)
To make you will need…
– Party Hat (minus the elastic) – Two A4 Pieces of Black Felt – Pre-made Headband in Black – Black Cardboard – Ribbon and Decorations – Hot Glue Gun and Glue – Craft Glue – Craft and Fabric Scissors – Lead Pencil – A Plate (18cm or 7″ in circumference)
For instructions on how to make all of these crafts, check out the video at the beginning of this post!
Enjoy making…
&
Happy Halloween Friends!
PS: This is where I found my inspiration for these projects…
Quilt Labels. They’re one of those things you usually forget all about during the glorious triumphant moment of finishing a quilt!
By the time you’ve conquered sewing down that last part of the binding, you’re thinking, ‘Yes! That’s it! It’s finally finished!!’ No more hand sewing! No more schlepping this heavy quilt all over the house.
But no.
There’s still one last little bit of sewing that needs to be done. And it’s one of the most important elements you’ll add to the quilt.
The Label.
Quilt Labels are like the heart and soul of a quilt. They list when the quilt was made or finished, who it was made by, who it was made for, it may list the name of the quilt and/or display a special message or saying about the quilt or be directed to the person who will be receiving the quilt.
The creative possibilities of making quilt labels are literally endless. There are no boundaries or rules to what they should look like and there are no wrongs or rights to how they should be attached to a quilt.
The way that you want to make and attach a quilt label is entirely up to you!
But in any case, here are just a few ideas that may help…
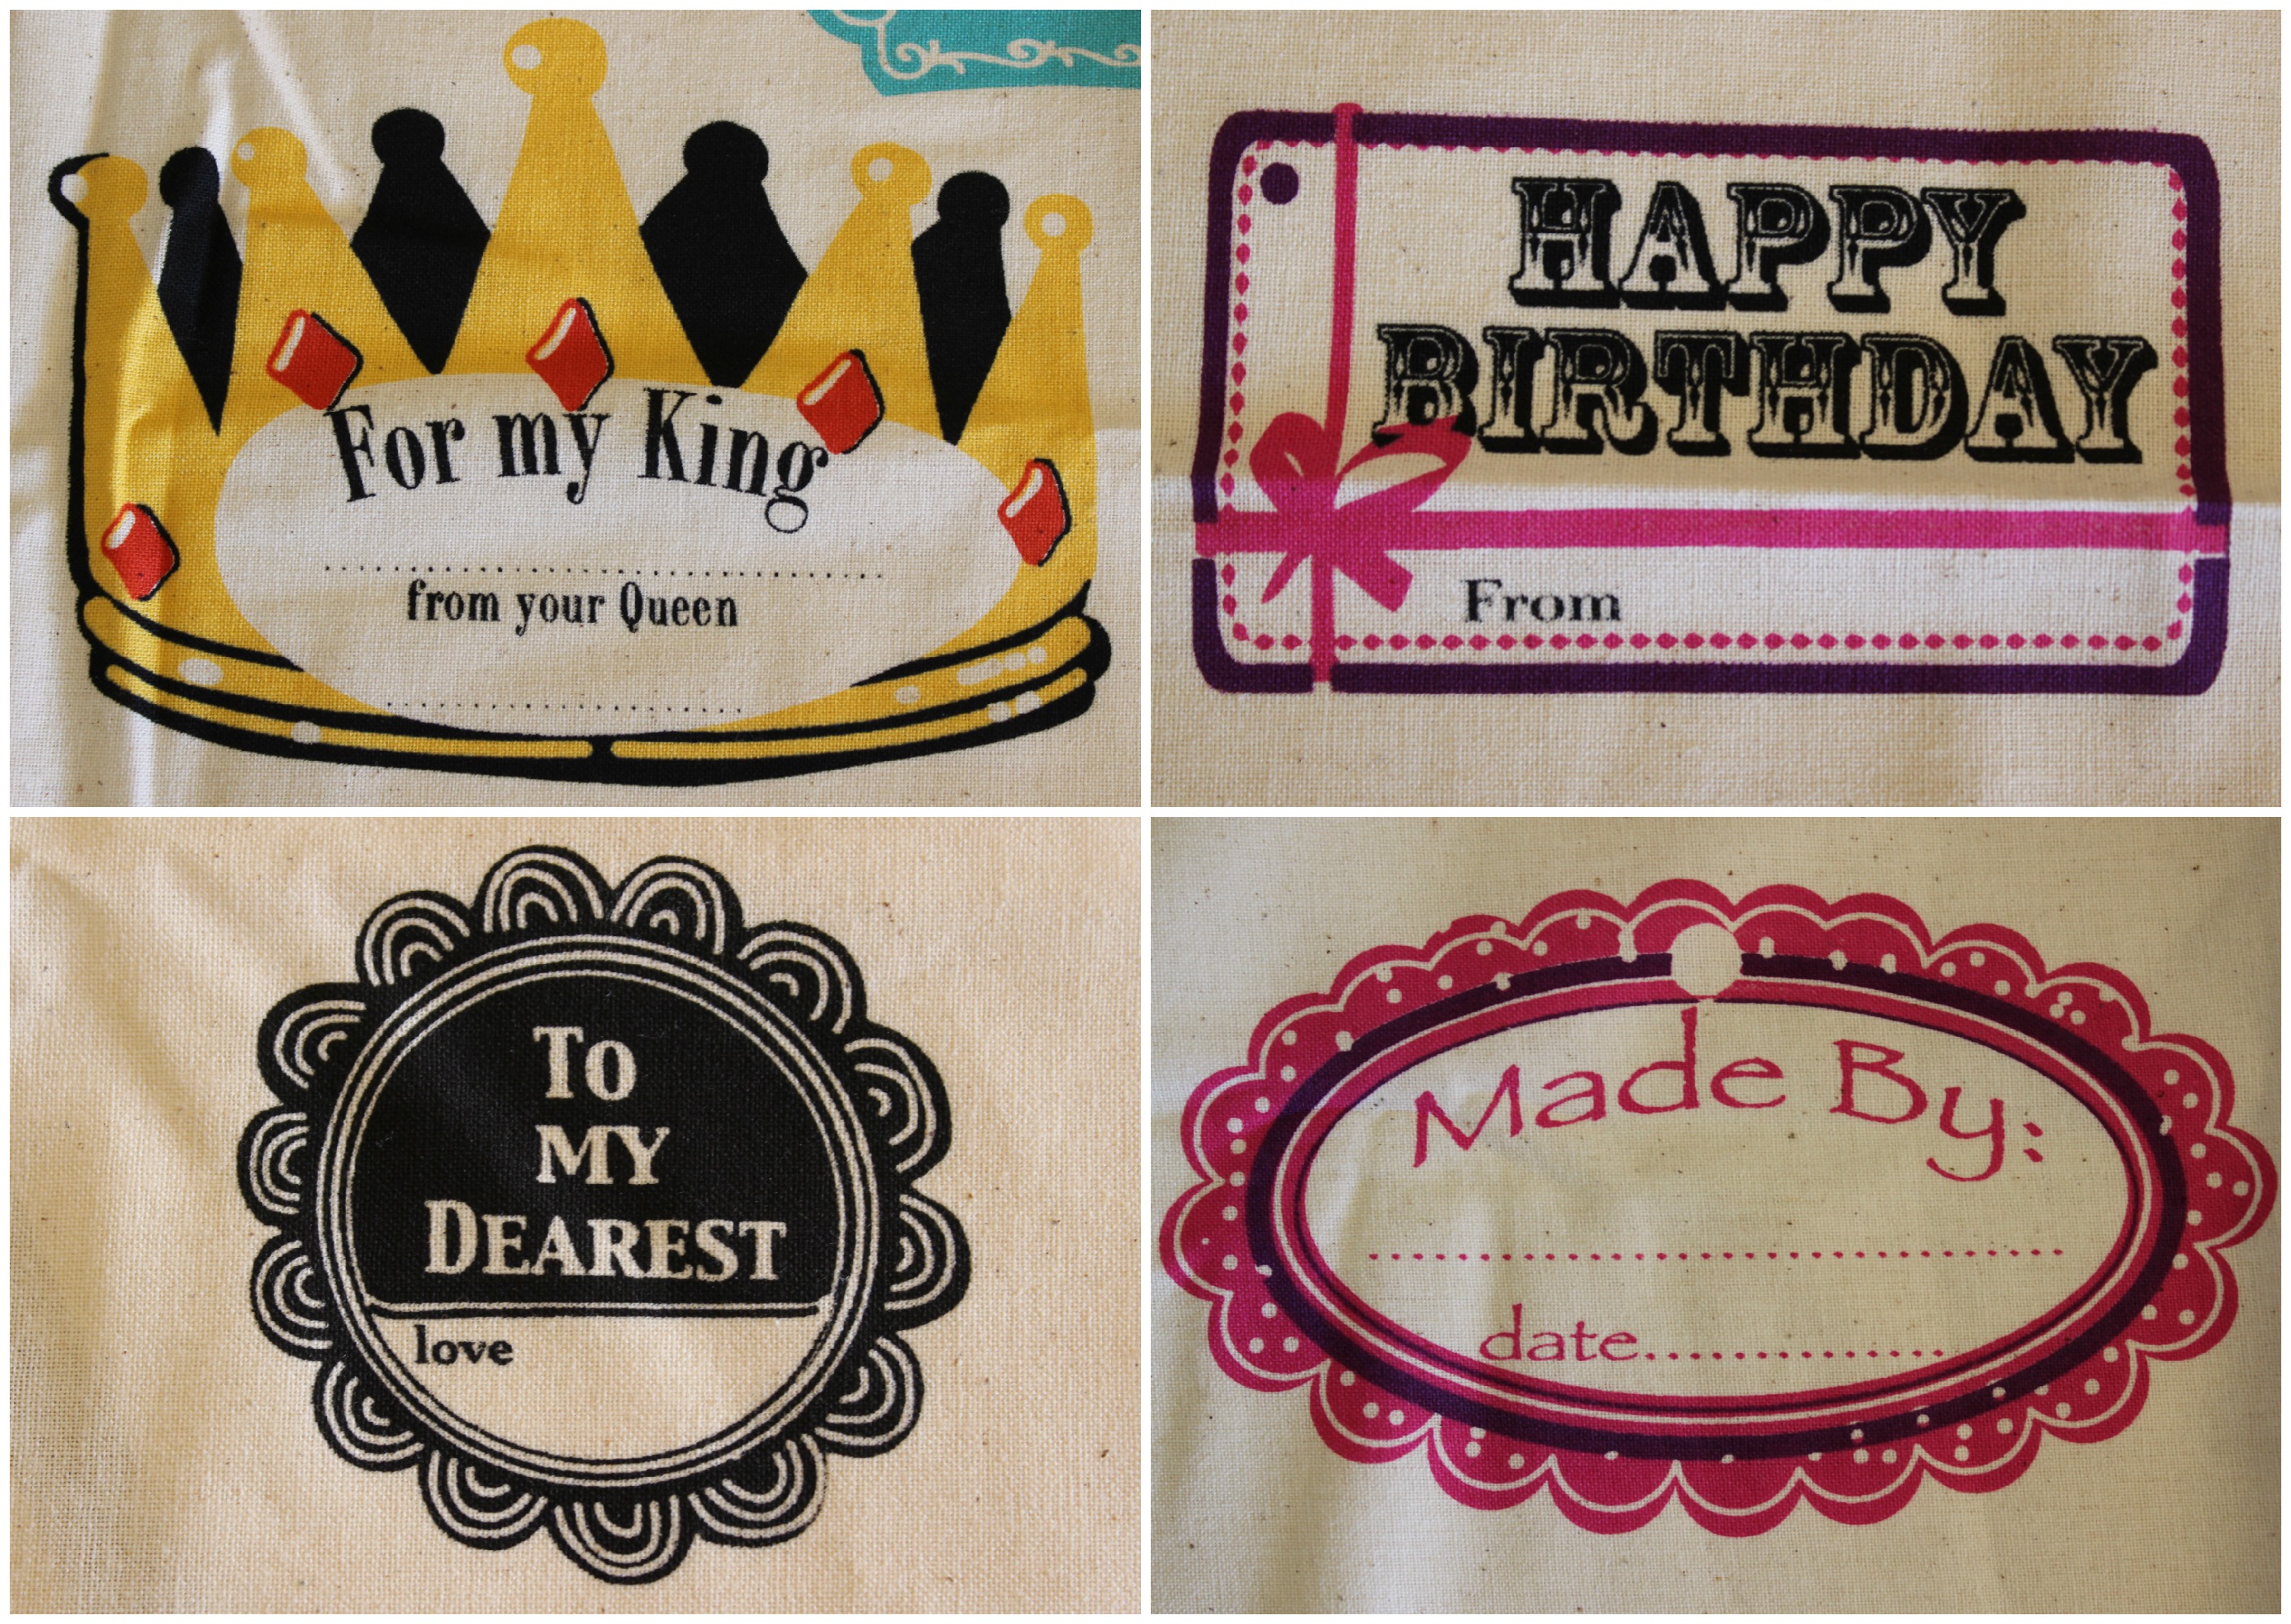
#one: Quilt Label Panels
These panels are a great idea for those of you lack time or confidence in making a label from scratch.
Labels like these tend to be personal and direct with themes like ‘Made by Grandma’ or ‘First Baby Quilt’ or ‘Congratulations’ etc.
Most quilting, fabric or haberdashery stores should sell similar type label panels that you can buy and stash away for a rainy day.
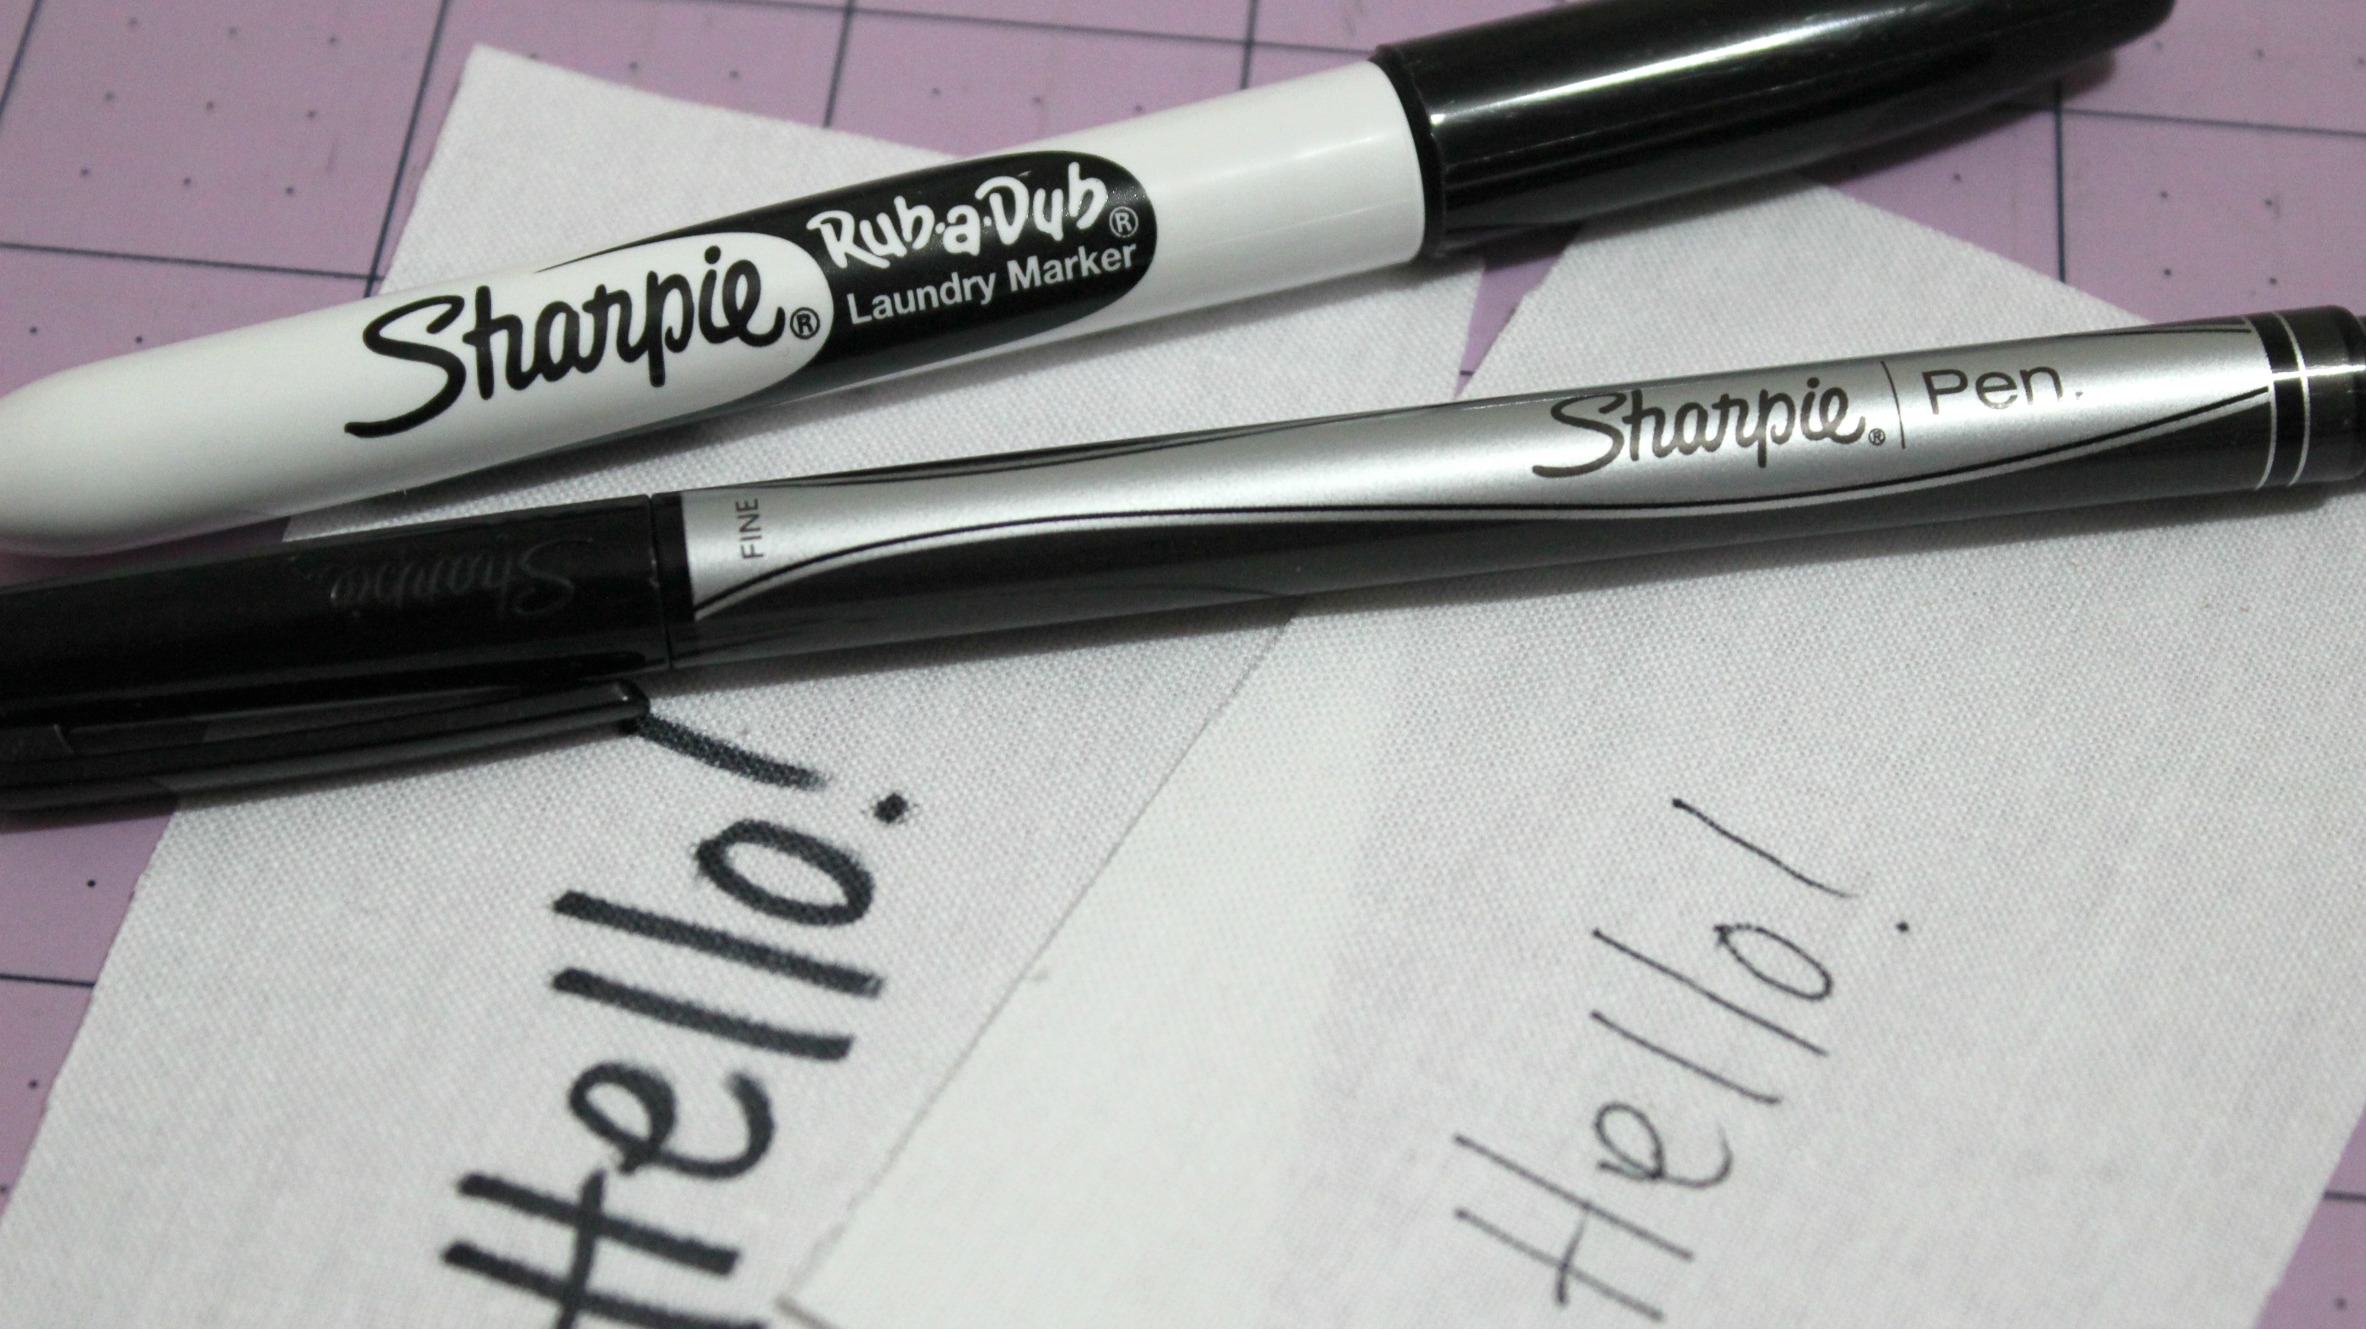
When it comes to writing on these fabric labels, I usually like to use Sharpie pens.
The two that I tend to use the most are the Sharpie Rub-a-Dub Laundry Marker (with a thicker type nib) and a Sharpie Fine Point Pen – both in black.
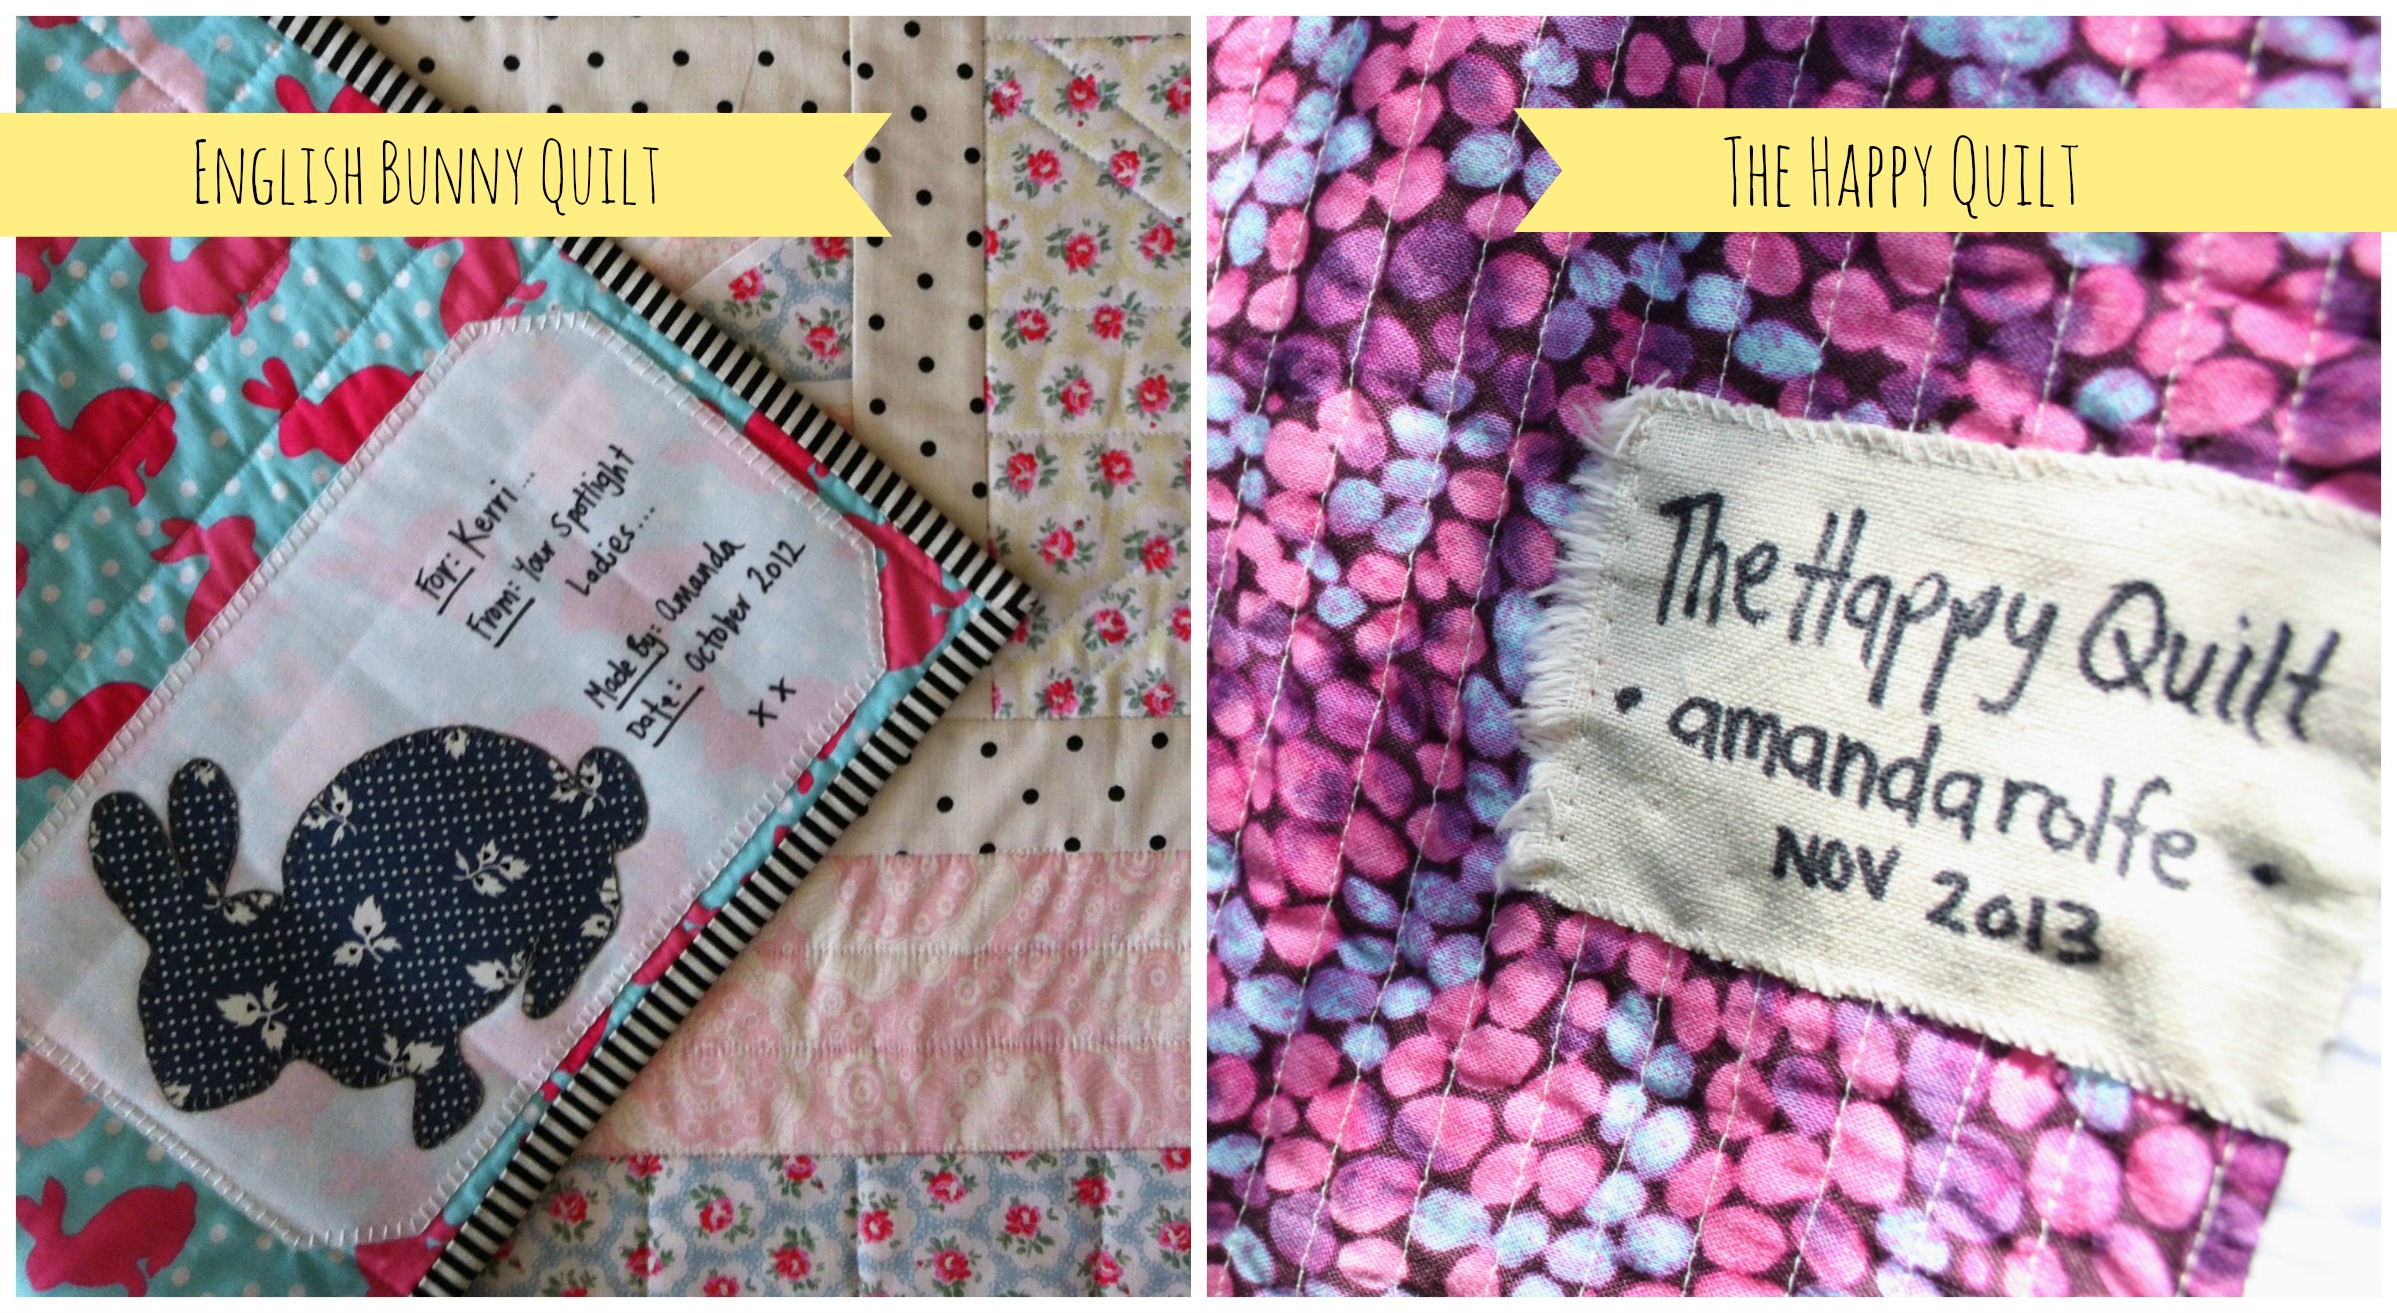
#two: Hand Written Labels
Sometimes, often than not, I make my own labels.
For the base of the label I’ll cut out an adequate size of 100% Cotton Homespun (in a practical colour) and write, using one of my Sharpie pens, all of the information that I feel is needed to accompany the quilt.
Personally, I feel that this particular technique is a little boring and uncreative. Recently, most of my labels have been created using the next idea…
#three: Hand Embroidered Labels
I love handmade embroidered labels. There’s something magically personal and sweet about attaching a little label that has been meticulously stitched together. An embroidered label just takes the quilt to a whole other level of being specially made for a particular reason or a very special person!
Amelia’s Baby Quilt Label
Just like the hand written labels, I use a foundation of Cotton Homespun (usually in white or cream) and gently sketch in the details of what I want to embroider in lead pencil. Then using DMC threads/floss in matching or contrasting colours to the quilts’ theme and then carefully stitch the label into life.
#four: Fancy Handmade Labels
If you have any left over blocks or elements that didn’t quite make the front of the quilt, you can very easily turn them into the centrepiece of the quilt label!
I made a Dresden Plate that was to be attached to the front of the wall-hanging (I sort of had a blooming flower effect idea rolling through my head at the time…). The idea was a complete flop but I didn’t want to waste the time I had put into making the Plate. So instead had a spark of creative genius and made it into the label of the quilt!
#five: Print Your Own on the Computer
This particular type of label I’ve never made, so can’t quite comment on it in too much detail.
But if I were to make a quilt label on the computer I’d possibly use a Photoshop/Illustrator type of software (or an online editing site like PicMonkey) to design the type of label I wanted. I would save it as a particular size with the right ppi (pixels per inch) and then print it onto special A4 printable fabrics that I’ve seen at office supplies stores and fabric/quilting stores. They usually cost a pretty penny which is why I’ve never really given it a go.
Now, there might be one question you’re all asking me right now and that is, ‘How do I attach the label to the quilt?!’
Ahh yes, good question!
Well, the method I like to use is appliqué.
I use a product called HeatnBond Lite that is a lightweight iron-on adhesive that can be sewn through either by hand or using a sewing machine – perfect for any quilter’s appliqueing needs!
I cut the same size amount of that of the label then iron (using a hot dry heat) the shinny side of the paper to the back of the label, wait for it too cool, peel the paper backing away from the label and then iron the label front side up to one of the bottom corners of quilt (usually the left).
To secure the edges, I then carefully stitch a blanket stitch (or buttonhole stitch) around the edges ensuring that I don’t bring the stitch through the top of the quilt.
And ta-dah!! A Quilt Label is completed!
Hopefully I’ve answered a few questions that people have sent through to me in recent weeks and have given some inspiration to those of you have mental-blanks when it comes to these types of things! (Don’t worry, we’ve all been there!)
If you want to see me chat a bit more about Quilt Labels, check out this video I posted on YouTube!
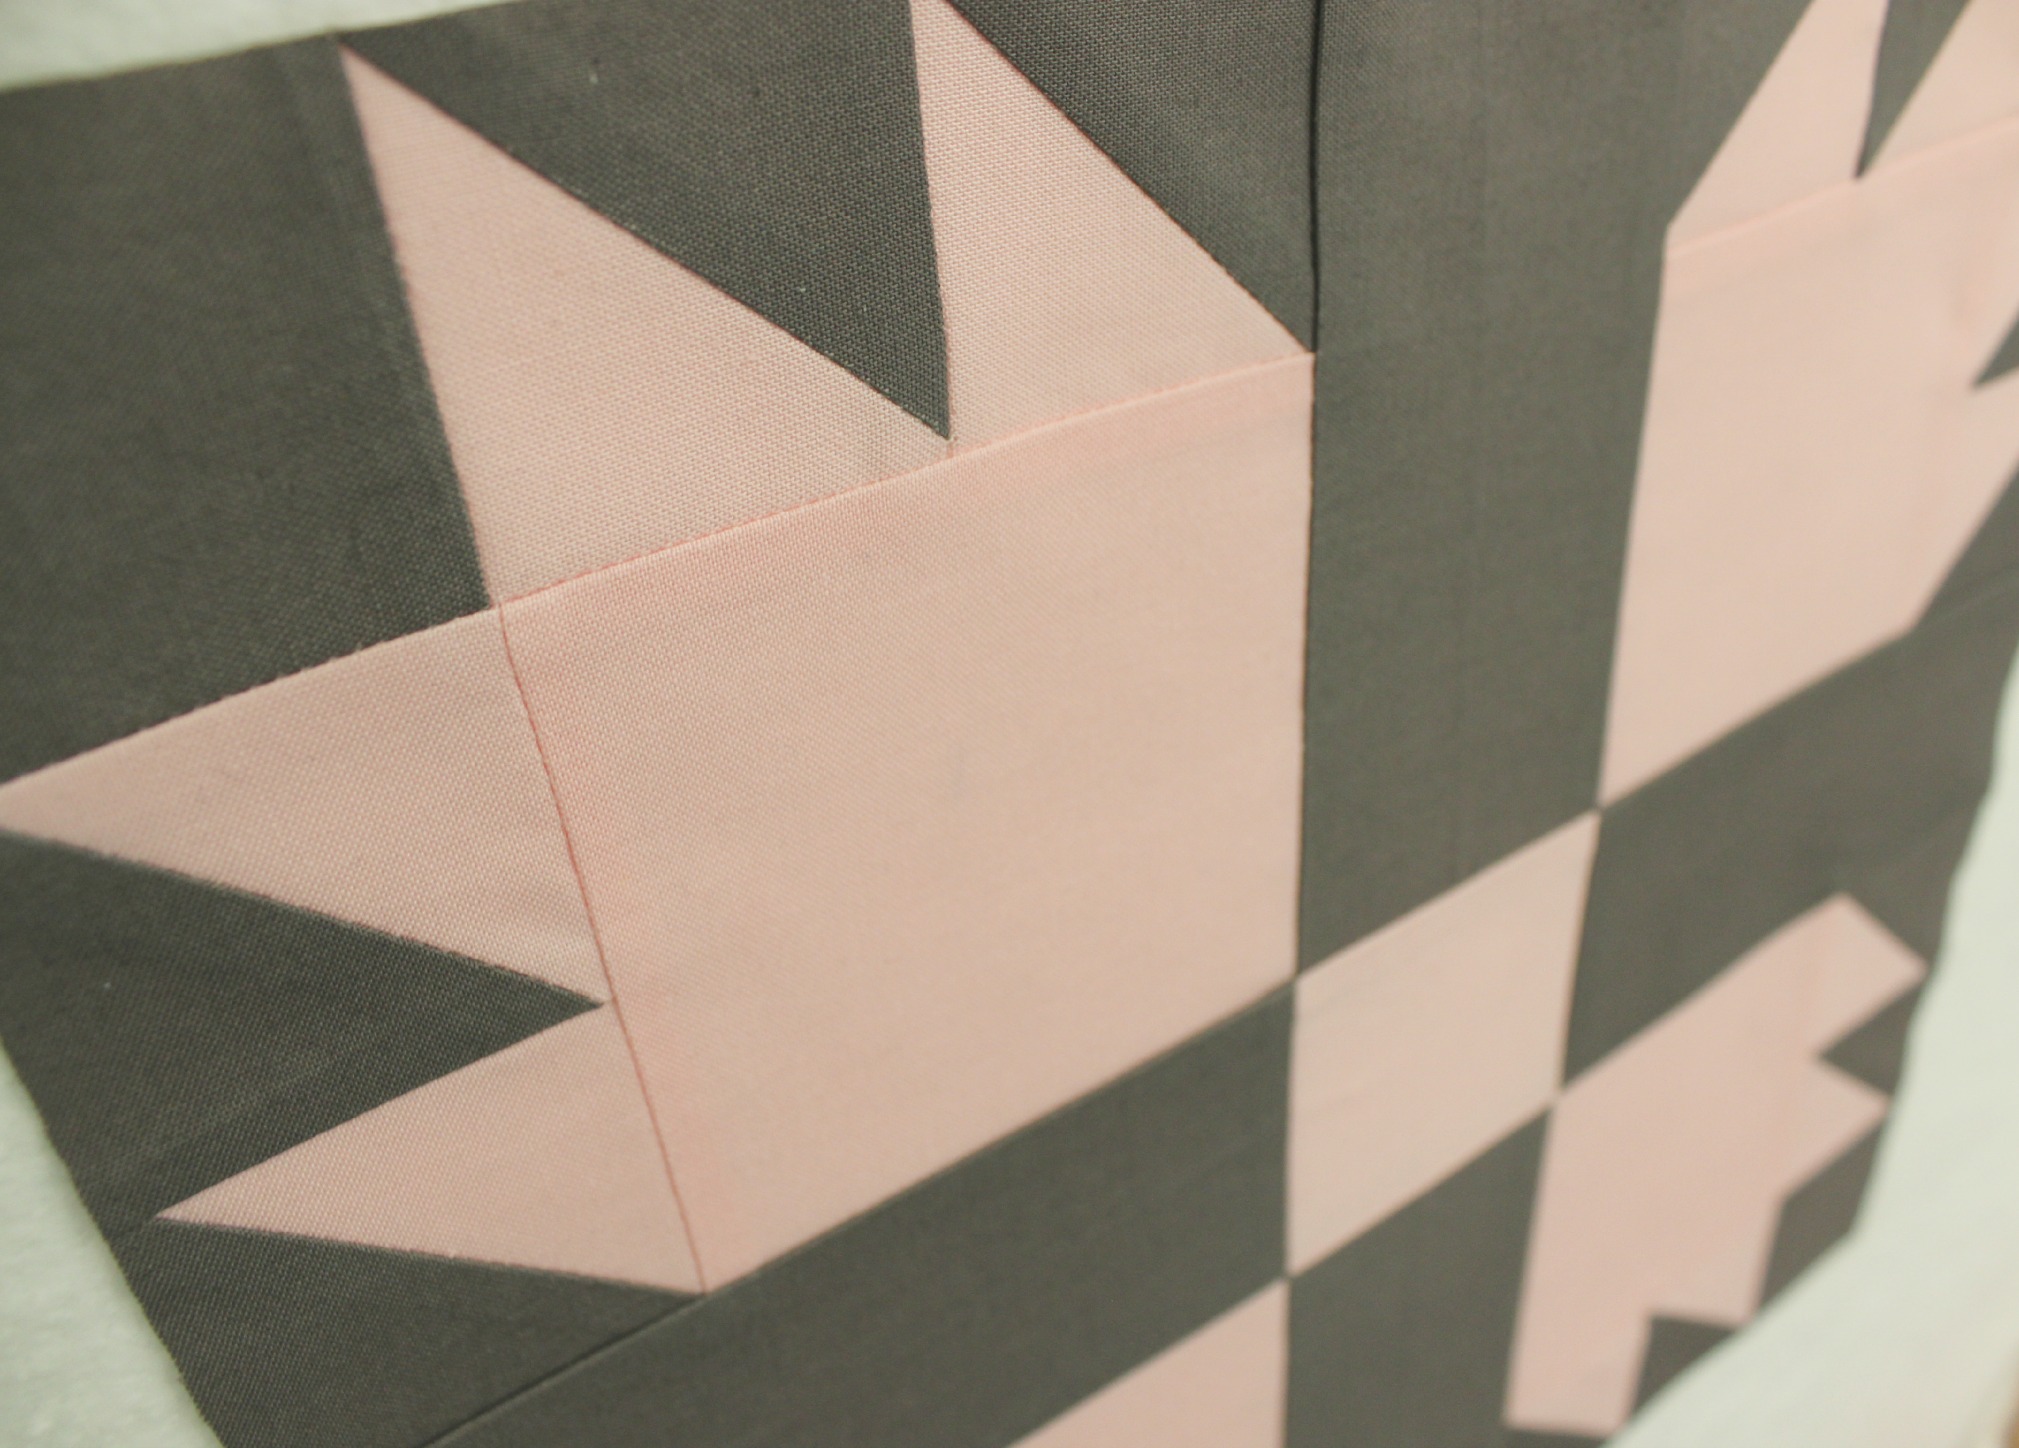
I’ve always had a bit of a soft spot for this block…
Perhaps it’s because it was one of the first ‘traditional’ blocks I ever constructed. (And come to think of it, I’m pretty sure it was one of the first times I ever made half square triangles!)
So, in a bid to mix the traditional with the modern (one of the things I love best to do in my quilting practice), I hovered over to my quilt book library and dug out this book. Full of simple and oh-so-delightful patchwork blocks, I found the one that I wanted and adapted it for this little tutorial.
Next came finding the right fabrics that would help make the unique design of the block stand out. In the end, I chose to construct the block using two solids – pink and grey – both so scrumptiously modern! LOVE IT!!
(Looking for the measurement & cutting instructions? Click of the PDF link at the start of the post and there they’ll be!)
Trailing off on a side note: some of you might not know that this December, a brand new little baby girl will be arriving in our family! No, it’s not me – I’m not pregnant… But my brother and sister in-law are expecting their fifth child after having four glorious boys! So this means, I can finally get into my pink cutesy fabrics and make something so girly that you’ll become so clucky you’ll want to have your own little baby girl!!
😀
But anyway, I’ve casually been on the lookout for a quilt design to make for my new niece and I’m quite sure I’ve found it in this little tutorial!
I am so simply in love with these two colours together that I almost feel a little uncomfortable by it… They don’t seem to over dominate each other; they quietly sit side-by-side, emitting a beautiful message of unity and history so much so that it almost makes me feel a bit teary! (Or it could just be my ever-loving monthly hormones wrecking havoc all over the place!)
So what I’m trying to say, after all of that weird emotion, I’ve decided to make a baby quilt for my pending niece using the Bear Paw block. YAY!
Have you made this block before? If so, let me know! And if you have a photo of the quilt, I would love to see it!
Also, if you have questions or feedback about this block/tutorial or have any other suggestions for tutorials or crafty things you would like me to demonstrate, comment down below or send me an email at 3and3quarters@gmail.com
In next weeks tutorial, I’ll be delving into the open possibilities of Quilt Labels! Should be a hoot!
For weeks now, I’ve been promising this little tutorial to you all.
I’ve been teasing, procrastinating and stressing out over it for ages until I finally said, ‘Sod it! Just get it done already!!’
And here it is!
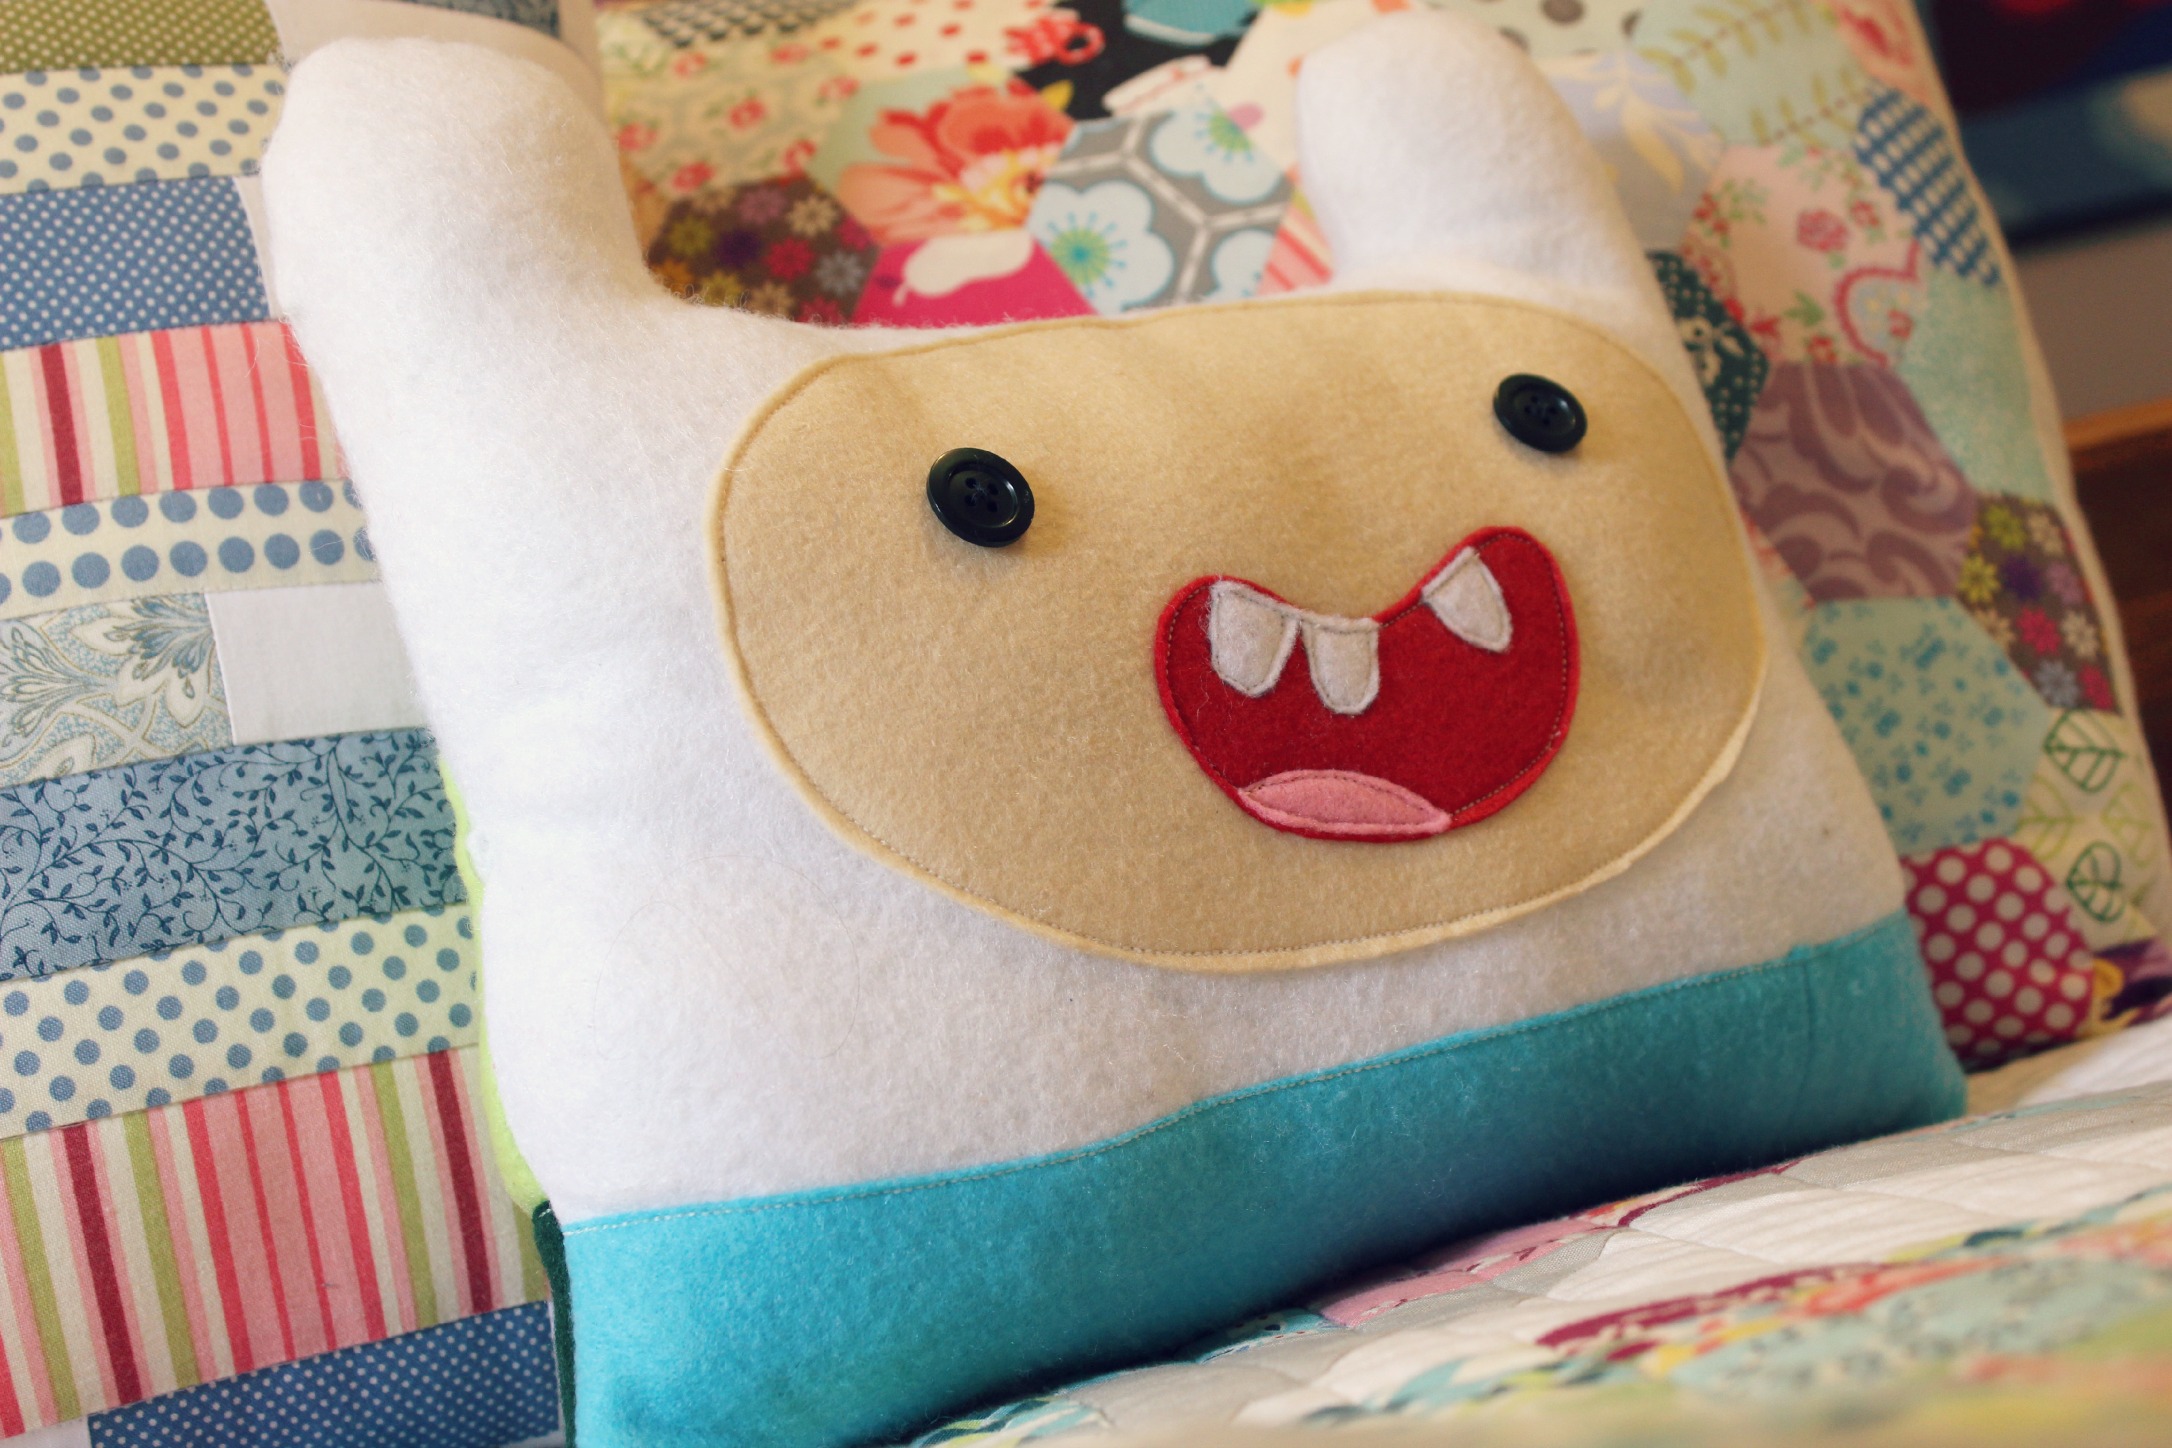
I’ve been hella nervous to publish this pattern & tutorial for so many reasons.
Here are just a few…
#1: This is the first ‘pattern’ I’ve ever really made and created. I’m sure somewhere there will be a crucial element I’ve missed or half explained that I will need to address sometime in the future. I’m super nervous that the pattern pieces are incorrect and won’t all match-up. And I’m desperately praying that the pattern link downloads and opens easily for everyone who clicks it! (The original plan was to have a PDF pattern but that wasn’t working, so I’ve uploaded it as Word docx. instead! Fingers crossed!)
#2: OMG, it’s Adventure Time! This cartoon series is huge at the moment and I’ve been so conscious to get the design pretty much perfect to the original design of Finn so that it doesn’t just look like another one of those ridiculous try-hard crafting nightmares!
#3: I suppose, in all honesty, I’m worried about the feedback I’ll get from this project. Will people hate it? Will they not understand the pattern? Are there elements of the design that just don’t work?
Hmm… I don’t know… I think I’m letting my mind run away with this issue far too much than I really should. I need to remember: Any feedback is good feedback (as along it’s constructive and helpful of course!).
If you’re new to the crafting/sewing game and would like to make this, I recommend watching the video first, that way you’ll grasp a better understanding of each step and not get too befuddled with what needs to be done next.
With only three days to go until ‘Christmas in July’, I thought I’d share with you a special series I made last year for Christmas called 12 Days of Christmas Crafts.
Some of you out there may be looking for some quick little crafts to make to mark the occasion OR are looking for an early dose of inspiration before December 25th comes around!
Here’s a preview of all the things I made in the series…
And here’s the link for the playlist if you’re interested in watching more…
Feel free to share this amongst friends who you know are searching for some last-minute Chrissie crafts!
I’m hoping to create another series for Christmas 2014 – all depending on how well I can organise my life between now and then! Christmas is busy, busy, busy!
I might be a little early to the party – so to speak – but if you have any suggestions of any Christmas type craft you would like me to demonstrate making, let me know! Comment below or send me an email at 3and3quarters@gmail.com!
Well, it’s only Tuesday and I’ve already got a whole lot of sewing under my belt this week! Whoop!!! Stay tuned at the end of the week and I’ll let you know (and see!) everything!!
Whenever I walk into a craft store, it’s inevitable that I’ll walk out having spent a ton of money on supplies that I really didn’t need but just had to have!
Surely, I’m not the only one?? (C’mon ladies, speak the truth…)
So over the weekend, I ventured into a local Spotlight store and got a little carried away…
To be honest, there were a few things I specifically wanted to buy (the Fat Quarters and Hobby Fill) but the rest were bought on a whim and the thought of ‘Oh, why not?’
Here are the deets of what I got:
Wooden Craft Keepers (Hedge Hog & Owl) by The Red Thread
DMC Stranded Thread/Floss in colours: 913, 959, 993 & 3812
Assorted Pastel Brads 60 pack by Francheville
‘Hello Sunshine’ Die Cut shapes by Kaiser Craft
Assorted Birthday stickers by Artwrap
Kraft & Cork stickers by Francheville
Saffron Craig ‘Bees’ Fat Flats | http://saffroncraig.com
Prints Charming ‘Spring Swing’ Fat Flats in Pink/Orange & Blue/Green | http://www.printscharming.com.au/home.htm
Elements Grey Stripe & Simple Green Triangles Fat Flats
Hobby Fill, 500g
So there’s just a little share of what I’ve recently bought.
I think my favourite thing is the two Wooden Craft Keepers.
Life as I had known was put on hold last week as I had a full first week at work. (Yay! I survived it!)
This week, I have the next five days to myself! *happy dance* But this, unfortunately, is the cruel sting of casual retail work! Lots of hours one week, none the next!
So what else is there to do in my down time but to do some sewing! I’ve been longing for the day when I would be reunited with my sweet sewing machine!
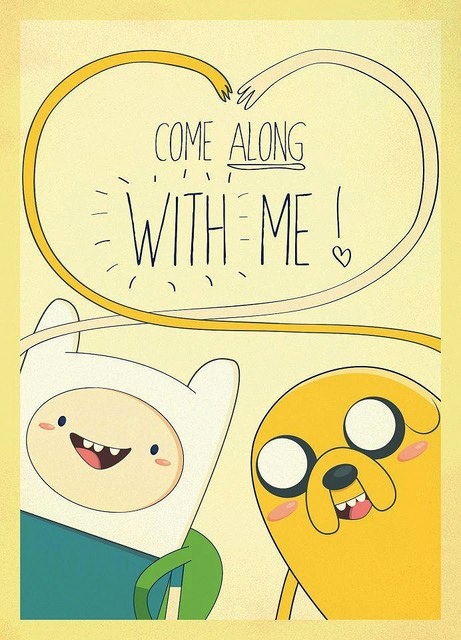
The first thing I want to get stuck into is the DIY Craft series I want to film for my YouTube channel and the first project I want to launch the series with has something to do with these guys…
This is Finn and Jake from one of my all-time favourite tv shows, Adventure Time!
I’ve still have a few things I need to plan and finalise but I’m pretty confident my little craft idea with these guys will be ‘mathematical‘! (HIGH-FIVE to you if you get that reference!)
I will update you with more information very, very soon!
If you’re a mad keen lover of embroidery and love something a little bit more modern/alternative to that of the more traditional embroidery designs, I urge you to take a look this awesome website!
They have ahh-mazing stuff!
(And the prices aren’t too bad either!)
I always love having a good little needle-point on the go…
It keeps my fingers and mind busy when everything else around me is a bit hum-drum and beige!